Or: A Dummy's Guide to DCS: Black Shark.

Since quite a few people have mentioned a demand for a basic tutorial that covers the very 1st steps in this great sim I thought I'd give it a go. This tutorial is intended for the newbie, someone who just got the game, browsed through the manual and key chart and now sits in front of his PC, eager to blow up stuff, yet utterly confused by the complexity of this simulation.
It is NOT intended as an "in-depth" learning tool, but as a quickstart guide to get you airborne ASAP. It does NOT cover the complex start-up routines nor any intricate descriptions of 'advanced stuff' like the ABRIS operation.
What it does is make you familiar with the basic operation of the Ka-50, basically: taking off and blowing up stuff.

While I use a simplified approach regarding many advanced aspects of the simulation, this tutorial is intended to be played at "full realism", because IMO "relaxed settings" often teach bad habits which are difficult to lose once you make the transition to higher realism settings.
I'll add the mission once I've finished the writing.
****
Link to the tutorial in PDF form, thanks to
EAF331 MadDog! ****
Thanks to
Yurgon the tutorial mission now works in DCS World! He's also hosting the mission file, thanks!
***
Link to the(DCS world compatible) mission file. Just place the file into your ...1c/Eagle Dynamics/Ka-50/Missions folder. ***
**** And (again thanks to Yurgon) here the mission for the original Black Shark 1:
Download Link ****
Here we go!
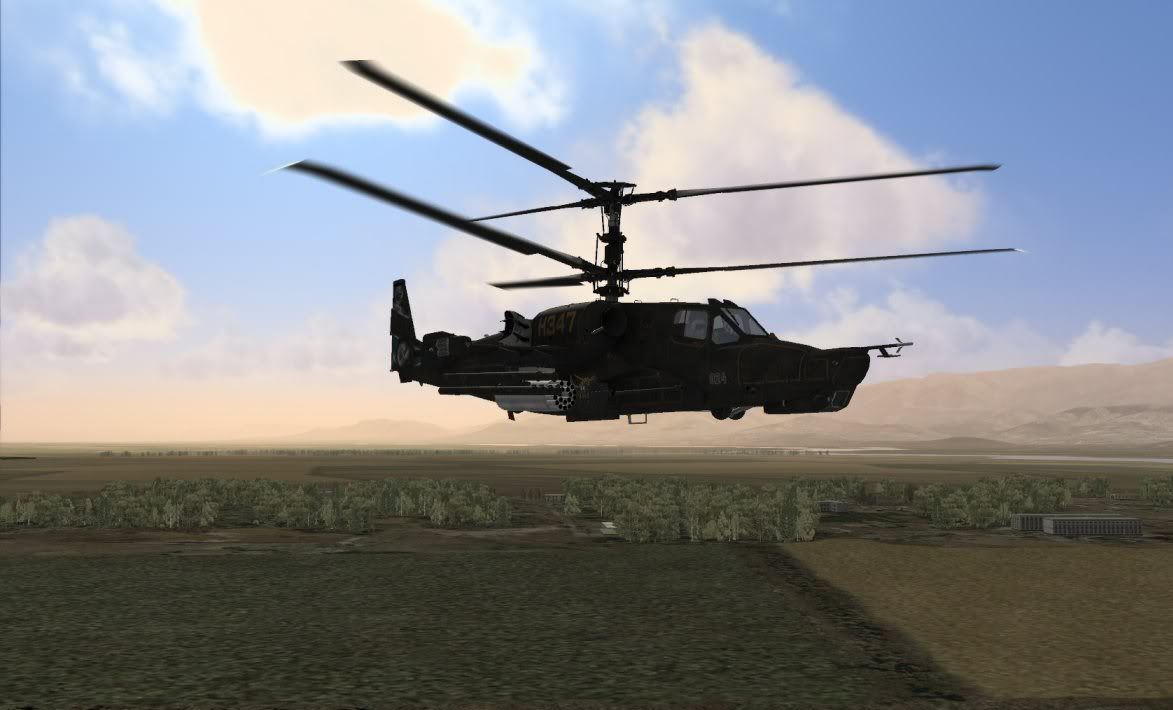
So now you're sitting in your brand-new Ka-50, it's a beautiful morning, and you're staring at a gazillion instruments labelled in a strange language. You took a look at the massive PDF manual and besides the sudden urge for Vodka in large quantities haven't really a clue what to do now.
Don't worry, we'll have you blasting stuff in no time!

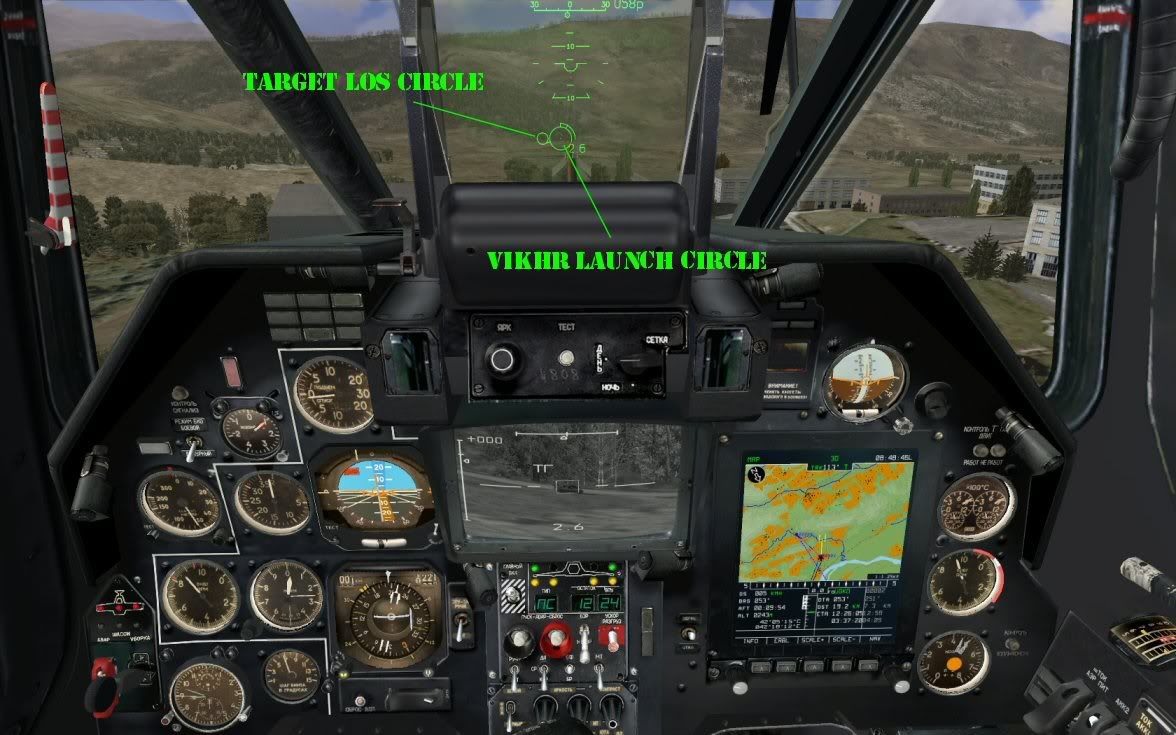
First, take a look around the cockpit:
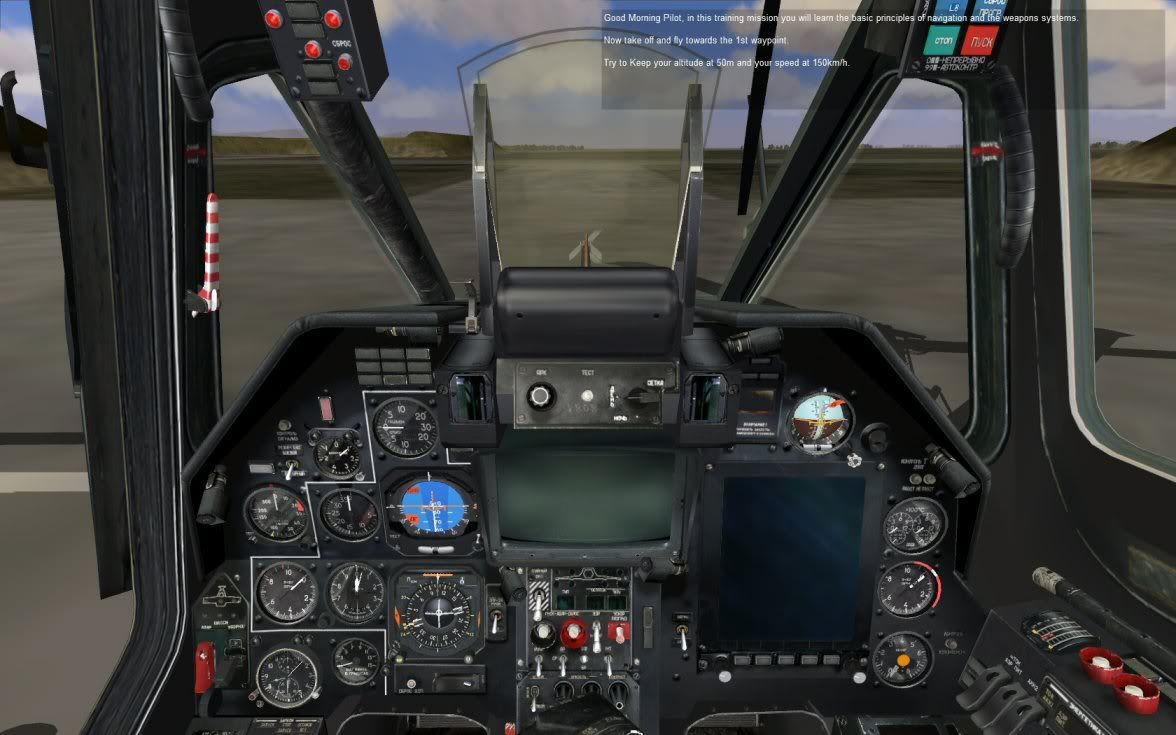
Looks great, eh? But don't worry, you don't need half of those instruments, buttons, knobs and switches to actually fly the helicopter and use its weapons system. Sounds good? Yep.
We start with an easy training mission: take off, fly to waypoint 2, shoot some tanks, fly to waypoint 3, shoot some very, very bad people and their very, very bad... uhm... tents, then head back home for a late breakfast.
First:
the most important key command for a new pilot:
left win+home. This combination auto-starts all systems so you don't have to do the start-up yourself. Once all systems are online we can prepare the bird for the mission.
We start with bringing up the map display on the ABRIS screen. The ABRIS is an incredible powerful system, but for now we'll simply use it to show the map.
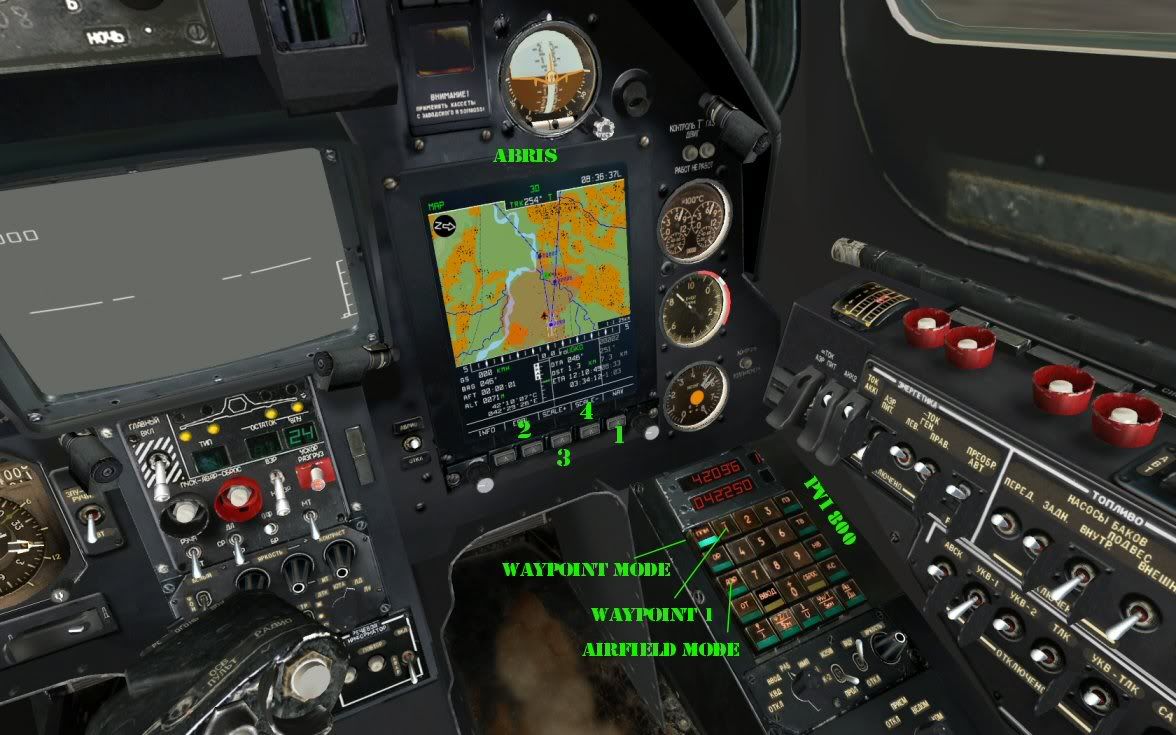
See the four buttons under the ABRIS screen? Press the (1), the one labelled NAV, then (2), labelled MAP. Now the ABRIS should show the map, you can use (3) and (4) buttons to increase/decrease the scale of the map.
For navigation in this mission we will use the PVI-800 system. Click on the button in the upper left corner to enter WAYPOINT mode, then click on 1 to select waypoint 1. You can select each waypoint by simply clicking its corresponding number. The Airfield Mode button will select the airfield you took off, then the airfield you intend to land on if it's different from the take-off location.
Next we take a look at some of the basic instruments:
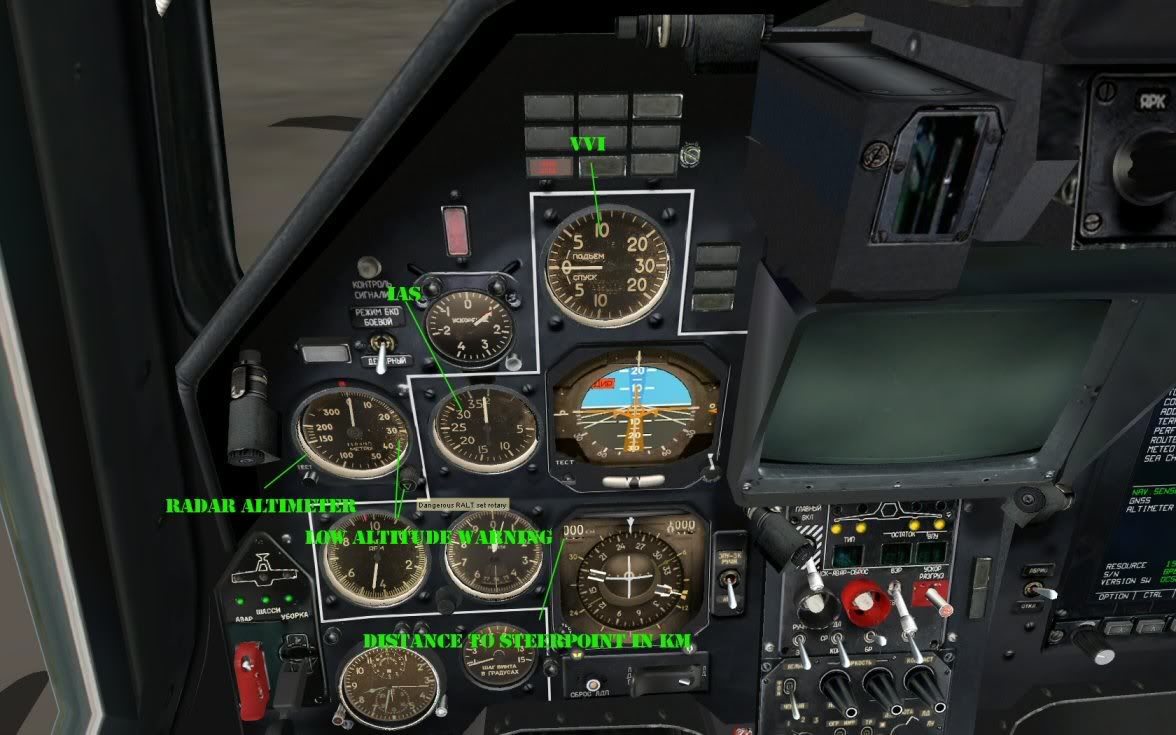
One of the most important instruments is the
VVI, the vertical velocity indicator. Always have an eye on this vital instrument, especially when flying at low altitude, which is what you'll be doing most of the time if you want to stay alive.
Two instruments below is the
HSI which doesn't concern us for the moment but keep in mind that in the upper left corner it shows the distance in km to the currently selected waypoint.
Next we have the
Indicated Airspeed Indicator and the
Radar Altimeter. While we're at it, click on the little knob on the altimeter, keep the mouse button pressed and drag the mouse to set the "dangerous altitude". I've set mine here to 30m, this is the altitude where you'll get a beeping warning.
The final step before taking off will be the setting of our countermeasures dispenser.
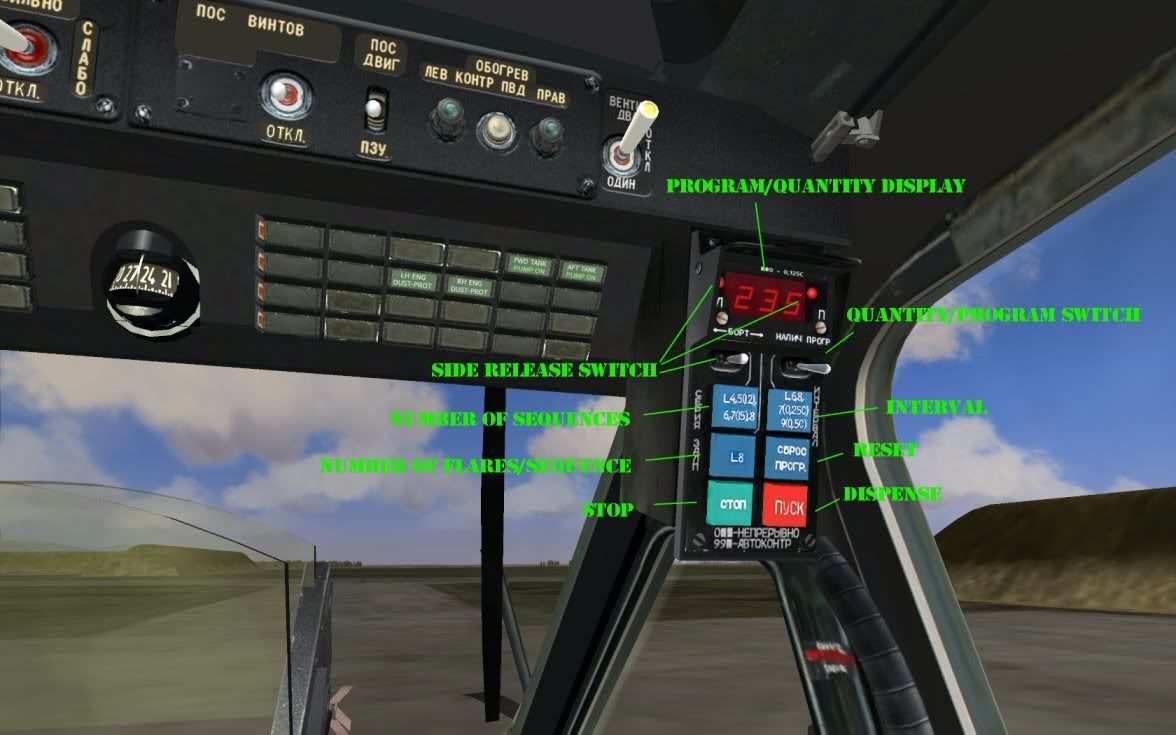
It's fairly simple, actually. The digital readout has two modes: it either shows the amount of flares left or the program settings. In the pic above it shows the latter. You can switch between both display modes with the lever on the right side. Opposite to that is the side release switch which governs on which side the flares are dispensed, which is shown by the red lights on the digital readout. In the pic the flares will be dispensed on both sides.
The "number of sequences" button governs how many sequences run each time you press the "dispense" button. The "number of flares/sequence" how many flares are released in each sequence, and the "interval" button puts a pause between sequences. "Reset" resets the program, "Stop" stops the current sequence and "Dispense" dispenses the flares.
In this pic I've setup the program so that
3 flares will be dispensed on
both sides of the helicopter, this sequence will run
2 times, with an interval (pause) of 5 seconds.
Ok, now let's get going!
With all system running we
carefully increase the collective until the helicopter takes off.
Carefully stabilize the aircraft at 50m. Yes,
carefully.

The Ka-50 is very sensitive to control inputs, there's nothing worse then trying to "chase the controls". Once you start swinging back and forth all over the place things can get nasty quickly. To avoid this, use the autopilot settings and the auto-hover (left-ALT-t) function. Think about the autopilot less as a fully automated device that flies you from A to B but rather as a
stabilization system for a very touchy aircraft.
Basically, you want to have the autopilot modes for pitch, bank and lateral/heading ALWAYS ON and using the TRIM function every time you move the cyclic controls. Yes,
every time.
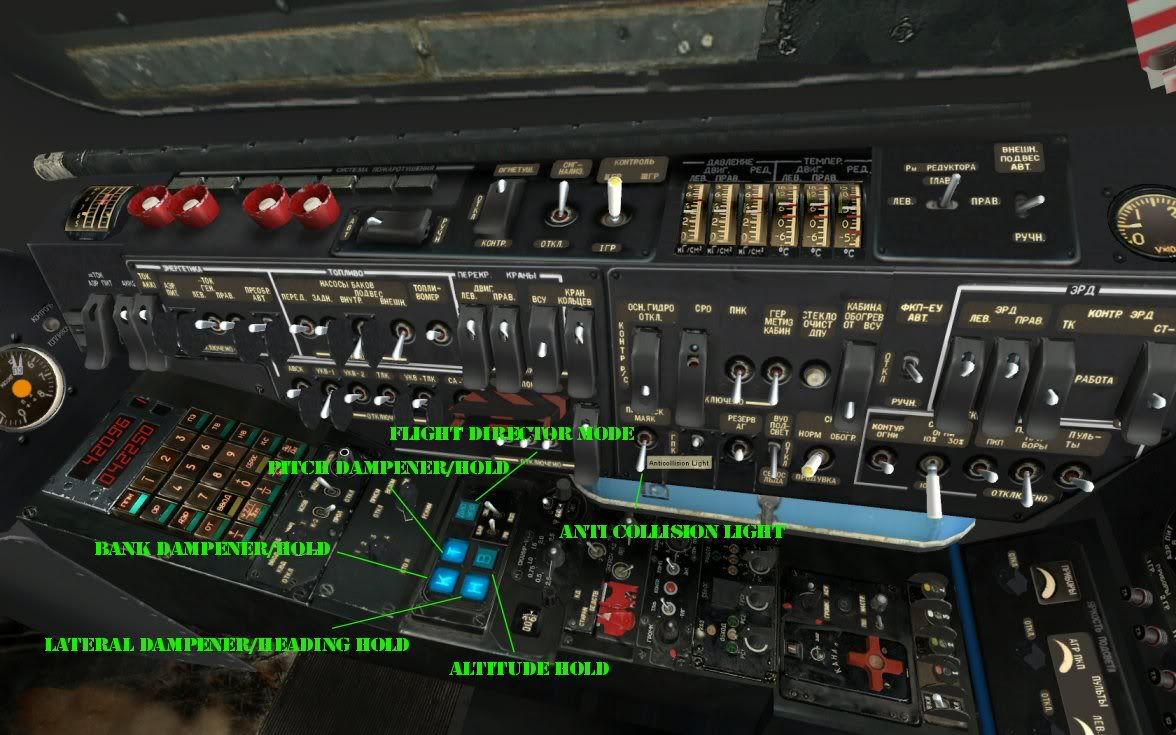
I know, it sounds a bit tedious, but the quicker you get used to it, the better. Map the trim function to a Joystick button and get used to press it whenever you move the stick, then release it again. You will be rewarded by a much more stabilized flight. You can switch off the autopilot/stabilization via the flight director mode, but I prefer leaving them all on and using the trim to change the flight profile.
Practice hovering! It's the most important manuever for a helicopter pilot. Always use the auto-hover function. And don't forget to switch it off when done hovering...
You can also see the switch for the anti-collision light, which we'll switch off once we're clear of the airbase. We won't go into indian territory with all fancy lights flashing and blinking, no Sir!
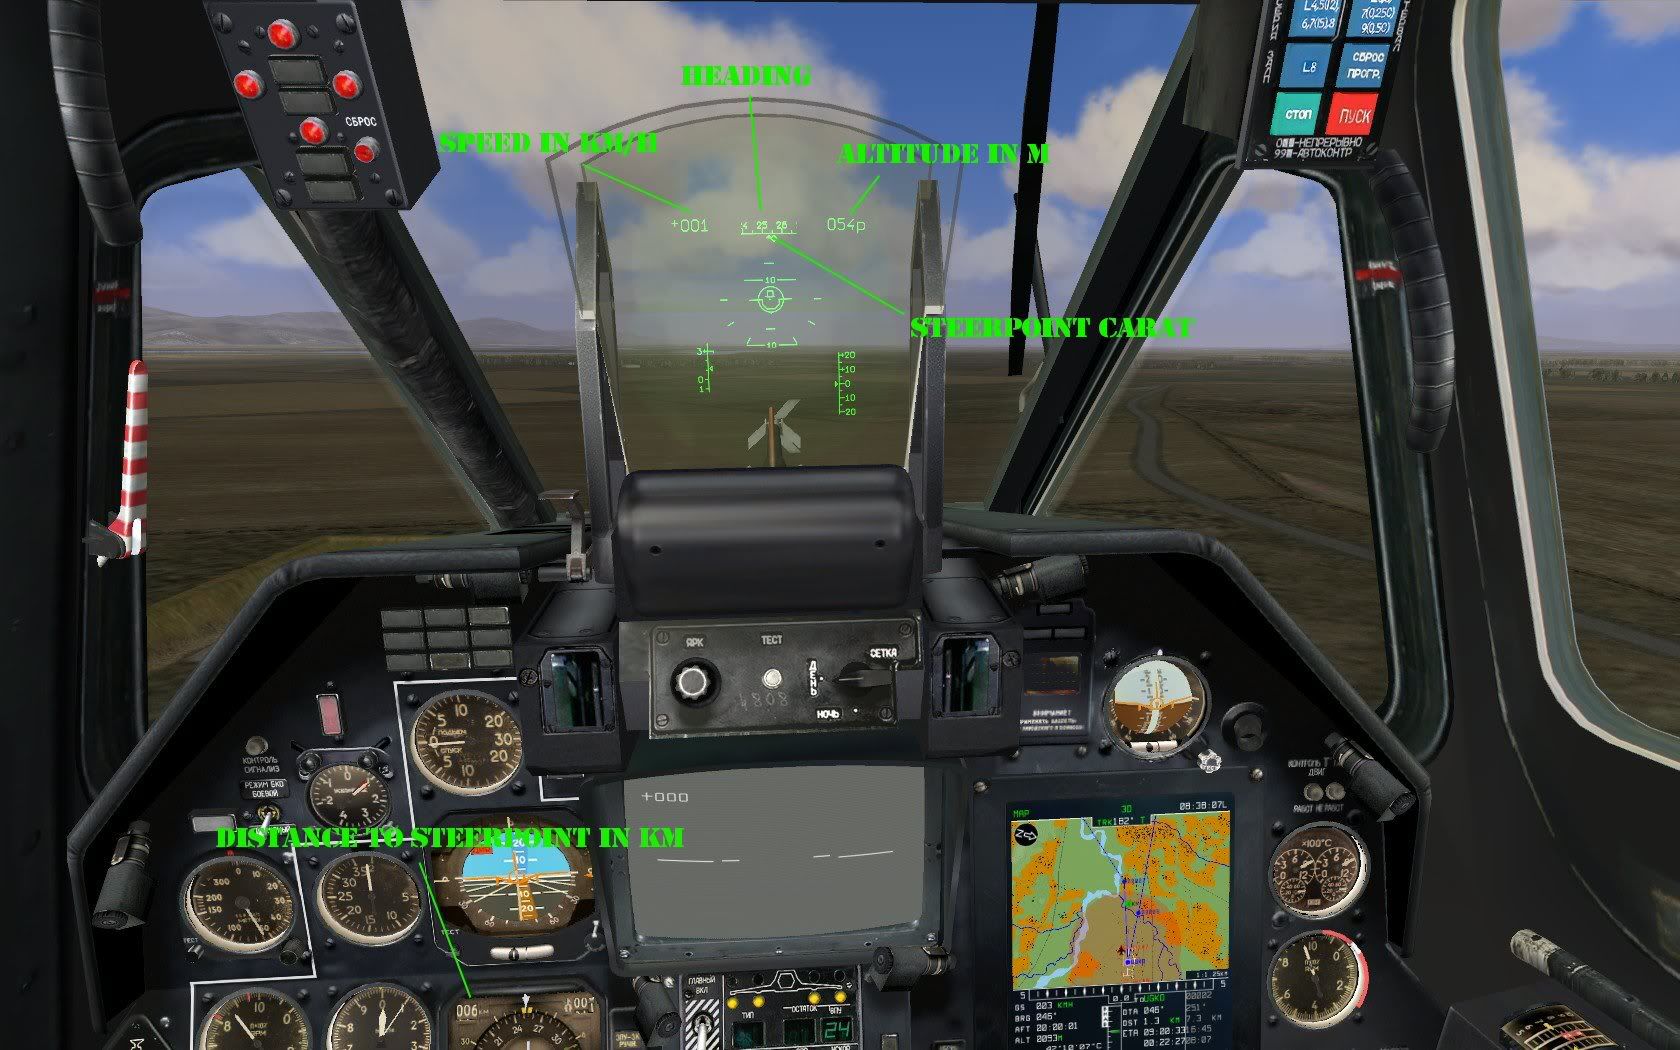
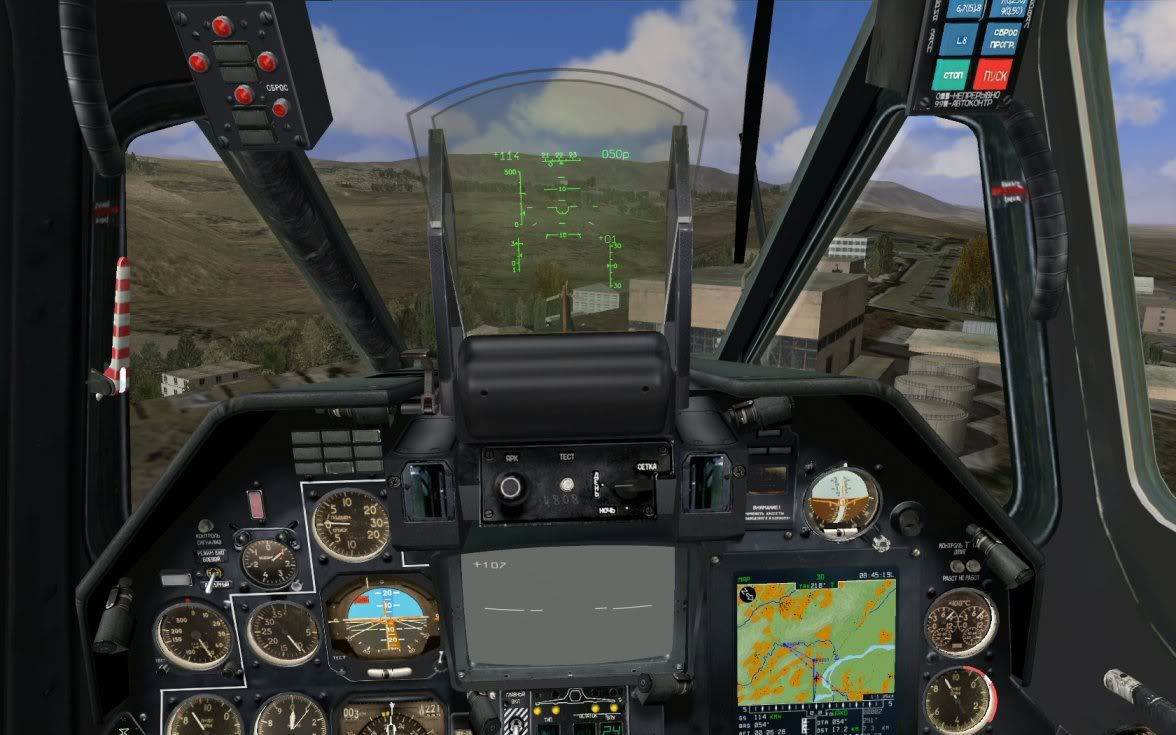
Ok, now we're stabilized, hovering at around 50m, all's fine. We can see the steerpoint carat on the HUD which will lead us towards waypoint 1, and the HUD also displays altitude, heading and speed. Since we're in hover mode the
hover point reference circle is also displayed on the HUD, it's basically a top-down view with the little square depicting the
hover point, which helps maintaining a position during hover. And in the corner of the HIS we see that we're just 6km from our 1st waypoint. Use the rudder to place the steerpoint carat right onto the little inverted triangle, which is the
current heading marker. Now, let's switch off auto-hover, press the trim button, lower the nose by moving the cyclic controls forward and increase collective so that we don't lose altitude. Once the nose is ~10�down we can release the trim button and should be picking up speed. And raise the gear ("g")
Try to stabilize the aircraft at 50m altitude, 150 km/h.
After we've reached WP2 select WP3 by clicking on the corresponding number on the PVI 800. You should notice the steerpoint carat move, change course to put it on the heading marker again.
Now that you're clear of the airbase, switch off the anti-collision light and the navigation lights.
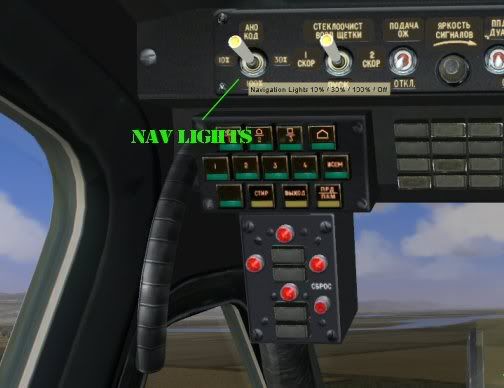
The switch has four positions: 10%, 30%, 100% and OFF.
Excellent! We're right on course to our 1st targets, we're not blinking like a christmas tree anymore and the Ka-50 looks mighty cool.

As we approach waypoint 3 we should get a message telling us to prepare our weapons systems. The armoured targets are supposed to be on the other side of that ridge on a road, so we better setup our systems from a safe position.
Press trim, pull up the cyclic, release trim, lower the collective. You should now lose speed without gaining altitude. Carefully approach the ridge in front of you, reduce speed to 0 and engage auto hover. You should be behind the ridge line, in a steady hover position.
Take a look at the
PUI-800 Weapon Status and Control Panel and the
Targeting Mode Control Panel:
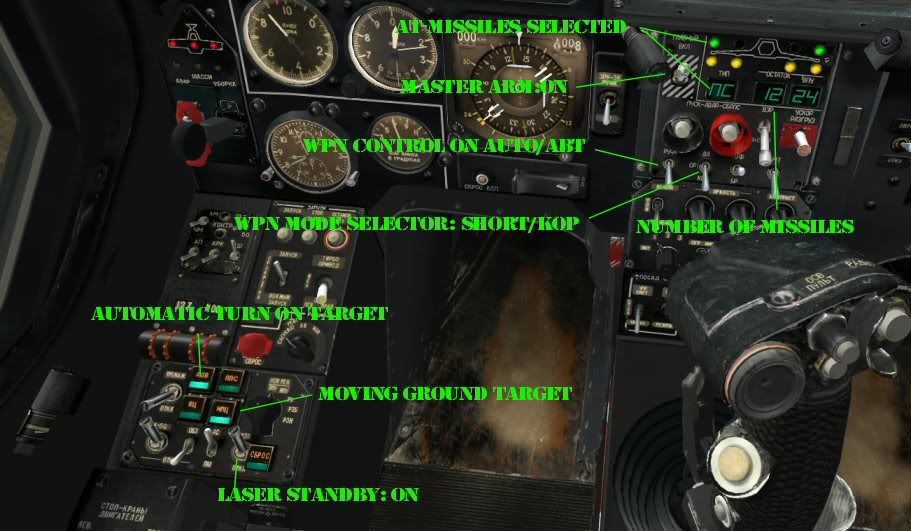
Let's start with the Weapon Status and Control Panel, directly below the
Shkval display. The cute little plane with the funky lights show the
weapon presence indicator (yellow) and the
weapon readiness indicator (green) which display the selected weapon. Select the
outer hardpoints. Below to the left the
NC readout shows that our currently selected weapon is an AT-missile (Vikhr), and that
12 of them are loaded. The
24 readout next to it shows the (currently selected) ammo for the cannon, x10.
To the left of the little plane is the
Master Arm switch, which should be in the ON position (up) so that we can fire our weapons. Below that is the
Weapon Control Switch which should ALWAYS be on AUTO ("ABT") position. To the right of that is the
Weapon Mode Selector which selects either short, medium or long burst for the cannon or the corresponding fire mode when firing rockets. When firing Vikhr missiles it designates whether the missiles are fired single or in pairs. I usually fire Vikhr in single mode.
The
Targeting Mode Control Panel:Here we need to switch the
Laser Standby selector ON. Next we press the
Ground Moving Target button. Your first targets won't move, but it's good to practice it nevertheless so you won't miss moving targets later on by forgetting to turn this system on. The
Automatic Turn on Target is a nifty little feature that will automatically turn the helicopter towards a designated target, you need to click on it once you've designated a target via the Skval, or press "q".
Ah, and uncage the Shkval targeting system with "o".
Now you're ready to fire.
Disengage auto hover and carefully move up the ridge. While still in cover slow down again and initiate auto hover again. Then increase collective to slowly rise above the ridge.
For this attack we will use the helmet-mounted sight to set up the attack.
Engage the helmet-mounted sight with "h". Slave the Shkval view to the helmet sight reticule by pressing and holding "o". You can now scan the target area. You should spot three tanks right in front of you, on the road in front of a forested hill. Release "o". The Shkval sight should now be stabilized on the ground near the tanks.
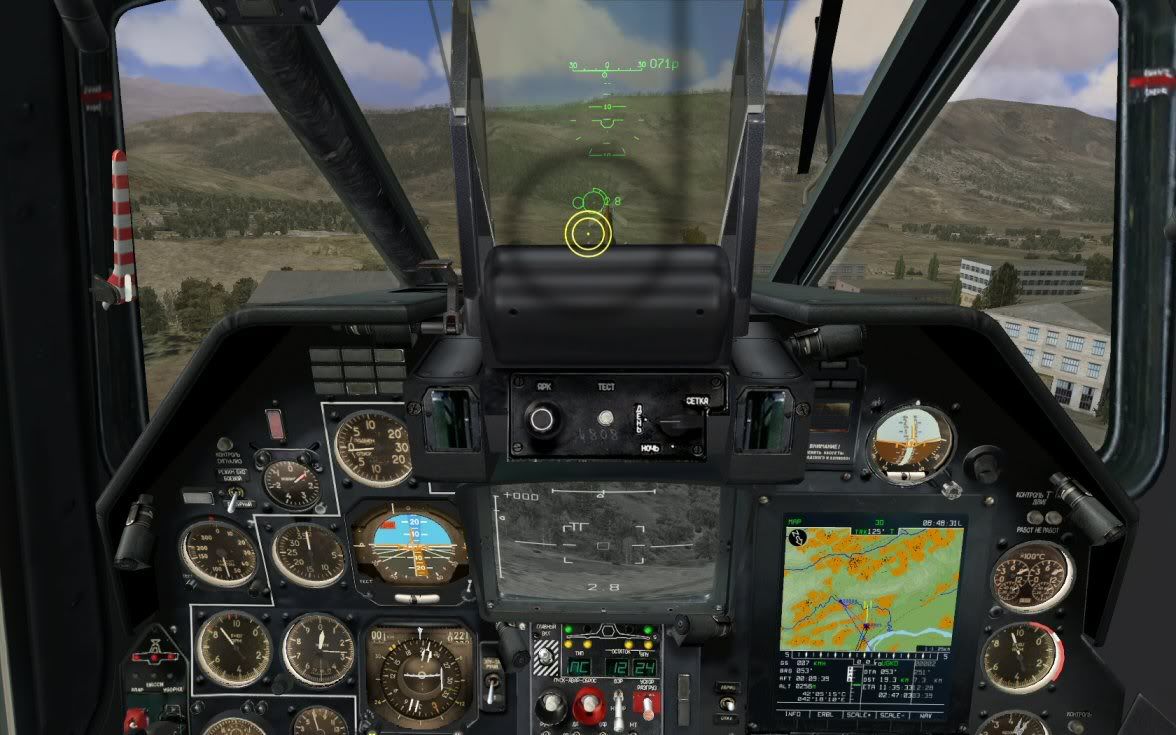
You can now zoom in/out ("=" and "-") and adjust the
TV target frame ("[" and "]"). Move the target frame onto a tank.
Now press the
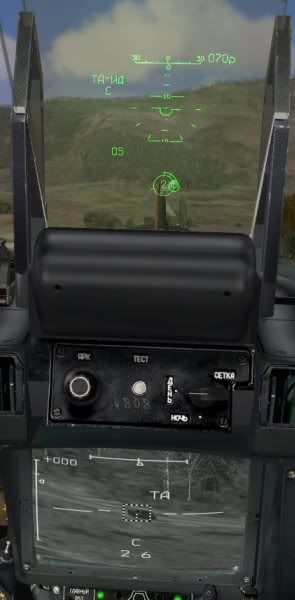
lock target key ("ENTER"). The "TT" symbol in the Shkval display should now change to "TA", "
auto tracking target", and you should see the "TA-NA"-message ("auto tracking target-range indicator") on the HUD.
***Move cyclic so that the target LOS circle on the HUD is
INSIDE the Vikhr launch circle.***
Now you should get launch authorization (a "C" on the Shkval display), hold the target circle inside the launch circle and
keep the "Release Weapons" button (right alt- space) pressed until the missile launches. You need to keep the button pressed for a second to actually launch a missile.
If you've done everything correct, you should see this:
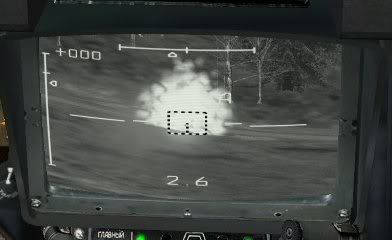
Well done, now destroy the two remaining tanks, then it's time for rockets and the cannon. But watch out, if you get careless by flying too high or getting too close the tanks WILL engage you. So, if your laser warning starts flashing you better be quick in finishing them off or go hiding behind a hill!
:WinkNGrin:
...to be continued...


