Oooh, I know that photo and video well - he got his tail chopped by the prop of a DR1 at an airshow in eastern Europe. DR1 made a nice engine out landing and he took a header in from about 200-300 feet.
Nasty bruises from the harness straps and a broken leg; he didn't walk away from it so much as get carried by two helpers to the ambulance.
That's the nice thing about tube-and-gusset construction - it's really strong but will deform nicely in a wreck, taking the G forces so the pilot doesn't have to.
I probably overbuilt my harness support system with that photo in mind, as it's the absolute worst case scenario, and one that lead to the only fatality in type. The guy nosed straight up on flight number one and did a header into pavement. So my shoulder straps are secured by a cable and a half system, the first one a cable going across the fuselage with both mounts running through and then a seperate cable for each running back on station on the fuselage. Back of the envelope math puts the cables handling ninety G's, positioned in the gussets on two places and angled to deform the fuselage. So hopefully between the front of the fuselage frame warping and the back of the fuselage bowing at the cable points I won't take that much. Plus the wings and gear will take a lot, too.
It would be hard to get that much G, though, as the aircraft works at slow speeds and is really light (around 600 pounds with pilot and full fuel), meaning the mass is low. She stalls at 35 MPH and cruises about 60 MPH; it's been debated whether or not one could reach the VNE of 98 MPH (where the aircraft would fall apart) due to the huge amount of drag caused by all the wires and fat airfoil.
Since the Nieuport 11 has a LOT of elevator (but not much rudder) and is light on the controls I put some tension on it. Not much, but hopefully enough to keep it from being overly responsive.
The FAA allows homebuilt aircraft for the purposes of "education and recreation," and I've certainly met the intended goals. In every set of plans - and even in the super duper CNC cut and pre-drilled kits - there's a bunch of blank spots the builder has to fill in and modifications to be made. The prudent soul finds a large body of research ahead of him over what seems like minor things (such as mounting harnesses or designing a seat), thinking about second order effects and accident chains. Three years ago I couldn't tell you the difference been an angle of incidence and dihedral (angle of the wing to the fuselage along the long axis and angle of the wing tip up from the side axis), annealing temperature of aluminum (800 degrees F, which is the same as the boiling point of Sharpie pen ink) and a host of other stuff that's neat to know. Builder groups on both the Internet and Real Life are invaluable, that's for sure!
I like those pictures because they show the mess of uniforms the French had in 1915 - several different styles, shades (from the complety random Horizon blue that went from dark blue to nearly fieldgrau of the Germans to territorial tan to red pants), hats, ways of wearing insignia (note the one guy wearing an aviator's brassard), and one guy wearing shoes instead of boots.
The nature of Horizon Blue is always a lot of fun with experts. While color standarization existed within printing, the French military went a different way in its specifications. The reason the blue of their uniforms, roundels, and a lot of other things is called "Horizon Blue" is that it was officially described as the color of the sky five degrees above the horizon as seen from Paris on a clear day. That's open to a lot of interpretation, and manufacturers all had their own ideas on how to proceed.
On one of the aircraft replica sites I visit the blue of my roundels and trim caused a minor stir; it's too pale for the likings of some of the experts, and should be more in line with the blue of US Union Civil War uniforms (and later aircraft markings). They've got a lot of research behind them and some sexy ways of determining color from black and white photographs (as well as some paintings from reputable artists at the time) to back them up. And then somebody else brings out museum pieces of the blue on Nieuports that have been protected from sunlight since they were cut from the aircraft.....and my pale blue matches them....well, some of them. Others show the original experts were right.
Naturally this is discounted as being non-standard, and it is. But standards over such things were much more lax in WWI, and the Nieuport factories just didn't want to bother with them. The first N11's came off the line painted all in Horizon Blue, which we would call sort of a robin's egg shade today. Then camouflage, with roundels only on the bottom (as I did mine) - but during the battle of Verun they had added the clay color to the scheme....which was often done in the field. Then they gave up painting them at all and just slapped on clear doping. The trim along the wings (and eventually fuselage) was blue and brown and gray, depending on who was doing it and in which month they were made.
Oh, Kanuk, I've plotted their main strategic positions in our sector.
They've a Mercedes plant making lorries in Tuscaloosa and some sort of rocket facility up in Huntsville. At the latter there's the Americans positioned to face them, but apparently it's something of a stalemate - neither side seems to have moved positions in a long time.
Oh, lord, you have no idea. I had to remove tons of rust a week or so ago from the wheels, and before covering them had to go back over them again to remove spots that had came up. Enough of that crap, I just painted the wheels (why not, nobody will see them) to hopefully keep the rust from coming back:
They're actually covered by scrap fabric.
Exterior latex primer paint to seal the fabric, spray paint over that.
Because most of the WWI representational plans and kits went with a more forgiving Clark Y or similar airfoil, they behave a lot like one in the air and in landing.
But it's a short wheel base, which means it can be a lot of adventure in ground handling.
I trained in a trike and found conventional gear aircraft much more natural, to be honest. Work into a mild flare and hold it. Let the plane settle on the runway in that position and it's a three pointer!
I learned wheel landings on a paved runway in a standard Champ, so it was a little more challenging, but not too much. It's just a little more power and flying down to and on the runway. Crazy enough, I did a lot of practice in a SPAD XVIII in Rise of Flight and it helped! Indeed, the SPAD XVIII seems like it's modeled on the Champ, right down to the glide ratios.
Like all aircraft, one isn't done flying a tailwheel until it's tied down. Then again, I managed to ground loop a tricycle gear aircraft (no, the wing didn't touch the pavement), so anything's possible.
I damn near ground looped a 172 as well when I didn't fly the thing to a stop and picked up a little drift on the rollout. Not too bad really, but my first an only one of those and an eye opener!
The hardest thing I have had to get used to again is how light on the wheels these things are. Everything else might swerve or cock up on a gear somewhat, but it's amazing to be able to still lift a wheel off the pavement when you've already been on it for half a mile!
Loads of "little things" getting done - and they all take more time and thought than I think they should.
Transition piece between side sheeting and the top of the fuselage:
That's little bits of copper tubing under a rivet and a small washer, part of a long vinyl coat, and a leather boot lace.
The combing around the cockpit is the same coat cut up over pipe insulation and a black boot lace.
I cleaned up the lacing to where it doesn't have that sausage effect. I used the collar of the coat for the back of the cockpit since it fit really nice there.
My 7/8th scale Lewis gun is done! I had made a mess of the plastic gun kit I bought and rather than just mess around with it making it even more ugly, I decided to use it as a template and make another out of wood:
Yep, that's a half inch board with some big dowels I ripped with my circular saw, some epoxy, some drywall spackle, and some sanding.
On the other side I used a bit of copper tubing after figuring out it's easier than molding that bit out of epoxy putty.
Oh, and the top bit there is some left over plastic cutting board I used as reinforcement for the turtle deck stringer.
I recycled the magazine and the barrel end from the kit.
The handle and the grips were pretty easy to do - it's just some scrap and a dowel that I didn't really clean up - I just lacquered over them as they were, with little imperfections and stuff on them.
In experimental aircraft, there are no requirements for instrumentation of any kind (in the USA).
So yeah, I could put a tach in it and call it a day.
The FAA designated inspector and I would probably have to have a long conversation over it, though.
However, I like the "standard six" on the panel, even though the only thing I ever really look at in an aircraft is oil pressure and temp, and a glance at altitude and airspeed when coming into the pattern to land, and a quick peek at airspeed before turning base to final.
A compass is nice, too.
Windscreen is coming along nicely. Gotta trim the silicone sealant tomorrow and figure out a good mount system to put it on the aircraft.
[edit]
LOL at the Orange Tip. Funny thing about that - a guy restored a P-51 and got a Class III license for automatic weapons. He then purchased six .50 caliber and mounted them in the wings.* The FAA didn't care - firing from an aircraft is allowed under the "dropping objects" rule (it's only illegal if something or somebody is hurt or if there's a complaint). The ATF, however, asked where he was going to shoot them. He had some rural property and did a range fan for it, which satisfied the ATF.
I am amazed they went into combat with 47 rounds. The Foster mount was a long way in the future, so if one wanted to reload it was a matter of undoing the seat belt, standing up with the stick between the knees (which meant the engine was at full throttle), reaching over the top of the wing to the gun and replacing the magazine. And then sitting back down, putting the belt back on, and continuing on.
If one had a malfunction, it usually meant standing up to pull the charging handle.
Or just running for home.
* If one can afford to restore and fly a P-51, one needn't ask if one can afford six M2 machineguns, forty acres of remote rural land, etc.
I thought y'all might like to see the sort of thing that is inherent to home built aircraft, where there are loads of things that just aren't in the plans and are left up to the builder to figure out. What would seem to be a simple thing - the windscreen - can really make one scratch the melon and become creative.
Let's look at what was on the actual Nieuport 11:
No, no, no. It worked great for them, but we can do better. That frame blocks too much view for my liking, and it's a port hole in the middle.
This being 2015 instead of 1915, we're going to go with some nice shatter proof plexiglas and keep the general shape of what they had as a fig leaf to the original. I started with poster board, but it was too flimsy and transferred that to cardboard.
It's sort of Nieuport 11-ish, I think.
So now it's just a matter of transferring that to plexiglas and cutting it out. I read a bunch of stuff on how to cut plexiglas and some special tools folks use to do it. I went with a standard jigsaw with a standard blade. It seemed to work out just fine.
Cut out and trial fitted.
It's three pieces, and I got to scratching my head on the best way to hold them together. First thought was super glue and silicone stuff, but that seemed to be a good way to eat a section of windscreen at 60 MPH. What I need is a mechanical join using some brackets. They don't sell 7/8th scale Nieuport 11 plexiglas windscreen brackets in the store, so I'll have to make my own.
Figuring out how long they have to be is easy; the angle is another matter. Easiest way is to tape the whole thing down to the aircraft, take a scrap of sheet, and bend it until it fits. I actually have an angle measuring tool, but it would take me longer to find it than to do it this way.
Off to the aircraft section of Lowe's to get some steel stock. Apply bending brake, hack saw, and smooth corners on a band sander to make something that will work.
I do a lot of "dummy" labeling, even for simple things I'm doing right then. B is for Bend, C is for cut. It was easier to bend to the right angle and then cut off that piece and repeat than try to bend little short pieces.
Four little brackets ready for drilling and paint. They're all identical in angle to make my windscreen square with itself.
Drilled and bolted in.
I had originally though to just throw a nice bead down the seam in transparent silicone and leave it at that. The issue was I can't throw a nice little bead of transparent silicone, and my efforts at cutting it square with an exacto knife were similarly disastrous.
It occurred to me that while I've opted out of having an aluminum frame around the windscreen (as in the original), I can pay a bit of homage to that with a couple of little strips over that seam.
So I used my standard "take a piece of scrap and bend it until it looks okay" method of measurement and bent a bit of aluminum.
I didn't take pictures (I didn't know if it would work), but I found that bending a larger sheet to the correct angle and then trimming it thin on a paper cutter worked really well.
I also painted the strips using the same metallic paint as the metal joiney bits and then applied silicone stuff behind them.
To mount the windscreen to the aircraft, I made little mount brackets the same way I made the ones that hold the sides to the front, with a big rivet onto the fuselage and bolts through the wind screen. There's two in the front and two in the sides.
The scheme makes it a lot stronger than I thought it would. As the front is pushed back, the load is transferred along the sides, and there's a lot of surface area to take that stress. I grabbed the top of the center section and pulled back as hard as I could and it didn't budge.
Now, then, the upper edge of the windscreen which I had cut out with a jigsaw is great. It's smooth and flowing and there isn't a hitch on it, as I wasn't worried too much about it and just cut it with one motion.
The lower edge, where it meets the aircraft, however, is an entirely different matter. It's close and I've tweaked it on the band sander, but I didn't get the curve just right.
I could spend endless hours trimming here and there hoping for the perfect curve and the perfect beveled edge, but that's a pipe dream. Long experience tells me what I'd wind up doing it "improving" it right into the scrap bin.
What I need is something to cheat that edge, make it smooth, and keep air from travelling underneath it. I had good results using car door trim stuff on the seat for both appearance and smoothing, so I decided to go with that.
And immediately ran into a problem. The edge material is a square groove with a rounded tip of plastic/rubber material to make it rounded at the end, about 3/8" below the bottom of the square channel. Too much! And my windscreen is wider than the car door edge it was designed to go over, meaning I really had to abuse it to make it fit.
So I slapped in the remaining part of the steel I used to make the windshield mounts and put the belt sander to use.
I brought down the bottom to where I could just see the steel underneath.
Now it's about an eighth of an inch thick and flat on the bottom.
Test fitted it on the windscreen and mounted.
Since I wasn't sure this would work I cut it at the seam between pieces. I'll have to do it again, trimming down the sides at that join to make it one continuous seal, as well as hitting it with some steel wool to take the chrome appearance off of it.
And that's a glimpse at the sort of stuff I've encountered along the way to building the aircraft.
Nice looking work, Dart. Craftsmanship looks very clean with all the added details.
Did you wind test it? Maybe with a 150mph leaf blower? Or hey, I guess you structure/wind test it and by mounting it (and a camera) on top of your car and hitting the highway!
I think my tent would fall down on top of the aircraft if I did that!
Here's how it looks all done:
I also found a new term: unforseen craftsmanship.
My wife was looking at the windscreen and said "one of your screws is off."
Now, I was about to go into the necessity of drilling some of the holes a little off center of the brackets in order to counter act the Coriolis effect and sunspots (always a ready explanation of my inability to center a hole on a piece of metal), when she continued,
"That one isn't going up and down."
Huh?
Well, out of 20 machine screws on the wind screen, 19 of them wound up with the screw driver slot vertical. The 20th was off by about 30 degrees.
"Um, well one of them has to be a little different from the rest in order to ensure the stresses on the installation don't loosen them all."
She almost bought it! Then she scoffs and says "you had no idea you did that!"
I'm sorting out the engine mount, which has to be drilled to accept the engine mounting bolts (standard grade 8 bolts, btw), and it's an example of "hold your breath" moments. If I drill the holes in the wrong place the mount is ruined. If I drill the holes to fit the engine but they're not on the center of the firewall (too far up or down) I'll mess up the line of thrust and the plane will fly crappy.
Measuring distances between holes is not my forte, and there is a lack of information on the spacing on the web. Everyone seems to go from engine in the box to on the plane. What I need is to ensure I'm spot on.
Well, my solution:
I took a wooden yard stick and drilled it, fitting it through holes on the engine itself. There was even a nice center line on stick to guide my holes.
Eleven inches is the answer, and you'll note that on the left one I did bad math and drilled one 12 inches - hence the "NO" annotation.
Not shown is the cross members I glued to it to form a template, and it shows that the mount was made perfectly - center of the supports that hold the bolts. Not shown is the fabrication of bushings to offset the engine by an inch and a half from the mount.
I cut a such a deal on the Firewall Forward (FWF) engine and prop setup that I think they cut their costs by not including any manuals - I think they went back home from the Gardner, KS airshow last year (where I blurted a low ball price and to my surprise got a handshake on the deal*), looked at the price agreed on, and palm slapped themselves.
But I asked them to slow walk the engine build, which meant that they could work on it between normal customers and include it in their bulk purchases they normally do after Oskosh.
At least I think I got a killer deal. They don't publish a price on anything but their top of the line engine, and almost everyone I've talked to gets really quiet on what they paid for theirs....afraid that either they paid too much or the other guy did. I had looked around and took the price of a speed shop's bug engine, added the price of a prop (which they do list), and 25% overage for labor.
Fortunately, I owned a terrible Bug back a zillion years ago and know how to maintain the engine. Bug engines are almost bullet proof if one checks the valve clearances regularly, changes the oil, spark plugs and wires as needed.
* Yes, there are still businesses that work on a handshake. Valley Engineering is a small family run one, and are beloved in the home building world in general and WWI replica one in particular. They also own Culver Props, and the one they cut for me is gorgeous.
Sh1t's getting real when you're about to mount the engine! Good luck, Dart. I'm sure it will be fine as you've been taking it nice and slow. It's been a real pleasure following your build, especially since you've shared all the details of your problems, solutions, temporary failures and eventual successes. Cheers, C_G
The first heart attack phase is done, though. There are a few "hold your breath" moments in building, where there isn't a tolerance for error and one gets a single opportunity to do it right.
Drilling holes in the longerons - the spines of the aircraft fuselage - for the cabanes that hold the upper wings was a prime example. One can't just replace a strut or tube and do it over; if it's drilled wrong, the only fix is to take the fuselage apart and replace it....taking it back to square one.
Putting the holes in the mount to fit the engine was one of those, too. Granted, screwing it up meant buying a new mount, but what a PITA!
On the Big Build Thread over on the EAA forums, my goal was twofold. First, to show all my work so people can step in and cry foul when I do something wrong, which has happened more than once.
Second, it was to show another first time builder about to start the challenges and setbacks of building. It's rare for a website or thread dedicated to a build to show technique and, more importantly, errors. Or when they show an error they had to fix, they don't show how they did it.
I have super thick skin when it comes to criticism in the build. Even when it's pedantic (such as the long conversation about my blue trim and how it should be gray), I take it as an effort by others to improve my work. I've usually taken advice and used it, and even when I went another way it was from a position of knowledge, knowing there was another path. Comments about some of my more, um, rough craftsmanship are always fun - sometimes they're right and I could (and do) better. But I never set out to build an award winner.
All of this gracious humility will go out the window the second she gets her airworthy certificate, though. Then any criticism of my Bebe will be met with that of a proud parent being told their baby is ugly.
Every time I look at your threads, I get the itch to build a Nieuport or Pup.
If and when I do, I plan to study in detail how you overcame the obstacles in your build...I hope you leave the pics and thread up as it's got to be about the best "how to" on building one of these I've seen.
I finally got signed off in the Citabria after putting it off for ages. I think I've got the tail dragger bug.
Plans drawn out for the "doghouse" behind the starter - which actually fit through the hole I cut - and I'll make it tomorrow. Then I'll mount the starter and think about the oil cooler mount.
Then it's a double check and touch up of the wings and out to the airport for help on the fuel and electrical systems.
The only work that needs to be done at the house is fabricating the oil cooler mount; the rest will be done in the hangar under the eyes of experten - the electrical and fuel systems.
I know just enough about how they should be put together to know that I'm over my head on those.
They aren't shelving brackets. They're rudder pedal stop reinforcing assemblies.
To keep the rudder pedal from going to far and whacking the rudder against the elevator, there's a bolt that is attached to the firewall and reinforced with some plate:
But there's some give to the firewall that I didn't like that lets the bolt move, so rather than fabricating a reinforcing guide I sourced one that was already made:
The nuts on the end let me do fine adjustments without having to mess around with the turn buckle (and the safety wiring of it).
That armed P-51 you mentioned. Twilight Tear .50 Caliber Machine Gun Testing
The owner was forced to destroy the receivers? by the ATF since he didn't have a FFL. Being more than just a little well off he paid to get a FFL and then had new receivers made for the guns.
Dart, you could make the gun look like it is firing by using propane or LNG. Some gas is fed to the gun where it is ignited and a flash comes out of the barrel. The guy had the gas feed pulsed to make it look like the gun was firing as a mg.
Read about this several years ago but can't find anything on Google now.
I've looked into gas firing guns and gave it a pass, as well as blank firing guns. I toyed with a strobe in the front as well (it actually looks pretty cool).
Most of the guys who work up gas guns do the whole airshow thing, and fire them for the wow factor. And it's a big wow factor.
Since I don't plan on doing any of the airshows and since I'm not going to trailer the plane, my fly-in range is pretty small. Mostly I plan to just fly up and down the Coosa river and over fields to look at cows. Cows aren't impressed by guns.
Home maintenance stuff has put me off schedule for cobbling together the battery box or putting together the fuel system.
Just a few pics for something I spent a lot of time thinking about, trying to make it simpler and less complex with every iteration.
First up is the stupid fuel strainer. I went through a host of trials using screens and stuff with little to show for it. And then I remembered the purpose of the strainer isn't to work as a filter, but to keep junk in the tank that's big enough to clog the line itself until it gets to the filter.
Hmmm, a bit of copper tubing with 1/8th inch holes drilled in it should keep 1/4" sized junk out of the lines.
I flow tested it by running water through the fitting and then putting on the pipe bit - no restriction. It also marked my first soldering in about 30 years.
I want a fuel cut off, and this is where a lot of trial and error factored in. Running it over, across, down the fuselage to where I could reach it by hand and then back down to the firewall presented more problems than it solved.
The plane is just so small that no matter how I ran it either it was too close to my feet and the pedals, rubbed by the aileron control rods, or otherwise too complex.
It occurred to me that I could put it on the tank, and since it's a big lever to operate, position it so that if there was trouble I could lift my foot and kick it over.
A few trials from the seat and it's a winner. One can't accidentally bump the lever in flight, but it's not difficult to put a toe of a shoe on it with the left foot and push it shut.
No real love on returning it into position, though. One is committed when the fuel is shut off.
Note the bottom of the tank has just a plug put into it. It'll be a condition inspection item to drain the tank and pull that plug for any trash or water that might accumulate there throughout the year.
On the engine side of the firewall, I put in a bog standard gascolator. First off, I like the idea of one. Secondly, I bought one about two years ago when I was on a purchase tear for stuff I might need.
The lines are fire sleeved up to the electric pump (which is below the level of the fuel tank), and then up and over to the carb.
The oil lines got a clamp to the mount to keep them out of the way of the hot stuff and to clean things up a bit.
I'm thinking of putting a bit of sheeting between the pump and the exhaust pipes (there's quite a bit of room between them, but I don't know how hot they will get) as a heat shield.
Fuse box arrived in the mail today, so I'll start the prep for the electrical system, mounting everything for the wiring job.
I had to buy and mount a voltage meter onto the panel, which went amazingly well. I had room for it under the other VDO gauges and it looks aesthetically pleasing IMHO. Didn't take a pic of it, though.
For the pilots out there, I'll clarify a point that caused something of a tiffle on some other forums about my aircraft.
The fuel is checked at every pre-flight at the gascolator. If there's any water present, the tank is drained and the plug pulled from the sump.
If I'd of put a check on the sump there would be no need for a gascolator - I'd just throw a fuel filter on the line instead. No need to check two different places for contamination.
After some detailed calculations I am wondering if the engine will produce enough Llamathrusts to get it, you and your sandwiches airborne. Please confirm
I brought the camera along yesterday to take some pictures of build progress, but didn't take any relating to it! Just too busy working when that got started. Before that, though, I grabbed some pics of my new digs.
Hey, is that...is that a hangar? I wonder what's inside?
Oh, lovely! What a neat little aeroplane!
One's first hangar is a bit like one's first apartment, I guess. I had asked for - and gotten - the least desirable one on the field in order to negotiate for the lowest price. This one has a nasty tendency to let water into it under the door for the first three feet of the hangar due to run off.
Like all first apartments, it came with obnoxious roommates.
I found we were incompatible after discovering she was far too goth for my liking and had to get rid of her. Plus it turns out she had a sister hiding inside an old cinder block on the floor in the corner.
Plus she had some friends that stayed from time to time that just left dirt in piles or long streams on the shelves and walls.
Each airport has its own flavor, and Talledega is no exception. When assembling the aircraft I worked until after dark. Around seven or eight somebody started up their hot rod and just revved and revved the engine. Annoying. Then their buddy joined in. What the f... Then a loud speaker started warbling and the National Anthem kicked up. Stopping work, I stood facing the music, only to put together that it's Talledega, and that's the short track races.
Leaving the airport at around 2300, I found the main access road had a chained gate blocking it off. Trapped like a rat! After many sighs and some color commentary, I correctly guessed that there was an escape route through the industrial park that is adjoined to the airport.
On the plus side, I struck up a conversation with the A&P's in the maintenance hangar across from mine and it's already proven to be a mutually beneficial friendship. He needed some help moving a metal shear and I was more than happy to strain and lift. I had ran out of AN4 washers and he let me wander around the hangar collecting strays from the cracks in the floor and from under shelves.
Anyhow, on to the airplane. She's all assembled and I had our resident EAA guru and tech counselor come out to give her a once-over and help with getting the wiring started. Rusty did a little frowning and some smiles, but mostly approving nods. He wants to put a third swag in the center of my cable joins...I'm not too thrilled with that, as I'm afraid that it will goof up the ones on the end. But I remember Robert saying one could do that.
Overall he was satisfied with my workmanship, which is reassuring. He even found a couple of my solutions to be praiseworthy.
Anyhow, we dug into wiring, with me being helper man to his expert. None of it is rocket surgery, but the execution of crimping and connection has to be done right. He's a master and has the right tools for it, so I'd be a fool not to defer to his judgement and skills.
Rusty also has this neat circle cutting tool, so the cowling now has a proper hole in the center. He held it in place and I measured back to see how far the extension needs to go. Rusty says it's kind of a shame to cut nearly two thirds of it away!
I'll stop posting in two different forums from now on, promise.
Great big milestone today. Our EAA tech advisor and super guru came out to show me how to put together the wiring, as he had worked up the bus bar for the fuse box:
I think it's a work of art.
We run all the wires and flip the master switch to see...
Volt meter shows the juice, and the oil temp and pressure wiggled slightly up from the peg.
A quick bump of the starter button and the selenoid kicked in.
Lots of work to do - I've got to dress up the wiring back from the firewall (it's hot and I wouldn't begin to ask Rusty to stick around for that!) and there's still a zillion friggin' things to do on the rest of the plane.
But here's a scary thought: If I mounted the prop and stuck gas in the tank she'd fly.
Sure, the turnbuckles aren't safety wired, the clevis pins holding them on don't have any cotter pins to hold them in, and the wiring to the panel is a hanging mess, but she could fly.
Bonus plan: one of my other EAA brothers showed up and, having a little time to spare, took me around the patch in his Cessna 150! Just too much fun! He let me move the flying stuff around, which was just a joy. First time every using a yoke.
Of course it's a super fancy airplane with flaps and trim and mixture and even ashtrays on the door, but I've never been a reverse snob.
Dart, Huge respect to you for this project, just a few comments.
Fuel pickup screen: Use stainless steel screen rather then drilling the tubing. Same amount of labor, plus you can find a pre made piece is used in most pre y2k snowmobiles. Cut the nipple for attaching to the fuel pickup hose and solder to your threaded brass. You would be shocked by how easily small micron particles can plug a larger orifice. A modern cars fuel pump pickup filter will allow gasoline to flow, but water is blocked due to the micron size.
Electrical connections: I HATE (what I call) hardware store crimp connectors. You can buy the split pin connectors used by the motorcycle and automotive industry. A good crimping tool is a one time investment and OEM quality connectors are easily found for the last several years in the automotive and powersports industry. I do not trust the longevity of those connectors on the neighbors mini-bike. If you insist on using those connections, PLEASE throw out the plastic shield, add heat shrink tubing and solder the connection. Snowmobile, ATV and PWC trailers use those crap connectors and how many have you noticed that the lights are iffy.
Negitive Gs cause my body to lock up so I can never be a pilot. A friend is a pilot and he showed us both all would die if SHTF and it was up to me for survival.
They're actually high grade connectors, and Rusty used the proper crimping tools! The wires are milspec as well, not your standard automotive wires. The fuze box is straight VW, though.
I'll probably go back and put in a screen, but the odds of picking up anything that would clog the fuel line is pretty slim with 1/8th inch holes. And that's what it's there for - the fuel filter is there to protect the fuel pump and carb.
On negative G - I don't do that! This plane is strictly utility, with no aerobatics.
Huge respect. I have massive respect for anyone building anything from scratch....but to build something that you are going to fly in - that's confidence in your work.
I already have a son...but I can always use another cousin!
I was looking at the pictures and it seemed the left lower wing had reverse washout - the roundel shouldn't be showing like that. So yesterday afternoon I went out to the airport to put in the ground wire on the tach and start on the "check every bolt" process (I plan on repeating it a bunch of times).
Turns out that when I assembled the aircraft I didn't put any nuts on the bolts that hold the interplane struts onto the lower wing! After a rueful "well, that ain't good," nuts were installed and tightened after loosening the landing wires. Wires back to proper tension and the wing has the required 1.5 degree washout. Much rejoicing in the hangar - I spent a LOT of time getting the rigging right, and did not want to have to attempt a do-over.
I need to bring some gas up to the airport as well. It dawned on me there is absolutely no reason I shouldn't put a gallon or so in the tank to make sure there's no leaks in the system and fire up the engine briefly. I must say that when I plunged the starter button to the bottom and turned it over it gave me quite a thrill. First gasps for breath from my Bebe.
I also need to get a decent fire extinguisher for the hangar.
It's now a ritual that I spend an hour looking at every bolt from engine to engine all the way around before I leave the hangar.
Next month after the cowling is done I'm hosting a sort of party with my EAA chapter. Everyone is invited out to find gigs on the aircraft, and the person that finds the most will get a modest prize and be awarded the title of "mostest and bestest homebuilder." When I announced it at our last meeting a lot of eyebrows went up and a few evil smiles.
That's a very, very good thing.
The Experimental Aircraft Association is a great big monster organization, but like all big monster organizations is only as good as one's local chapter. I was very fortunate to find mine, as it's small by EAA standards but made up of Old Guys Who Do Stuff and are helpful besides. We're very much not a "type" club - everyone seems to have built or owned very diverse aircraft. So there's sheet metal guys, fiberglass guys, a wood guy, an ultralight guy, and me as a tube-and-gusset guy. We boast three military pilots (Navy, Air Force, and an Army rotor head) and two A&P's. And the others with a huge amount of experience doing things.
The neat thing about having such a mix is that there is a repository of inter-discipline knowledge that gets shared. It can come from unexpected places, too. One of our guys building his aluminum skinned aircraft had a question about annealing tubing, and I immediately gave him the answer - mark it up with a red Sharpie. The boiling point of the ink is 800 degrees, which is the same as the annealing temperature of 6161. So when the ink disappears, the aluminum is at the right temperature.
It was like the dummy of the class coming up with the theory of relativity judging by the looks I got. But then smiles, as they know I've annealed a helluvalot of 6161 tubing and plate.
Clever idea about the poke around party. If you leave us for a better place I'd rather it be because of doing something brave than something stupid. Or old age will also be accepted
How are you going to "testfly" the thing? On any model aircraft it's always a bit of tuning needed to get the controls just right, weight and balance, CoG/CoL...
With a kit build there's enough knowledge to be sure it will fly proper and well controllable the first time?
Or are you going to "hop" around the airfield like the old pioneers first?
Well, of course it will fly proper and be well controllable - I built it!
Seriously, the CG is determined just as in any aircraft - one pulls out the scales and does the whole moment calculations, both empty and with full fuel and the pilot in the seat. For the inspection W&B an FAA approved pilot weight of 170 pounds is used. But I'm a growing boy and don't have far to meet it in reality!
Gub'ment in action on test flights, but this time in a very good way. The FAA has a great test flight program laid out in the form of a circular; it's not mandatory but since the EAA, NTSB, NASA, etc., all had a hand in drafting it I reckon it's what I'll use (modified to suit my aircraft, of course).
First flight is really short and involves a ground crew for communications and safety. One takes off, checks directional controls, and lands. Loads of guys include a stall, which, depending on how well she's in trim I may do. Otherwise it's a landing. Every flight after that extends the manuevers - slow flight, steep turns, etc. I'll also figure out all those "V's" for the aircraft - best climb over distance, best climb over time, etc., etc. later on.
My plane is ground trimmed for cruise, and the most common type of tweak is raising or lowering the horizontal stab to get it right. I've done everything I can to ensure the rigging on the wings is correct, but the only way to find out for sure is to take it up.
On hopping and fast taxi - oooh, that's really "of the Devil." In WWI they used "penguins" to do most of it - airplanes that were modified so that they couldn't fly. I've done some fast taxi work in a Champ, and it just begs for disaster. One is putting the aircraft in a state where it's almost flying. It is the point of every flight where the most incidents happen during a landing, and for some reason folks think that it's a good idea to put and try to keep an aircraft there. Not for me - either she's at a slow taxi, taking off or landing when the ground is concerned.
Every homebuilt aircraft is a prototype. While there are a number of examples of the type flying well, I have no idea if my plane will be a sweetheart, a handful, or a wrestling match until she takes flight. The design is proven and I've followed it in construction, so I have zero doubt it'll see me around the patch without injury.
A few nice differences between the actual Nieuport 11 and this plane help out. First, it's an inline engine, so no rotary effect. Second, it has a throttle. Third, the airfoil is a thick, friendly Clark Y - the same that's on a Champ or Cub. It makes for a more docile aircraft at the expense of manueverability, but I'm not patrolling Alabama in search of Eindeckers and don't plan on radical maneuvers.
You're really not a true redneck then... I was envisioning some pickup (Ford or Chevy?) with a construction tethered on the back to get it airborne and hold it there...
Kind of brave, really. I'm not good enough with my hands that I would step into something I built and just take off. Heck, I don't even like to change tires on my motorbike least they come off at inopportune moments...
I'm not a redneck, but I am very much Country. I did use shelf support angles for my rudder stops, after all.
Funny you should mention the Ford F-150 and flight testing. It's actually used. To determine the amount of thrust the engine and prop is putting out, one ties the aircraft's tail to the bumper of a truck with a rope and a scale. The engine is brought up and one looks at it.
In a normal aircraft the number would be deceiving, as there is ground effect in play (and thus the term "unloading the prop" on takeoff). But mine is so full of wires and struts and crap that it's got enough drag to make it about even.
Oh, and in October Greg Koontz is putting on his annual home show in October, but since it's a grass strip he won't be landing a Cub on a platform above a pick-up...
When a plane is tethered and the engine is brought up to full thrust, the prop wash under the plane is caught between the plane and the ground - the same effect as when moving on the runway.
The turbulence of all that air slapping from ground to plane and back again and off of the gear and stuff leaves when one climbs off.
In normal aircraft, that means one gets more effective power (thrust minus drag) as soon as one leaves the ground. In really, really dirty aircraft like mine it doesn't matter. The drag from the wires and wings isn't all the way there on a tethered run-up, but it's there when it's moving.
On landing, that same turbulence makes a cushion, letting us float down the runway.
Only plane manufacturers and home building nuts do a ground thrust check.
My son says I should put some sort of graphic on the side of the aircraft, and my Mom asked if I had named it yet.
So SimHQ friends, I'd like some suggestions on the graphic.
A few things:
1) It's WWI, so no pinups! 2) It's a French plane, so let's keep that in mind 3) Nothing strictly historical. I don't want my plane identified with a specific pilot (though since I painted her in Verdun scheme I suppose Escadrille might be okay) 4) Keep it simple. I'm going to have to paint it myself, and I'm not much of an artist.
The wife ruled out my Hello Kitty In the Ring, much to my chagrin. She says it's too girly.
On naming the plane, I'm a bit of an animist. I just don't know the true gender of the aircraft or its temperament until I take her up in the air. Right now I refer to the plane as "her" and call her Bebe for obvious reasons.
So good French names of each gender would be cool.
I would think you could get some inspiration there.
If you are going for the Lafayette Escadrille thing then, as you know, there was no squadron symbol on the Bebe. But other squadrons had some, so you could go that way as well especially considering that not all Americans flew in the Laf Esc.
Alternately, it seemed that simple symbols were popular, (stars, stripes, cats, cranes, etc) so you could pick something meaningful to you. Another, easier route I've seen that was popular was initials; singly or as part of a monogram...no artistic work there.
If you have a little more talent, you could go for a more complicated image. I don't know how attached you are to your name here, but you could do something like a dart or darts sticking out of the Kaiser's behind or a dart board which would be easier to draw.
Or how about a cartoon character? The first one that popped to mind was Swee Pea from Popeye...
Which would go along with the "Bebe" theme. You'd need to do a little historical research to find out what the troops were reading back then.
Lastly, how about some words. Less popular in the Bebe I think but all the rage it seemed in the Pup were large and small stylized words,
DO DO, BABY MINE, CHIN CHOW
Maybe just a cool looking "BEBE" or whatever "My Baby" is in French. Girlfriend or daughter's name or nickmane like "BOBS"?
Just some suggestions. Very jealous of where you are sitting my friend!
I'm going to be the cheeky guy and make it for you. It's going to be a Dart (duh!) With a face like the mosquito I drew for Combat Helo and maybe another detail. I was thinking a prop or some wings like the bebe.
With my new series 7 battery all hooked up and charged, the engine would turn over once and then go click-click-click. Normally this is a connection problem, so I spent the balance of a day charging it and re-charging it as I checked cables. I finally gave up on it.
Out back to the hangar today to start all over again.
So I spent a couple hours checking all the cables three or four times without any love. Finally I just threw up my hands and went to the parts store and bought a new battery, figuring that it was the only thing that could be screwing things up.
Thirty minutes and a hundred bucks later the new series 12 motorcycle battery was installed.
She cranked on the first turn!
A couple issues came up immediately:
First a minor leak at one of the fittings to the oil cooler - easy fix. Second, none of my gauges - excepting my volt meter - are working. I'll start trouble shooting them some other time, as I'm whipped from bending into the airplane and getting frustrated.
The oil temp and pressure gauges wiggle when the master is first turned on, but I think they're not getting enough juice. We daisy chained the power connector to connector, with the first stop being the volt meter.
I'm going to move the incoming hot line to other gauges to see if that's the issue. Otherwise I'll beg Rusty (who helped run the wiring) to come out and ungefuch the system.
Dart, Not sure what you mean by "series 12 motorcycle battery" but a few assumptions by me.
The numerical value is the amp hours of the battery.
Charging of batteries has changed since we changed from the standard 'wet' lead acid battery. A maintance free battery relies on the fumes trapped between cells, so charging at a rate that heats the battery causes the gasses to be lost through the valve that prevents it from exploding. I filled a 7 amp hour battery for a YFZ 450 from the leading battery maker today and there printing on the battery is max chage rate of 3A for one hour and a typical charge of 2A for 5 hours.
Jell battries are a little more forgiving, but they still require that you keep the "magic smoke" within the battery.
BTW, the typical lead/acid battery will loose 1% of charge to atmosphire per day. Once a battery reaches 50% charge (12.25 for 12v) it is at risk for sulfating. You drive your car more then once a month, so the battries live a long time. Your lawn tractor sits for months, so even the best brands die often.
Valley Engineering said that they typically use a size seven motorcycle battery, so I went to the auto parts store and asked for one. They handed one over and asked for money. Basically just me using savant skills of saying stuff I didn't know the meaning of.
When I replaced it, the auto parts place didn't have a size seven, but they had a 12 and a 15 (each larger in dimensions), and I got the 12, which cranked and ran the engine just fine.
The whole battery thing is kind of scary, because it's in the territory of "unknown unknowns." The bulk of my build has been dealing with "known unknowns" like how to anneal aluminum, cover and paint the aircraft, and putting in the wiring. I haven't always had a ready solution or the skills to tackle problems, but at least I knew what had to be done - I knew what I didn't know.
Dart, Did you make the domed section, purchase or have it fabricated?
How is the cowl assembly attached? Depending on hours between service, your going to have to remove it a lot in it's life time. Pop-rivets are only good into sheet one or a few times. Plus, adding backing washers to rivets looks to be a real pain.
In it's lifetime that piece will see a lot of vibration from the harmonics of the engine. Your mountings need to spread out these forces or you will get localized fatigue.
What does the painters (blue) tape mark?
I wish I had the money to build my own tank. Huge respect to you for your hobby.
The spun part of the bowl was part of the kit, but like everything needs trimmed and added to.
The sheeting is attached to the bowl with rivets to make the cowl, and that will be attached to the airframe by sheet metal screws until I get some quick fasteners.
The blue painter's tape is holding the cowl on while I saw how it fit.
The funny thing is that today I went out to improve the fit and look to see how much trim needs to be done and mark the line for the horseshoe and realized I fit it with the bowl just off the exhaust...which put about 3/8" clearance between it and the back of the prop. I don't know much, but that didn't look right.
So a quick call to Robert Baslee (designer of the aircraft) and he said it should be about four inches and to enlarge the hole and cut around the exhausts and back that sucker up.
Not quite square one, but definitely a few steps backwards.
At the Colonel: Gimme two weeks, a factory floor, a crew of expert craftsmen, and a government contract and I'd pump out four a day.
Looking good sir. Hope you will have a GoPro mounted so why can share your first fight!
Funny you should write that - guess what the wife bought me as a surprise gift yesterday! Man oh man, did I ever choose well!
That picture is a bit of propaganda, though. The cowl is just tacked on with a couple machine screws and the top guiding post, and the prop is resting on the hub with the bolts in to keep it from falling off. I needed to see what the clearance was from prop to cowl - and reward myself by seeing them both on the aircraft.
Miles to go on the aircraft, though the end is in sight:
The tachometer provided with the engine was inoperable, and there's a new one on order. Pitot tube needs put on. Loads of cotter pins and safety wiring on stuff, as well as a bunch of "bolt checks." Gun needs mounting. Cowl needs to be truly secured with camlocks, as well as painted. Rudder needs re-lettering. Prop has to be mounted and tracked. Weight and balance has to be done. Paperwork!
And then find a Designated Airworthiness Representative (DAR) for the FAA to bless off on her.
Looking good sir. Hope you will have a GoPro mounted so why can share your first fight!
Funny you should write that - guess what the wife bought me as a surprise gift yesterday! Man oh man, did I ever choose well!
[...]
She came running into the room waving her newly-acquired PPL*? So after all your hard toil, blood, sweat, tears and pieces of skin, and paper cuts from too eagerly turning the pages of the construction manual, you will still not be able to reap the fruits of your labour?
* (he asked, purposefully ignoring the rest of the post and its context)
Alaina at Culver Props is an artist, that's for sure.
Blonde girl-next-door looks, sweet as can be, sharp as a tack, and a true craftsman. She wanted me to get a multi-colored prop with some of the laminations in a lighter color, but I'm more traditional than that. I could hear her smile over the phone, though, when I said I wanted a solid colored prop but to use her best judgement on stain and grain. She asked about the paint scheme and went a little darker than she normally does to match.
Indeed, she said they like it when customers leave the prop up to them in length and pitch, as they have a collective 150 years experience in what works best with each engine they build (horsepower, direct drive versus reduction unit, application, etc.). Plus every wooden prop is going to be slightly different in appearance, so it's hard to meet specific demands on cosmetics.
Well, the wires aren't cotter pinned or safety wired and the weight and balance hasn't been done yet so that's out of consideration.
But I definitely goosed the throttle and got a big thrill when she leaped forward. I suspect I've got a real honey of a plane.
The quick releases for the canopy arrived yesterday, but I opted to fool around with the engine baffling instead - a testament to self discipline!
I also found the huge downside to putting her in the Talledega airport. Sunday is race day, and yesterday the campgrounds were already filling up with very bad drivers.
But they also sell reconditioned props for about a third less (or more off, especially if one says it is for display). Basically they take a larger prop that was damaged and cut it down, re-varnish and balance it.
Mucho props, pun intended, on the craftsmanship and ingenuity you have shown.
I gotta ask. Are you or do you plan on getting some more tail dragger time in before THE big flight? I don't really know your currency or really your experience level, total time etc, I just remember some stuff about ultra-lights and a Citabria I think.
Not as much as I'd like....but I got a line on another one and will also be spending some time with an instructor to see what new bad habits I've picked up are next week.
On seasons - Winter is a couple months away....and as far as flying goes it's all on the wind, not the temperature. I have a conuncopia of snivel gear supplied by our favorite uncle that is good to forty below.
I was getting really frustrated at working out the baffling for the engine and figured I might as well try out the new GoPro camera the wife bought as a surprise for me.
I really need to find a good, cheap video editing tool. Man I miss the old Windows Movie Maker.
It's alive! Also, no cranking hu? Modern technology rocks.
Also, doesn't Windows Movie Maker (think it's called Windows Movie Studio now) work if you download from MS site? I know it does in Win7, no idea 8 or X.
But, Sony Movie Studio is $50 and quite capable and easy. Similar in concepts to WMK, not that easy but a lot more powerful.
I do not hand prop! Indeed, I didn't take it into account when mounting the prop so it's not on the compression stroke when on the level - one has to hand prop starting from the four o'clock position, instead of the two....not that I knew to do that until after we had torqued and tracked the prop.
But I like it because she stops with the prop at the level.
Thanks for the heads up on the new Windows Movie Maker....downloaded and the video updated. It's clear I need to dink around with the GoPro settings to get rid of some of that aliasing.
1) I need to raise the camera, as bending over like that makes me look like I have far more belly than I do. 2) I'm a big weirdo...nobody else she knows reflexively uses the word wondrous, or pronounces it "wonderous." 3) I need to remember that I'm making a video and not just doing stuff with a camera on - the little "airplane strut" and tuneless whistling are things I do when I work by myself.
At least I turned off the salsa music that was playing earlier when I made this. I'm pretty sure nobody wants to see what I think of as salsa dancing next to a WWI replica.
All those things made it all the more personal. It showed your personal joy in your project.
Wheels
+1 I agree. Unless you were going for some professional looking diy documentary. I thought it was a "wonderous" video that you were showing your friends of your milestone accomplishment.
I keep thinking that someone is going to make a video of me working in the hangar without me knowing - I tend to dance around a lot when working on the aircraft, or kick the floor in frustration and talk to the pieces I'm making.
It's rather foolish to see some fifty year old guy acting like a little kid.
I think my wife would be surprised if I acted any other way!
Man, you are getting close to the finish line. So what is your proposed first flight now ?
Speaking of first flight, I flew up to Kitty Hawk and went to the airfield "First Flight". They have done very good on replicating the old wooden workshops and set-up the Wright Brothers used. You would have felt right at home there Dart. Very moving to fly by looking down at the field where they made those first flights.
That's not too far for you to do Dart. It would be fitting.
Actually it would be much closer to get permission to land at Maxwell AFB down in Montgomery, Alabama - where the Wright brothers set up their one and only flight school.
Cowl paint job is coming along - needs a little sanding and another coat:
The boring weird technical stuff I've been working on is the baffling that splits the engine area in two, making the top a high pressure area that forces air around the cylinders to the low pressure area below in the interests of cooling. Like everything, there's a zillion ways to do it and I wound up using ideas from about six different airplanes...along with an idea or two of my own.
The good news is that there is no shortage of advice - and, amazingly, all of it good - on baffling and decisions I've made.
Indeed, they observed that I've overbuilt myself in a bad way - but that the fix is simple. Then again, it's always easier to remove stuff than to add it on.
Deacon, here's my much smirked upon solution for baffling:
The engine area is now split in two, making a high pressure area on top and a low pressure area on the bottom. Air is forced down through the cooling fins of the cylinders, keeping them cool.
My fellow builders have mixed opinions, mostly to do with my lack of craftsmanship and a little "why didn't I do that" thrown in. The idea of cheating the seams and where the baffling meets the firewall with industrial aluminum ducting tape is sort of "smupid," in that it's both smart and stupid at the same time.
But nobody can tell me why it won't work, so I'm running with it. It's just way outside the normal conventions of doing it.
But hell, that's why they're called Experimental aircraft!
I don't see why the alu-duct tape is "smupid", at worst it's "smartd" (increased ratio of smart to stupid ).
I'll be interested to know if your dual-pressure theory works in practice. What aircraft have implemented such a desing?
My gut tells me that the upper area may not develop sufficient pressure relative to the bottom to work due to pressure leaks (how is the cowling sealed to the fuselage?) and, the horizontal separator may cause turbulence in the airflow around and past the cooling fins which may offset any benefits derived from the design. This is, of course, pure speculation. Outside of an proper airtunnel testing it is impossible to know how the design will work at different velocities and angles of attack.
Exciting stuff! Did you get all your electrical gremlins sorted out?
Baffling like that is pretty much a mainstay of air cooled engines, either by a plenum (formed fiberglass that draws air in and forces it over and down between the cylinders) or by splitting the engine compartment with a baffle like I've done.
But most of the Nieuports do it as I've done it (though a little bit more sexy).
I'm going to put some felt around where the cowl fits the aircraft.
However, the idea here is to increase airflow over the cylinders; one wants as tight a seal as one can to the cowl and the firewall, but it's not like we're talking high pressure - just higher pressure. Plus I've got a huge oil cooler that holds about a quart of oil including the hoses to help out on that front.
I just got back from our monthly EAA meeting and the consensus was that it should work out okay, and if it doesn't it's easy to modify.
Angle of attack is a tiny consideration as all of this is right behind the prop and air is just getting rammed into the upper part of the cowl and there's nothing underneath.
On electrical - yeah, sorted. I wound up tying all grounds for the gauges together and running them back to the battery. The tach was replaced with a less attractive version, as the Royale tachs seems to be hit or miss with VW's.
Even with only 'higher pressure' one can get a build up of pressure on the high pressure side (semi stagnate air) if there is not enough air flow to the low pressure side.
Dude, that is waaaaay too professional looking! LOL! Mine would have a lot more false marks, cuts, wrinkles, and gaps in it than that.
Very, very nicely done.
You know, I spoke with both Robert Baslee and the guy up in Minnesota or something like that that built the Pup and their ideas sounded like exactly what you are doing, give or take some jots and tittles of personal design.
Purely out of curiosity, would some sort of scoop improve things right around the cooling fins. Not so much anymore, but some planes I flew were scoop city!
The other think I was just thinking about, and maybe this would only work in high altitude jobs, but has anyone ever used a fuel/oil heat exchanger on one of these? Like I said, the fuel might not be cold enough for it to work.
Anyway, your solution looks spectacular and, since it's easy enough to modify, doesn't mean that you'll be taking half the plane apart if it doesn't work.
I tend to fly rather low and slow, which a real life fighter pilot described as "loitering over the entirety of the route," which he did with a smile, having traded in F-104's and F-106's for a Champ.
On scoops: one of my early design ideas was exactly that, scoops that covered the tops of the cylinders and then went forward to the edge of the cowl. But it's just too complicated.
Dart, I remember the first time I saw the thread where OG asked how your progress was, and you posted a picture of partial frame under a tarp in your backyard. I thought to myself "Hmmmm. Whatever dude."
But I'll be damned. Shame on me.
That video was fun to watch, not to mention the insane sense of pride you must feel taxiing that thing around. This thread is by far the most worth while one to check on SHQ. I check almost daily.
Looking good Dart..... You must of felt an immense feeling of satisfaction; taxiing the fruit of your labours on a nice sunny day. What could be better....except the first flight of course I expected a little triumphant ejaculation at the end of it (A 'woohoo!', not the other kind!)
Be interesting to see your tally of total hours spent constructing when you finish the build.
Cool. That "documentary" made the craft look larger and the roar of the engine has a deep growl which also makes it seem bigger. I was expecting a high revving, screamer. very cool.
We were discussing "fast taxi" at the last EAA meeting and had a few chuckles.
Fast taxi is where one takes the aircraft up to almost flying and then slows it back down.
The advantages are that one can get a feel for stability of the aircraft, control response, and any other issues that can effect flight.
The disadvantage is that fast taxi can affect flight - if things get a bit squirrelly, the proper thing to do is increase power and take off. My one experience with a fast taxi attempt was in fact flight.
The chuckles came from my comments that I'll do a fast taxi attempt if the DAR hunt takes too long once she's done and then self report the flight and landing to the NASA site.
This is too cool! At the end you wrote, "Still a lot left" - and I suppose that means, things that need to be done before the official check and first flight. What items still need to be done?
I'm just praying that this doesn't end up as a story in the "ever done anything real stupid" thread in Community Hall.
If he had thrown this project together in six months or less I would be more worried about it but he seems to have done his homework on it and has shown quite a bit of moxie by asking for help when he ran into problems.
I have been impressed with Dart's ability to address any criticism and/or questioning of his work on this project. If it does end up in an "ever done anything real stupid" thread, it will be because some stupid little thing fell into the gap of "humans are not perfect". If it were a two seater, I would not be afraid to go along for the first flight.
I'm very, very confident the plane will fly safely. I cannot say for sure it will fly well. Is the trim good, or will I be compensating with the elevator the whole time? Dunno. Is the rigging spot on, or will she want to roll one way or another? Dunno.
That's flight testing!
My version of dumb stuff means that after a successful flight I'll taxi up to the hangar, shut the engine down, undo the restraints, stand up on the seat, miss the hole in the side of the fuselage with my foot, fall back from the aircraft and break my arm on the pavement.
I'm at the "come out and look it over" stage, where I'm having a lot of different people from different disciplines criticize her. Some times I wind up educating them on the particulars of tube-and-gusset, but mostly it's folks pointing out little things that can be improved and confirmation of things I've done right.
My operating mindset has been that I'll take any criticism at face value and then use it to improve the aircraft - right up to the first flight.
After that, though, saying something bad about her will be fighting words.
I'm am very confident of his build. I was just saying that it is very easy to have a "oops, can't believe I did that" moment around aircraft. Crickee, I got distracted during my preflight and tried to taxi with the right gear chock still in place. The brain can only handle so much load before it either fails to register something or distorts something and flying has a lot of load on the brain. And since it is so easy to kill yourself or damage the aircraft, your brain never gets breaks. Overloaded constantly. Lots can go wrong.
So I wasn't doubting his build; just recognizing the possibilities. His mind will be on a lot of things and trying to come to grips with a new aircraft and he will have many distractions thinking about all the things that not only he is doing, but evaluating all the small unknowns of his build. His brain will be very busy and that's when simple things can go awry.
So it's time to do the weight and balance, so I call Robert Baslee to find out what the CG range is supposed to be.
He tells me to grab a pencil and gives me a laundry list of things to measure besides the firewall to the axel, gas tank, seat, and tailwheel. Wing cords, offsets, wing span, etc., and I'm off to the airport to do all of it, plumb bob and tape in hand.
"Email it to me and I'll do your W&B. It's kind of involved."
A bunch of marks on the floor later, I weigh the aircraft, move it, and measure those marks.
I figure Robert was just taking pity on the guy that calls a panel a dash, instruments dials, and spars "the fat wing tubes." Then I dug into W&B calculations for biplanes. Yikes!
OMG, the math is eye-bleeding. Robert Baslee, the designer, told me to just send him my numbers and he'd work it up as "it's complicated." I dove into it anyway and am waiting for his answer to see if I'm even in the ballpark. But everything so far shows that while my plane is a little heavy, it's balanced okay.
The passenger warning is hilarious. It's even more so in my plane. Yes, gentle reader, I am required by regulation to have a passenger warning in my aircraft which can carry no passengers.
Yes, gentle reader, I am required by regulation to have a passenger warning in my aircraft which can carry no passengers.
I think they call it wing walking or maybe the kids these days call it wing surfing :P . I'm shocked a warning decal is not applied to the hood of every car. They have them on the cargo racks of ATVs. You can't regulate stupid, but the government still tries.
Here's the sexy "do I look fat in flying position" photo when I did the W&B stuff. Lots of tape on the floor!
Yes, my hangar is a mess - but my building process thrives on chaos.
The last big thing I had to do was figure out how to mount the pitot tube. I finally figured out that using some 1/4" aluminum tubing and fabricating some flanges at each end for mounting was the way I was going to go. It's the least ugly technique I came up with!
Time for going over the aircraft again and again looking for things, doing the paperwork, and lining up an inspector.
The math is eye bleeding - which is why we have people with degrees in physics and aerodynamics.
The funny thing is that one can't go back to the original design stuff for early WWI aircraft to find out what their CG limits are, as they simply didn't do it mathematically. They used a lot of experience and trial and error.
And there were a lot of errors. Because CG limits weren't taught to maintenance personnel or to pilots it's thought that a number of unrecoverable spin crashes were due to CG limits being crossed.
For scouts it wasn't that huge a deal the majority of the time because they only carried the pilot, fuel, and the ammo in the trays....and with a flight duration of only a couple hours nobody was piling stuff on to them. The large bombers were definitely nose heavy, but that made them more stable rather than less. If they handled like pigs so much the better.
Btw, the whole exercise I'm going through in CG constraints might seem odd for anyone with a certified aircraft, but that's because a factory plane already has it's CG range figured out. What I'm doing is finding out where the CG should be based on design and then finding out if where it is based on weight falls within it.
Robert Baslee, the designer, is swamped up with stuff and will get the definitive answer to me after the holidays, but the folks that have taken a stab at the problem all agree that I'm well within range for safe flight.
This was kind of a concern for me as I've added weight to the plane as I went along. The wood floor, the use of latex paint, engine with starter, some overbuilding here and there...it all adds up. My curb weight is still within the okay range, but on the upper end; my useful load is around 300 pounds (including fuel).
I've always wanted to build one of my own, but my "meat" is about your max weight so I'd need a turbo charged 2275 to get my fat butt off of the ground !! I can't wait to see it fly, looking great and gives those that are contemplating building one an idea about what's involved and what to look out for .
You just need to follow (then) big ol' Butch Whitlock's lead and build a full scale Fokker DVII:
The definitive answer to the Weight and Balance is back and as I suspected, I'm actually nose heavy. Going to have to find out how to add ten pounds to the tail without doing major surgery.
The definitive answer to the Weight and Balance is back and as I suspected, I'm actually nose heavy. Going to have to find out how to add ten pounds to the tail without doing major surgery.
Securing some lead weights against the frame (on the inside of course) not an option? Right in front of the vertical tail - or will it interfere with the control cables then?
I'm going to see how much fabric I'll have to cut back to do that. Repairing fabric is simple enough, but I don't like to do it!
I may be able to mount the weights on the outside in a inconspicuous way on the fuselage under the horizontal stab. Going out tomorrow to see if I can pull it off.
What do you have for a tail wheel? Can you get a heavier weight hub? Heavier Springs? I don't think you have a tail dragging stick, I don't remember seeing pics of the tail wheel. And farther back the weight the better also correct? But damn 10 lbs. What got over built up front that you could shave some weight off?
What do you have for a tail wheel? Can you get a heavier weight hub? Heavier Springs? I don't think you have a tail dragging stick, I don't remember seeing pics of the tail wheel. And farther back the weight the better also correct? But damn 10 lbs. What got over built up front that you could shave some weight off?
Maybe time for 2gal. auxiliary fuel tank in back.
I'll post some pics tomorrow, but some quick answers:
1) My tailwheel is a dinky thing with bungee cords for shocks.
2) Actually, nose heavy is better than tail heavy. Tail heavy aircraft are prone to spinning, and if bad enough, unrecoverable ones. So in my case it was the best of bad news to need to add weight to the tail. Because of leverage, less weight makes a big difference in CG calculations.
3) Ten pounds is quite a bit, but not as much as some have had to add. Why was I nose heavy?
A) Aircraft design. Because engine choices are open, Robert has to work up the design based on a lighter Rotax (two stroke) engine.
B) Engine choice. I went with a VW engine (85hp 1915cc) with a starter and electronic ignition and a Diehl generato for a long list of reasons, which is just about as heavy as one would hang on a 7/8ths scale airplane.
C) I went with a beefier battery because it's electronic ignition; even though the Diehl case is putting out 15 amps at 2500 RPM's and 20 at 3500, no spark = whisper mode. I wanted a battery that wouldn't be crapped out if I had to turn the engine over three times to get it to start.
D) I put in a wooden floor, as opposed to either just covering it or putting in aluminum sheet. It's lightweight 1/8" stuff, but it's still heavier than either. But it looks great.
E) I used heavier wires for rigging. I'd like to say that there is some great reason for it, but honestly I had so much trouble getting the rigging right that I went through tons of the stuff, and the heavier wire is actually less expensive.
F) Other stuff that seems incidental but ounces really do matter, like a windscreen, an overbuilt chair, harness attachments, plywood panel, full instruments, etc.
I really like my solution to adding weight - it's adjustable (after a fashion) and will probably cause a chuckle or two in building circles.
There are different good and bad points about the CG being either forward or aft.
At the aft CG limit will almost always be the better of the two choices. First, aft CG doesn�t make the airplane unstable in pitch, design won�t let that happen because it�s unsafe. Furthermore, CG within the pitch range has a negligable effect on roll or yaw stability.
The key to realize is that while an aft CG is less stable than a forward CG it is also more controllable. In fact, forward CG is set by the minimum allowable control in ground effect. In other words, when you land is when you�re most succeptible to run out of control in a forward CG condition. Get a strong down gust feet off the runway, you�ll be in a better position to handle it with an aft CG than a forward one.
Long story short, aft CG gives better cruise speeds and better controllability to the pilot. So for all normal conditions it would prove more useful. The only time forward CG may prove better is during stalls and spins. Though, keep in mind, when you fly aerobatics you load to the aft limit specifically to have more control. Aft limit, by design, still has a safety margin above unstable built in.
My C-177 has a forward CG as manufactured. It is caused because of the more powerful and heavy engine modification to the original design. I try to make my CG pretty balanced unless I will be flying a long distance. Then I will adjust for a slight aft bias. Like you, I have bags of lead shot in bags that I use if I don't have baggage to place. But mine are easy removable from my baggage compartment. Since I have a slight forward CG I can load passengers and baggage without worrying about getting out of CG aft. I will reach maximum weight before it will put me out of range to the rear.
It is very interesting watching your build and solutions. I haven't got your talent. But it has given me a greater appreciation for aircraft design and construction. I actually participated in my last Annual to learn more about my airplane.
Everything is from scratch - POH, operating limits, checklists, etc.
That said, I'm borrowing liberally from others whom have been more than happy to provide their own for use.
The pre-flight checklist is pretty straight forward:
1) Exterior stand off: Just look at the plane from about 20 feet back. Does it look right? 2) Remove cowl. 3) Check prop. 4) Check oil and baffling. 5) Check left wheel and brake. 6) Work around the aircraft, checking the wings, wires, ailerons, fuselage, tail until back at the engine. 7) Check fuel - both for quantity and then for water. 8) Put cowl back on. 9) Check throttle for free play. 10) Turn on master switch and check for voltage and fuel pump operation. 11) Put on harness, set altimeter, do radio check.
No check on full and free movement of the controls?
Standard airspeed indicator. Checking the pitot is just part of inspecting the interplane struts.
Static ports are behind the instrument panel tied together into a filter.
To be honest, I'm not real excited about either altimeter or airspeed indicator; naturally I'll do the checks to see where it's at versus reality, but it's more about feel and sight lines for me when landing. In a conventional geared aircraft with a lot of drag the worst thing to do is look at a panel.
On the first set of flights, I'll come in with a little power and just let it settle on the runway. The GoPro can look at the panel for me.
While that sounds a bit cavalier, one must remember that what I've built is really an obese ultralight, and is flown in pretty much the same way - no super long cross countries, morning and late afternoon, and always in extreme CAVU weather.
A little back story on that - one of the things I really wrestled with is how to mount the darned thing. I knew it was going to go on the interplane strut on the left side, but how to attach it? The thought of a bunch of ties (yuck) or a series of straps, but it would look like crap and involve more holes in the strut than I wanted.
So I was playing about with some quarter inch aluminum tubing in my scrap bin and tested to see if the nylon tubing for the pitot tube fit through, and it did. So I annealed a piece on both ends, cut it two ways on the end, flattened it, notched it for the actual pitot tube that I had bent to match the angle of the strut, and Presto! something that's robust, subtle, and doesn't look like ass.
Btw, a shot of the panel before I added a voltmeter, a master switch, a start button, and a different tach:
Quite the avionics suite, huh?
Radio is hand held and not on the panel.
The W&B story is one full of stupid.
All that cutting and box making was not only unnecessary, but would have put my CG well aft of where it should have been. The problem was relying on math and false assumptions rather than empirical data. The wing center actually starts well forward of the firewall (I had done the math with it flush), and the plumb bob put the upper wing offset at 2.25" back from the firewall (my datum point) rather than eight and a quarter. So my CG was fine from the start.
Oh well, I caught the error before flight and patching fabric isn't hard.
For my POH, a handy CG chart:
The odd thing that might stick out is how much five pounds in pilot weight matter between 180 and 185. This is because the gas tank and the pilot dance around the CG; that's the tipping point where the pilot wins and offsets the weight of the fuel. I may make the one gallon cell on the 180 line yellow, as it's close.
But at the FAA approved 170 pounds (with clothes on), I'm okay to run out of fuel. Sure the engine will go into whisper mode, but hey, the CG will still be okay for my unscheduled landing!
Everything is from scratch - POH, operating limits, checklists, etc.
That said, I'm borrowing liberally from others whom have been more than happy to provide their own for use.
The pre-flight checklist is pretty straight forward:
1) Exterior stand off: Just look at the plane from about 20 feet back. Does it look right? 2) Remove cowl. 3) Check prop. 4) Check oil and baffling. 5) Check left wheel and brake. 6) Work around the aircraft, checking the wings, wires, ailerons, fuselage, tail until back at the engine. 7) Check fuel - both for quantity and then for water. 8) Put cowl back on. 9) Check throttle for free play. 10) Turn on master switch and check for voltage and fuel pump operation. 11) Put on harness, set altimeter, do radio check.
First glance I read that as "Check Throttle and Pray"
Like everything, it's not done until the paperwork is done.
First, the FAA processed my registration outside of the published 30-180 day* window, getting it back to me in less than five business days. So in the eyes of the gub'ment, she's an airplane!
Second, I had to take the build thread over at the EAA site and turn it into a builder's log. 250 pages of pedantic mumblings and poor photography!
Third comes the Pilot Operating Handbook, which I'm developing based on a couple examples some very nice people sent me.
And last comes the actual inspection. I found a Designated Airworthiness Representative (DAR) over in Atlanta that is familiar with tube-and-gusset aircraft in general and Airdrome Aeroplanes specifically. This is naturally good and bad. But at least I won't have to explain why the only thing welded on the aircraft is the engine mount and the brake drums to the wheels.
This actually makes me kind of sad. The DAR we had here in Birmingham knew all about my airplane and had seen various parts after I built them. Unfortunately he had a big stroke last year and while recovering, it's slow and he's not able to work.
* Gee, guys, 30-180 days as a published window? That's a helluvalot of leeway! Might as well just say "when we get to it."
Five USD every five years to the FAA to renew the registration. So much lower than a car!
The taxes should be about fifty USD a year, if that.
I won't be able to obtain insurance until it has 100 hours, and then only liability. But at around 15K it's not worth insuring the aircraft itself...especially since it will only be worth 9K USD once it's airworthy.
I won't be able to obtain insurance until it has 100 hours, and then only liability.
That's interesting. So if you take out someone's roof in the 99th hour (at no great damage to you personally, we wouldn't have that happen ) then you'll paying all that yourself...?
100 hours is to proof to the insurance that the thing is airworthy and reliable?
100 hours on an experimental is pretty much the bottom threshold for the insurance companies. At least in the air. They'll insure the aircraft on the ground, though.
After that I could get full coverage, but I won't. It's just not fiscally viable, as I'd be paying more than the plane is worth in pretty short order.
That said, not all experimentals are equal. Some more established kits have a lower threshold.
Mine is actually Number Two of type from Airdrome Airplanes. There are a lot of Graham Lee N11's out there with a shockingly good safety record (only one fatality, and that on flight #1), but that doesn't apply.
[edit]
Remember that the first 40 hours are the test flight phase, and no insurance company is going to cover that (or if they did, will ask for a high premium), and that 40 hours is a minimum guideline. It just means that after 40 hours the aircraft is unleashed from its 25 nm boundary around the home airfield. It's up to the builder to decide when to take it out of test phase once past 40.
Not that I've heard of anyone not taking it out of test. I know a lot of guys that put it back into test phase due to changing something major, but not extending it.
Pilot Operating Handbook. Sorry for not explaining the acronym.
There's no set standard beyond the obvious stuff of basic stats (Weight and Balance, Gross weight, type of fuel, engine, and V-speeds*), and I've got a couple examples to work from. Some are clearly written by engineers and others by aspiring novelists. I'm hoping to find a happy medium.
* Obviously I don't know the V-speeds beyond the Velocity to Not Exceed (Vne)...best climb over time, distance, over a 50 foot obstacle, etc., are all things I'll have to find out once she's in the air.
Saturday is "come find stuff wrong with my airplane" day, with my EAA chapter brothers sharpening their knives and grinning at the prospect.
Should be interesting - most of them have been through the inspection process and have long experience with homebuilts, and know that a tough rehearsal is the surest way to get a good show when the time comes.
I take it the POH is a necessary step prior to the DAR inspection?
She looks like a tight little ship and you've given a fair bit of thought to all your decisions so I suspect that your chapter buddies aren't going to find more than a few niggles and I-might-have-done-it-this-ways.
Six guys, three going by the inspection checklist the DAR's use and the other three just poking around and I came up with seven items, all of them pretty minor or easy fixes.
Mark the instruments better, lock washers on the oil cooler mount, clevis pins instead of bolts for the tail wheel cable mounts, fabricate a clamp for the throttle cable on the firewall side for redundancy, and some other super minor things. I worked off most of the gigs on the spot - I'll pick up some clevis pins later this week from one of our guys that has some extra.
Oh, and the oil vent hose isn't an oil hose, so it's weeping. Easy fix, though I left my extra oil hose at the house (of course) so I couldn't change it out right there.
One of the neat things was all the "NA" stuff we crossed out. No Emergency Locator Transmitter, no transponder, no lights, no mags, carb heat is automatic so no lever for it or heat box, etc. Plus a long discussion about the heresy of not having a run-up before takeoff in my plane.
Since it's single ignition, turning off the master switch gives one a helluva RPM drop - right to zero. I can't check carb heat, so no lever to pull to check for an RPM drop. If it's in the green on taxi, just go.
Another type of tax you may encounter as an aircraft owner is a personal property tax. The following states have personal property taxes that may apply to your aircraft:
Alabama, Arkansas, California, Georgia, Kansas, Kentucky, Louisiana, Minnesota, Missouri, Nebraska, Nevada, North Carolina, Oregon, South Carolina, Tennessee, Texas, Utah, Virginia, West Virginia, Wyoming.
Please note that in several of these states, personal property taxes are applied at the local level.
Generally speaking, personal property taxes are assessed on all property of (1) a specified type; (2) located within a certain place; and (3) at a specified time. A brief discussion of these features of personal property taxes, as they relate to your aircraft, follows below.
Property of a specified type. There is little doubt that your aircraft is a tempting target for any state or local tax collector. First, it is easy to trace the existence of your aircraft through FAA or local registration documentation. Second, your aircraft usually represents a relatively high dollar assessment as far as personal property taxes go. Although your aircraft may be an easy target for personal property taxes, you should be aware that many jurisdictions only assess you if your aircraft is used for commercial or business purposes. Therefore, if your aircraft use is purely personal, you should check to see if you are exempt from the tax before you pay.
Located within a certain place. It is well settled that with respect to aircraft and other tangible personal property, the actual site of your aircraft, rather than your residence, determines the place of taxation. Therefore, if you live in a jurisdiction with no personal property tax, you may still have to pay tax on your aircraft if you base it within a taxing jurisdiction. The legal rationale for this rule is based on the theory that your aircraft is enjoying the protection of the state or local jurisdiction where it is kept. Therefore, when you're planning on a place to base your aircraft, you may want to consider whether that place has a personal property tax. You can't simply go by the law where you happen to have a residence at a specified time.
This is an interesting feature of personal property taxes. The tax is often based on property found within the taxing jurisdiction at a certain date. Some aircraft owners have interpreted this to mean that as long as their aircraft is out of the state on the specified "tax date," they are not subject to tax. It's not that easy. The law generally states that as long as your aircraft has a more or less permanent location within the taxing jurisdiction, you can be subject to personal property taxes. Of course, this also means that if you are merely passing through or have your aircraft at a site for repairs on the tax date, you should not be subject to personal property taxes.
You should keep in mind that many states have personal property tax laws that permit local jurisdictions (counties or cities) to levy personal property taxes. Your local jurisdiction may or may not levy personal property taxes.
Another important point to remember is that the personal property tax is based on the value of your aircraft. Most states apply the tax on the fair market value of the aircraft. Therefore, you should ensure that the assessed value of your aircraft for tax purposes coincides with published guidance.
Some states also have registration fees that they impose on aircraft. Sometimes the fees are in addition to personal property taxes (see Oregon, Utah, and Virginia) and sometimes they are substitutes for personal property taxes. The states imposing registration fees are listed below:
Arizona Connecticut Hawaii Idaho Illinois Indiana Iowa Maine Massachusetts Michigan Minnesota Mississippi Montana New Hampshire New Mexico North Dakota Ohio Oklahoma Oregon Pennsylvania Rhode Island South Dakota Utah Virginia Washington Wisconsin
Registration fees are often imposed as a flat rate. However, sometimes the fee is dependent on the weight and/or seating capacity of the aircraft. You should check with your state or local revenue office to determine the method applied.
It's going to be interesting to hear what they want since it was never sold.
Reading other articles on it and the "double taxation" people incurred since they paid sales tax on the parts and kit as they were bought the state still assessed a value to it and unless the person had detailed receipt records the states valuation was used to come up with a sale price. In one instance the individual saved himself two thirds the value of the plane since the state had way over valued its cost to build. From what I read it almost seemed like they spun the "Wheel of Tax" to come up with their values.
The Alabama Tax Man says to send them just the Bill of Sale for the kit. Not the kit and engine or some valuation or something, just the kit. I specifically asked which bills of sale they wanted and that's what they said. In an email. They might come back and try to hit me for more, but at a minimum they can't say I was trying to avoid anything.
But I can't pay the tax until it's an aircraft; and right now it's a ground vehicle.
The cool thing is the local FAA man has all my paperwork and is reviewing it. Then he's going to schedule a time to come out and do the inspection. Even more cool is that since it's the gub'ment that's doing it there's no additional fees, as they already been paid by our taxes.
And my EAA chapter is just the best. It's no accident that they volunteered me to give a presentation on the Test Flight Pamphlet for our next meeting. That is probably the most non-subtle way of them showing me the love.
One of the things the pamphlet says is to drain and check the oil before and after the first flight. I was thinking of doing that anyway (at least before the first flight), but there is was in black and white - not just a good idea but a best practice.
As always, there's a kind of story to go with changing the oil. Since I don't know what wrong looks like, one of my EAA brothers with a lot of VW experience came by to lend a hand. My five gallon oil drain catcher needed some surgery to shorten the pipe going up to the catch pan so it'd fit under the airplane.
Huh. So I whip out my Harbor Freight dremel tool, put a cutting wheel on it, hack some off, run the edge on the sander, and call it done. He just gave me a look and said "I'd of used a tape measure."
"They only complicate things," I replied in my best deadpan.
But I did measure the oil cooler under the engine when he wasn't looking, grabbed a bit of scrap sheet, ran some lines down it in a sharpie, and whipped out the butane torch.
"Whatcha doing?"
"Annealing. I don't want to have any fuss out of this sheeting." When the mark disappeared, I just quick-quenched it with water, put the edge on the side of the table, and whacked out some bends with a rubber mallet on both sides and then the end.
I put a line of rare earth magnet buttons along the lower edge and put it on top of the oil cooler, a clean shop rag into the catch basin of the oil can thingie and then put both to the side, and grinned.
"We should warm the engine."
"Yep, that's the best way."
So I taxied around the hangars twice, because what's the fun of just having it sit there idling?
Put all of it back, pull the plug, and two little tiny slivers of metal, each maybe a third the with of a hair and less than 1/4 inch long stuck to the magnet, and we didn't find anything else on the rag. So nothing that would cause concern out of a new engine.
Like most of what I do that appears spontaneous and whacky, I had actually put a lot of thought into it. I had the Harbor Freight guy untether the 5 gallon oil catcher from the top shelf and knew it was going to be too tall by about that much and had mentally cut it right then.
The pan to cover the oil cooler and let the oil flow into it was built about a zillion times in my head before I went out to the airport, along with using the button magnets to catch any ferrous material and a shop rag to catch anything else.
I also did a fuel flow test. To find out how much fuel my little pump is providing to the engine, I unhooked the line from the carb, ran it into a gallon jug, and turned on the master. Two minutes to fill the jug, so it's 30 gallons an hour. More than enough for an engine burning between three and four.
My EAA chapter is just the best. In an effort to show the most amount of care with the least amount of subtlety, they put me on this month's program covering the FAA's Test Flight Program pamphlet.
Last weekend I had a big "roll up, roll up, come see the freak" party at the hangar. A good number of my EAA brothers and some of their guests came out to go over her with Condition Inspection checklists, little mirrors, wry remarks, and general observations. Thankfully they found a short list of things to fix - good that none of the things they found were big things, better that they found things at all. My biggest fear is that they'd say "nope, everything looks great."
Naturally I advised them that now was the time to be brutally honest about craftsmanship, technique, or deficiencies. Once I get the ticket and she's in the air comments in the negative may well be fighting words.
As to "nose art," I'm holding off on that until she's been in the air. Is she a short haired brunette Babette with flashing eyes and a quirky grin, or a brutish Bruno that needs a thick stick to the head to keep in line?
A Bruno would get no artwork, at least not until he's brought to heel.
A Babette would probably get the Scarfed Fox from the Martin AAR's:
The wife preempted my first inclination before I said a thing about it. The Kitty-In-The-Ring is not an option, as SWMBO said she'd disown me if it wound up bigger than life on the aircraft.
Click to reveal..
But I think I'll put a small version of it somewhere on the aircraft.
Zero real gigs on the inspection. He wants me to put some slip paint on the nuts on the engine case bolts, which is really minor (and something I had no control over, as I didn't assemble the engine), and I'm more than happy to oblige.
Still, I got the pink slip and certified as the official repairman for the aircraft in one swoop.
Of course it's windy season here, so I'll have to be patient before I can put her to flight.
While I'm normal-stitious (as opposed to superstitious), there were a lot of good omens flying around today.
As I walked out of the house to drive the wife to the chiropractor I was greeted by my pair of barn swallows. First day of their arrival, and prove that the SWMBO rule isn't iron clad. She hates them but I really like them, even if their annual nest is in the overhang outside the front door.
When I was filling up the truck while the wife was being contorted by the strange man I look down to see three quarters laying on the ground under my feet.
Take her back to the house and up to the hangar. My mom calls just to say hello (we only talk to each other every few weeks) just to say she was thinking of me and wanted to know what's going on.
The FAA man was early and looked eager to give the plane a look. When the inspector says "hey, that's neat" at first sight it's a good thing.
Get home and the wife has a hug and kiss, and a present. The last season of Game of Thrones Blu-Ray set arrived in the mail.
3 1/2 hour flight for me. I'm planning on coming up to see you when we have adequate weather. Monday/Tuesday looks good for both of us. Route is projected to be clear. Wind projections not available yet.
LOL, I dropped the A instead of the K....it's been a long day.
Monday is projected for 9mph, Tuesday is 10....but who knows what part of the day they're talking about....and yeah, weather.com is actually pretty spot on.
If you're coming this way lemme know so I can be sure I'm up there when you arrive. Oh, and call to confirm the price of fuel. The web says they're down into sanity levels, but last month it was 5.50 a gallon - they were selling it for what they bought it for when gas was high. The airport is ran by NASCAR, not the County, so there is some weirdness to the field. The crew is good, but there aren't a lot of local decisions.
The wife preempted my first inclination before I said a thing about it. The Kitty-In-The-Ring is not an option, as SWMBO said she'd disown me if it wound up bigger than life on the aircraft.
Ok, I'll be the one to bring it up... how about a pic of your wife on it?
Congrats Dart! I have the Lafayette Escadrille color plate book if you need any pics or type face references. The Americans seemed to favor just their last initial on their planes though there were dice and feet and personal logos as I'm sure you've researched by now. But that's not stopping you from putting whatever you want on it.
Looking at a lot of WWI aircraft it seems that elaborate designs (with the exception of the indian head on the Lafayette Escadrille) weren't the norm. Nor was it very "sexy"
There really isn't a nose to put art on - so whatever it will be has to be on the fuselage itself.
And my aircraft is painted in a scheme that doesn't imply the Lafayette Escadrille (LE). It's more in line with the pure French ones flying over Verdun, including the field mod of the clay at the front. That's okay with me, since most Americans flying for the French were NOT in the Lafayette Escadrille; that was as much a flying club of high breeding as it was a fighting unit - not to disparage their service, but after the war there were a lot of bad feelings between the Lafayette Flyers (who weren't in the LE, but referred to that way during the war) and the LE veterans.
The test of patience is on. While there are some post-inspection things I want to do to the aircraft (like patching the holes in the wings I had to make to assemble the wings and attach the wires), this time of year is just miserable for flying. Winds and gusting winds are the norm - we had better flying weather in February than now.
It's a bitter thing, but it might be two or three weeks before first flight.
Another factor is that the nearby range won't be open. I am going to bring a few things and Dart has a couple. Figured we would do some range time as well as flight time.
Ug, I was out at the airport putting the slip markings on the nuts the FAA man told me to, installing a Hobbs meter, and making patches for the install holes I made in the wings for the bolts, clevisi, nuts, cotter pins, etc. and vacillating between a little happy dance and fits of swearing.
Little happy dances because I play salsa music while building and who can't dance while salsa is playing? and fits of cursing every time the wind made the hangar doors bang loudly. 10kts gusting to 15 all friggin' day long. Too windy to even taxi down to a grassy area and take a few hero photographs of my Bebe.
Going to be a long couple of weeks, but I'm sure it'll be worth it.
Looking at Ye Olde Logbook after someone asked me how many hours I had, I noticed that I'm a month overdue for my biannual Flight Review. So being faced with pretty good Fast Taxi weather or becoming legally compliant with FAA regulations, I opted for the latter.
Ug. The dreaded Cessna 172. My first two hours were in one, and I didn't like it then and haven't much changed my opinion. The instructor was great - turns out he's the full Varsity Team SF guy (multiple Vietnam tours, HALO instructor, , etc.) and as such real nuts-and-bolts evaluation style.
Since most of my time is in Champs, he reminded me several times prior to flight and on the first landing that the third wheel is in the front of a C172. He said I had great rudder control on turns and was an ace at slow flight and stalls. But I love slow flight. Man, he asked me to do all sorts of turns and junk in slow flight - and admitted on the ground he just wanted to see how much I could dance around the air without stalling her. But a 172 doesn't stall so much as sort of mush the nose down; it's the friendly Buick of the Skies, after all.
He let me forego the use of flaps, as I've never really used them and winked at my minimal trim use. Landings were okay; I'm not used to such a big plane going that fast so they were functional. Plus the wind was gusting 5kts "variable," which always makes things interesting. I did a 90 degree crosswind, upwind and downwind landing all in one go. But I did make a big fat slip on final owing to being a bit too high. Slips are just good for the soul.
We get done and I painted my new patches on the aircraft and buttoned up all the inspection panels. It's all dry and I look around. 1700 hours. Winds are Zero gusting to One. The airport is deserted. My plane is legal. I am legal. The weather is perfect. The airport is deserted.
But since I had no ground crew (the FBO closed early, so those guys weren't even there) for safety I gave my airplane a little hug, promised it would be soon, closed the hangar door and drove home.
Good call. Of such temptations are stupid mistakes made
So the day was perfect and so I donned my flying cap, cinched up the straps, hollered Clear Prop and went on my way.
The plan, as I agreed to, was to slowly increase the throttle down the runway, bringing her up to flying speed gently. That way I'd know for sure she'd fly true before taking her into the air.
I'm not a big Fast Taxi fan. My only other experience with it lead to a great tale involving grass, a broken landing light, and a very nice first landing in a tailwheel - one of my best three pointers, to be honest.
Anyhow, I got on the runway and advanced the throttle. Wowsers, she's got loads of power right away. I was between a quarter and a half of throttle and she was starting to get light.
So I pushed it forward before things got squirrelly, got the tail up, popped up into ground effect, built up speed, and took off cleanly.
Hahahaha - no I didn't.
She started to drift a bit left off the center line and with the tailwheel down on the pavement I gave her just a smidge too much right rudder to put me back on proper track. Now that whole directional control thing is getting iffy, so I chop the throttle.
A perfect - and I mean perfect - three hundred sixty degree ground loop!
I was so good that the lower wings barely kissed the pavement, and only that because the left wheel became a taco at the side stress.
I took a look at the wheel and decided she'd be good enough to get me off the runway under the plane's power, and once there shut it all down. A moving dolly under the bent wheel and we pushed her back into the hangar.
The supra crappy tailwheel Robert issues out got a flat spot on it, too, but I didn't expect it to last past today regardless.
So no flight today. The upsides:
1) I know she'll track true up to flight speeds, so forget any more fast taxi nonsense. Next time it's advance the throttle and go.
2) No real damage. The hub on the wheel is fine, so I'll take it to our local bike shop and have them replace the rim and spokes. That's super good, as my brake drum is welded to the hub. We had to look hard to find any scrub marks on the lower wings.
3) I get to exercise my rights as an official FAA aircraft repairman!
4) I've had my ground loop. They say there are two types of tail dragger pilots - those who've ground looped and those who will. I may just make myself a decoration for it.
5) Absolute sheer joy with the aircraft. She's a honey, I can feel it. I have to admit to chuckling as I got out of the plane rather than cursing up a storm or being downhearted. Hell, even the KC Dawn Patrol guys have taco'd and shattered main wheels (including Tom's famous Oshkosh incident).
I can imagine the stomache in the throat feeling when that thing was spinning. I know how I get tense when I get caught by a gust and get just a few degrees off longitudinal alignment.
Well, little harm done.
What is Tuesday/Wednesday looking like for you next week. They are predicting a break in this Spring rain we've been getting.
Yikes. Well, at least you've got that experience and at little cost.
I'm a bit surprised to read of the power you were getting at lower throttle. Do you recall whether that kind of power generated much in the way of torque/roll tendency?
I dunno the torque - I'll look it up, but they said about 85hp at 3K rpm. But I can rock the aircraft on its bungees by goosing the throttle.
Part of it is that I have a prop cut more for climb than cruise, as it's a big honking drag magnet. When Valley Engineering said they were going to put together an engine and prop combo with some bite to it they obviously weren't kidding around.
Plus the prop is going to be really efficient. I backed the cowl off of it for the top third of its arc and there's absolutely nothing in the way of the bottom two thirds except the bottom of the engine and the gear.
Really it's pilot error. I was already adjusting for the torque with some right rudder (but not quite enough to stop a little drift) and I suspect I was light on the tail wheel. When I cut power the tail dropped and grabbed...with it turned to the right. By the time I let go of that it was too late - she was 'round and 'round.
I'd like to say my stomach lurched but it was so quick that I was sort of stunned by it. Whoops, drifting - stopped.
I'm going to drop the wheel off to the shop in about an hour and find out what the prognosis is. I may just order an extra pair to have on hand!
The strange thing is that in thinking about it I almost ran into the same situation in the Champ early on, but that was from a tire going almost flat while I was in flight (picked up a nail on takeoff or taxi). That time, though, I just powered through it rather than trying to back off.
The video is just crap. The GoPro had shifted on my head to show not much of anything. There's a glimpse of the ASI just before showing just over 40. That's the cusp of takeoff. It could very well be that I wasn't just light on the gear but skimming them.
It also means that on takeoff the elevator is neutral, not up to hold the tail down. I think my fears of the rudder not grabbing air are a bit overstated.
Glad to hear that no real damage done Dart, perhaps an over-strained (due to tightening) sphincter perhaps.... Bebe historically was notorious for groundlooping I believe.
New wheel(s) on back order, they should be available for shipping in
Hahaaha.
The wheels are super duper made-for-the-hell-of-it "purposes" by a company in New York State - they freely admit they made no product or know of any particular product they'd be used for. But apparently loads of people have taken them up on their challenge to find a use for them, as they're out of stock presently. The local bicycle shop took one look at the wheel and said it was out of their league (they don't even have a spoke wrench big enough), but gave me mad respect for bending it up like that. They suggested a local motorcycle shop manned by smiling salesmen in the front and the mentally handicapped behind the parts and service counter. These are the same people that could not find a four point restraint system in their catalogs while sitting under a sign that says "we specialize in off road adventure" and had a picture of one of those "quad runner" dune buggies. If it's not a part for one of the products they sell forget it.
So much for "buy local," and with great pleasure I called Worksman Wheels where a very helpful man who knew their inventory well enough to appreciate that I had a part number or two placed the order for a whole new wheel assembly as well as just a rim and spoke wrench. The hub to the wheel looks good and the spokes either pushed through or pulled out of the old rim as it twisted. There are four that need straightening. My hope is to use the old hub, as the brake drum is welded to it. If not, I'll have to make an adapter for the new drum I ordered - this time I'm going to try a sandwich of plates rather than welding a wore out bushing that fits on farm equipment.
So it looks like three weeks minimum before she'll be back on her feet.
Friday I'm going up to the hangar to give her a good twice over and pull off the tailwheel. It needs either some work to true it up (maybe trimming off a bit to round it, as it's solid plastic) or replacement. Since it's just a Harbor Freight solid plastic-rubber wheel I think I'll replace it regardless.
Well, sorry that happened Dart. It's good that you got away mostly clean and can give her another go in short order.
I don't know if this applies as my taildragger experience is still in the formatve stages. When I started to do wheel landings in the Citabria, my instructor was explaining the aerodynamic changes that come along with dropping the tail. I won't list them all but between changing the angle of the prop and of the wing etc and so forth, you can induce some pretty big yawing tendencies. Add the change in torque by chopping the throttle, and suddenly putting the tail down is a moment of moments as it were.
Do you think any of that yaw was induced by putting the tail down smartly along with the power reduction?
It's hard to dissect something that happened in a fraction of a second, but the post-mortem we pieced together was that I was transitioning from taxi to flight, with the tail just on the ground.
Normally I'd of firewalled the throttle, picked the tail up, and taken off, but I was being overly cautious. When I chopped the throttle, the tail immediately went fully down, with my rudder (and wheel) to the right. Tail wheel bit on the pavement and Bob's your uncle - the tail swung left and no torque factor from the prop to counteract it. Side load went onto the left main and she folded, so there wasn't any going anywhere.
As I've said, there's a lot of upside to what I learned. She wants to fly! If I had lateral instability (more lift on one side than another) she'd of really dug a wing, but she didn't. Also, my CG is really on the money, too; too far rearward and she'd of twisted on her tail.
So next time no monkeying around with that danger zone of transition between ground and flight; I'll move swiftly to it, let the tail come up on her own, and put her up into the air.
The thing that is really thrilling is the feeling in an open cockpit. It's more akin to being in a motorcycle than an airplane in that respect - the noise, even with a headset, is much higher and there's a lot of tactile feedback from the aircraft.
I've only taken one open cockpit ride but it was heady stuff. Just think, soon you'll be dancing in the clouds, wind singing through the wires. That'll be something very few pilots get to experience anymore!
Dart, I was at Sun n Fun today and went through the WW1 area. Saw this and thought of you. Not a Nieuport 11, but just thought . I have some others if you are interested.
No, the Se-5 wasn't there. It was last time. Real nice Fokker D VII and Fokker D VIII. The D VII had some of the covering removed and you see quite a bit of the construction .
Doing the post-loop maintenance, two things came to the fore on the aircraft, indicating that I may be an average rather than a poor pilot.
The shock bungees had become loose, floating in their slots. I didn't pay it much mind, to be honest, and it explains the goofy sort of ground handling and why she over-reacted to course correction on the ground.
The second is more of a head slapper. As I tightened the bungees yesterday I swapped the one good wheel from side to side to check tension. When I put the wheel on the left side the brake strap was tight on the drum! Of all the dippy things, it was acting like having the left brake applied. No wonder I was drifting left and couldn't easily correct for it.
The upside is I have a way of checking brake tension much better now, using a jack.
Wheels due in late this week, so shouldn't be too long for try #2.
That is Robert Baslee's latest creation coming out of his Aerodrome Airplanes shop.
It a new design with a welded steel fuselage and a wing with wooden ribs. Designed for the Rotec Radial or a lycoming O-290 or O-235 or other similar engines. Price for the kit is going to be $12995 when it shows up on the web site.
Isn't it funny how the prop would change the direction of its spin ? I first thought that it might be that old radial engine, but I see modern aircraft do it as well.
Isn't it funny how the prop would change the direction of its spin ? I first thought that it might be that old radial engine, but I see modern aircraft do it as well.
Its a video recording flaw, most recording happens at 30fps. When the prop exceeded that it distorts into the video you are witnessing. Even if you record at 60fps, this can happen.
Isn't it funny how the prop would change the direction of its spin ? I first thought that it might be that old radial engine, but I see modern aircraft do it as well.
A lot better rotary. The Fokker sounds like it has a miss.
Some of those old rotary engines you controlled the RPM/power by chopping off the ignition which leads to them to sounding like they have a miss - which is exactly what it is doing
The blip switch. They had very limited RPM control; some had none, it was on or off. Some had limited control of the fuel, but not what we think of as a throttle.
A lot better rotary. The Fokker sounds like it has a miss.
Some of those old rotary engines you controlled the RPM/power by chopping off the ignition which leads to them to sounding like they have a miss - which is exactly what it is doing
Wrong. What happens is the engine gets dizzy and forgets to ignite occasionally.
:P
From what I saw it seems they also controlled speed by selecting magnetos. So it wasn't all on and off.
The Rhone engines in Nieuports and some Fokkers had three controls.
There was air, fuel, and a magneto ("blip") switch.
One adjusted the fuel and air for best mixture for RPM adjustment. But it was adjustment, not for throttling at we think of it today. In fact, one wanted the air/fuel mix for best RPM at all times, with the engine running smoothly.
The blip switch in the early rotary engines was for all cylinders that were firing.* Either there was juice to the spark plugs or there wasn't.
Later models, like the ones that went into the Nieuport 28, had a variable magneto switch that fired every cylinder, every other cylinder, every fourth, every eighth, or none at all. Plus a blip switch. But the Nieuport 11 was either running or it wasn't. Even in later models most pilots preferred to leave it on all cylinders firing and just blip the engine.
Of course all of them were "total loss" systems where the fuel and oil was dumped out of the spun cylinder and into the cowl. Gasoline and castor oil. Yum!
* Though the engine was spinning around the crank, it was still a four cycle engine, so only one of four could be on the power stroke at a time.
Thanks KK, I never looked that closely at a radial engine. I know racers who complain about the rotating mass of a wider tire. I can't imagine the torque effect from that engine's RPM change. No wonder it was all on or all off. I am lost. Do the cylinders spin on a radial engine or not?
You are saying "radial" but mean "rotary". Radial engine has cylinders in a circle but are stationary driving the crank. In a rotary the cylinders spin around it.
You are saying "radial" but mean "rotary". Radial engine has cylinders in a circle but are stationary driving the crank. In a rotary the cylinders spin around it.
When I was about 8years old I was given a box of Biggles books by my older cousin, they all were about WW1 and Biggles flying his Sopwith Camel and that really kickstarted my interest in aviation.
I had 2 pictures on my wall back then, one of a Sopwith Camel and the other was of an Avro 504K
Well, Worksman Wheels finally got off the dime and according to FedEx I should have them on Wednesday. So I might be able to get out to the airport on Thursday afternoon or (most definitely) Friday to fit brakes to them and maybe cover them.
Then I'll have a whole new opportunity to break it in some other way!
Seriously, while I'm disgusted at how Worksman slow walked my order, in reality I just got the brake drums modified to fit this last week so it's not that big a deal. Then again, I didn't jump on the brake drum mounts because the wheels were taking forever.
Now I'm getting excited again. I have a feeling that the ugly dress rehearsal will make for a fine show.
First flights are fickle - the whole affair is one of looking for the wrong and it's pretty short. That's why it's always down to a very few people to watch and assist.
Drums worked a treat! New wheels and brakes installed, but I held off on covering them.
The reason is that I also laced the new rim on the old hub, an exercise in extreme trial and error. Even with an identical wheel to use an example, it took me four complete re-do tries to figure out the right angle to the first spoke. From there I worked fairly quickly, but the afternoon was spent.
The allen wrench for the cable catch on the brakes is normally in my airplane "quick kit" that has the most common tools needed to work on stuff. I guess gnomes must have come in the night and taken it, though, as it was nowhere to be found. I played the long odds that maybe I put a tool back where it belongs with the others, but no dice. My allen set was all there except the one I needed.
My diagnosis on what went wrong on the fast taxi attempt was validated. The left brake is tight - it's a wonder it wasn't pulling me left at slower speeds.
With no way to adjust it, I packed everything up and headed home. There was no point in even a slow taxi; I'll go back tomorrow with a wrench that fits to fix it.
Then it's a matter of finding the right weather for another try.
Flat rate to relace a rim is 1.5 hrs and that includes dismounting and remounting the rubber. Multiply flat rate by 3 and that is my typical, real world time. The cheat to replacing a rim or spoke set is to tape the old spokes together at the X.
I assume you checked how true the rim was after relacing. If I could ask, how true did you get it?
On my last fast taxi attempt everything got squirrelly with lateral control being really difficult, and coupled with too loose bungies and a left brake that was rubbing hard, lead me to a ground loop.
So this morning I decided to give it another go, since I have a new set of main wheels and a new solid rubber Harbor Freight tail wheel. I had one of my EAA brothers on hand in case the aircraft needed to be unceremoniously pushed back to the hangar.
After a nit-picky pre-flight we discussed my plans, which were simple: 1) Slow taxi to make sure my new tail wheel was up to snuff, and 2) See if the bungee and brake fix had solved the bad lateral instability when the wheels are off the ground. If I get into trouble or things look really good, I might take flight.
A very, very long taxi and I make the turn onto the runway.
First issue - over a standard leather flight helmet I can't hear the radio over the engine.
Second issue - with the radio next to me in the seat, Mike could barely make me out when I spoke. So it'll get moved to the rear cabane strut. I'm thinking bungee cords to begin with and then maybe velcro.
Back to the aircraft!
She's tracking true as I slowly advance the throttle and at about half she starts acting squirrelly again. I backed off the throttle and she started to behave. I advanced again and back to squirrel mode....but this time she wound up pointing towards the grass!
Ghaa! I'm not bending another wheel, and I'm definitely not rolling off of the runway into the grass and down a slope.
I firewalled it, did a quick stick forward-stick back and she immediately went into flight! I mean just jumped off of the ground.
Nose down a bit to make sure I wasn't just in ground effect and a small adjustment to align over the right edge of the runway. She's climbing in a stable state, not much pitch up and the ASI is telling a fine lie (70 MPH? I don't think so!) but other than that she's singing to me.
Literally singing. Wind on wires!
What the hell, I'm already up, might as well do a circuit and land.
Stable, stable, stable. Holy smokes, she's a beauty to fly. I pulled a bit of throttle and she flys straight without adjustment, meaning the rigging and ground trim are as spot on as I could hope for. Like a Champ (7AC kind), a little lead with the rudder and she turns nicely, and all the controls did what they're supposed to do.
Coordinating turns felt like cheating - the FM is set to novice!
Indeed, all those people who say a 7AC Champ is a good analogy for this aircraft are dead on the money.
So long right half circle, pulling only the power required to lose altitude gently until I was on a very long final. Forget the numbers, let's land somewhere on this strip. At 8,000 feet long I think I'll be able to be a bit cautious.
Gently pulling power, I flew it down to the runway, just a tad nose high. The right wheel just kissed the pavement. I picked it up a little, gave her a little more nose high, and the mains rumbled without a bump. Chopped the throttle and she she slowed quickly, the tail floating down to meet the asphalt.
She slowed straight and true without any of that goofy stuff.
So there's a particular speed where things aren't good. I think it may be right when the rudder is biting and might be fighting with the tail wheel. The solution is to be in one of three states - slow taxi, taking off, or landing and not muck about with the mid throttle.
It's a long airfield and that makes for a long taxi. I made my way to the turn off and things got weird immediately after. The tail was trying to dance around like a drop of water on a hot skillet.
I killed the engine and rolled it onto the grass next to the taxi way.
WTF? Oh, the solid rubber Harbor Freight tail wheel had disintegrated and fell apart on the turn off from the runway. I was grinding down the steel mount for it.
So once again me and my helper tote the aircraft to the hangar, one on each side of the vertical stab.
But who cares! Hurray! I'm officially a test pilot - me and Chuck Yeager, peers.
Mike volunteers to make a new tail wheel mount and happens to have a spare tail wheel to donate to the cause. A real aviation one with bearing and everything. It came with his KR kit and he went for a larger one. He said he would be able to work it up this afternoon and bring it out to the airfield tomorrow. I had to explain my incredulous expression - every time I've had to farm something out or get a spare part it's a month. One day? Incredible!
The last note is that I guess I either pressed the record button on the GoPro twice or missed it entirely, so no video. And Mike was so enthused with watching he didn't take any video with his phone.
When you say the wheels are true, does that include "toe in" and "toe out"?
Is there any slack in the rudder cables at all?
When I google squirrely ground handling this showed up. Do you have springs from the tail wheel to rudder?
When I first got my Pacer 16 years ago it was also very squirrely during take off and landing when the tail was on the ground. In my case I found the springs connecting the tail wheel to the rudder were too loose. I tightened them so there is just a little tension on them and it fixed the problem.
No springs involved with the tail wheel - it's a direct link to the pedals and they're tight to them.
I'm waiting on an email from the Dawn Patrol Guys (who've been flying 7/8 scale N11's for about 30 years now) to tell me "Well, yeah, don't muck about with fast taxi stuff!"
Once I work that bug out, I'll have to conspire with OG to find a place in his schedule that fits the weather for a visit!
Congratulations on a successful first flight and a project very well done. I like that it was a 'surprise' first flight, seems to fitting climax to your 'imprecise precision' engineering. Brilliant, very well done. Colour me impressed and envious!
Big congrats on the first flight! It was a joy to follow all the build and stories up to this point, and I'm sure the upcoming tales won't be any less interesting.
Grab yourself a well deserved drink or cigar, what a great day that must be.
Are there any official ceremonies or rituals for an aircraft that did it's first flight? How about she gets that nose art now?
When I started reading your fast taxi post, I thought to myself, "I'll bet Dart is in the air by end of the second paragraph." Congrats to seeing all of your hard work prove itself to be more than airworthy. I can't wait for the first video!
I got a set of awesome responses from the KC Dawn Patrol guys when I emailed my exploits to them. Seems I'm in the bell curve for results:
Quote:
Congrats Frank!!!
Sounds like an average DawnPatrol taxi test. You are sticking pretty close to the norm for our world. Exciting isn't it? Made me smile and laugh-out-loud reading your exploits and remembering our first flights. The thrill of that first take-off (never on purpose) is just hard to describe.
One of the things I really like about the WWI replica/representational aircraft community is that almost everyone is quick to tell about the not-so-great things about their builds and flying, while cheering everyone else on.
Even the guys that have amazing gems that not only look perfect (and also have authentic instruments) and pilot them expertly are loathe to hear compliments and are quick to offer good advice on things.
I knew the N11 was going to be quirky in some respects, owing to the short wheel base between mains and tail wheel and the free flying rudder, but the learning curve seems to be as short as it is steep. In Dick Stark's books he tells the tail of how they built and learned to fly their N11's, and in revisiting the first one I realized my first flight was an awful lot like Tom Glaeser's.
Btw, KC Dawn Patrol is their site, and there's a link to Dick's books on the left. It's worth a visit. And yes, they are just as friendly and welcoming as their site (and books) seem to be.
Tomorrow I'm back out the airport to fabricate a new tail wheel mount. The one Mike made for me isn't of a big enough gauge of steel for my liking, but is a fantastic template, and the tail wheel itself is awesome.
My covering job on the new wheels is terrible! I rushed to get them done and it shows. So I think I'll strip them, re-cover and paint them. Plus the radio mount, which I think is going to be a huge PITA. Since it's the first time I've run the engine at full RPM's, I'll also change and inspect the oil in the engine.
A few more flights and I'll start thinking about mounting the gun as well.
A few pictures of some kinds of craftsmanship which has become somewhat standard on my beautiful aircraft:
First up is the new improved brake drums:
This actually is a huge improvement, as they can now be moved from wheel to wheel if I have another unfortunate event. With the welded plate machined out to a perfect center hole and the bolt holes drilled expertly (by someone else, of course) now the drums are dead center.
I did have to put a high spot on one of the drums to the sander. It's a machining error on the manufacturer's part, as one section was thicker than the others, making it less than perfectly round.
Tail wheels. Ug.
Okay, backing up a bit, my Aerodrome Airplanes tail wheel took a helluva beating in the loop, so I replaced it with a solid rubber one from Harbor Freight:
It looked okay mounted to the aircraft, and turned freely.
However, under load it didn't fare as well!
We found this at the edge of the runway about 30 feet from the turn-off to the taxiway. I reckon the core went to little pieces and I rode the steel down to the bushing in about 40 feet.
Because the airport is all IFR ready, the pavement is grooved - we figure that's why I lost so much steel in such a short distance.
Time for some professional parts. One of my EAA brothers donated an actual aviation tail wheel and worked up a mount to fit it, as it's wider than the old one(s).
It's a smaller gauge steel than what was originally there and proved to show some flex. I figured the mount would work well until it didn't....and it wasn't something I'd like to explore again, so another one of my EAA brothers donated a piece of steel channel that's just a tad thicker than what I had before and we chopped and drilled it.
I still have to re-cover those wheels. In giving the plane a complete look-over I couldn't help frowning at what a sad rush job I did on them.
[break]
I've been told that building airplanes is a bit like getting a tattoo - as soon as you get one done you want another. Not for me, though. As much as I found building my Bebe to be satisfying it's more interesting than fun, if you get my meaning.
WOW, that messed up tail wheel looks like some of the wheels on the carts at our local Walmart. Flat spots on them make for an interesting shopping experience hearing them go across the floor. NOT.
Working out the bugs on take-off - first flight I advanced it too slow. This last flight waaayyy too fast.
For those who fly Rise of Flight this should look pretty familiar:
I changed the oil on the engine and gave her a good going over. A few little things popped out on the video that aren't apparent on the ground or at low speeds, like the fabric on the aileron hinge being loose, to fix - as well as to sort out the brake adjustment mess.
I'll be looking closely at the weather for the next few weeks, as the next flight will be a long one of circling the airfield above pattern altitude to check the engine baffling and other stuff.
Soon I'll be very amiable for visitors - I may even force the wife to come out to the field and see it go around the patch.
Dart, first off. Big, big, big congratulations. First real flight. You didn't panic and flew the airplane; good for you. Yep, piling the throttle on fast can get you out of sorts. I learned that but not in as exciting manner. Flight looked good. Seemed real easy a plane. I didn't see any of the wires loosen because of flying loads. Seemed to have the right amount of hum to them. I just didn't see any problems except for the brakes which you already talked about. Didn't seem to have any apparent bad manners. Good landing even with the bouncining; that happens and for your first landing it was magnificent.
Really big congratulations and respects.
Now..... what happened about letting me know. I'd have been up there; the weather has been good for the whole flight. What's up ?
I've been up to the airport six times, and only twice were worth the try.
Loads of little maintenance things that make me say "whoa, wait a tick" and scrub any attempt at flying. I had to completely re-cover the wheels as the cloth was interfering with the clincher tires and didn't have a good seal. Landing with the chance of the tire and tube popping off the rim isn't something I'm willing to entertain.
This morning I found one of the oil cooler fittings to be loose! No flipping idea how that could be - I put them in and it was sealing fine before now as well as being held in strict alignment by the hose. Fortunately it was a quick fix and no oil leaks from it.
On rig and ground trim, I hit the jackpot. Well, I'd say on the ground trim it was fortuitous luck (usually it needs adjustment), but considering I spent many weeks working out the rigging to get it right I'm going to say that was preparation. Still, usually there's some adjustment needed in rigging.
As the wires and tangs settle in even more I might still have to revisit them, but right now I'm dead center with them. She truly flys hands free at a little over half throttle, which is just amazing when one thinks about it.
When I'm confident I can say "come up and watch it go around the patch," which shouldn't be long, I'll roll out the red carpet. I'd hate for you to fly up just to sit in Waffle House and drink coffee.
The interesting process of letting the WWI Replica and EAA crowd dissect the video is ongoing - I now know what being on the other side of an NTSB investigation must feel like.
There is even the stock "oh, the pilot sucks" answer.
In seriousness, everyone is very much focused on what went right as well as wrong.
No, this is a learning curve Inherent in the type.
Ron over at the EAA site is helping dissect things and came up with an interesting set of statistics based on the 15 reported accidents in the Nieuports:
Five of the fifteen were on the first flight.
Ten of the fifteen were in the first 40 hours; so five more past the first flight, but within the testing window.
So two thirds of all accidents in Nieuport 11's happen right where I'm at in the learning curve. Indeed, in many ways I've beaten the first set of odds by not cracking up on the initial flight.
Of course most incidents don't get reported - my taco'd wheel, for example, won't ever make the statistics.
To add to the statistics: When I opened your Hero3 pic my computer crashed, rebooted and got the pic and made it sepia, posted it and... computer crashed... been working on it until now.
How is the torque steer from revving up the engine? Is that part of the lurch to the right along with the starboard brake binding slightly?
It's the torque and the p-factor driving the plane right. Thanks to the physics of propellers, I have more thrust on the left side of the plane than the right.
The immediate problem is the wheel and the rudder are fighting each other.
So with the wheel down on the pavement, it's sticking the plane in one direction and has a lot of authority, and does NOT want to give. So to maintain directional stability, the rudder has to be neutral. But the wheel needs that authority, as the rudder can't work until it gets enough air flow hitting it.
On grass this wouldn't be an issue, as the tail wheel could literally slide as one applied rudder. Heck, the mains can slide on the grass, giving one extra help - but on pavement that's not going to happen.
When the wheel comes up, it's the rudder's job to keep the plane straight - and it needs to be applied just right and Right Now. The problem, of course, it that it's binary in nature and instantaneous. We're people, though, so we can learn the skill. In a Champ on pavement I can do it without thinking; but then again, a Champ has springs on the tail wheel (more on that later).
Part of that is managing the acceleration to take off speed, of which I've done a poor job. The first flight I was too hesitant in accelerating the throttle and danced around the transition to flight, which put me up and over to the right edge of the runway. This last flight I did it waaayyy too quickly, and you saw the results. So it's clearly a smooth, constant acceleration using the throttle that is required (one of the Dawn Patrol guys guesstimated that it's about three or four seconds from idle to full).
With the wheel and rudder directly connected, right now there's no middle ground between them. What one does, so does the other. Heck, the control horns for both are pretty much the same size, so I don't get a break there, either.
So what I need is for the rudder to be able to be applied while the wheel does its thing. Enter in springs. It allows the rudder (which is directly connected to the pedal) to be moved and the tail wheel to keep doing what it's doing with much less pressure on it, giving one a grace period between the two. Now the rudder and wheel will be compromising with each other rather than at an impasse.
Or so I hope. One of the things not listed in the specs of the compression springs is the amount of tension required to compress them. Too much and it might as well be a direct connection. Too loose and it might make landings a bit more interesting than they should be.
Oh, and on the types of springs - there are two. First is the typical tension spring, like one finds on a screen door, with all the coils touching each other. The spring wants to be short and so pulls back when load is put on it. The problem with them is that they can stretch over time and lose their tension. The second is a compression spring, which wants to be long; its coils are spread apart, and resist being pulled together. They hold their strength longer than tension springs, and perform better at failure (or so I've read, though that may be propaganda put forth by Big Spring).
To be honest I wasn't scared in the least during the flight - I was actually more concerned on the landing! Part of that is the speed at which event were happening, but I could immediately see I had airspeed and acres of room to get her in the air and pointed the right way on my side, provided I didn't do anything sudden. That and the alternative of chopping the throttle and attempting to land on a rough unpaved slope down from the runway seemed ripe for disaster.*
I invested almost all of my flying time doing touch-and-goes in a Champ - up, around, land, down to taxi speed, up, around, etc., knowing that they would be the critical skills required when the plane was built (and I became a pilot specifically to build and fly this aircraft). Yes, I did a bit of sight seeing and other stuff (loads of slow flight, ground reference maneuvers, etc.) because that's just fun! Indeed, I haven't bobbled a landing like the one in the video in a long time - I guess the observer rule counts when a camera is rolling - but I've also done my share of them and know how to work through a bounce (and when to hang it up and just go around).
What makes these planes in particular sort of, well, particular is the short wheel base and the actual footprints of the wheels. The mains are only an inch and a quarter wide (each), and the tail wheel is two inches wide - the tail wheel has almost as much friction on the ground as the two mains combined! I may actually replace the tail wheel with a thinner one in the hopes of reducing it's grab.
* This is an area where being a long time flight sim guy actually applies to real world flying. I've muffed literally thousands of take offs in various sims in the exact same way as I did with the Nieuport, and so wasn't completely out of my element. Heck, scooting around an errant tree didn't cause much of an eyebrow raise.
That typed, don't misunderstand the level of seriousness I place on flying an actual aircraft. It's a risky endeavor and has to be treated with the utmost respect; one has to carefully manage all the different factors and weigh them out, hoping to isolate any unforeseen events from all the others. For example, it was perfect weather - clear skies, moderate temperatures, a little after dawn (before the thermals could start seriously forming), and absolutely calm winds. I've scrubbed four days of potential flying over even small winds!
Beautiful stuff Dart! And congrats on the first flight.
It's pretty awesome to have her up and flying while the N10/11s were still in the fight. I'd love to start one, but there's something special about the 100 year thing.
Thanks for the explanation, Dart. Am I correct in thinking that is also why many taildraggers have no steerable tailwheels - they're either free castoring or locked?
Not 7/8 scale so it might be a bit heavy for your Nieuport. Plus, you'd have to figure out synchronizing gear. And it would ruin the authenticity since the N11 didn't use the Vickers; just the Lewis. I'll keep my eyes open for a Lewis.
Oh, no, synchronizing gear is crazy talk. Just mount it above the wing to shoot over the propeller, as God intended.
Springs on the way from Atlanta. Naturally since I've grounded my little Babette the weather is picture perfect. It'll probably storm for weeks after the parts arrive and are put on the aircraft.
I can fly up with very short notice. You should have someone out there with you. Safer than being alone. Plus, once things are good, I can fly alongside and get some good photos for you.
I thought for a second that I might just be able to stick the compression spring on there and have it a little slack, but it was too much - the tail wheel didn't move at all!
So I measured back seven inches from the thimble end of the cable, whipped out my Harbor Freight dremel type tool, stuck a cutting wheel on it and cut them. Digging through my pile o' parts, I found two - and just two - nicopress sleeves of the right size. So only one try with the go-no gauge on each.
The springs came with one long chain, so I cut it roughly in half and started dinking around with the correct lengths - I want a little slack between the wheel and rudder, with the rudder getting the play.
I tested it out, and it looks like I get a little left rudder when the wheel cable snugs up; this is what I wanted. Taping the extra chain up (I don't want to trim it just yet), I went around the hangars at fast walking speed and I think this is just what I needed.
We'll see on the next attempt!*
I worked a bit on the left brake drum, slowly taking down some of it on about a quarter of the way around on the belt sander. It's much, much closer to round now and isn't making a thumping noise as the high spot goes through the brake band. I was getting a little anxious with shaving tiny amounts off and thinking of being more aggressive, so I stopped work. The brakes behaved much better on the taxi run as well, so I'm at the 90% solution there. I just didn't want to ruin the drum because I was getting tired of putting it on the plane, spinning the wheel, marking the drum, taking it off, running it on the sander, putting it on the plane....
The right drum runs pretty true but has a little squeak at the end when it's full stop. I think that just may be that everything is new. I'll look at it next time.
The last thing I did was trial fit my antenna extension, which is just a coax cable with fittings on both ends that go the handheld on one end and the rubber duck on the other. I put it on a fuselage tube just behind the seat, inverted to where it points downwards. I reckon it'll work much better than laying sideways in the seat next to me.
* I've made a rule for myself - I won't fly immediately after performing maintenance. That gives me a chance to look at what I've done with fresh eyes the next time around.
That it was just too windy to even think about it suited me just fine.
Wonderful thread, sir. My question is a bit off topic, but since you're the only thread I've seen flying an N11, I thought maybe you had an answer for me. I always wondered if you can see your rudder behind you when you "check-6" like TrackIR would normally show (i.e. Linda Blair neck twist) or are you actually limited anatomically to see part of your elevators when you turn to look behind you. I found various topics on the net, but conflicting answers.
Well, the answer in my aircraft is answered by the inclusion of the mirror!
But it comes with some caveats.
First, my aircraft is smaller than the original, though the seat is a full scale.
Second, I have a four point harness, which restricts my movement. In most WWI aircraft, they had just a waist belt (though it's huge - the one in the local museum for a Camel looks like it should have a WWE logo in the middle), so they could turn.
Third, I'm an old stiff guy, so turning about and really craning my neck is out.
But I side with the guys who say TIR is overly generous in turning to the rear. I also think it's okay, as overall visibility is much better in an aircraft than on a screen. It's hard to explain, but there's something with the context of peripheral vision that just makes things easier to look around.
LOL @ the gun. After this next flight I think I'll mount it.
I had a special visitor the other day, our very own OG!
He pilots a very pristine Cessna - she looks show room clean inside and out!
The day he flew up it was too late for flying my Bebe, so I put him to work doing a bit of tinkering on some minor things. That it was 95 degrees with 90% humidity made me no nevermind, and he's a good sport and didn't gripe or gently remind me that not everyone likes Alabama heat.
Still, he seemed pretty pleased with my plane!
Part of being ground crew is bearing witness when things go wrong and helping diagnose it. Note the leather combing around the cockpit, particularly the bit by his left shoulder; it figures pretty large into the tale of Test Flight #3.
The next day we were out at the airfield bright and early - CAVU with zero gusting to one winds - and we did the pre-flight and I taxied her out for a nice showy takeoff.
Initially it was straight forward, and the addition of the springs and chains to the tail wheel seemed to be just the trick I needed to keep stability. I applied left rudder, relaxed it a bit, and put in a little more.
Only I was stomping the left rudder cable and Jack Nothing was happening. At flying speed. And she was flying. To the right. Ghaaaa! I rolled the aircraft to the left, throttle to the stops, and brought her over the runway, leveling out the wings with the right rudder and ailerons.
A quick check and the rudder was responding left and right as it normally does.
"Um, I got a problem with my left rudder," I say over the radio. "Roger," OG says over the handheld he has, "Copy you've got a problem with your rudder."
The initial plan was for me to shoot some go-arounds, floating the runway to find the perfect landing speeds without actually landing. But with a control issue, all that was out of the window - I needed to get her down.
Lining up was no problem, though I was a bit high and a bit fast. I two bounced her, realized I was just asking for trouble in trying to make a bad approach into a good one and went around. The rudder was responsive throughout, so I was cautiously optimistic that I was in jeopardy but not danger (if that makes sense).
I landed okay, but as I finished up with all three wheels on the ground and began to slow the left rudder stopped responding again. It was like the pedal wouldn't go down. The aircraft did a little half circle right at taxi speed; not enough to cause damage to aircraft, but enough to bugger up my bicycle wheel and flatten the tire.
Oh, hell, that's why I have spares. I taxied it back on a flat tire and a slightly warped wheel.
I started at the front of the left rudder control system. My rudder stop nut was loose and turning freely in my fingers. Nut out and thrown against the hangar wall with some bad words. The cable guide bushing at the front was back fully in the mount for it. I moved it forward, wondering if that might have caused the binding.
OG leans over the aircraft and says "Hey, what's that in the fuselage?"
I look back and see something black right against the left control cable for the tail wheel at the bushing that guides it over the fuselage tubing. I fetch my grabber tool and with OG guiding me, snatch it up.
It's a piece of pipe insulation foam, the type I used to form the combing around the cockpit. I had put a small piece of it on the long piece that goes all the way around to give the combing a better silhouette.
I must have knocked it out of the combing when I got in the aircraft and mucked about with the shoulder straps. It fell in exactly the wrong place to where it would sometimes pick up into the cable at that bushing, binding it - but when the rudder went the other way would pop out enough to allow free movement.
Another flight that day was out. I needed to check the cables again, epoxy the cable guides in place, run the combing to make sure that I didn't have any more pieces other than the great big one, and be glad I was up to being Adventure Pilot.
I felt kind of bad that OG came all the way from Florida to see the plane fly and it turned out to be all screwy, but he knew it that I'm still very early on in the test flight program and handled it with grace. We talked airplanes and Army stuff and off he went back home.
Since it was a loss of a flight control system due to mechanical reasons, I self reported to NASA about it. I didn't violate any FAR's or anything, but the program is there to build a database of f--kups.
So this morning I went out to the airfield with the intention of just covering the spare wheel and dancing around the airplane, but was shocked to see there were absolutely no winds. Hmmmm, I worked off all the gigs from the last flight, might as well get back on the horse that threw me.
It was good to see the plane in real life. You appreciate small details of the build that pictures don't convey. Marvelous piece of work. Building your own flying airplane. Helping him was akin to going back in time to the days when the only things flying were what people built themselves.
As he said we did some small work. He was not happy with the the coordination of tail wheel and rudder. So we adjusted the cables until he could get some rudder before it resulted in any tail wheel movement. We adjusted his brakes to lighten the grab. Couple iterations to get them as he wanted. This was confirmed during taxi testing with me observing the rudder and tail wheel coordination. After taxi I found an oil seep in his engine oil pan that Dart was able to correct. We changed some bolts and cotter pins. Taxiing went well so he went on the test flight where he had the rudder problem. Afterwards, he found the rudder stop bolts had backed out and figured that may have been the problem, but we wondered about the intermittency. He was looking at some guides he had in the cockpit so I traced the cabling all the way through to the tail. That's when I saw the foam pieces. After we got those we replaced the damaged wheel and tire. The wind was picking up so we scrubbed another attempt.
So we took up my store bought airplane and Dart took me on a little aerial tour of the Talladega/Gadsden area. Followed the Coosa River. Beautiful. Foothills of the Appalachian Mountains. Then back to land. I had to get used to the difference in airfield elevation and didn't allow for enough in the approach. So I had to keep in some power to get a proper glide angle.
He didn't think he was going to fly the next day, so I flew home.
I admit I'd be a bit scared to find a mechanical blockage of a control surface due to some small mistake... but I'm a pussy at the racetrack too, I'm not built to always test the limits
Could you afford to lose one axis of control and correct with the other?
Wish this was in our Community Hall also. Lots of good stuff, photos and all. We all kinda keep an eye on Dart, and this has become a real 'Adventure' many of us are monitoring. Hope you don't mind I put a link to this, in my post in your Community Hall thread.
Those goggles look tacky on you OG. Also, the color is all washed out in that photo. Darts plane looks a bit worn, odd, in a way I can't put my finger on.........
That's really cool that OG flew up to check out your bird and hang out and help. That's SimHQ for ya. I'm so glad you've taken the time to document this journey. It's been a blast, and now, it's just beginning.
I know that building and flying RC model aircraft gave me a lot of pleasure, but building a model you can actually sit in and fly must give you a great sense of achievement. It has been with great interest that I have followed your build, congratulations Dart!
May you have many happy hours of flying your Nieuport.
Now, your next mission, should you choose to accept it, is to build a two seater so your wife can have your back
I understand Dart. My wife doesn't find joy in flying either. She will fly to go places, but isn't one to just go up and fly. But she does appreciate the speed and ease in going places. Makes it much more convenient to see friends and family.
She does show some vanity when she tells people that I'm a pilot and we own an airplane.
She delights in having me take people for flights and always encourages young friends who haven't flown to go. I've taken many teenagers for a flight for their birthday present.
Hahahaha - you have no idea just what a ghost town my little airport is or how much the two employees just do not give a flip about anything but cutting the grass or running the fuel truck...as long as nothing gets broken I don't think they care what I do.
But I think I could take off and land on the taxiways to the runway no problem!
Hahahaha - you have no idea just what a ghost town my little airport is or how much the two employees just do not give a flip about anything but cutting the grass or running the fuel truck...as long as nothing gets broken I don't think they care what I do.
I imagine that is convenient for your flight testing, since you don't have to deal with an air traffic controller getting their underwear in a wad. On the flip side, that may mean you get help less rapidly if something goes wrong...
Today's flight was remarkable only in that it was unremarkable.
Takeoff was what should be normal - no hysterics - and I just flew around for a little less than an hour to monitor temps and pressures, as well as bringing along a little tablet to see what my ground speed was versus indicated.
Zero wind, and the GPS was indicating around 55 mph at cruise (about half throttle, straight and level with no adjustments required to keep it there) while the ASI read 70. It's not the static line, so either it's the crimp in the pitot tube or a bad ASI. Gonna replace the pitot tube next time up the airport.
What surprised me was oil temperatures. It only got up to 180 and stayed pegged there at cruise, dropping when I throttled back to get into the pattern. I guess my baffling and huge oil cooler are doing their jobs (ambient temp was 85 degrees).
On the ground the oil temp sensor is out of the oil, so naturally it went to zero pretty quickly.
Landing was gloriously uneventful. I floated her long down the runway, let the mains kiss the pavement, pulled the throttle back and let the tail come down naturally.
I'm going to validate the weather forecast for tomorrow and maybe commit some more aviation - she's such a forgiving aircraft and a honey to fly!
[edit]
No video, as I moved the camera to face the instrument panel. Nothing exciting about that!
Lol a little late but you had me rolling with the first unintended takeoff. Glad to hear things are progressing fairly smoothly now.
Enjoyed the commentary on takeoff two's video but what would have happened if you had aborted as soon as you left the runway? From the video anyway, there looked to be plenty of room to stop before you had committed yourself to aviation.
She's really a beautiful Nieuport 11. I may have missed it, but why a Nieuport 11? Besides having a tail wheel, what drew you to it. I know you like the design of the "kit", how they designed it, etc. Was it a childhood favorite or what?
When I was in Aviation Mechanics School one of the shop projects I worked on was a 7/8 composite FW-190. I thought it looked cool, but no way I would trust flying it. Way too much of a hot rod beyond the owners capabilities. I have no idea if it ever flew, it was still there when my classes ended.
The funny thing is that while Dick writes as if he's the class clown with two thumbs, he's a helluva pilot and builder. Well, he is a competent builder, leaving most of the brain work to others and then just following instructions really, really well.
The second was price. There are a lot of WWI representational aircraft models I'd love to have, but the 7/8th scale N11 fit my budget the best. At 7/8th scale the price and weight go down - which means the power requirements go down, which is the same as money. The leap from my 1915cc direct drive VW engine to a 2276cc one with a redrive for the prop a full scale plane requires is almost double the money - from around five grand to ten.
I could swing 13K for an airplane, but not 25 or 30K, and I needed an airplane. Having to rent an airplane pissed me off as it was expensive, not really at my schedule (though I usually found it available), and it wasn't mine.
That it looks like a WWI airplane is actually a bonus. It sealed the deal, but if they were much more expensive I'd of gone a different route in plane selection.
A single seat means I can't take passengers. It sounds terrible, but I don't want to take passengers because I don't want to fly any place in particular. I just want to putt putt around the skies low and slow, look at cows and fields and trees for an hour or so, and then jealously put my aircraft in the hangar.
And I wanted to build my own airplane so I could do maintenance myself. My fear of buying a Champ was that at some point an AD would pop up that would have a 1,000 price tag and ground it. Or during an annual it would be discovered than an AD from 1973 either wasn't done or wasn't documented and another 1,000 dollars. And the thought of paying forty bucks for just one spark plug for an A-65 makes me go pale.
I'd of wound up with an airplane on its back! When in doubt, fly the airplane.
Just seemed that the trees were awful close when I watched the video and looked at the area in Google Earth. Not knowing the climb rate of your plane makes any "back seat flyer" observations even less relevant. Mainly I am just glad you didn't need to pick yourself out of the trees on that takeoff.
Still getting a second hand thrill watching your adventures though.
The advantage of this aircraft (and disadvantage) is its slow speed.
I'm taking off somewhere between 35 and 40 mph and cruising at around 55 mph, with a guesstimated best climb of around 60 or 65 (and there's not much more after that) - so nothing is happening very fast. The climb rate is good as well - I can't put a number to it, but I'd say somewhere between two or three hundred feet per minute...and in that #2 video I was pushing for airspeed, not altitude (as a stall would be evil).*
Add in that she's surprisingly nimble and it was with the most gentle of controls that I neatly went around that tree, and I was a good 300 feet from that tree line and above it as I made the sharper left hand turn.
It takes me more than a minute to fly one statute mile, assuming wind isn't a factor.
To put things into perspective, a C172 with full flaps has a Vso of 54 miles an hour; it's landing speed is my cruising speed! Hell, a C150 has a higher landing speed than my aircraft's cruising speed - with its flaps down!
One of the things that is really striking is how she absolutely leaps off the ground. This plane doesn't transition; it is either not flying or flying, meaning one has to be absolutely ready for flight the moment the throttle is moved forward. In a Champ, for example, one can put the stick a little forward (or even neutral), ram the throttle to the stop, and contemplate when one wishes to take her into the air. This aircraft is too impatient for that, owing to it's short body for it's wing area (and a thick airfoil).
With no vertical stab, I'm not mucking about too much on the pavement - this last video shows she doesn't mind a wheel landing (I think she prefers them), but is twitchy at what would normally be rotation speed. Speaking to other 7/8th scale N11 pilots this is typical of the breed.
In some ways I feel like I'm having to learn to fly all over again in regards the take off, as it's somewhat counter-intuitive. Left rudder instead of right. Stick neutral or a touch forward at the start and just a hair back at speed, as it has loads and loads of elevator versus rudder.
In the air and on landing she's a treat. There is a tendency to yaw, meaning a little left rudder is almost always applied (the KC dawn patrol guys actually put a bit of long bungee cord to the left side of their rudder bars as a poor man's trim on long flights), but coordinating turns comes naturally and she is pretty docile. Because I went up an engine size from the typical 1835cc VW and have a prop that is more on the climb than cruise pitch, responsiveness is really good - but I can slow down much, much faster than I can speed up. I don't see a lot of slipping in my future, as just bringing the throttle down to a quarter is pressing the down button pretty hard.
* Determining the various V speeds is much further down in the flight test program. Right now it's more important to find out if she'll fly and stay flying in normal profiles.
The wife says I have to find a mount for my camera that is not on my head, as it makes her motion sick to watch it.
"Head on a swivel, dear," I said. "Put the camera on something other than your head then," she replied.
So next time I'm going to put it on the right interplane strut, which might look like it's suspended in space.
With three of the mandated 40 hours of the test flight period done, I think the next two hours are going to be just flying around doing gentle turns and monitoring the engine and airframe. I think I've had enough drama for awhile and will put slow flight, slips, and stalls further down in the program.
I think I'll also start putting videos in the Video Forum of the site and let the serious model makers show us their work at the top of this forum.
I guess you weren't kidding about the sight picture being familiar. Mutual Self Destruction:https://youtu.be/rm6Q1JKsRrU?t=3m40s I commend you on doing a better job on dealing with the tree obstacle in real life.
It may eventually be a bad thing that I wasn't the least bit flustered at that take off, as I'd seen the sight picture of that in sims about a zillion times, but so far it's served me well.
The thing to remember is that while everything IRL has been programmed for collision, the hit boxes are really, really well done.
I show up at 0630, driving from almost no clouds through fog halfway there to overcast at the airport. Humph, let's check the ceiling. Ghaa! 1500 feet; it sure looked higher than that. I decided to wait to see which way it was trending, and sure enough it went down to 700 feet.
So I waited around until 1000 for the clouds to break up or at least rise, by which time the wind had picked up and the thermals had started. I was wrestling turbulence and gusts from takeoff through the pattern and then landing.
In other words, a glorious adventure in aviation! Woohoo!
I'll check later to see if the video is even worth uploading.
Fun flying today! Winds were light and variable, bumps were tolerable, and I just had a ball.
Did some Thottle Back stuff; woof, there's a lot of terrain filling up one's view to keep reasonable airspeed - it's like a big hand just grabs the plane from behind. I did it a couple times feeling out glide angles and it's actually not as scary as I thought it might be - the cone isn't as tight as I though. Did a 180 as well to see how much altitude was lost and that wasn't really all that bad compared to a straight glide. One just has to realize that when committing to a landing spot, commit to it and if there are two of equal okay-ness, pick the closer one.
And, as always, altitude is one's friend.
I also did my first cross country flight in the Nieuport! I was tooling about and realized two things: I was really close to Pell City (PLR) and I was getting a bit barn broke to my home airfield. So I landed pretty crappy, trying for a sharper angle and a three pointer, but it was at the far end and nobody saw it. Taxi up, park next to all the CAP planes that were there for check ride training tomorrow, and walk in. I learned to fly at Pell City (okay, St. Claire County), and it was familiar ground, so to speak.
What I didn't expect was the warm reception from actual people at that airport. I had forgotten that pilots actually hang out there and talk to each other (Talladega is a fine airport, but a ghost town). So my fifteen minute bio-break and stretch took an hour of folks swapping stories and looking over my airplane.
It came time to take off and I realized two things:
1) The winds favored taking off at the end by the FBO.
2) There were six folks grinning from either the ramp or the air conditioning of the FBO. I figured the two taking shade under the wings of the CAP C172 were the Russian judge types.
Might as well get it over with. I can always just avoid coming back for a few months if I make adventurous looking, and so with a shrug I advanced the throttle AND DID A PERFECT STRAIGHT ON TAKE OFF. No rudder swish, she just smoothly walked up into the air.
That's the sign of both a great woman and a fine airplane - she'll give you hell one on one, but when there's people watching she'll back you to the hilt.
Did a fine wheel landing with a steeper approach at my home airport and put her up.
And noticed that I hadn't actually turned the cameras on to record.
The supports from the front bottom mounting points to the slip ring at the front of the receiver have to be measured and cut, the mounting bolts need trimmed, etc., but it's coming together in a solid mount.
I'd of kept going, but I'd been dinking around with the gun and some other stuff on the aircraft for four hours and was starting to wilt.
Dart, looking at your videos and from a question that was asked I remembered an old TV series I used to watch in 1976 called Wings, don't know if you are interested in it or not, but it is set in WW1 about a young lad that sets out to go join the RFC in 1915.
I have the boxed set of the two series and looking on youtube I see that it has been uploaded in it's entirety.
So here's the gun mounted with some trimming and painting to do - hopefully it'll be more difficult to explain what I did after the finishing touches are done!
In the front, the all-thread bolts run through the leading edge material just behind the spar, reinforced by an aluminum strip.
There are four supports on these bolts - two up to the barrel, which is easy to see, and two that run to the bolt that runs through the center section in the rear.
The whole thing seems pretty solid, and hopefully the weather will cooperate tomorrow morning and I can put some wind on it. The reason these are indoor shots is due to rain just outside the hangar.
Next up is that cowl repair:
The split behind the plate there was stop-drilled and this is the cover...there's a matching one on the other side. I also cut the baffling back to where it's not hitting the cowl in the front even a little.
Also, sigh. Somewhere along the last few times with the airplane I put a little rip in the fabric on the right fuselage near the bottom. So that got a patch. I don't mind doing fabric repairs, but I'd love to know how it got there in the first place.
My rate of climb seemed a bit wimpy yesterday. Nothing in the "golly gee maybe I ought to land" range and the engine was doing everything it's supposed to, but it was a bit lazy.
Take offs were some of the best yet - I've found the correct amount of up elevator to get her to step into the air rather than leaping - but my landings were kind of wonky. Usually it's the reverse, of course, where I swish it around going up and walk it onto the pavement going down.
More vexing was the fact that I've also found a better approach and angle from my super shallow technique, dipping back to what I used to do in the Champ. It's more a large curving descent than to turns on a box, with "large" more in line with the short Champ pattern.
So instead of kissing the pavement with a main and settling the tail down in a straight forward manner I was tapping the main and getting a minor bounce, which had me setting up for another try and a little bounce. I wound up going around at Pell City just to eliminate the frustration factor and keep from "fixing" the problem with a ground loop. I managed to work through it by putting her into three point position and dancing between the three wheels.
On a hunch I tuned back to the airport weather station (which I had hit to confirm wind direction when approaching the field) and the answer made me laugh.
...density altitude three thousand two hundred feet... the computer man said. Quite a bit of difference from the 480 above sea level actual.
The way to my home field was long as I just did some field survey and the landing was much better, though a bit bouncy. I write that off to the collection of people outside the FBO waiting on a charter flight and watching more than anything else, though.
I'm my own worst critic, of course. One of the pilots on the field said my landing looked good before I could apologize for being crappy.
I should have replaced that wheel before we flipped her back over!
Brakes locked up on take off, putting two very nice skid marks on that black grooved pavement of the runway, ran into the tall grass right off of it and up and over she went.
Front spar on upper left wing. Front spar on lower right wing. Landing gear strut. Landing gear support that goes across the front. New prop. Break down engine for inspection - though I think I got off lucky on that score.
Should be back in the air in six weeks if the engine isn't FUBAR.
Only injury is a stiff neck from where I bonked my head after the flip. Nobody has told me a good way to get out of being suspended upside down in a harness without landing on one's head. The old "one arm up" thing just doesn't work.
Are you playing a joke? I say no way you pretzel a rim like that and the roll over left so little bent grass and so little wing damage. I am rivet counting.
If it's not a joke, you need to consider a full rebuild on the wings she pivoted over on. Glad you are not dead. We lost a few from less at PTK.
Bicycle wheels, no matter how heavy duty, don't take lateral pressure well.
And that's he as she lay - the flattened area of grass in the foreground is me stomping and saying damn-damn-damn.
I was going about three miles an hour when she went nose over end.
All four wings come off and get stripped and inspected, but light weight and strong aluminum tube construction means that it's not that big a deal, really.
Really sorry to see her in that state. Glad your OK.
The engine is a dry sump, so it should have had oil pressure the entire time. I would think the major issue for the engine would be if the end of the crank got bent when the prop hit the ground. You can measure the clearance between the piston and the head to see if any of the connecting rods are bent.
How to measure 'squish': http://homes.ottcommunications.com/~red/squish.html
But, since you can not walk home if the engine fails, maybe a complete tare down is in order.
Happy you are healthy, and best wishes for a fast and cheap rebuild with no unforeseen issues. I really *hate* throwing my racebike away so I can somewhat guess how it must feel to flip an aircraft... like 100x more complicated to get everything sussed and reviewed for the next flight... :/
Sounds like you didn't yet have the gun mounted? Thank god for small savings... shame about the beautiful prob of course.
It does look like a RoF screenshot doesn't it? Shame he can't just hit 'refly'
It does, when it popped up in my email I thought Dart was trying to pull a joke, it was only when I came to the forum that I saw the picture in full detail that I realized it was real.
Also, this time around he's lucky in that he can actually hit the "refly" button, only that button is in the form of dollars, lots of them.
Just curious Dart, how did they right her? Did they pivot her over on the prop or lift her into the air and do the pivot while suspended?
"They" was me and two Department of Transportation guys that were working on the lights.
Since the whole plane weighs less than 500 pounds and the prop was horizontal, I walked the tail up into the air and we just flipped her over after grabbing the leading edge of the top wing. With the grass and the spongy ground there wasn't any problem for the prop or hub.
I grabbed a spare wheel from the hangar, replaced the taco, and we pulled her to the hangar behind one of those industrial golf cart thingies.
Because it's all so minor and there was no injury, no reports were made.
Aviation in the USA is very, very different than in Europe.
I'm going out to the airport tonight to take the prop and wings off and make a shopping list.
I figure that I can get her back in the air for under a grand. This is where being the official Repairman saves a crapton of money.
Jesus Christ you are one lucky guy. Glad you walked away from that one with just a sore neck. Can you think of any reason why the brakes locked up at such a slow roll?
There are a lot of theories on why the brakes locked up, the most popular being that the brakes moved with the extra weight on the bungees (the brake assembly rotates with them), causing minor friction. With slow taxi and a final braking they heated up, and when I accelerated they heated up even more and everything expanded to a tight fit. The way the bands go around the drum, they grab more at higher speeds.
I like the minor theory that I was grabbing the brake handle as well as the stick and unintentionally applying them. It's one of my pre-takeoff checks to ensure I'm not doing that, but it has a certain YouDumbAss appeal to it.
At any rate, I'm going to come up with a better brake system.
Wife didn't give me the long face; almost nothing I do surprises her. Indeed, when I ordered the Minor Surgery Kit for the suture needles and clamps she said it was probably a good idea, as she got a little anxious the time I heated and curled a regular sewing needle to take care of a cut I put on my thigh. I did a good job - one has to really look for the scar!
Saturday I've got a fellow EAA guy that's going to be out at the airfield doing final checks on his plane to help me pull the wings off. All my documentation is in the hangar, or I'd already ordered the new prop.
Glad you are ok Dart, and that the aircraft will soon be too.
The brakes binding on like that reminds me of an incident with a friend's bike, an XJ750, it had a remote master cylinder operated by a cable from the brake lever.
Anyway I had borrowed the bike to go off to a caving club meeting in the wilds of west coast Scotland, all was well until I went home when I got a few miles from where I had been staying it was taking more and more throttle to maintain speed, I stopped and looked over the bike fearing I was on the verge of seizing the engine but all was ok and the engine was free.
So off I rode again and all was well for a couple of miles and then it started happening again needing more throttle to keep moving, I was almost on full throttle and when I shut off the throttle and pulled in the clutch the bike screamed to a halt...
Ah hah! brakes - someone had adjusted the brake cable up until the brakes were just on and no more so as you rode and applied the brakes they heated up and got tighter and tighter until ...
I would love to find out who did it as it could have been disastrous especially if the disk had split or cracked under the heat and load.
Ah hah! brakes - someone had adjusted the brake cable up until the brakes were just on and no more so as you rode and applied the brakes they heated up and got tighter and tighter until ...
Ah hah! brakes - someone had adjusted the brake cable up until the brakes were just on and no more so as you rode and applied the brakes they heated up and got tighter and tighter until ...
What a nasty, dangerous prank!
Freaked me out that someone could do such a thing, I could think of two guys there that could have done it and one of them was a police sergeant.
That the club president did not take it seriously was the breaking point for me and I severed any ties to them at that point. Still love to go exploring caves tho
The brakes binding on like that reminds me of an incident with a friend's bike, an XJ750, it had a remote master cylinder operated by a cable from the brake lever.
Not to derail the thread, but I had an '82 XJ750J ... fun little bike, but it could have used a 6th gear for highway travel.
Dart, So, heat expansion caused the brakes to lock and endo the airframe? Are the brakes cable or hydraulic?
Hydraulic must have the return orifice open when the lever is in the released position. I have had more then one bike brought to me for brake repair because the owner had no free play between the lever and the master cylinder's piston. Some were corrosion not letting the lever return all the way and others were the owner wanting a 'harder' feel to the lever.
If it is cable, you also need a minimum free play in brakes and clutch to allow for heat expansion. On a side note, most older utility ATVs have drum brakes. There are a variety of drum sizes and, as Alicatt mentions, you can use cable remote master cylinders. XJ750 was the hot Yam when I enter the working life, but new guys never get to touch the hot stuff.
Back to cables. I spent an hour an half yesterday replacing a brake cable and lubricating the cam for the rear brakes on a 92 Yamaha 250 Timberwolf. I kept adjusting the hand and foot cables until they felt solid, but the brake was obviously dragging. In the end I had to elevate the rear axle and adjust the cables by feeling the drag on the drum. The brake shoes are well worn to the drum. I verified the placement of the wear indicator with the brake cam and visually inspected the shoes and drum. The wear indicator is only half through the usable range. If they were new shoes, I would expect this 'spongy feel' until the shoes wear in.
Edit: At the start of the repair, I moved the cam arm one spline. This is an old trick to get the maximum life from brake shoes and worn cables. Most brake shoe cams will not allow the pads to wear to the point of metal to metal contact. When I tried the trick this time, the brakes would drag unless I added some return pressure to the cam.
In the end, the levers feel soft but the machine stops properly. The moral of the story is to not let lever 'feel' fool you.
Edit: Some brake shoes do have a trailing and leading edge. If you install these types reversed it will cause problems. I learned this on a friends 70's Cadillac. Most manufactures eliminate this by not making the shoes look symmetrical.
Dart, Edit: Some brake shoes do have a trailing and leading edge. If you install these types reversed it will cause problems. I learned this on a friends 70's Cadillac. Most manufactures eliminate this by not making the shoes look symmetrical.
Edited for emphasis! Good advice right there Brit44. Please keep this in mind Dart. I have even seen banded brakes with a front and rear.
Well I made the executive decision to ditch the band brakes and come up with some sort of disk brake - not quite sure on exact design, but I have to have something that can't engage unless I want it to.
On reversing bands, it's very possible I did that when I replaced the axle. I had the bands so loose they didn't engage at all, but when I put them into the correct tightness they grabbed all too well.
Wings off, prop off, oil cooler off the engine....it's like Deja Vu all over again!
Okay, so we've got a bicycle wheel with a drum on it.
The mount (I'll get to that later, this is before I cut it down).
The brake band (not this one, I put on other ones that weren't rusted).
The axle that the wheel fits onto that also slides into the larger axle.
The drums go onto the wheel by bolts and spacers:
When assembled, it looks like this:
The mount holding the brake band rotates with the axle as it moves up and down on bungees. The axle goes up, the mount goes forward on the stabilizing rod. The cable that pulls the brake tight comes in from the front (foreground).
Here's the brake handle, a standard dual cable one.
So I'm thinking of ditching the drums and putting on a disk with some bicycle disk calipers. I don't need a lot of braking power - the brakes are to be used only when starting the engine and coming to a stop at a slow taxi.
[edit]
Going over the aircraft it looks like my initial damage assessment is on the money. Two spars, a wheel, a gear spreader leg, a gear leg, prop, a drag wire inside the upper wing with the bent spar, and a smile on the top bow of the rudder.
Engine gets tested tomorrow for true. Fingers crossed.
The reason there's so little damage is one of weight distribution. 700 pounds spread over 20 feet of wing. Since it rested on a six inch wide area at the top of the ribs, the math says it's 11 pounds for each spot on the wing where it touched the ground. Also, fabric is flexible, so it doesn't dent and crinkle up like an aluminum skinned aircraft would have.
Prop ordered, gonna dig up the rivet specs for rib stitching.
That set up would have 2 issues. First, the caliper is not a floating caliper. The caliper would need to be mounted on pins as your disk will not float. Second, the cable threads into the caliper. You would have to fabricate some kind of insert or have a custom cable made. The up side with the self adjusting caliper that your only maintenance would be cable free play.
While we are on the subject of cables, is there a pivot in your dual cable lever so the cables are pulled evenly? When dealing with dual brakes, you need some sort of 'balance block' to prevent one brake from pulling.
For hydraulic, I was thinking brake calipers from the Chinese knock off scooters and either a cable operated master cylinder or a fabricated lever, similar to the type used for an ATV snow plow and a remote reservoir master cylinder. You can use a master cylinder with a build in reservoir, providing it is designed to mount at the angle you need. I did some quick searches.
It looks like Grimeca is the primary manufacturer. If weight is an issue, I did find that hydraulic brakes for a bicycle are much smaller. Like anything else, the smaller they are then the pricier they are.
After doing a quick google for "brake handle, a standard dual cable". I am of the opinion that your banded brakes are not the problem. I believe the problem is with the single lever. I believe this is a single lever with 2 pivot distances. That is OK if the braking is applied to inline brakes. You have parallel brakes. When you pull the lever, the lower cable applies less pull. If you use a single cable from the lever to a junction box, you can apply the pressure evenly.
Note part #27. The cable to the lever attaches in the center. Part #27 is free floating inside part #26. The brake drum cables connect to the outer edges of part #27. This allows part #27 to pivot on the end of the lever cable. This compensates for cable adjustment between left and right and applies equal pressure to both brakes.
If your single lever cables are perfectly adjusted there should only be a problem if the brakes are applied with a moderate to hard pressure. At that time you should notice a pull to the upper cable side. If you adjusted the cables to eliminate any pull then you could have easily set the lower cable so it had a drag on the band. If I were a betting man, I would bet she pivoted on the brake that is attached to the lower cable.
If both brake cables have the same pivot distance, then I am wrong and I hope you will except my apologies for wasting your time reading this.
Edit 2: It is possible that the torque of the engine could compensate for the minute difference in cable pull if the left and right cables are installed in the proper order. :P I'm starting to over think this.
Edit: for spelling and changed fulcrum point to pivot distance.
It sounds like the bicycle calipers are your best bet then. My only concern with them is that they could be too small and will over heat quickly. I did notice that Wilwood makes a mechanical caliper if the bicycle ones are not strong enough.
To me it looks like your brake handle is the same as the "Not this" type. I like your brake band system. I don't understand when you say the bungee shock changes the band pull when it extends and compresses. ??? I would try the side by side brake lever first.
To me it looks like your brake handle is the same as the "Not this" type.
Dart said:
Quote:
Yep, both cables have the same fulcrum point. The handle is very ingenious that way.
I trust Dart is saying that there is an equalizing pivot built into the lever.
Falstar said:
Quote:
I don't understand when you say the bungee shock changes the band pull when it extends and compresses.
When you bend a sheathed cable, the inner cable will tighten. If you consider the typical motorcycle, where the throttle is routed along the frame and forced to bend at the pivot point of the steering and then turn the handle bars from steering lock to lock, you will find that the throttle free play has changed slightly.
Dart, I missed your comment of "the bungee shock changes the band pull when it extends and compresses". If you are having problems with cable length changing as the suspension moves, then a different style of mechanical brakes will not correct the problem. You need to reroute the cables so they are not affected by travel as much, or let the cable 'float' more as the suspension moves. A little cable float goes a long way. You also have to consider your control stick pivot and how you attach the cables between the stick and frame. Worst case, you have to unsheath the cable and add a pulley at, or near, the pivot location.
I like to think in theoretical, if I bore you or offend you, tell me thanks but no thanks.
I bought a new dial indicator as the one I borrowed was a bit rickety, so jury is still a bit out - I need to confirm it.
There aren't any published runout on a prop hub for a VW, but the guys at Valley Engineering are saying that my current findings of .08 inches is okay, but the big test is to mount a prop and see if it tracks within 1/8th inch.
So I'm going to put the new dial indicator on it, and with the plugs out crank it over to ensure no oil got past the rings into the cylinder when it was inverted.
Fabric arrived, so now I can get into wing repair.
One sticks a mount for a dial indicator onto the hub. It's basically just a rod through a gauge that measures any up and down movement on it as one spins the item to be measured.
Tracking a prop is even easier.
Mount the prop. Put something that can be marked on that won't move - I like a bit of dense foam stuck to a board - and rotate the prop to where the tip just touches it. Mark it. Rotate the prop and mark where the other tip touches the foam. The marks should be within 1/8th an inch.
If they aren't, a couple things may be off:
1) The crankshaft and/or prop hub aren't true (every engine has tolerances that are pretty loose). 2) The prop isn't perfect (a real possibility with carved props).
If it's just out of tolerance on tracking, one can fudge a bit with a slip of paper under a bolt or two as a spacer to get it back in.
[edit]
My last prop tracked at 1/8th inch difference, for example, and I just left it. One can go crazy trying to get zero, but that can be an exercise in losing good in the pursuit of perfect.
.008 inch run out, your lucky. I am only allowed .002 for any crank I press together. But, I have to admit that I have shipped some that are closer to .005 with no issues and my twin and single cranks are much shorter.
It is not just oil in the combustion chamber that could bend a rod. It is possible for the combustion of one cylinder to bend a rod if the crank can not rotate. In my 30+ years I have seen it 2 times on a twin cylinder 2 stroke. Both times were a hydrolock of water or fuel in one cylinder while the other cylinder fired. note to the wise, turn your fuel off when trailering.
If the rod is pretzeled, you can measure it with generic calipers. You will not need a dial indicator. One or five thousands difference from plug hole to TDC is to be expected. 3 mm is a tear down.
Polaris did have a problem with there PWC cranks going out of phase when one of there triples hydrolocked, but there crank sections are not keyed sections, while you are working with a cast crank. Cylinder phase is not a problem you need too worry about.
As always Dart, I am not an experminatal aircraft expert. My words are just my opinion.
A brand new Lycoming engine has a tolerance of .005 at the hub, and a VW is even looser.
To make sure we're writing about the same thing, it's the measurement of the rotation of the crank off of true, not the offset of back and forth inside the engine forwards and backwards.
One good sign is that mine is dead on tolerance that way.. If the crank shaft was bent it wouldn't be right, if I understand things correctly.
I may replace the crank shaft anyway; they are inexpensive and the high dollar piece - the prop hub - is reuseable. I just need the right adult supervision in the tear down and re-assembly.
It's been 35 years since I cracked a case, and that was a motorcycle engine. Things are a bit foggy in my memory. I borrowed some VW books, but like everything there's nothing like getting hands on to confuse things.
Ah... I had some weird imagination of a large piece of string going round or whatever, but true enough if it has two ends and is off you only need to check one point of the circle. I learn a lot of practical thinking from this thread
To make sure we're writing about the same thing, it's the measurement of the rotation of the crank off of true, not the offset of back and forth inside the engine forwards and backwards.
One good sign is that mine is dead on tolerance that way.. If the crank shaft was bent it wouldn't be right, if I understand things correctly.
I may replace the crank shaft anyway; they are inexpensive and the high dollar piece - the prop hub - is reuseable. I just need the right adult supervision in the tear down and re-assembly.
We are talking about the same thing. You are correct. If the end of the crank were bent, the run-out would be out of spec. Since it is in spec, then it is not bent. The only reason to replace it would be if you have a fear of a stress crack forming and causing the end of the crank to break off some time in the future.
If it is a forged crank then I can not see that happening. If it is a cast crank then there is a (very) slim possibility. If this were not an aviation application I would say you are good to go, but it is hard to land if the prop flies off in mid air.
You could have your crank X-rayed or magnafluxed. Edit 2: Magnaflux will only find an existing crack, or stress very near the surface. X-ray is espensive and may cost you more then the replacement crank.
The standard 2.1 liter waterboxer crankshaft is not known to fail in that way. As a matter of fact, we have NEVER seen one crack or break in any way. It is a superb design, way more sophisticated than any crankshaft used in the two earlier VW horizontally-opposed engines, the Type 1 and Type 4.
Edit: I assume you have a type 4. It looks like both types came with a forged crank.
Aircooled Type I, bored out to 1915cc. Basically a hot-rodded Bug engine with no transmission and a prop on the end where the accessories normally go. There's an extra bearing they put on that end of the case for the stresses.
Nobody I know uses cast cranks in aviation, as having one bend (forged) is better than having one break (cast). If I haven't gotten them backwards in my head.
You're correct - if I have a doubt I'll just buy a new crank shaft - at 200 USD it's probably cheaper that way.
Yep, it's an Airdrome Aeroplanes Nieuport 11. I need to update their page to increase the count to two. Funny thing - there are actually more than that, when one considers the N11 is no more than his Nieuport 17 (full scale) with the measurements re-done for 7/8ths scale - literally marked out an new measurements put in. There was very little difference between the two models other than size and a few modifications.
Some interesting problems in translation were found and easily worked around!
The Valley Engineering guys are very much trial by fire types, and I can't say I blame them, as they store room full of parts to dive into if something goes awry. Then again, if the crank is bent in the front four inches (from case to end of prop hub), the propeller won't track.
Now that it's cooling somewhat (high 80's and low 90's) I can reasonably get hopping on stripping the wings and replace the spars, as well as repair the gear.
So, order a new prop, buy a decent dial meter for the engine, get some oval tubing from Robert for the gear, strip the two wings, replace the spars, strip, un-bonk the rudder, recover, paint, write it all up in the logs, and take back up into the air.
Now that's it's two degrees cooler than Hell, let's get to work!
First up, the good news! The engine dialed out at .009, and turned over fine without plugs in (in case there was oil in the cylinders), and then gave a brief bark of life when they were put back in. Since I drained the oil I didn't let her run.
I'll mount the prop once the gear is repaired and see if it tracks okay. If not, well, gonna have to tear it down. Oil was clean, though, so fingers crossed.
Anyhow, let's get on with stripping that lower wing! For those who have never had the life experience of skinning a catfish, well the starter version of that is pulling fabric off of a wing! It even feels like catfish skin!
It was simple as could be, after I drilled out the rib stitching rivets, sliced along the inside edge of leading edge, and just peeled it down over the rear bow, worked it down the leading edge, and off.
Fabric is a kind of leathery stuff and folded up nicely.
Drill rivets, drill more rivets, and then some more and the leading edge comes off. The wing is great shape over all, but it's not hard to see where the bend is, just at the compression strut.
So my plan to detach the ribs, cut the drag/anti-drag wires, pull off the spar, make identical holes in the new spar, slide it in, lock it down, put the leading edge back on, cover and paint looks doable.
Other great news - guess what came in the mail today!
Man, that look like a fun little bird. Sometimes, when I was in my Sonex and I'd see the guys in my club having so much fun in their ultr-lites, that I'd wish I'd gotten something that I could fly low and slow in. We're never happy are we? Can't wait to see some pictures of you in the skies with it.
Yep. Replaced lower wing spar this morning and re-attached the ribs. Drag/anti-drag wires and leading edge go back on tomorrow.
The ovalized tubing for the gear arrived today as well!
Tomorrow it's finishing the lower wing and working on the upper. Hopefully I can get it all the way to putting on the leading edg, which needs some TLC; it got some crinkles in it that have to be pounded out.
Then strip and re-cover the rudder.
I'll re-cover the wings at the same time, and then paint them concurrently.
I'm working out the best way to repair the gear, specifically what's the best way to suspend the aircraft so I can work on it. I'm leaning on putting the tail on a square block and just lifting the nose by some straps and my engine lift.
Since I'm improving things, I'm going to deal with that tail wheel as well. I settled on bolting some square stock around the tube so that the control horn is flush with a flat surface rather than a round tube.
So that spar was only slightly bent; I am being just nit-picky on the decision to replace it.
The advantage of putting all the plan stuff onto the MDF boards I bought is that they can come in handy for repairs:
So mark, drill, slip back between the ribs, drill, rivet, and spend far too long figuring out a way to tighten the drag/anti-drag wires.
For the leading edge, I used copious amounts of rubber mallet to get any of the big creases out, riveted down the bottom (the rivet holes matched up!), and used a specialized aviation tools to hold the top down into shape.
Ha! Cleco fasteners cost money and are only temporary. Therefore, I didn't use any.
Upper wing spar replaced, wires put in, ribs reattached, and I started on the leading edge when every battery for my drill was dead.
So there she sits with cinder blocks on boards holding the leading edge over waiting on me to show up tomorrow morning.
I'm also going one step further in non-authentic stuff in that I am going to put some square tubing for the cross bar of the gear rather than a round tube. It just seems more robust in my mind. The sorts of people who will spot it and might say something about it being inaccurate probably know better than to say something about it.
I decided to stick with the band brake system after a long conversation with the Nieuport guru association; they suggested moving the handle either to the side or some place on the stick where it is away from my hand on take off (you can guess what they think happened). That would mean making a new control stick with more aggressive bends, which is easy enough, or making a handle to attach to the tubing on the right side of the cockpit.
I also need about an hour to try and bring order to the chaos of my hangar. After the wreck I sort of just threw stuff around as I took everything apart and dumped new parts onto the bench.
Before you actually make the change from round to square for your axle I would consult the material supplier about the tensile and shear strength on both the round and square stock. You may be right and the square stock is the stronger choice of the two for your application but my machinist background keeps telling me that in most instances that is not going to be the case when the tubing material and wall thickness are the same.
It's the spreader bar on the gear, so we're talking compression and bending.
Upper wing back together, so let's start covering the lower wing!
Since it's narrow, I'll use the "wrap" method and use one piece of fabric, gluing it at the bow on the trailing edge.
Things are a lot slower than last time I covered. Last time was in the middle of summer at over 100 degrees, and with cold fall weather (it was in the low 70's) it takes a lot longer for the glue to dry.
Gonna run the iron over the glue and put in the patch for the interplane strut before I do the shrinking, put in the rib stitching rivets, and tape.
As long as you checked things out and are happy with it. Even with my 30+ years as a machinist initially I wasn't going to say anything but if anything had gone wrong and I hadn't at least mentioned my concerns I would have never forgiven myself.
My questions were about flexibility when I pondered the question.
A round tube will flex and return when under moderate stress, but a square one won't. They stay rigid until they fail.
Do I need some flexibility in the gear strut across?
The answer is in both the design and what happened in the wreck.
The gear is really a triangle (though the shape is more a trapezoid, with the top cut off), with the legs of the gear coming up at an angle to the longerons and the base the strut across. Wires cross to put tension on the gear legs to hold them firm to the strut, making it a rigid structure.
Furthermore, the bungees hold the axle to the gear legs, giving the whole thing even more lateral stability. Indeed, the left set of bungees slid down the axle when the cross member bent, but the right set held firm in place.
The whole design seems to be favoring rigidity, so I'm going a bit further in that direction.
It's stuff like this that makes repairs slow way down. One has to really take a step back and figure out the why of design.
An oddball idea that came to mind the other day regarding the square cross bracing looking "wrong" that shouldn't affect the weight a lot would be to put a piece of thin wall round tubing over it. If you wrap the tubing with fabric like I have seen in some images you could even use a piece of plastic conduit. The plastic would definitely fail long before your metal cross brace.
Measure across the points of the square and take that number by 1.414 to find the minimum necessary ID of the pipe so it will fit over the square.
I used aviation grade thin cardboard for my reinforcement around the interplane strut mount.
It may cause a chuckle, but it works great! I need the fabric there to flex enough to get at the nuts and bolts for the struts and still be firm enough not to let the fabric flap about and rip.
Lower wing ready for paint!
On to the upper wing. One of the things that crossed my mind is that the compression strut on the wing that holds the interplane struts might not have the holes lining up. In a rare moment of foresight, I checked and they weren't. So I rotated the wing compression strut until they both agreed with each other and the holes in the mounts for the interplane strut.
It would have been a nightmare to fix after covering. Note the rubber mallet laying there for an idea of how nightmarish it would have been.
Here's how to get a sharp glue line across the leading edge. The fabric above the glue line was trimmed away.
The clamp is there just to keep the fabric in place initially. Once the glue went down it wasn't needed any more.
So bottom fabric is on and I'll go out after Thanksgiving and finish covering it.
And a couple other things. I'm going to fabricate a new control stick, one where I can move the brake handle down on it so it's not in the intuitive position for squeezing.
Oh, and the rudder and tail wheel modification.
I'm going up tomorrow for painting, and may start on the gear between paint drying.
No mod on the rudder - it just needs the top bow straightened and re-covered. I may get away with a slice and patch on that.
The tail wheel mod is something I have been kicking around since flight #1. The issue is that it's a flat control horn to the wheel assembly that is attached to a round tube.
The solution from Airdrome Airplanes was to place a thin sheet of aluminum bent into a three sided square and rivet it to the round tube.
On grass I'll bet it's enough, but on pavement - and probably doubly on the grooved pavement I'm dealing with - the flat bottom of that aluminum piece isn't flat. The stresses on the bolt and the holes in the tube mean that the holes are going to start elongating. Right now it's not happening because the forces are enough to force the locking nut to loosen (meaning it's a check item with a wrench on post and pre-flight); if I had it cotter pinned I think I'd wind up riding a stump of tube and drag the gear assembly.
So my solution is to follow along with the intent of the design, but make it more robust.
Instead of a thin piece of aluminum with two bends in it, I'm going to take some square tubing stock that fits snugly around the tube and put two bolts horizontally through it to secure it (as well as the vertical bolt that holds the wheel on). Now the horn will be a flat surface against a flat surface.
The upside is that there is more contact for the horn, spreading the force load out and making it less loosey-goosey. Also, the horizontal stress will be on the horizontal bolts instead of the vertical one, and I shouldn't elongate the holes.
The downside is that it is much more rigid, meaning that the point of failure moves up the tail wheel arm to the pivot point mount. However, that mount is pretty robust, and I don't see it failing. If it does, though, I'd be dragging the rear of the fuselage on the ground, not a stub of tubing.
Odds are the tail wheel would skip up off the ground or slide horizontally against the pavement under stress (which Lord knows I've proven when I had a tail wheel disintegrate) rather than come off the main pivot mount.
So here in Alabama we've been under severe drought conditions, including fire bans, on account of the fact we haven't had a single drop of rain in over two months.
Everybody, including the atheists who pretended to be agnostic for just a little while, was praying for rain.
Well, naturally, now that I'm ready to paint, we have rain. Glorious rain.
But that means that I put on the primer and just sat there as it didn't even attempt to dry, with the humidity at 100%.
So back out tomorrow to see if it dried enough over night to flip and prime the other side of the upper wing.
Wowsers. No limits on power/performance for that class?
The USA is very, very different from Europe when it comes to home built aircraft.
There are no limits at all for any experimental, other than that which the builder puts on it and demonstrates in the flight testing period.*
For example, in Europe one must prove aerobatic capability (or, for that matter, strength of any design) before building and being approved by the authorities for flight, and the inspections are much more rigorous.
In the USA, the onus of airworthiness is on the builder, and only the builder. The government inspection is of basic workmanship and validation that it is amateur built rather than purchased or farmed out - the builder must do 51% of the work.
So, for example, if I were foolish enough to try aerobatics in my aircraft while in the test phase and didn't kill myself, I could put in the log books what maneuvers I performed and it would be perfectly okay. All of the "V" speeds, from stall to Do Not Exceed, are decided by me as the builder (so is gross weight limitations) during test flight. No government approval or justification is required or even desired by the FAA on what I write down, and when I am finished with my 40 hours I just put it in the logbook and go fly about.
Fun note - Experimental Aircraft aren't airworthy in the eyes of the government, at least not in the official sense. We perform condition inspections, not airworthiness inspections, on our airplanes. No mechanical updates or warnings by the FAA apply to experimental aircraft; no Aircraft Directives on a part will ever ground an E-AB.
* There are a few limitations put on experimentals, such as whether they can fly at night (no lights = daytime only), IFR (must have the proper equipment), and a few other broad areas (if it doesn't have floats it can't be taken off from water).
No, they have a limitation on home field and range for the first 25 hours. After that they operate the same as other general aviation aircraft. The only difference that comes to mind is that when operating under traffic control, they include that they are an experimental in their initial contact. Such as "Leesburg tower this is Experimental RV7 45S48 10 miles north inbound with weather for full stop landing". Also in submitting flight plans they specifically include Experimental.
I can't think of any other issues different than general aviation.
Aren't Experimental aircraft "limited" to flying to and from their Home airport unless they are being flown to an exhibition?
Wheels
That's Exhibition Class, which is very tiny and has to be applied specifically for - and is usually reserved for historical aircraft.
For example, if one dug up a Curtiss aircraft and restored it, chances are it would get an Exhibition Class rating, which would mean it could also keep its original markings with no additions.
However, most builders - even of replicas - are more than willing to put an N-number on their aircraft and be able to fly it as any other airplane.
Bear in mind that it's not the aircraft itself that is the reason for the restriction, but the lack of proper display of registration number.
It's the same primary reason race cars are limited to the track - they don't have license plates!
It's interesting how different designers came up with gear solutions. I think if I were to go there I'd have to ask the minders the same thing I did at the Seattle Museum of Flight - "I know the sign says not to touch the aircraft, but is a hug really touching?"
Just a quick update at my progress:
Upper wing primed and ready for color!
There's a wayback moment in that pic, too. The board with a rudder shape showing where the plywood formers where was what I used for the rudder kit I ordered before committing to the full aircraft. I didn't use that rudder (it became a test piece for covering), as it was acceptable on the lowest level and the stuff to make a new one was part of the kit anyhow.
Lower wing primed and ready for color!
Note the special Aviation Grade latex primer I used. It's terrific stuff, being meant for placement on stucco and brick, and sealed the fabric with one thin coat. The faint glue lines showing through aren't a concern, as the glue most definitely sealed the fabric.
While I was waiting for the lower wing to dry, I decided to tackle the gear repair.
First, my hangar/workshop is in a total state of chaos. There's a bit of a reason for this. Once I covered the wings I couldn't sweep. The amount of dirt that would fly up would put a layer on the fabric that would cause all sorts of problems. Why didn't I clean and sweep before covering? I was in total work mode, and when I finished the repairs on the wings went straight into covering.
Hey, at least I know where everything is in all the clutter, and those rivet mandrels aren't hurting anything.
Anyhow, my idea was that I'd have to suspend the gear assembly off of the ground in order to allow it to center properly. I didn't really like this, but figured it was an eventuality. It was. Jacking up the gear from either the struts or the axle just wasn't going to allow me to work.
So I lifted the front end with my engine lift, removed the bungees, and one wheel, thinking I might have to remove the axle in the repairs. Turns out the axle is just fine where it is, and serves as a nice guide as a double check of original position.
I removed the center section that was bent and after many attempts learned that straightening it for measurement for the replacement wasn't going to happen. So I put it on the end of the new piece, marked a common center, rotated the bent tubing, and made a mark at the end. What a smart fellow am I!
(It's a quarter inch too short.)
The big hint is the cross wires. They self-center the gear when tight. So I need to make a new cross bar of the right length, plunk it in there with tension on those wires, drill and bolt in place.
The bent landing gear strut was removed by simply drilling out the rivets that held it in place. Fortunately it did straighten out very well, and will be a good template for the replacement. I should be able to slug it in there, drill through the holes in the gussets, rivet and be back in business.
The wood blocks, boards, and cinder block are there for placement when I was done under the gear legs. I don't know how good the jack in the engine lift is, and if it relaxes I do not want to open the door to find the aircraft in some unusual position.
The square tubing looks organic and no the least bit weird. The type of person who would know it shouldn't be square will also be the sort of person who would know better than to criticize.
One addendum to earlier posts about Experimentals. My test phase is 40 hours rather than 25 as I have a non-certified engine.
Thanks for the details on the classes Dart. I was confusing pilot limits (Sports Pilot versus Private Pilot) with aircraft limits it seems...
Does this level of disassembly set back your initial flight tests? I.e. you need to recheck all the basics again, or are you confident the main characteristics won't change?
Yes and no. I tipped her over at 11 hours into the 40!
If I've done something wrong it will probably manifest itself in the first flight, most likely on takeoff.
So the first flight will be just a turn around the patch to see how she does in the basics, followed by a close inspection. In this way it's a step back.
However, if she doesn't break in the first fifteen minutes chances are she's not going to break.
And she was rigged perfectly. All the wires were disconnected for disassembly, and while theoretically it should all go back together and be the same, I won't know until she's in the air.
How about a parachute? Or maybe throwing an anchor over the side. Really, though. Hell of a job. As a former homebuilt airplane owner (but not builder) I can appreciate all of the work going into that machine. I know that I never could. By the way, another caveat with experimental airplanes is that it has to SAY experimental somewhere on the plane. If I remember correctly it was usually inside the cockpit so that anyone in it knew that they were not flying in a mass produced airplane. That's where mine was. On the right side of the cockpit interior.
Taking your airplane to an airshow is one of the most exciting things a pilot can do. I flew my Ercoupe into Sun n' Fun and I still think about it all the time. Having it on the line with all of the other Ercoupes and antiques and having people coming over and looking at it and taking pictures...asking questions...etc. Was there for two days and it was a blast.
On brakes, it's all variations on a theme, with no two alike.
I'm going to rethink the mounting if the bands. I may lock down the axle or re-work the arms.... not sure yet.
Weather should be good for painting, with temps in the high 60's and low 70's, tomorrow.
On airshows, I seriously doubt they would want my airplane anywhere near it.
We all tend to downplay or own accomplishments but you have really done a nice job in building your plane. I could definitely see it being part of an airshow. If not flying then definitely on static display.
You should have put several small round patches in the repair so when someone asked what they were you can say you patched the bullet holes you got in the plane from the Red Baron shooting at you.
1) Since it's a plane I built, I'm always making sure it's not coming apart. 2) Lots of no radio (NORDO) operations at the fields I fly at, and so I keep my head on a swivel. 3) Force of habit from too many flight sims!
Flying this aircraft is an exercise in straight up stick-and-rudder piloting. Outside of the slip indicator, the only gauge on the dash I look at is the oil temp. Mostly it's sight and sound for altitude, airspeed, and navigation. At 60 mph and 2,000 feet above the ground the finer points of precision flight are somewhat dulled, excepting the aforementioned slip.
The lack of a vertical stabilizer means that she'll tend to develop a slip on her own. It's subtle, and the inclination to a slight roll is to adjust with the ailerons in the opposite direction. Without realizing it one can get cross controlled!
If you watch the rearward view video, you'll notice the rudder is always a bit to the left. This isn't a design flaw or a feature, it just is what it is.
Anyhow, an update on the aircraft:
Wing transitions done:
Wavy tape down:
Wavy tape up:
It's not even close to historically correct, but I think it looks pretty good and was a simple solution.
Now for the non-historically correct blue trim and the dead on the money roundels!
Dart, as a fellow taildragger and biplane pilot (and maybe some day an aviator, not just a mere pilot..), I love your dedication and skill. Your plane looks great!
Four of our five Tiger Moths do not have brakes. We usually land on the grass next to the runway, as that allows the tail skid to dig in and offer some control. Do you usually wheel your plane in, or do you three-point her? Is she nervous around the yaw axis while on the ground?
Short wheel base = squirrelly on three pointers, so it's wheel landings, and letting the tail drop on her own and then pasting it there. Kind of funny that I almost exclusively three pointed the Champ.
But it's your typical "lazy" wheel landing, in that it's tail low with just a touch of power, so it could turn into a three pointer if she wanted it, and since the Nieuport is one big exercise in drag, once the mains are down the stick doesn't need to go full forward. She'll settle and track straight for about 200 feet and the tail's down at just a little forward of neutral.
I'm still landing her a little hot, but it's a long runway and airspeed is my friend.
Hell, one could keep the stick there or just a bit behind neutral and be just fine all the way to the hangar.*
Indeed, landing her was easy to figure out - I was takeoffs that I had to seriously work through. It took a few flights to figure out that it's stick back about a four inches from neutral and let her takeoff from a three point configuration. My Flight #2 video is what happens if the tail comes up too soon. Loads of elevator, so it'll come up before the rudder has authority.
* My Nieuport in many ways is just a fat ultralight, so it's super VFR low winds kind of plane. I had one eight knot wind crosswind landing - no video, naturally - that I actually nailed, but no damned fun at all. I considered taking the WWII strip that is officially a taxiway/access road if I had to bail out of it, as it's 90 degrees to the official one.
Using the grass at my field is a no go unless one has a bush plane. Plowed fields have fewer ruts and holes. Plus the mowing is so inconsistent that it's a crap shoot. The airfield cuts the grass between the runways and on the outsides o the VASI lights, and the Speedway cuts it past that. In my wreck, if they had cut the grass past that tiny strip there wouldn't have been a wreck...but the grass was over knee high instead.
I'd like to have a go in a Nieuport to see what it's like. There is a guy in Sweden, Mikael Carlsson, who specializes in WWI-era planes, and even earlier. He has crossed the English Channel in his Bleriot, and performed at several shows here with it. He also has a Fokker Dr.I and a D.VII.
A former colleague of mine also commissioned a Bleriot XI replica, similar to the one used by Norwegian Tryggve Gran, who was the first person to cross the North Sea in an aeroplane in 1914. Check this out: http://warbirds.no/fly/bleriot.htm
Well, the DR1 has a lot of the same characteristics in takeoff and landing - with the exception that I have an inline engine.
Just ordered the new crankshaft, prop hub, bearings, and gaskets - should be here by the end of the week.
Throw another 600 bucks into the crash fund.
I'm fighting with Sherwin Williams about my red. Even though they have the paint I used in their computer, they didn't know how to adjust for the sample size (no reason to buy a gallon for about a square yard of coverage), and couldn't get it right. They asked me to bring in the yucky can I have to see which sample base they used.
But hey, the weather's been to crappy to fly anyhow.
I'm fighting with Sherwin Williams about my red. Even though they have the paint I used in their computer, they didn't know how to adjust for the sample size (no reason to buy a gallon for about a square yard of coverage), and couldn't get it right. They asked me to bring in the yucky can I have to see which sample base they used.
Seems a bit strange for a gallon, but not inconceivable I guess. I used to mix paint formulas for years at a DuPont automotive paint shop. You'd occasionally get people wanting to buy less than a quart or pint of something but since the formula included colors with literally one or two drops (it's actually done by weight on a scale) there was no way to "halve the recipe" sometimes. We'd go into "eyeball matching" sometimes (with the customer being plainly informed that it's a gamble), but that can be unbelievably difficult - it can look identical in the can, but once it's on the car....
Also, you might run into another color matching issue - even with a perfect formula match if you're "patching up" with new paint on something that was painted a year ago it can be a bit off - the "blending skill" of the painter really comes into play there, but even 15 years ago that was becoming something of a lost art.
Flew to Williston for a grilled cheese sandwich today. Was pleasantly surprised to see another home build warbirds. Looked extremely good. The fit and finish was top notch. Just superb.
They are still going through pre-flight testing. It hasn't flown yet. When it starts flying, I'll have to go back to see it.
That Titan P-51, from the stats, is a pretty sedate and it would become clear quick that the weight-to-power ratio is more in line with a standard aircraft, not a warbird.
I regularly fly with an RV-7A. Nice plane. Fast for a fixed gear. We have three planes in hangars right next to each other; my Cardinal, the RV-7, and a Cessna 150. We regularly fly somewhere for fun and lunch and we have a very staggered arrival time since the RV cruises about 35 MPH faster than me and I cruise about 35 MPH faster than the 150. We always rag each other about how long we've been waiting for the others to arrive. The TitanT-51 with the standard Rotax is about the same speed as my Cardinal. So while it looks really cool, it isn't a speedster. Small cockpit for passenger and no real baggage storage. Plus my Cardinal is a 4 seater. The T-51 isn't really a worthwhile plane until you go with the V6 automobile engines. But they aren't the failsafe aircraft engines and use gear reduction to keep the props at correct RPM. Gear reduction has been problematic.
But they really look cool and always get people walking over to check them out.
Next time I go there I will find out which engine he is using. From the props it looks like one of the auto engines.
The prop on the shots in this thread on the Titan look great. The ones people chose on the wiki page for them, not as much of a fan. I like these rounded blades. Also was surprised reading the wiki that it's a two seater. Hard to tell from these pictures. Coulda swore it was a 1 seater.
I was back at Williston today. The T-51 has successfully flown. Found out some details. It has a 300 HP Honda V-6 motor in it. Reduction geared to keep the prop speed ok. Is really a car engine put in; doesn't have magnetos, doeasnt have dual spark system, etc. the rampies I spoke to said the pilot was satisfied with how it flew and especially its rate of climb. He claimed over 1,750 FPM which is quite good. They said it sounded wrong; too loud and to high revved. Louder than a real P-51. In general they didn't seem impressed or approving, but that could just be envy.
Since Farstar mentioned the skin buckling in the fuselage under the canopy I checked and took picture to make sure it wasn't the lighting in the original picture. It wasn't. There is some wrinkling in it that I attribute to slightly misaligned sheet skin.
Plane uses a combination of flush rivetting, pop-riveting and screws. Would have looked much nicer with more flush and less pop.
In all I am still greatly impressed with the quality of the build.
Two seater. Not a very good shot since I couldn't climb up on the plane in any way and just had to do a blind shot.
Did you happen to notice if the port side was also buckled?
Bucking rivets has become a lost art especially for home-built. Plus pops are a lot cheaper.
Oh... you just happened to be back to Williston again so quickly. Window shopping?
This one is a lot like the one I helped build while attending Dakota Aero-tech to get my airframe lic. at Hector Airport in Fargo ND in the early 90's A W.A.R. FW-190 pretty much all composite with a VW engine..
Oh... you just happened to be back to Williston again so quickly. Window shopping?
OG brought me along on today's trip. He seems to *really* like the grilled cheese sandwiches there, (plus the chili)! He burned the calories off though, behind the yolk, as the air was continuously pushing the plane up and down. It was a beautiful day with good visibility.
I They said it sounded wrong; too loud and to high revved. Louder than a real P-51. In general they didn't seem impressed or approving, but that could just be envy.
Sounds like a leak in the intake, running it rich, to me.
The T-51 is nice! When I was at Reno in 2010, there was a race class with Thunder Mustangs in it. Quite a few of them, they were quite fast. One lost oil pressure and had to make an emergency landing. He just made it, but swerved off the runway, hit the tarmac edge of the crossing runway and cartwheeled a couple of times. The pilot was fine, fortunately.
A couple of my friends have RVs. They are really fast for their power, and good aerobatics machines.
There is also a Harmon Rocket here. That's an RV on steroids! Check this out:
Yep, that sheet was misaligned or mis sized...looks like he riveted around the edges, got what he thought was a good fit, and then riveted the inside - and there was too much sheet. Been there, done that. With pop rivets it's easy and quick to drill them out and do over. With bucked rivets not so much.
Like all builders, he was faced with a decision of time and money. It's just a cosmetic problem, not a structural one, so there's no compelling reason to fix it.*
On automobile engine conversions, I'm always cautiously optimistic. Certified engine technology is literally stuck in the 1940's. The reason there are two ignition systems in aircraft engines is that magnetos are crap. Okay, not crap, but sufficiently unreliable that it was long ago decided that the only safe thing to do is have two of them driving the spark at the same time. Hell, cars got rid of distibutor caps twenty years ago...and magnetos are a distant memory except for a few motor heads.
Don't even get me started on carburators. Yes, my little VW engine has one, but it's 1930's technology. There is no excuse for why modern GA aircraft engines don't use fuel injection, other than idiot regulations.
* I've come to realize that in the homebuilt world there are builders that are also pilots and pilots who are also builders - that is to say some really enjoy building the aircraft, and others want to make something to fly. One can usually tell which camp someone falls into by fit and finish. My aircraft has a lot of "gooder enough" because I just want to fly, and didn't get too fussy over minor fit and finish blemishes.
It's like car restoral. I'm more of the car-of-many-colored-panels type of guy, rather than the took-it-down-to-the-frame type. The difference of value is big, but chances are the red car with the blue hood and yellow front quarter panel gets driven a helluvalot more.
It's like car restoral. I'm more of the car-of-many-colored-panels type of guy, rather than the took-it-down-to-the-frame type. The difference of value is big, but chances are the red car with the blue hood and yellow front quarter panel gets driven a helluvalot more.
All good points!
There was a year where people bought a "car-of-many-colored-panels" brand new.
I was fortunate/unfortunate enough to live in an area of "economic difficulty" where U-Pick-Em parted cars were never made fun of, as long as the ultimate defense could be proven - Hell, It Runs, Doesn't It?
And the Harlequin? Well, this is what happens when Germans try to get fancy and hip.
It's like car restoral. I'm more of the car-of-many-colored-panels type of guy, rather than the took-it-down-to-the-frame type. The difference of value is big, but chances are the red car with the blue hood and yellow front quarter panel gets driven a helluvalot more.
All good points!
There was a year where people bought a "car-of-many-colored-panels" brand new.
It's not what you were talking about, but I guess it serves as an example of how wildly tastes can vary.
My father's garage put these two cars together, they were a new blue Hillman Imp and a new white Hillman Imp, swapped the doors, bonnet(hood) and boot doors over and then fitted them out and painted them for Dumbarton Police to patrol Loch Lomondside
apologies for the bad condition of the slide
Article in a Dulux brochure:
So swapping panels etc. has been going on for a while
How did they fit all that stuff into the "Cruzer"?
no back seats oh and the engine is in the rear too, those little Imps were the hot hatchback of their day, they were very popular in the 60s, 70s and 80s as race cars
I (heart) SimHQ. A thread about a 7/8ths scale aircraft in the model forum (kind of a mis-match) that goes afield to police cars with swapped doors and hoods.
I (heart) SimHQ. A thread about a 7/8ths scale aircraft in the model forum (kind of a mis-match) that goes afield to police cars with swapped doors and hoods.
Still waiting on the crankshaft and prop hub.
Just shooting the breeze while awaiting your parts delivery. What? Do you want us in the hangar kicking the dust up while waiting?
Tear down of the engine has commenced...learning a lot about how it works.
Camera has been left twice at the airport, so I guess I'll share pics after the fact. As one can expect, there were some snags in the process - nothing ever seems to go smoothly with me - but it seems pretty straight forward.
I was doing some poor mouthing at the cost of the new crankshaft (200 USD) and the new prop hub (230 USD), when one of my EAA brothers gently told me to shut up. He's having to rebuild his certified Lycoming engine, and one lifter - just one - costs 400 USD. And there are eight.
I'm looking at just over a grand to fix the plane, including replacing the prop, two spars, recovering, and changing out the crankshaft...he's staring at ten thousand just for the engine and hoping it's enough.
Damn... Yeah, that is the thing about whining... you have to be mindful of which audience you have.
Dart, it sounds like you have made a lot of good choices for your circumstances. Flying is not an inexpensive hobby, but you have made choices that helped make it more economical than it is for many. Of course, all the work you put into it is another kind of 'expense', but you seem to take a lot of pleasure in that.
I am rebuilding the engine from a 1980 Suzuki GS1100. The crankshaft is discontinued, but the retail price when it was discontinued was $2,717.13. This is a roller crank (ball bearing all around). The crankshaft for a 2015 Polaris 1000 sportsman ATV is $991.99 ( twin cylinder, sleeve bearing).
Here's my guru, Dave, surveying the task ahead. Not the engine as much as teaching my dumb butt as we go along.
Hmmm, so that's what a wrist pin is...neat. "Put a finger on the...[sproing]...so it won't fly across the hangar. Did you see where it went?"
Most of the way to where we can split the case.
But all the RTV Red stuff has to come off, so I spent some time with kerosene, a soft toothbrush, and some wooden sticks turning this:
Into this:
Valve push rod label cardboard holder thingie.
Front left cylinder running a bit rich. Hmmm.
Case split and we get to see some guts.
Here's the prop hub, front bearing, and source of the problem:
The silver thingie right at the start of the case, behind the hub, is the bearing. There's a little cup right behind it - it looks like a beveled piece - that is a kind of splash guard, and it's warped. Indeed, we could find no way for that front bearing to get oil but by having some just thrown on it from the engine.
The prop hub just fell off without the bolt to hold it in; I thought the heat shrinking around the woodruff key would have kept it on. It may well be that the crankshaft is okay and the hub was katywhompus. But in for a penny, in for a pound, and the new crankshaft and hub will go in the engine.
Pulling bits and pieces off. I am sorely lacking in tools and we couldn't pull the drive gear off of the shaft...I'll carry it someplace professional and beg them to do it for me.
We're writing stuff down and marking stuff up on what goes where, and I'm making everything slow out of ignorance. Dave has been a helluva guy for displaying the level of patience with me that he has.
But all the RTV Red stuff has to come off, I have to take a pic and show the reason why red RTV should require a licence. The previous person should be banned from all colors of RTV.
And I need to fully understand how it works anyway. It's the only part of the aircraft (until now) that I hadn't assembled or built.
Tomorrow back at it.
Funny story on the camshaft drive wheel removal:
Lacking a puller that could grab the teeth properly for removal, I carried it to a couple places.
The parts store had the same type puller that I had borrowed, so no joy.
First mechanic shop told me that I'd have to go in line for repairs of any sort and that the soonest they could get to it was next week. I tried to explain that I had the crankshaft not only removed from the engine but in the cab of my truck and only needed the gear pulled off of it, but he was adamant. He also said he normal shop fee would apply. I didn't even ask what that would be. I was scandalized, to be honest, as this wasn't a dealer or a specialty shop, just a regular ol' mechanic shop.
The second shop I stopped into had three guys covered in grease eating lunch when I stepped through the door. One of them was smoking. "Reckon we can give it a shot, lemme finish my sammich, though."
We jawed about the engine - one of the guy was familiar with VW's being used on aircraft - as well as football, weather, dumb people and their cars in the bay as we installed the puller, and in short order it was off.
"Wadda I owe ya for it?"
"I dunno, whatcha figure?"
"Here's ten for the lunch I made you hurry up."
"Works for me."
I probably could have gotten away with a handshake.
Always nice when you meet the right people for a job. The guy who works on my motorbike I sometimes have to slap over the head so that he doesn't forget to charge me what I owe him - he just likes the bike way too much.
I know that you made sure that the case halves were put together correctly. They weren't on my Sonex. The engine developed an oil leak because of that that drove us crazy trying to find.
Everything cleaned, crankshaft and camshaft put into place, time to mate the cases:
Lots of careful fitting together, but it's looking pretty good.
We actually had a minor mishap where the ancient ring compression tool used to put the pistons in the cylinders wasn't cooperating and we wound up breaking a ring. Sigh.
So I got a new, better tool and a new set of rings. Pretty expensive lesson on why getting frustrated and whacking things isn't the way to go.
But she looks pretty engine-y.
Loads to do, of course, including mounting accessories, the prop hub, valve thingies, etc., but things are really looking up.
Thursday the guy in Georgia with the extra brakes and wheels from his Nieuport projects, and hopefully that big gaping hole in my "repair the problem instead of just fixing it" plan for my airplane will be solved.
What compound did you use as a case sealer for the case half? 3Bond is the maker for most of the motor bike manufactures (Yamabond, etc..). I hate the old school Permatex 2b, but RTV silicon would be the worst possible choice.
Quote
We actually had a minor mishap where the ancient ring compression tool used to put the pistons in the cylinders wasn't cooperating and we wound up breaking a ring. Sigh. So I got a new, better tool and a new set of rings. Pretty expensive lesson on why getting frustrated and whacking things isn't the way to go.
It is not hard to break pistons and piston rings. I still try and do them by hand and that is how I will be doing it on the GS1100 mono block this week. Yes it is a pain and takes a lot of time and patience. I learned long ago that the force from your hand mashing down on the cylinder can break the ring lands of a post 80s design motorcycle engine. The KTM RFS engine has a very strong oil ring. Believe it or not, 2 worm style hose clamps with the screw adjuster 180 degrees apart works better then most special tools. KTM says to install the piston into the cylinder and then fit the wrist pin. Austrians must be very strong. Fitting there super thick wrist pin clips is hard enough with a just the piston. Installing a piston from the top allows for most any ring compressor. That is not possible with most roller cranks. crap, I am rambeling
About your cooling... Could you put a small tube (1/2 or 3/4) in the cowling that would trap some of the fresh air and direct it behind the front cylinder?. It would not take much, in fact too much could cause a cold seizure. Your main problem is that the hot air from the front is what is used to cool the rear.
The only solution I can think of would be making the cutout in front of the cowling a bit larger. Might ruin the looks, though. And of course, might weaken the cowling structure. Is there any way that you can design some baffling into that cowling?
Actually, it is baffled. The engine is split horizontally - note the aluminum sheeting across the front - with the baffling. This causes a high pressure area on top of it, forcing the air down through the cylinder heads.
It may be a simple as cutting down the lip that goes across the front there.
Yeah, that could work as long as it doesn't weaken the cowl and cause it to vibrate. Got a wind tunnel nearby? I'm kidding but I know it must be frustrating. Have you been on homebuilding forums to ask how others solved the problem?
The consensus within the Nieuport 11 community is "Yeah, weird, huh? If you figure it out, let me know. If the engine is running within tolerances, don't worry about it."
Out of pure curiosity I did some searching and found the following page, I don't know how applicable it is in your case but looks like good info anyway.
Forgive me Dart if I saw you comments in another thread about heating of a back cylinder and hijacked this thread. Air flow is almost the same as water flow. You can see water, but you can not see air. For the basics think of water flow and not air flow.
Your prop spins in a given direction. The heat (air) is moved back and away, following the direction of rotation. The air flow under the cowling is trapped at the back if you do not have some outlet for the pressure differences. This is dead air space. Spray your garden hose into a bucket. Note the direction of the returning splash.
Does this description match the rear cylinder in question? If it does, then you only need poor fitment (or a purposeful air gap) on that corner of the cowling to let the air flow.
You mentioned that you could tell that this cylinder was running hotter then others. Did you mean that you could see a difference in wash across the top of the piston, or did you mean that you could see smoothing (wear) on a given cylinder?
Then that is heat expansion of the piston against a cold cylinder. You are over cooling that cylinder. You need to baffle air flow away from it.
It may be as simple as a shield in front of the cylinder to limit the prop wash directly onto that cylinder.
Is this the front cylinder that is first in the prop direction of rotation? The opposit cylinder should pick up air turbulence and heat from the engine cases.
if you want a good example of air cooled cylinder problems look to the Yamaha YZ/WR 490. Even if you have the correct jetting, the owner can easily seize the piston. What a pain that motor was in CA. Run it outside of sand and elevation changes, she was stable, torque personified.
if you want a good example of air cooled cylinder problems look to the Yamaha YZ/WR 490. Even if you have the correct jetting, the owner can easily seize the piston. What a pain that motor was in CA. Run it outside of sand and elevation changes, she was stable, torque personified.
The IT465 had similar problems, but that was more due to fuel starvation at higher power levels, the standard Yamaha tap on the tank could not flow enough petrol to keep the float bowl filled and that lead to over heating due to a weak mixture, instantaneous throttle response was fine but anything more than a few seconds at full throttle then the piston melted. It had happened to quite a few IT465 owners I knew, including me, 6mm drill on the tap and I never had any more problems after that.
Alicatt, That is the same engine family. I stand corrected by your real world experience. Your tale sounds similar to the problem with the 88-89 Yamaha EX 570 snowmobile. It took 3 years for the experts to find that the problem with the VM carbs was caused by air turbulence from the secondary clutch.
I went to put on the shrink prop hub and the worst thing happened - it went on halfway and stopped.
Tarnasions! Golly gee!
When this happens there is only one thing to do - tear the engine back down, remove the crankshaft, and very, very gently take a puller and get it back off. Fudge.
The woodruff key was a smidge too tall in the back.
Fuss and bother!
The upside is that Dave's ever so slow methods really made soaking in all he taught me sink in, and in about an hour and half I had the engine torn back down. One of the airport guys had a puller, and it came off okay without damage to anything.
Many, many measurements later, a little work on the belt sander, and the key is back in. I'm going to re-polish the crank where the prop hub goes on, make sure there's no burrs in the prop hub, and give it another go tomorrow.
Rassle-fassel.
* I may have used words similar in sentiment but slightly coarser.
Btw, big smile on doing all the woodwork in the cockpit, burnishing the outside of the aluminum, and not taking some rubbing alcohol to remove the factory stencils on the inside of it.
Gotta be a Robert Baslee/Airdrome Aeroplanes construction!
Re-polished the crankshaft, polished the inside of the prop hub, heated it to a tad over 400* degrees and she fell right down to the oil slinger like it was supposed to in the first place.
While I was waiting on it to heat up on the hot plate, I also put a new big N on the tail.
Time to put it all back together!
* All the instructions say "heat it to where it will fall down the crankshaft freely." No numbers with that. I called Great Plains and they said "somewhere around 400 degrees." Well, 400 didn't cut it, so I took out my torch and heated her up as evenly as I could to about 475 or so and she plopped right on. The problem, I think, is that the "400" assumes an oven with the whole thing heated up equally. I don't have an oven in the hangar, so I had to make due.
Dart, I understand about the prop hub stopping upon install, but why did you have to tear down the crankshaft to remove?
What you did is called an interference fit., or so I was learned .
Be careful how you heat things. You can make them soft or brittle.
" "400" assumes an oven with the whole thing heated up equally " You are correct in that it assumes an even heat. If you ever learn how to bore a cylinder, you have already learned how to press a sleeve.
In order to remove the prop hub which was on half way, I had to use a puller. The only way to get a grip on it was to have the crankshaft out of the engine.
And I needed to inspect the crankshaft and the woodruff key that the hub fits over. The only way to do that is by removing it.
The upside is that I kept the rods, bearings, etc. on the crankshaft so it'll be quick to put it all back together. Clean everything up, put the crankshaft back in (lining it up with the camshaft), mate the case, put the pistons back in the cylinders, wrist pins to rods, heads on cylinders, valve rods and lifters on, carb, oil screen, oil pump, and I'm ready to start thinking about triple checking timing marks and spark plugs...
Everything all lined up and the case put back together? Yep.
After torquing the case nuts I stopped for the day. I was getting all scatter brained and started setting things down and forgetting where I put it and not finding things that were right in the open.
Not a good way to be when I had the task of positioning piston rings and putting the pistons in the cylinders. Better to call it a day, drink some water, and get something to eat.
I borrowed a bit from the instructions on the circle thingie that goes between the flat oil slinger and the prop hub. With it on the crankshaft I couldn't get a good view if the prop hub was fully seated or not when mounting it. It said that it could be split and the join rotated horizontally in the case once joined, so I did that.
I need a pinion removal tool to back out and re-align the distributor gear...I was off a tooth when I put the darned thing back together. It's on its way and should be here Tuesday or Wednesday.
Then it's a matter of putting the bolt into the prop hub (Dave has it to drill a hole for the cotter pin), putting the Diehl case and starter on the back of it, putting the spark plugs in, mounting it on the engine, filling it with oil, and seeing if she'll start and adjust the timing.
So engine is pretty much done. Just have to put on the valve covers, torque the spark plugs and hook them up, and mount the engine and prop.
Just to show how my "bad luck/good luck" life works, there's a little spring that goes between the cam gear for the distributor and the distributor. Once everything is lined up as it should be, one simply drops it into a hole on the gear and puts the distributor on top of it.
There is a cut in the side of the well where the distributor fits in to meet the gear, no doubt to allow oil in and out, and is about a third the way up from the cam gear. It is horizontal. The spring goes in vertically.
I know that it is the perfect size - not one bit bigger or smaller than absolutely necessary for a zero tolerance fit - for the spring to fit through. The spring fell to its side and I used my little wooden skewer to pick it up and it simply vanished. Gone. Not popped out, just gone.
The spring is in the engine. The tiny half inch long three eighths inch wide spring Is. In. The. Engine.
Breathe.
Flashlight down the hole. Can't see it. Start undoing the bolts to the plate where the mechanical fuel pump would go.
Have my two Pros From Dover gently step in and volunteer, suggesting I sit in a chair and let them do it.* Apparently I looked like I was about to rip the whole thing apart with my bare hands while producing a stream of profanities that would probably take the paint off the cars parked outside the hangar.
Pump plate removed. Flashlight. No spring seen.
Oil filler plate removed. Flashlight. Silence. More flashlight. "Hand me that magnet," Rusty says, and expertly removes it from the bottom of the engine.
So fantastically terrible luck in having the spring go into the engine, but also wondrous good luck that it could be spotted and fished out.
From there things went pretty quickly, and we moved the engine onto a stand over by the aircraft, hooking up various electrical things and turning it over to set the timing. It was off initially, but thanks to the flashy flash gun and an allen wrench, we soon got things right.
* LOL, it's been a long time since I was put in "Time Out."
Went flying with a couple friends yesterday. As I was putting my flying machine back in the hangar she asked when are we going back to Talladega. I told her soon.
I made the sleeve for the tail wheel mount, and bought some more bolts, so that's a quick put it together. So figure that done.
The engine mount is still bent, so I've got to either find someone local with a press or take a trip up north to my father-in-laws.
Brakes are a 50/50. The drums themselves can be drilled to fit the wheels no problem, but the drum has to has it's hole enlarged. So I need to find a lathe or do it the long way.
I'm thinking of ordering some more wheels. Or looking around for some heavy duty BMX wheels. It's not like I'm risking a lot going to those thick solid ones. They just have to have the big hubs.
Gotta fabricate and move the brake handle from the stick to the side of the cockpit as a bit of idiot proofing.
Then touch up some paint, mount the engine, put the prop on it, put the brakes and wheels on, put the wings on, and go fly.
My camera had crapped out, so Mike, a fellow EAA'r with a lovely KR2, took this photo. Sunlight on the tip makes it look candy corned.
A few other things done:
Brake handle mounted; I need to get some more cable to fit the new location, but I like the routing paths. They aren't going to interfere with anything.
Engine was re-timed and ran well!
And more stuff to do:
In all the shuffling of stuff around my hangar, I mislaid two of my 10mm bolts needed to mount the oil cooler. Simple enough to replace, but it's disconcerting.
Go on a bug hunt. Paper wasps are in full swing, and industrious suckers. On the other side of the aircraft from me, right about where the prop tip is on the back side of the firewall one had started a nest.
I know this because I put my hand there without looking and got stung for my effort. Just three cells, so she had clearly just begun her work. But that means I've got to seriously look at each piece of the aircraft to ensure I don't have more.
Drum brakes installed. I had to do some thinking on this, though it looks dead simple.
My original drum brake mounts, which was a bushing welded to a bit of thick sheet steel, were just too good to toss aside, as they answered so many questions.
The problem was that the weld beads were on the outside, towards the brake. This didn't matter with the band brakes, as the drum was on the wheel and the bands went around the outside of them. With the drum brakes, they had to go flush against the steel plate, and couldn't with the bead in the way.
My solution was to take a 1/4" thick bit of poplar and oversize the hole in the center to go around the bead, and use it as a big ol' washer. It worked out really well.
Two bolts hold the brake assembly to the steel support, one on top and one on bottom.
Happily enough, the bolt hole that had the band brake mount was in perfect position for the cable clamp for the new brake as well.
There's some slack put on the cable to the rear of the mount to allow the arm to move forward as the gear rises in the bungees without tightening the cable.
One of my EAA brothers has the drums for drilling holes that match the wheels, and I should have that by the end of the week. I have a basic inability with the tools at hand (and lack of skill) to drill them correctly where the drums are centered on the wheel.
Some of y'all might not be aware, but the axle setup is, um, interesting in my airplane (and I think most Airdrome ones), in that the axle is a tube and the wheels rest on a 3/4" inch, 12 inch long bit of solid round steel stock that is slid into it. The bushing around it is PVC pipe.
Both of mine are slightly bent, so some replacement stock is in place. I'm going to increase the length of them by about six inches. That should be here by week's end as well.
I washed the wings yesterday evening and spotted a few things that need correcting. I cut a small inspection slot in the end of the undamaged wing to look at the spar and need to patch it, and do some touch up painting.
But I'm damned close to putting her back in the air!
The axle inserts have arrived, and I took them out to the airport. Since the brake drums themselves weren't ready, no need in undoing the bungees and mucking around with the axle.
So I patched up a couple of inspection slits I cut into the undamaged wing, touched up the paint on the wings, drilled the replacement spar on the top wing, put on the side sheeting on the fuselage, and was about to call it a day.
My EAA brother called to say he was finished with the drums, so I hopped in the truck and made my way over there. Jack is a great guy and had a helluva career as a USAF pilot, so I got him talking about flying...I just sat there slack jawed as he talked about some of the stuff that happened to him in SE Asia in the '60's.
One of the tales he regaled me with was flying a Cambodian AF plane over to Vietnam to have bomb racks retrofitted to fit US munitions. His introduction to the MiG 19 was a Cambodian pilot pointing stuff out to him and going through start up and shut down procedures, gear, flaps, etc., with everything labeled in either cyrillic or squiggly writing - and the inherent hazards of flying a MiG, regardless of markings, over South Vietnamese airspace. He had "friendly aircraft is armed and will respond in kind if shot at" put in the NOTAM for it.
I did a down and dirty mounting of the drums to see if he got center right on the holes and it's on the money.
But by that time it was late afternoon and I was wilting from the Alabama heat and called it a day.
Once I put in the new axle inserts, it's time to mount the wings, re-time the engine, and do some taxi tests to ensure the brakes won't do anything hazardous.
One of the guys who has built and pilots this type of aircraft told me, after hearing the damages, "It'll be a year before she's back up," to which I guffawed.
But unless one is willing to go full time on a hobby like this, it really stretches out.
One of the guys who has built and pilots this type of aircraft told me, after hearing the damages, "It'll be a year before she's back up," to which I guffawed.
But unless one is willing to go full time on a hobby like this, it really stretches out.
Having seen how long it takes to restore an aircraft even with a crew working full time I thought the same thing when I heard about the damage you needed to fix. Looking really nice again though.
Okay, so brakes all good now - at least until taxi tests say otherwise!
First, those 3/4" round steel bar axle inserts were bent, the right being the worst:
Interestingly enough, they were bent on the outside of the axle, right after the bushing that holds the brake mount and at the wheel.
New inserts cut and the plane up on blocks, bungees removed. I wonder who will spot the inherent reason for my general difficulties in the picture.
New inserts in, bungees in place, end caps to hold it all in place drilled, and just a little cleaning up of the cables needing done.
A few notes:
Note the cable routing along the inside of the strut with an easy loop for slack as the assembly moves up and forward on the bungees.
The twisty ties are going to be replaced or hidden with some twine wrapping, which will then be painted, along with the cable. The cable is staying on the outside of the gear leg. I'm all over aesthetics at this point (not that it was ever high on the list, mind you), and since the entire aircraft is an exercise in drag, it's not like I'm spoiling the clean lines.
There were two things spotted and corrected with the hardware: One of the bushings on one wheel wasn't seated properly at the factory. A little gentle tapping put it right. Second, one of the brake shoes on one drum was proud of the assembly and had to be taken down a bit to ensure a fit. It was tight fitting into the drum before placing on the aircraft.
You mean the little black tube that's pointing upwards?
It's actually for the brake mounting assembly arm. In the lower picture you can see it attached to the arm.
Since the axle isn't fixed and can rotate, the brake assembly is mounted to a bit of steel plate with a big bushing that goes around the axle insert.
The arm fixes it in place, keeping the whole thing from going around and round.
Here's a good picture from when I had the band brakes installed.
As the axle moves up and down on the bungees, the whole brake assembly rotates, and since there is a loop in the cable, the brakes don't apply themselves.
A question if I may... N11s didn't have brakes in 1916 so why do you include them on your build now, considering the problems they have caused you? Is it a FAR legiislation thing over there?
There's absolutely no requirement for brakes, and if I were working off of grass strips I wouldn't bother.
However, on pavement it really is needed for starting and stopping the aircraft - at taxi speeds only - for taxiways and stopping at the end in front of the hangar.
While we don't have a lot of traffic at my field, I have to be able to stop short of the runway if someone is coming in for a landing.
More than once I've been tempted to leave them off, believe me.
Oh, and here she is as I left her yesterday, wings on and ready for rigging.
Next up after rigging:
Touch up the center wing over-wrap section, repair and mount the gun, patch the access holes I had to cut for installing wires, touch up paint, re-time the engine, and it's on to taxi tests.
I'm not going to cover the wheels until I know everything is good with the brakes.
I received a letter in the mail from the Military Aviation Museum in Virginia Beach, VA inviting my aircraft and myself to their airshow, which will feature WWI aircraft. They did an FAA search for all WWI sounding planes to gain participation. I'm sure you got one, too.
Sure, it's a kind of form letter and they got my first name wrong (it's just Frank, not Franklin), but I was pretty jazzed by it.
Dang that would be cool Dart. Just looked up the museum and you would need to practice your grass strip landings if you went. From the looks of it you would get there faster pulling the plane in a trailer than flying though...
I've been following your build for a long time. Glad to see she nearly airworthy again.
BTW I went to your new website and I'd like to point out a wee problem with it. If you click on any of the working links and then click on the Home link it puts a whole new menu/windows in to the display area (easier seen that explained). I think all that is wrong is the Home link is "http://www.darts-page.com/index.htm" and it should only be "index.htm".
When everything is tight-ish and the upper wings are leveled to the fuselage.
I'd like to say there's some sort of high science involved including wire tension gauges and stuff, but on these kites there's a bit more art involved.
Basically, one levels the aircraft as if in flight, both along the fuselage and across the front.
All the turnbuckles get tightened to about two threads showing.
Starting from the landing wires, which hold the lower wings up, one tightens them until the upper wing is level across the bottom (there is almost no airfoil there, as the ribs are basically flat, and it sets the right angle of attack for level flight). Once that's done, tighten the uppers to not show threads.
Double check. If it's now screwy, adjust as needed.
The wires should be close to the same in tension, but it's not rocket science. It's hard to explain how tight - I just strummed the wings of a bunch of flying types of this aircraft and it's sort of a low G string sound - enough to where it's not trying to pull the airplane into a ball but tight enough to keep everything solid.
Only the upper wing is measured for level, as the lower wings are at a dihedral and will follow the upper wings. I've long suspected they're mostly there for structural stability, working as a lifting surface as well.
I encountered a problem requiring some minor surgery during rigging. The left front inter-plane strut was slightly damaged, dimpling where the final front drag wires went through it, and cut a bit short during the build process, so I'm going to replace it. It should be here by the end of the week. So I'll have to remove it, measure to fit the new one, cut, cope, and replace. Thirty minute job once the tube comes in.
Dart, You have just described how to relace and true a spoked rim. When it comes to spokes, they now have a special torque wrench to take the art out of the process. I still prefer the old school. (shock).
Sorry you bent the old girl, but I for one, have enjoyed the drama of your journey.
Aldo, this is much easier. I gave truing a wheel using the little wrench a spin (!) and figured out it was worth the ten bucks in my time to have a bike shop do it. I was chasing my tail with so many spokes. This happens in a lesser degree with airplane rigging - sometimes one has to just loosen all the wires and start over.
Colonel, rigging very much can change flight characteristics.
If the top wing isn't level all the way across, it will induce a roll, as the airfoils won't be the same. Or it may break to one side instead of another or straight ahead. Or have one aileron more responsive than another.
Of all the things I worked on in building the plane, rigging the wires took the most time for any single task, including rebuilding the engine. The better the rigging, the better she'll fly, so I went through a lot of wire and nicopress fittings figuring out how all the wires interact.
Since she's ground trimmed, this also means adjusting the angle of incidence on the horizontal stab in the back. Right now it's set to where I'm a touch nose down at cruise, giving me a nice hands-free straight and level flight. It also means that on take off the stick is slightly to the rear, ensuring the tail doesn't come up until the rudder has enough bite of air to keep me from departing the runway. She takes off from a near three point attitude, which is actually pretty common for this type of aircraft, as in reality she's just a fat ultralight with tons of power for her weight and thick airfoil.
Sadly, the new tube hasn't arrived....I guess USPS is running a bit slow.
I went out to the airport with a long bit of wood measure out the new strut, as it's a lot easier and cheaper to cut down and whittle a bit of lumber than a flattened tube.
I also had a bit of a flashback. I pulled out the plans to see what the length there called for and laughed. "As Required," is the dimension listed.
So using the other one as a starting point, I matched it and fussed a little to get the measurements just right:
It's just held in with clamps, but the wing is level with a little tension.
Speaking of which, with the strut longer than the one I had originally installed, my wires are too short. At least too short to tighten without leaving threads exposed. So I get to cut and swag new cables. Hurray!
I guess my deep desire to drive my swagging tool (unaffectionately known as the M'Fer to me) to the Tennessee River and throwing it as far in as I could was a good thing to have repressed.
Well, I'm calling her flight worthy, though there are a few things left.
I did a bunch of taxi tests with the brakes, using actual testing methodology:
I took temp readings of the brake drums using an IR thermometer from cold (okay, that's relative, in the hanger, in shade, they were 88 degrees).
To see if there was drag on them (the wheels spin freely when lifted from the ground, but there's some flexing of the wheels with the weight of the plane on them moving over ground), I taxied about 500 yards at a normal taxi speed and let her roll to a stop after killing the engine. Twenty degree increase on the left drum, ten on the right. Slight squeak at the end of the roll.
Stopping required no adjustment of the tailwheel to stay straight.
500 feet taxi at normal speed, hard braking at the end, bringing me to the halt with the engine off in about 20 feet. Thirty degree increase on the left, twenty five on the right.
Braking required no adjustment of the tailwheel to stay straight.
1,000 feet faster taxi, brakes used once to slow, full brakes at the end with the engine at idle. She managed to stop in about fifty feet ( ), with some noise. Oddly enough, thirty-five degrees temp increase on left drum, thirty on the right. I'd of thought it would be higher.
Last test, after the drums cooled a bit, was holding from the start. She'll hold firm from idle to about an eighth of increase. After that, she'll roll - but not real well, and it's a gradual grabbing and not locking up though all the throttle I was willing to give her (about half). As expected, she did want to go left, but only a little.
One of the guys watching all this foolery brought up a good point after I got done: the drum is on the outside of the pads. As they heat up they expand away from the pads. In the band brakes, it was the other way - as the drum heated and expanded, it was into the band, actually increasing brake efficiency.
Small repairs to the gun - "heat shroud" replaced with a new bit of PVC pipe, new barrel to extend from it fabricated from a bit of spare tubing, crack in magazine glued and re-painted (it's not invisible). Everything re-painted, in fact, and I set it up to dry before I it gets put back together.
I have a small amount of oil leaking from around where the prop hub goes into the engine. This is really weird, as the spinner cup and the seal in front of it should make this pretty much a spot for casual oil. Then again, this is the first time I've really cranked up the RPM's since rebuilding her, and I need to check oil levels. I may have a bit too much in, as I had to add to account for the huge oil cooler.
In the VW, to really check the oil level one has to lift the tail to get the oil pan level.
Oh, and the airspeed indicator. Someone on the EAA forums mentioned that they had the same problem as I do - reading 10 MPH too fast - and fixed it by moving the static port to the rear of the fuselage. Or I could pull out the pitot tube/static probe combo thingie and mount that...but I'm kind of enamored with the idea of the mechanical paddle-on-music-wire ASI that Rick Bennett came up with and will dink with that.
So it's now down to waiting for weather, a nice calm morning and a ground crew to start all over back at Flight Number One. My plan is the same as it was back then - go up, fly a close pattern, land.
But I got to say I got a huge thrill pushing the throttle forward and feeling the aircraft around me. If the winds hadn't been pushing, I'd of gone up yesterday.
Could I suggest that the battery has a "dead cell" ?
What happens is that, if a lead acid battery is charged to quickly or drained too quickly the heat generated causes the plates inside the cells to distort. If two of these plates touch that then becomes a short in that cell and makes it a dead cell. This now drains power from the other cells in the battery. Only solution I'm aware of is to replace the battery.
Keep up the good work.
Andy
Yep, she's shorting internally.
Zero volts, zero amps across the posts, but the battery is very warm to the touch. Removed it at 0800 and at 1100 it was still generating heat sitting on the concrete floor.
But it's a damned motorcycle battery, which is laughably inexpensive in the context of aviation pricing.
It was a bad luck/good luck kind of day.
Bad luck in that the battery took a dump in a big way.
Good luck in that it did it right at start-up in front of the hangar. Here I am all flying helmet, goggles, strapped in and shouting "clear prop" and the battery goes fzzt. It didn't take much trouble shooting to figure it out.
But fantastic that it did so right then and not fifteen minutes later when I would have been 1,500 feet above the ground and working best glide to the airstrip or a field with a silent engine.
It gives me time to refine my vane airspeed indicator and mount the gun.
Talking of warm batteries, I had not used my drone for about 10 days, everything was all charged up when I put it away and then due to weather and lots of low flying aircraft never got to use the drone, so when I got it out last week and selected a battery to install in the drone the battery was quite warm Eeek! and with all the scare stories about Li-po batteries ...
Anyway I knew that the battery is "intelligent" so it turns out after leaving it for 10 days with a full charge it will self discharge to 60% for long term storage, now I store the batteries separate from the drone!
P.S. I had took some pictures of the wheels and suspension setup on the Bleriot monoplane that was at the local airshow but alas my camera has developed a fault and everything is out of focus the focus mechanism won't focus more than about 1m away.
Seems scary that something as basic as a cheap bike battery might cause another year-long repair...
I wonder... obviously there's no magnetos on this engine, but there's an alternator. Not being an electrician myself, but couldn't there be a capacitor or similar thing put into the circuitry which would store the energy of the alternator long enough to provide the next spark for the ignition...?
There is normally a rectifier pack attached to the alternator (if it's like a car one) that converts the AC the alternator generates in to DC. Is there no way to use the DC out put from the alternator to run the ignition circuits and only use the battery to start it ?
What does the battery power other than the ignition ?
I've not the first clue about these things myself but I might guess that the alternator (since it's a car engine, it might well be from a car) produces "spikes" of converted DC power, not a steady output, based on rotational angle. That's why I could imagine you would need something acting as a puffer in between to run the ignition from it.
Second question would be how the fuel is moved (electrical pump or gravity feed?)
I'm sure Dart has had hundreds of thoughts on the topic and very curious what he thinks. Just seems a shame that a 70EUR part failure could turn him into a glider pilot...
The electricity is generated by, well, a generator that's on the back of the engine - magnets on the flywheel and the coil on a case behind it. Can't use an alternator because the prop is on that end. This goes into a voltage regulator that then charges the battery. Anything over 1500 RPM's generates enough to begin the flow - but since it's run through a big (make two fists, put them together at the thumbs and that's about the size) regulator there aren't any spikes.
If one wants to do the research, it's a 20 amp Diehl case generator.
The fuel pump is electric as well, but it's a tiny pull on the charge.
If anything toasted the battery externally, it would have been the battery charger I used to re-juice it.
Dunno. Chalk it up to the risks inherent in Experimental aircraft. They don't call it flight testing for nothing.
Charging systems can be qualified by the type of magnet used to excite the electrons and the type of voltage produced. Ignition systems are similar in that they either need voltage present to fire or they can work from the electrons produced by the system. Modern batteries are not your fathers battery and care must be taken when charging.
Feel free to correct me if I am wrong. It's been 30 years since my last class work and the more I type, the more I realize I have forgotten.
Both an alternator and generator use copper winding to create a magnetic field, while a magneto uses rare earth, perminate magnets. The method used to ground the excited coils determines if the output is AC or DC. If your AC output is twice the required DC voltage, simple items like incandescent bulbs will function as AC or DC. A regulator or zenior diode ensures that the system does not exceed a given voltage. Both bleed excessive voltage to ground. A rectifier converts AC to DC. A rectifier is either single phase or three phase. AC voltage is a negative and positive sine wave. A single phase rectifier throws away the negative side of the AC output. A three phase rectifier converts the negative side of the AC output to a positive DC,
There are two types of ignition coils. The first requires power to a produce a spark. These are know as battery/coil ignition or TCI (when we replaced points with an electronic box). Examples are Honda CT 70 and Yamaha XS1100. The second type can produce a spark form the voltage provided by the spinning of the crankshaft. This version is always a rare earth flywheel. It may be points or CDI ignition. Example is your lawn mower an most off road motorbikes that do not have lights or electric start. and 100% they are not fuel injected.
There are three types of "motorcycle" (not Ion) battery. And since this is more important for educational purposes, I will use a new paragraph for each.
Let me precede by saying that all batteries will go bad if you let them sit with zero charge and most will start to sulfate once they drop below 50 percent charge. A typical lead/acid battery will loose 1 percent of charge per day and start to sulfate once the charge is below 50 percent. Storing near a concrete floor has more humidity, so the charge is drained faster. Plus, the concrete displaces heat. A fully charged battery (12.8V) will not freeze at 30F. Freezing can warp the plates, resulting in a short.
The first is the old school, wet, lead acid battery. These are the ones that leak fumes, do not like to be inverted, corrode your frame, and require that you add distilled water to them when they are low. This is your fathers battery. It will last as long as you keep fluid in it, do not seriously over heat it, and keep a charge in it. It is the most forgiving for over charging.
After those, we had sealed batteries. These work the same as the old wet batteries. But, they use a stronger acid and they use fumes, not fluid, between cells. It is critical that you do not over charge these batteries. Use a tender, or float charger, and not a trickle charger. If your charging makes the gasses too hot, then the pressure release will result in lost gasses. This is the same as low fluid in the wet type battery, but here you can not replace what you lost.. A general rule of thumb for charging is half the amp hour rating of the battery for the same amps charging. If the battery is warm, stop charging. This type of battery is better then your fathers battery, especially if you are worried about fumes/liquids corroding your equipment.
The latest fluid type of battery is a "Gel" battery. The fluid within is a jelly. This makes it less prone to over charging problems and less prone to shock damaging the plates. You can still over heat this type of battery, but is is much more difficult. It is more resistant to freezing. The down side is the cost.
Dart, Reading the post you made while I was typing, I would suspect that you over charged the battery. I will rescind that assumption if your assure me that you used a float charger (battery tender) and not a standard charger. An old school, trickle charger is NOT a float charger.
One of the thing we were talking about at the hangar today is the crappy power supply to the hangars. Running my little corded drill dimmed the fluorescents every time I pulled the trigger. I suspect there was a power spike or drain as I was charging the battery. I guess I'm going to have to bring out an uninterruptible power supply box and run the charger through that to keep the power levels steady.
There's a lot I like about my airport, but there's a bunch of things that piss me off. NASCAR operates the airport, and the board has not one pilot on it. The airport manager is not a pilot. They seem to resent the fact that part of the deal for putting the racetrack on the WWII airfield was that they had to build and maintain a new one for the County, and do the bare minimums.
Large sections of grass between the runways and the hangar area haven't been cut all Summer. The power in the hangars is jury rigged through the security lights. Our automated weather station hasn't provided wind information since March. The manager says it will cost 125K to have repaired, and isn't covered by Federal subsidies, so they aren't going to spend the money until the FAA starts threatening to fine them. Some of the hangars leak, and unless one puts in writing a complaint, along with a reminder that any damage to the aircraft or contents within due to watewill be their liability, nothing gets repaired.
Once my 40 hour testing is done, I'm moving ten miles to Pell City. It's about the same price and the management and board is made up of pilots who give a damn about the place.
Went out today and replaced the battery and mounted the gun. Hopefully weather and my little Babette will cooperate and I can go around the patch.
Dart, Your description of when the battery failed is a bit odd. It does sound like a shorted cell. The description of the charger does not mention float or tender. I suspect it is an old school, variable amp charger. These are fine for larger and/or old school "maintenance" free batteries. Can I trouble you to give the letter code of the battery that failed? Something like 12n14a2l, cb7a-l, yt14a, etc..
I was a big fan of NASCAR for 16 years starting with the year before R Petty retired.. I had tickets to MIS each August . Eventually ended up with row 2, seat 1-4 behind the flag stand. I have a signed stub from a legendary flagman. The only year I missed (lost tickets but later found and framed) was the only year a Pontiac won. NASCAR has turned "stock car" racing into a parade. NASCAR sux and they are trying to do the same to motocross.
They are doing a lot of work on this side of the field for PTK, but as I say since they built there sound wall "I grew up next to an airport. I live next to a prison wall".
Well, the "one more thing" monster raised it's ugly head, but at least I solved why the last battery damned near melted.
The Diehl alternator is pumping pure juice to it. I was on taxi to the end of the runway and the voltmeter jumped with RPM's, going up to 16 volts before I backed off the throttle. If I'd of gunned it, the needle would have pegged for sure.
Back to the hangar. No flight. This is why one never invites spectators to initial test flights, or for the first few of them. It's a 50/50 chance they won't get to see anything but a lot of fussing.
A little troubleshooting later, and everything is grounded okay, with no change from what it was before. Disconnect the voltage regulator and it's a flat 12 volts on the battery. Run the engine and it's a flat 12v (as to be expected).*
Well, sh*t. So there's one of three things going on:
1) Voltage regulator is crap and needs to be replaced. Eighty bucks.
2) I need to run a ground directly from the Diehl case to the ground on the regulator. The instructions say "The regulator/rectifier unit must be properly grounded to the alternator. Simply placing the unit on standoffs located on the firewall may not be sufficient. A ground wire may be necessary." Apparently in putting things back together I wasn't holding my mouth right - mine is on a standoff to the firewall - and there's insufficient ground now. But it was okay before. Huh. Maybe two dollars.
3) There's a problem with the coils in the Diehl case. Highly unlikely, as if there was it wouldn't be producing juice, and it's not something that moves around and I was very careful with it when it was off the engine. The darned thing is dead simple:
I called it a day, though, as I needed a decent Internet connection to do the research....plus I've found that when I attempt to repair a problem immediately after finding it, sometimes it turns into a fix that will require a larger repair later.
* My ground crew joked that I should just fly the plane the ten minutes around the pattern on just the battery. I guess I got bug eyed at the notion, as it brought big laughs. Flying an aircraft with the ignition on a total loss electrical system? I'm pretty cavalier, but damn.
I had to fly my Cardinal on a total loss situation back from Fernandina Beach to Brooksville. I made sure I had a good charge before I started out. Called ahead to my home field and told them about it so they were ready if I arrived without radio and had to use light signals. Had enough amps to start, so I didn't have to hand-prop it. Turned off all instruments except for transponder, primary radio and one GPS (Garmin 430 WAAS) which is also my primary radio and nav. Had my route planned so that if I lost power and the radio and transponder that I wasn't in controlled airspace. Then off I went . Uneventful. Arrived an hour and a half later with enough juice that I still had everything and made normal communication with tower for approach and landing. Good experience. Turned out it was a failed voltage regulator that took the alternator with it.
But I have dual magnetos and knew once the engine was running it would continue to do so even if I lost all battery power. You don't have that same situation. You lose electrical and you lose engine. Yeah, I would look at that a bit bugeyed too.
It is very old school (60's Lucus and British) and analog, but you could place a zenior diode in the hot wire for the charging system to battery. It would be a fail safe for the situation you have encountered. Do not forget that the diode needs cooling fins if it is passing current to ground. That flower below the headlight of a 70's Triumph bike is the bit that keeps the battery from cooking.
No pics or video - I didn't have the mind to set up the GoPro, as I was going over the plane closely and when she was ready for flight, went!
Weather was still with some patches of fog. In fact, about 500 feet from the end of the runway was a wall about 1,000 feet high, and when I saw it taxied back to talk to my spotter.
"Hmmm, fog on that end. Whatcha reckon?"
Rusty looked that way, squinted, and said "That's a long way down there..."
And we both laughed.
The runway is 6,000 feet long. I need about 500 feet to take off, and about the same to land.
So I took off pretty cleanly, if a bit longer than normal - she didn't quite leap in the air as before - did a slow climb to build up airspeed to about 1,300 AGL, did a gentle turn until I was going the other way on the downwind, and looked at the runway. By design I was just about over it, and there was more runway behind me than in front.
One of the things I've been doing not so well is my approaches to land. Way too shallow and way too fast. This time I pulled throttle just past the runway end and did a nice curve to the threshold, letting the plane sink in a good glide down to it. Tiny goose at the end for a not bad wheel landing.
Rigging seems okay, though she's got a little pitch up hands free at full throttle - still very much a two finger aircraft on the stick, though, so I'm not too concerned. It might resolve itself at cruise.
Brakes are pathetically weak, which is okay by me.
Engine timing is <this> close, but off a bit. She ran fine, turning 3K RPM's on the climb and downwind before I throttled back, but it's not quite there. I killed the engine at the end* and she kept running for six or seven turns of the prop. So something to work on.
* I have just one switch, the master, and she's electronic ignition. I have to chase down solutions to this, but my money says it's a timing issue. Also, I should be turning 3200 RPM's on take-off. Part of this just may be breaking in the new engine.
Gotta make sure the bugs are all worked out - I'd have for you to make another trip just to see her sit in a hangar!
This morning was a whopping seven minutes of flight, then she went into the hangar.
Along with the timing issue, I've got a tiny leak in the fuel tank along the bottom weld - just enough to wet the barrel - but that's got to be addressed.
Looking good sir, well done overcoming your misfortunes on your first forays air-wise. Lewis looks good too! Do you have to paint the muzzle orange?
No, as I left off the bayonet.
Fun fact - there is no FAA regulation against mounting a gun on an aircraft, or even firing one from an aircraft. It falls under "dropping objects," which is totally okay, so long as the pilot ensures no person or property is damaged.
The BATF, however, has some rules about machineguns that would apply.
Did something happen to this thread? Last night when I checked it there were 38 pages which I thought odd, as it had 75 the last time I looked, now it's back up to 76.
Nope, not changed a thing on it. I just noticed it and thought maybe that your video posts had been removed and put into the screen shot/video thread.
Anyway nice video and thanks for showing us around your lovely aircraft, and nice to hear your voice too, now you will be narrating your posts as I read them
If you look at my YouTube channel, I put up all those old "training" videos and other IL-2 nonsense I made a long time ago.
As we switch from Summer to Winter,* we're entering what I call "wind season," a slight shifting of prevailing winds that happens every year. So it's a hunt-and-peck kind of thing with the weather on a day to day basis, seeking out windows of decent wind to fly.
Kind of pisses me off that the plane is ready to go and the winds have kicked up.
* Here in Alabama we rarely get either Spring or Fall. We go from 80-90 degrees to 50-60 in one great jump, with a dip to freezing temperatures in January.
I still refer people to those training and nonsense videos. Plus I have always been able to "listen" to you in your threads because of them.
Normally I'd be at home with my lower lip stuck out, but tomorrow morning I'm up with the Dawn Patrol to do...maintenance. I'm helping a friend do his annual condition inspection. I'll sneak over to my hangar and put the mirror back on the rear cabane. I really missed it being there.
Went to the airport to not only check on the general state of things after the storm, but do some minor maintenance.
The forecast was no wind, but low clouds. No flying, just work, was my decision before heading out.
The epoxy on the fuel tank worked a treat - I no longer have a sheen of gasoline on the lower neck of it next to the battery. While that removes some minor sense of adventure in flying, I'll just have to live with it.
I had used the fuel pump to empty the gas tank, and so the battery had to be recharged.
One of my tires was flat, so I replaced the inner tube.
The gun's front bottom bolts looked kinda ugly sticking out there, so I made covers for them. Completely cosmetic, the bolts are firm and robust. The rear support tube joint was a bit rough, so I bent the tabs to a better angle and placed nuts on the insides of the center section to reduce vibration. Not that I saw it wiggle in flight, it's just a simple means of beefing it up.
Double checked my fuel bobber, as it seems a bit low with five gallons in it. It's bobbing fine; maybe I've needed to extend the rod the whole time, and adding another three gallons really brought it up. Going to have to think about that. It needs to bottom out at the three gallon mark (one hour flight time) or maybe two, not the five.
Meanwhile, the clouds were slowly lifting and breaking up. Two thousand feet. No, don't look, the're sucker holes and there's a lower wall over there. Two five hundred, with it looking pretty good to the west. Winds are almost nil on the ground. But something is moving the low clouds, and it ain't magic.
I have a little personal rule that if I call a no-go for flight from the start, that's it. No flight. Nobody is running up to me with a kidney in a cooler for a child's transplant, after all, and it's a hobby. I'm naturally kind of risky, so I have to really watch myself; without a system of personal rules for risk to follow I have been known to be foolhardy - it is through the grace of God that I survived long enough to see the wisdom of risk management.
Talledega race week, so my airport has already been invaded. On the upside, they cut the grass. Hell, they bailed it, it was tall enough. The front of the FBO looks like a car dealership with rental vehicles. RV's are starting to fill the areas across from the race track, so traffic will be crazy soon. Well, slow and stupid. The NASCAR guys that make up the airport board and folks sporting lanyards with ID's on them were seen today clearly checking things out, and judging by the looks I got from them, us local yokels aren't favored sons. The place where they put the boarding pass machine was being cleared in the FBO.
Things get pretty fancy for a few days twice a year.
I need to have a few weeks of good weather to complete my test flight requirements and move one airport over. St. Claire County (Pell City) is much better, with friendly folks and management that isn't a huge corporation taking care of a field only because they are under under legal obligation to do so.
Nascar was fun to watch in the 70's and 80's but then it became too corporate. Just like most every other sport these days. Hopefully you get some air time before winter sets in Dart.
I’m with Dart. The winter doesn’t scare me either (south of Tennessee). I just pull the “cabin heat” plunger and adjust as necessary. Put my sensors on the glareshiel to watch for carbon dioxide and carbon monoxide. I am blessed with a very clean and contained system and don’t have a problem with either; but I watch for them. One the ground it’s just like normal.
I wish I could justify the cost of a proper flying coat!
Spent some time fussing with the engine today, pulling the prop and starting from square one on timing. I think I have it licked....the engine is sounding great, getting good RPM's,* and no run-on when the master is cut.
So prop is back on, and I'll head out in the morning to do some tests on the runway. If she runs great and leaps into the air, I'll just consider that a result and deal with it.
* The guys at Valley Engineering suspect that my tach, which was connected to the coil, might have been shorting it out (causing low RPM's) and sending a residual charge to the coil (causing or contributing to run on). So I did all the timing without a tach, and when finished, connected it back up to see if I could get a guess on RPM's. She turned about 3500 RPM's at max. I certainly re-arranged the back of my hangar at full throttle, as well as losing my hat. She stayed in the chocks, but the elevator was forced from up to neutral by the blast and the ropes securing the tail went taught.
I'm going to have to figure out a way to tap into the voltage regulator for the tach.
I did have to re-adjust the idle speed on the carb, which isn't completely unexpected, as I sort of just plonked it down on the build table with the intake manifolds still attached to it. She was idling way too fast.
For those counting, that's the Airspeed Indicator and the Tach that have been pulled from service. At this rate I may be down to a Slip Indicator, Compass, Oil Pressure and Oil Temp on the panel by Christmas.
1) Tightening up my pattern is a must, as I've been taking these terrible long low ones that aren't any good. Last time, when I didn't have a camera on board, naturally I rounded it out and landed picture perfect!
2) Putting the GoPro on top of the gun magazine sounded great in my head, but it moves around a little in flight (or so I found). Worse than the head mounted SpazCam.
3) Some minor oil leaks to chase down, but other than that all is well. Hopefully. I've got some oil leaking from the #4 valve pushrod. Hopefully I can just rotate it around and get the seal to seat. Otherwise I'll have to take off the head to see what the deal is.
Landing wasn't all that bad but the way your "Bebe" tracks after the tail wheel hits the ground is a bit disconcerting. Looks like it would almost take full rudder to keep from ground looping.
A true "splatter landing," complete with what is affectionately called the "Nieuport Stomp" within the community.
Indeed, at the end of that I over corrected slightly to the right, which means I had to stomp hard left. Such is the ways of a very short coupled tail wheel. They didn't put those wooden skids at the tips of the DR1 for nothing!
Part of it is the grooved pavement; it just grabs the plane, which makes for some interesting handling.
But it was all me - stick too far back for a good wheel landing, too far forward for a three pointer. Part of the learning curve in setting her down properly on a short field. Nothing bent and I made the first turnoff without any difficulty and no brakes.
Takeoff was good, though. Started the run at the numbers and up at the start of the white lines, tracking true.
I am an average pilot. Because of me, there is a standard set so that one can say others are either poor or superior.
Oh, btw, it can bit guys with hundreds of hours in type...
Pilots all know how twitchy things are and how easy it is for the smallest thing to make for a bad landing or runway incident.
We had a barbecue at my hangar Saturday and got to see a flier with a beautiful Cessna 195 ground loop it off the runway and end up in the grass between the runway and the taxiway. He did a full 360 and added 90 more to that. Fortunately nothing touched the ground, but there were some very bad noises coming from his gear. Darn; some of our wives are already a bit reticent about flying and we didn’t need that with a bunch of them at the barbecue. He was able power it onto the taxiway and taxi off to the hangars on the other side of the field.
I watch all your videos enthralled Dart. Like a few others here. It is just so cool to know that you built the plane yourself and are actually flying it. The sight picture in the video after you landed is almost the same as an IL-2 external view and it was just a wee bit too familiar to this flight sim only pilot. In my case though those instances almost always end up with me going along for the ride hoping nothing breaks and I can actually taxi the plane back to the hanger after I stop spinning.
Not sure if it would cause a problem eventually but I noticed the fabric under the gun on the left side was catching some air and flapping a bit.
That center section is two aluminum sheets, one on top of the wing, one on the bottom, with one continuous piece of fabric that joins them, running around the front of the wing.
There's a spot where it's de-laminated from the sheet just aft of the left gun mount that I'll re-glue, and put a little more tension across the front left to right. It's all held on by industrial velcro, so it's not hard.
No chance of it tearing; a little slack isn't going to do that. Such is the glory of an aircraft that doesn't fly faster than 65 MPH, and usually around 55.
I thought I was being super innovative and smart when I came up with that system, but then at SERFI I saw an ultralight where the exact same thing was done. Convergent evolution at its finest.
Nixon would approve of your fuel economy measures.
Engine is breaking in nicely; took her up for an hour today and IAS was around 68 mph (new tube type airspeed indicator, validated by CloudAhoy).
She just flew great, and I greased the wheel landing. More surprising was there were people watching, which never happens.
Alternator isn't charging the battery, though, so I'll have to sort that out later this week...which is why my flight got cut short. I think it was intermittent, actually, as it was at the mid point where voltage started to start dropping. So she's grounded (!) until it's repaired.
So I'm thinking that the generator needs to be re-polarized, which means I have to figure out which lead to it is the field connection. I'm learning way, way too much about electrical systems.
I'm also going to run a switch to the voltage lines, which is suggested in the instructions, regardless. If I can't figure this out (the number of grounds to the voltage regulator and battery is now four, for those counting), it may be a matter of turning on the generator "as needed" in flight. Heck, it could be that the regulator is having a hard time dealing with pushing out a load in a gradual increase, as the alternator puts out juice depending on RPM's, with nothing before 1,500.
Another option is to put a diode on the line and see if that works. I'm thinking a simple Zener diode like they use for heavy duty trailers would do the trick. I realize that's putting a voltage regulator onto my voltage regulator, but this is getting frustrating to the point of going for complicated solutions.
It's not a standard generator, being at the back of the engine rather than the front. I have a propeller on that end.
It's a Diehl case, which has a magnet at the center of the flywheel, and the ring of coils on a case around it. It starts generating electricity at around 1,500 RPMs.
Well, I think it's a generator. It's actually listed as an alternator. Gonna call Great Plains tomorrow and get clarification.
And now, in the category of "of all the dippy sh*t," I may not have a problem at all.
The previous voltage rectifier/regulator was clearly flaky, either putting out a bunch of charge or none at all. So I replaced it.
Now I'm showing between 14 and 15 volts when the engine is running, topping out about 15 at full RPM. So I got to digging around the Harley-Davidson forums (since I finally figured out the whole system is HD), and guess what? The system should be throwing around 14.5 to 15 volts, depending on RPM and battery charge. It could be doing what it was supposed to all along.
I wigged out, naturally, since I haven't seen voltage go up like that before, and the aircraft I've flown previously didn't have a voltage gauge. Plus I smoked a battery. If I smoke the battery in flight the big fan in the front goes into whisper mode.
Since the bog standard automotive voltage gauge isn't exactly a precision instrument, I'm going out Wednesday morning with a proper volt meter to see just what it's pumping across the terminals. Any less than 15 volts at RPM's means all is well and I'm a Nervous Nelly. But I'm still glad I put a switch on it.
It also means I'm an idiot, as it means that previously I'd been flying off just the battery and not noticing the voltage go down and down. The short duration of my flights thus far were the saving grace. What I chalked up to a small battery sitting for a month and needed a charge wasn't that - it was low because I ran it down. Indeed, on the day where I saw the battery charge go down it was on the second flight - she'd already been up for a solid hour, back down and sat for another hour. And even then it didn't start noticeably dropping until I was up and had flown away from the airport.
Pretty interesting decision tree at that point.
I'm about six or seven miles (which, easy math, is about six or seven minutes) from the airport at around 2,500 feet AGL. I have a working engine at 11.5 volts indicated and slowly dropping. So point the airplane back at the airport, go into a gentle climb with a minor bump of the throttle (the coils are going to suck the same amount of juice pretty much the same between 2,500 RPM's and 2,700 RPM's), and keep a look at what's below. Reduce throttle when I'm at the glide to the airport, about two miles out, bring it close to the strip at pattern altitude, shadow it, and do the short half circle to the end to a bouncy landing (yep, that "flight after repair" was my sort of cautionary landing). If she'd of gone dead at any point I'd of made the field, though it would have been with a tail wind (oh, no, the horrors of a two mile an hour tail wind! Could I have survived?). She had a little over ten volts when I taxied up to the hangar.
One would think there'd be a manual for all this stuff, but there ain't none. Not knowing how much charge should be showing with the system running could have really hurt me - and I didn't know that I didn't know. I just assumed that the little volt meter would be nice and steady in the upright 12v position the whole time, like it does in a car (well, with a little nudge to the right).
Weather was criminally good this morning (mid fifties temps, zero wind, etc.), so I went up to the airport. One of my EAA brothers arrived at the same time for the same reason, and he whipped out his phone to take some pictures and video of my flying.
I did the typical low pass flyby stuff down the runway (he drove down to be right off of it) and really made an interesting landing.
But it was all fun!
I finally got some photographs of my airplane in flight!
Another fellow out there took some video as well, and is going to upload it for me in the next couple days, so I'll have some sexy stuff to show (after serious editing).
Dart, is your upper wing supposed to have anhedral ?
LOL, it's an optical illusion...there's no "hedral" at all to the top wing...she's straight across.
Between the angle of the lower wings and the sweep of the upper wing, it sure looks like that. Enough to where I've put the tail up into flying position and put a level on it.
Indeed, before flight I had to recheck the rigging, as in order to remove the left side panel I had to loosen and retighten a turnbuckle.
Even though the picture is at a slight angle, if you put a sheet of paper across the top wing, hiding the lower, it comes out straight.
We need to start looking at calendars and forecasts to see when you can come up again!
If I scroll either of the pictures to the top of my screen so that the edge is a straight line, but have anhedral. But that may just be flukes of picture angle.
Looking at some video and other pictures, you may be right that there is a little on the ends.
So this morning I dug through a bunch of photos of N11's and N17's and they all show the same thing. Lots of sticking straight edges to pictures, hiding that lower wing - which makes it look much larger.
I think it's a function of how the interplane struts and the rigging shakes out, as well as the shape of the upper wing.
She's a peach in the air, though, so I'm not stressing it.
Of note was that I flew yesterday with a full tank, which I don't normally do. I does change things a bit, pushing the CG to the forward limits. My landing was...creative. Her normal glide slope of a rock was even more with the extra weight, and I did a bit of a bounce followed by a little stomp slide (and some dramatic swishing just for the camera, since I'd already botched it).
Dialing in the new approach to landing is going to take some practice, but when I nail it things are going to be pretty sweet. Short fields will be no problem. Heck, the times I've rounded it out right it's just delightful. Mains touch, tail drops, and slowed to taxi in 300 feet.
Mike said that depending on how the aircraft was pointed the sound of the engine really changed.
At idle, though, she's really quiet.
He goofed up recording on his camera, but the other guy didn't and is going to upload what he has on his phone to me Monday or Tuesday, and I'll have some sexy stuff to make a video of.
Bunches of folks only ever show the good stuff where they grease it in, which is kind of sad. I tend to advertise the not-so-good, as it's more interesting and informative.
In this case, what screwed me up was overthinking my landing point. I was dropping like a rock, and throttled up to halt it - and thought maybe I should extend to land closer to the guys. And then thought that was dumb and I should just land. And, naturally, bounced it. Once I had the wheels down I glanced up at them and wound up a little off track of centerline, and instead of just pulling the stick back got cute with the rudder first.
The swishy-swish stuff after the tail was down, though, was purely for comedic effect.
Still, no wing scrub, no wheels bent, so it's all good in my book!
Old, that illusion is being caused by the fact that the Nieuport's upper wing has a slight sweep back to it. At least the real one does, anyway. I'm sure Dart's replica does, also. Swept wing jets will give that illusion, too, at some angles.
You weren't joking about the glideslope of a rock. I'm surprised that your "fat ultralight" doesn't do better in that department - i.e. it does look really steep without power?
Power off best glide is about a 10 degree down angle - if one goes engine out, look at what's below you.
I'll see if I can get my little screen capture program to agree with me and make a video of what CloudAhoy recorded during the "flight after repair" landing. It is instructive to see just why I bounced the heck outta the aircraft - hint: it is in fact all pilot error.
The entire aircraft is an exercise in how to induce as much drag as possible and still have it fly with a small engine and prop.
I'm sure a lot of people look at your Airplane, Dart, and think, "Boy, I bet that's easy to fly, huh?" But with that small wingspan, flat nose, wires, struts...etc.. I'm not surprised that she glides like brick zeppelin. And I'm sure you're bouncing around a lot and dancing on those rudder pedals, right? People thought that my Sonex looked like a handful. But it wasn't. I actually was surprised at how easy she was to handle. And being a taildragger I was just waiting for the day I groundlooped it. But I never even came close. Speaking of that, how is that little Nieuport when she's back down on earth? Tap dancing practice?
Once she's down, she's down, and ground handling is very straight forward. Like every tail dragger, one must be ready to put on dancing shoes at any time, though.
The thing I'm trying to figure out is rounding her out from that descent into a more gentle landing angle and attitude AND not going too fast at the same time. The days of mile long finals are done with this aircraft; they're not really helpful and it's not like one can see well out of the front of the windscreen.
With an aircraft like this the notion of "what did the panel say" is irrelevant. If you're looking at the panel you're about to do something very bad with the ground. This is all eyes up, looking at the horizon, the ground, and how the plane looks against them kind of aircraft.
But I cheat. Usually I have a little app - CloudAhoy - running on a tablet in the aircraft that tracks the aircraft via GPS, and even takes in reported winds to figure true airspeed. It's not 100%, but it's pretty darned good* and has been invaluable in figuring out the "V numbers" of the aircraft.
* CloudAhoy does not like really tight turns in the "simulated glass cockpit" mode. It just doesn't render 60 degree banked turns that make a circle of less than 700 feet. It also assumes one is in a nose geared aircraft, so while it's really good on takeoff, on landing it assumes that when one slows to a certain point the plane is level rather than tail low. It's super minor, but always takes me by surprise. It also will lose track from time to time, so one looks like they had lag on the server - in real life.
Very cool. I just downloaded that app. Thanks for turning me on to it.
I see on your approach analysis that it only knows ground speed. I know you have been flying in light winds so the difference in airspeed versus ground speed isn’t all that great and shouldn’t throw that speed number off too much, but don’t forget to factor it in. If your groundspeed was 55 then your airspeed was slightly greater. So even more propensity to bounce and float.
I wouldn’t be to hard on yourself about landings. Unlike production aircraft you don’t have a POH produced by engineers and test pilots. That is you. So you are establishing approach procedures and power settings. And without flaps and trim, it is all less forgiving. So all you have to work with is power setting and flare. You are flying it to the ground. And this is the test pilot stage. Shaking things out.
Yeah, 600 is a lot of down. To me I would try initial aim point short of runway, round out to get a much lower sink rate, add just a bit of power (just a couple hundred RPM) and then go for your landing aimpoint with a flatter approach, and just fly her to the ground. You had the airspeed to have allowed for more pulling back without stalling. That would lessen the sink rate.
I found my Cardinal landings were better with just a couple hundred additional RPM above idle. A full chopped throttle made the bottom drop out and a plonk. Part of the Cardinals landing being different than a 172 is the different wing design on the early ones like mine. They had laminar flow wings that really lost lift at low speed. So the transition on landing from flying to dropping happened fast right at flare. So I had to change what I knew from training with the 172.
Yes, the constantly learning is part of the fascination of aviation. And the fun of it...as long as you don't break the airplane, and yourself. My Sonex was a whole new flying experience for me. ...Never had an airplane that I could fly upside down, before! And I had gotten use to lowering the flaps to full down on landing on other airplanes, mostly Cessnas. You don't do that on the Sonex. Not on mine, at least. It was like hanging two barn doors outside of the airplane. First time I did it, I had a landing the may have been a bit worse than Darts. The Sonex was still vibrating a bit as I was rolling to stop. Learning. You're having way too much fun. Seeing all of this makes me want to go up again.
It really is a conversation one has with the aircraft, learning each other's language.
OG:
CloudAhoy does in fact account for wind - there just wasn't any of measure on that flight!
Here's a screenshot from my first cross country over to St. Clair County:
If one squints, they can see the little airplane on the lower right of the track, flying south before the turn back to the airport.
It takes reported winds from airport stations as well as NOAA and extrapolates, which is pretty cool. Not super accurate, but not bad - I couldn't argue with what it spat out.
On the course itself in that flight, note that I went around the large patches of forest, opting to stay over handy fields.
It would not surprise me if there wasn't some inspiration there.
Having a tablet with GPS and tilt sensors record while an aircraft is in flight and then overlaying it onto Google Earth isn't exactly rocket surgery - but what impresses me is how they grabbed the NOAA data on winds at different altitudes to do the airspeed calculations. They're not 100%, of course, but pretty good.
There's a host of ways to view a flight - over a sectional, a road map, Google Earth (including "3D" terrain), as well as bunches of data charts one can pull up.
It also knows when one is at an airport and does the designation for it.
I'm pretty stoked that Saturday's forecast for the airport is "Mostly Sunny," 67 degrees, and winds at 2 MPH. Wife better not have anything planned or I'm going to be one grumpy fellow.
I don't trust two cycle "screaming meanie" engines. There's a reason why the ultralight guys are experts at engine out landings.
For the pilots, a bit of a flying report:
Transitioning to this aircraft from the sedate Champ wasn't as straight forward as I'd thought, obviously.
With all that elevator, it's easy to pick up the tail before it has any authority, which means one is just along for the ride until it does. The upside of this is that it's actually a very small window of speed where it's an issue - around 20 miles an hour or so it starts to bite. To avoid this, I've been keeping her tail down with the tiniest bit of back pressure on the stick and letting her just lift off in a three point attitude and bringing the nose down once she's flying.
Ailerons:
The ailerons are weak, but once at flying speed the free flying rudder makes up for it's silliness at lower than stall speed. All turns are lead and ended with the rudder. Throwing the stick side to side without it is just pissing around. Adverse yaw is very mild.
It also means "wing wagging" is pitiful. In the "flying" video, the little wiggles were me trying to rock the wings to wave. I thought I was really doing something there, but it just looks like it was gusty winds.
With weak ailerons, slipping isn't as aggressive as one would like. One can pretty much make a Champ fly sideways, but the Nieuport sort of muddles into a slip and tries to get out of it, rolling the wings level against the ailerons in favor of the rudder.
This is a dangerous place to be, obviously, as one is cross controlled.
The good news is that the aircraft is nothing but drag, and slips aren't really required. Pull the throttle and the down elevator button has been started.
I know I just typed a big bunch of stuff saying the ailerons are crap, but in fact she's a surprisingly nimble aircraft. Low weight, decent thrust with a responsive engine, and high lift wings means she can do incredibly tight turns. A proper Immelman is easy as punch.
So, the roll rate is pretty good, provided one leads with the rudder.
Controls:
Controls are very light. I actually put some resistance into the elevator control rod, as it was floppy; as it is, one can fly and maneuver with forefinger and thumb on the stick. Likewise, the rudder requires very little pressure to move. One has only to look in the direction they want to go and think it through and it's done.
I'm going to throw the engine in here as well. It's crisp response to the throttle in all ranges and without a hiccup. Indeed, the challenge is to find the sweet spot for level cruise, as she likes to climb.
Stick movements are large side to side and small front and back, as the elevator is overly large. The only time the stick is all the way back is during taxi, and all the way forward during control checks. Moving it halfway from center forward during wheel landings is more than enough to stick the wheels.
Rudder:
A free flying rudder has it's advantages. When one moves the pedal, one is getting all of it working for the pilot. Coordinating turns is easy as pie - just use a little less than one thinks they need. It doesn't take but a minute to figure this out, and the pressures are very light.
The disadvantage is that without a vertical stabilizer, the aircraft tends to roll on it's own accord, so a little left rudder input is required at all times. Some guys with rudder bars came up with a light bungee cord system to do it for them. I just use my foot. The inherent problem with this is that the pilot can try and fix the roll with the ailerons. And, if they're not careful, wind up cross controlled without realizing it.
It is an article of faith in the Nieuport community that the slip ball is the most important instrument on the panel, and I concur. It's subtle enough to defy the "butt test;" one just doesn't feel it.
I put springs on the cables that go to the tail wheel, as the pedals give a bit too much authority. The tailwheel cables and the rudder cables actually join and merge a bit behind the seat.
Speeds:
The stall speed is about 35 mph. She breaks straight ahead in a power off stall, and slightly to the right in a powered one; a little anticipation of this and it's straight ahead. There is little warning to the stall in the traditional sense - no buffeting, for example. One can feel her ending flight, though, as she'll get mushy and then stop flying. In any case, it's very gentle. The aircraft doesn't "brake" into a stall, she eases into it. Stall recovery is immediate and without issue. Again, this makes sense, as stall is 35 miles per hour - it's not hard to get that back.
I have not, and will not, spin the aircraft, but I suspect recovery would be immediate and straight forward.
The difference between climb speeds is minor. 55 mph gets one a climb rate of 300 feet per minute; 60 gets one 350. I've been aggressive on the stick and cranked it up to 450 at 60, but the aircraft can't sustain it. While that seems anemic, the take off distance itself from the halt is less than 500 feet. Since most short fields are 1,500 feet long it's not an issue.
She'll cruise all day long at around 2700 RPM's at an indicated airspeed of 70 mph. She's ground trimmed for level flight at around 60 mph, though, turning about 2500 RPM's. This suits me fine, as my flight goal is to look at cows and fields and the pretty sun on the waters of Lake Martin and the Coosa River.
Best glide is around 50 mph with a 5 degree nose down; but she has the glide angle of a rock. One must always be cognizant of the terrain ahead, to the sides, and what one has just crossed over in the event of an engine out.
In all cases, there is so much drag due to wings, wires, and wheels that a little power is a good thing. Pulling power to idle causes a feeling of a brake being applied. One moves forward against the straps - gently, but it's really something the first time one feels it.
Engine:
I'm flying along behind a direct drive 1915cc VW engine throwing a 60x27 propellor (which is going to get changed out to a 62x27, as Culver goofed up the replacement). The engine is single electronic ignition, with a single carb that has the heat applied continuously. It is responsive through all throttle inputs with a steady power band. On takeoff I'm turning around 3300 RPM's, and at cruise around 2500 - so no real stresses on it.
Half throttle and she's tooling along beautifully.
Cooling of the cylinders is by a baffle that divides the engine horizontally, creating a high pressure system above in the cowling and pushing the air around them to the open bottom portion. The oil is cooled by a massive cooler underneath the engine positioned in the prop wash directly. In fact, I have a cooling problem, not a heating problem, with the engine failing to reach full operating temperatures in flight - even in the hottest part of an Alabama summer. I'm going to start blocking off portions of it with cardboard and tape for winter flying.
I have not CHT's attached to the engine itself, so I can only go by oil temps.
Comfort/visibility:
On taxi, there is no visibility over the nose, so S turns are the order of the day. In flight it isn't so bad - she is pretty much straight as an arrow, neither nose down or up. But one of the reasons I went to a half circle approach is to get better visibility of the runway. Since all landings are wheel landings, it's not really an issue - but one uses all of their vision, working the peripheral vision to track the sides of the runway. Focusing on the center usually works out to something goofy.
The windscreen does a very good job of protecting the pilot, but goggles are still a must, as looking left and right around the nose puts one in the wash. This last weekend I went up in temps in the mid 50's and my sweatshirt was the lower limit of comfort. Next time it's leather jacket or wool coat and scarf.
The seat cushion is three inches of foam on a board that is on aluminum, and after an hour or so one can regret keeping one's wallet in the back pocket. My extra back cushion (ones they make for driving) is a must.
The harness is three points - a lap belt and two shoulder straps hooked into a quick release. Even cinched, they allow movement to lean in the cockpit left and right enough to look around the nose. And they have been tested for inversion of the aircraft under duress with glowing results.
Overall visibility is very good. What we miss in flight sims is the brain filling in the blank spots and peripheral vision. It's rare that the lower wings get in the way of inspecting points of interest on the ground while in flight.
Being very light with a lot of wing area, she gets pushed around a lot in thermals. She responds well to corrections to them, but on a hot, sunny day one is going to get tossed around a little...something one just has to get used to.
Wow, thanks for that detailed write up Dart. Any place that you can attach a zippered pouch that won't get in your way when flying to keep your wallet out of your pocket? Zippered so the wallet won't fly out of it during your Immelman manoeuvres.
Wheels, it's called a chest pocket, and I sometimes get so focused on the aircraft during pre-flight that I forget to move it.
I failed to mention that with single ignition and continuous carb heat, there's no run-up before flight, as there is nothing to check. I do a control check and adjust the altimeter at start up, and check controls again during taxi (which is why a mirror is a must). So it's slow down to check for traffic and go!
Right now I've got two things to work on:
1) I bought a proper cork for my fuel gauge, and applied spar varnish to it. The synthetic ones I have on the aircraft right now got saturated and no longer float. I cut my last flight short at an hour as I was confident I had a full two hours worth of fuel, but wasn't certain of it. A check on the ground showed I had loads of gas, and could have gone another hour and a half with reserve! But I'm the bravest sort of chicken....if in doubt, I either return and land or, most likely, scrub a flight entirely before it even begins.
2) I've got a huge squeal when I transmit on my handheld radio. I've tracked it down to the headset side of the radio, rather than the antenna one. Disconnect the headset connector entirely and she'll transmit over the built in mic no problem. Either the press-to-talk switch is goofy, or it's not playing well with my headset. I'm going to change out the headset and see if that's it. With the headset mic disconnected, no squeal (though the press to talk side still works and I get the TX light on the radio. At any rate, I can receive fine. Heck, at 2,000 feet AGL I can hear planes from far, far away clearly. Moving the antenna (just a cable extension for the rubber duck one) aft of the seat worked a real treat.
On a weirder note, flying eliminates my tinnitus for three days. Before flying I've got the Emergency Broadcast System Test tone in my left ear blasting away, but give me an hour in the air and it's totally gone for two solid days. The third day it starts coming back about lunchtime, and by bed time is gaining volume. I've just learned to live with it, but it's nice to get a break now and then.
Only thing I can come up with the tinnitus is air pressure variations? Once you go higher there is less pressure on the eardrum relieving the symptoms temporarily.
On a weirder note, flying eliminates my tinnitus for three days. Before flying I've got the Emergency Broadcast System Test tone in my left ear blasting away, but give me an hour in the air and it's totally gone for two solid days. The third day it starts coming back about lunchtime, and by bed time is gaining volume. I've just learned to live with it, but it's nice to get a break now and then.
Cool, I need to get my PPL! I wonder if my health insurance would pay for it since it's for medical purposes???
Cool, I need to get my PPL! I wonder if my health insurance would pay for it since it's for medical purposes???
Lol, that's one way to work the system but be careful what you wish for because you might not experience the same positive effects as Dart. After doing a little more searching on the subject last night it seems the effect of altitude on tinnitus can be good or bad depending on the person and for those that it gets worse it tends to get a whole lot worse.
I've done some flying in light aircraft and have bad tinnitus ... damn now its been mentioned again I noticed it once more!
Mostly it blends away, but you always know its there. Have had several ear tests, 58 years young now so not expecting my hearing to be at its best ... but yes, in those light aircraft flights in Cessna 172 and Piper Warriors, un-pressurised aircraft, I came away worse, so guess it can effect folk differently and is not an exact science, maybe the open cockpit experience is the trick, no idea.
This is a fascinating thread from a simmer to flyer, love to fly the WW1 sims like RoF and WOFF too.
Probably OT for thread, but Dart, and since you like a replica gun on top of wing, have you ever thought of fun bombing practise WW1 style as in those simulators, just basic dropping a practise shaped and weighted bomb or similar object over side of cockpit onto a mock target on ground just to see if you could hit it, not sure even if such mock bombing would be allowed but would be fun to try once you have ironed out the main and important flying stuff.
Stay safe, but it looks like you know what you are doing.
"Probably OT for thread, but Dart, and since you like a replica gun on top of wing, have you ever thought of fun bombing practise WW1 style as in those simulators, just basic dropping a practise shaped and weighted bomb or similar object over side of cockpit onto a mock target on ground just to see if you could hit it, not sure even if such mock bombing would be allowed but would be fun to try once you have ironed out the main and important flying stuff."
Well, when I belonged to a flying club back in Texas, we used to bomb targets that we'd set up for our club meets. We'd have competitions. It was a kitplane and ultra-lite bunch. I had the fastest airplane in the club. A Sonex. I never could compete with those other guys. I couldn't get as slow as they could! We'd come in low and sort of dive bomb the wooden targets. They could see the target better, too. I'd have my son with me and he'd throw the bean filled bag out the little window I had for letting in some cool air on hot days. We never hit anything.
My best friend got his PPL at about age 20. I was still living with my parents on the farm and I remember him flying over once, he had told me he was going to and for me to watch, and he tossed out a Revell 1/48 scale F-105 Judging from the way it "glided" it was very tail heavy LOL
With snow on the ground, temperature hovering around freezing, and a ten mile an hour wind (though going down the runway), who can resist a bit of flying?
Mike was on hand and, as become something of a hobby, drove down to the runway to catch me bounce or skid on the landing. I don't usually do those things, but when I do it's worth watching.
I couldn't tell if he was happy or disappointed to catch this:
The windscreen does a good job; looking around it was certainly very brisk! I was in full winter garb, though, so no chance of freezing.
Snowmobile gloves? I have a pair that looked similar, used to wear them when riding my motorcycle in the winter. My record for cold weather riding was a 20 minute ride to work when it was 9 degrees F.
The layers are: t-shirt Five button wool sweater (US Army issue) Desert Storm parka (with liner) Swedish issue wool field pants Wool socks Carhart insulated boots. Tricolor scarf my mother knitted for me. It's not wool, but really long so it doesn't matter.
Of course the leather flying helmet and goggles, not worn here, to keep the rest of my head warm.
The windscreen does a really good job - I didn't realize just how good until I looked around it and got a blast of freezing air.
The mittens are soft leather on the palms, and the inserts are fairly thin, if tightly woven, wool. I've no idea how they work in arctic temperatures, but they do. The trigger finger on them makes manipulating items easy, including writing. Since the plane is pretty much forefinger and thumb light in controls, no problem.
They worked wonders in the winters of Germany hanging out of the open hatch of an M113, and were a treat in the Nieuport.
The new cork for the fuel indicator was trimmed up a bit, re-shellacked, and is working a treat. The old synthetic ones became sodden and refused to float, which I found disconcerting. It's one thing to be "pretty sure" there is sufficient fuel and an entirely different thing to actually know there is sufficient fuel.
The squeal on transmit with the handheld turns out to be a common problem, and is most likely the cables from the handheld unit to the headset. It's not the antenna, as it squeals with everything removed from the aircraft and the rubber duck antenna on the unit. So I'm ordering new ones, as well as little thingiebobs that attach around the microphone cords. I suspect they're magnets of some sort.
Being a small, slow aircraft, one of my worries is runway or pattern incursion by another aircraft. A surprising number of folks with certified aircraft and built in radios don't use them around my field. I realize that it's not required, but it doesn't do any harm at all, and I like to call out my position to them. It's also one of the reasons I've been finding the correct - but smallest - pattern I can find to land and be off the runway at the first turn off.
Being a small, slow aircraft, one of my worries is runway or pattern incursion by another aircraft. A surprising number of folks with certified aircraft and built in radios don't use them around my field. I realize that it's not required, but it doesn't do any harm at all, and I like to call out my position to them. It's also one of the reasons I've been finding the correct - but smallest - pattern I can find to land and be off the runway at the first turn off.
Back about a hundred years ago (~1985) when I was training for my PPL at KGYH I was told to be wary of brand new biz jets flying in sans any radios, they were in fact arriving to have radios installed at a facility on our field.
I was out at the airport today to help a friend work on his KR2 when we realized that the weather was pretty darned good for flying.
When he got to a point where he didn't need my help, down I went to pull Babette out of the hangar and into the air.
So here I am, flying a small route around the aerodrome, well away from the front, when I feel it. I'm not alone. Looking around, up, and behind me, I'm shocked to see a Folke Wulf 149D at my eight o'clock, 1500 feet above and about half a mile off, stalking.
His paint scheme pretty much just like this:
It's intuitive!
A gallant salute (he had no ammo, so I spared him), and we went our separate ways.
I got wrote up (un-officially) by the FAA for attacking a Goodyear blimp near Vero Beach, FL circa 1972. The blimp pilot contacted me and we talked on unicom channel. He apologized for having to report me, said it was company policy...ada...ada. The Melbourne FSS, the closest FAA types knew me very well and it was much ado about nothing.
Nowadays it would prolly be a terrorist threat requiring a zillion dollar strategic redeployment of AD assets.
Oh...the blimp attack. I was in a Cessna 150 Aerobat, climbed to about 5500 ASL, he was at about 1,000 ASL, did a proper wingover, and wizzed by the astonished blimp types at an almost VNE of 130 kts!
I'm wrestling with the oil pressure right now. It's way too high, and I took out the two oil pressure relief valves, checked the holes for galling, cut the springs back a bit, and put them back in. No dice. The rear one had horizontal grooves on it, and I suspect it's the wrong one - it should be smooth - being the one used for the single oil relief valve VW engines.
So I'll go track down a new set of valves, take them out, cut the springs back a touch more, and replace the rear valve.*
* A bit of explanation of what the "valves" are. They're little cylinders pushed up into the paths of the oil flow by means of a spring held in by a bolt.
The front one has oil either going to the oil cooler or the sump. The idea is that if the oil cooler gets blocked up with something, it will divert oil back into the sump.
The rear one is the true oil pressure valve, as it has oil either going to the cylinders, etc., or the sump. The darned thing should be moving down against the spring a bit against the pressure, giving me 10 pounds for every 1,000 RPM. But it isn't moving at all, forcing everything into the engine...and there's no regulation of pressure. So the oil at 60 pounds of pressure has to go somewhere, and the only place it can go is out the prop hub.
It's all the rage to put in "heavy duty" springs to the point that one can't find the stock ones. They're grand if one's engine is worn out or running redline RPM's in a racing Bug, but no so much for normal operation. The response to too much oil pressure is to cut the springs back bit by bit until they act properly. Of course that means I need extra springs for when I cut one of them too short and don't get enough pressure.
I'm beginning to really, really, really hate mechanics.
Most likely the spring you have is an incorrect aftermarket item. They are too long if memory serves me. Go to www.thesamba.com and check the 'performance' threads. There was some discussion there about this just a few days ago. Seek poster 'Modok'. He is very knowledgeable.
Yep, there are a few "hot rod" parts in the engine, for better and worse.
While the replacement set I bought are after market, just by looking at the springs, it appears they match the originals closer - they don't look as robust or long as the ones in there now.
The wife was smirking at me for not rushing to the airport to put them in, as we've got another cold snap here. She thinks it's endlessly humorous that I don't flinch at flying in freezing temperatures but don't want to perform maintenance in them. The truth is that in the cold, when my hands get numb, I tend to over torque things and cut myself more.
'The Cold' is a story everyone has! When a young lad my autos (just a few car lengths ahead of the junk yard's tow truck) always had major break downs in Feb... the coldest time of the year, here. I wrenched them myself.... outside.... on the ground... in the cold, wet rain, sleet and snow using a few basic hand tools and an abundance of curse words. Trannys, blown head gaskets, burnt valves and etc. I could repair it or at least get them to a machinist for the work needed. My hands never hurt too bad until they got warmed up to normal temps after all work was done. You realize then and there that, yep, that hand slip DID slice the meat on the knuckle or that starter that fell DID catch the pinky finger. That's when 'The Pain' stories start! lol
Yep. Today is a hard freeze, this weekend will be in the 60's and sunny. Life Down South.
New plungers installed and the springs cut down to where the pressure is much better - still high, but not crazy, and I'm loathe to cut them down too much, as the oil will thin as it heats up. I should be able to take her up and around to check it out this weekend.
Culver Props started on my new one! The replacement they made for me was 60" long, when it should have been 62. Pretty neat that they're exchanging it with no cost - that's customer service! So next month I get to change it out.
That's pretty cool customer service with Culver! I'm a big fan of Golden Age Racing airplanes and have built a few RC models of them. One I still wish to build is Hans C. Rasmussen's 'Skippy'. Mr. R. was a very interesting man and worth an internet search. Mr. R. made everything on that airplane except the prop and the tires. His friend, Roger Lorenzen, supplied the hand carved prop! I wrote Mr. L. a letter a few years ago asking if he remembered the colors of 'Skippy' but he didn't. I still have that lovely letter in unsteady hand writing from a very nice and genteel man! Mr. L. has probably passed on by now but it was cool to have that tiny bit of interaction with somebody who was actually a part of that period of history... and he was a prop carver!
As far as those springs go cutting them back might not be the answer as the metallurgy is suspect and causes problems with elasticity and such. I have tried to find the thread about them but, alas, cannot. I'll keep looking.
Well, cutting them back seems to be the consensus from the folks I've been talking to.
She's still topping out at 60 pounds at full throttle, but down to 40 at cruise. A few spots of oil on the cowl at the end of the flight, but nothing serious. I may back off about a pint of oil in filling her.
I went out to the airport today to work up some replacement baffling seals for the engine, and after gluing them up, realized that not only was it in the mid 50's, but the wind had died down to almost nothing.
So up I went! Air was glassy smooth - it was like sitting on a kitchen chair - and I made the most of it in the hour and a half before the sun started to get low in the sky.
When the air gets thick like this she doesn't want to land! I went really long waiting for her to settle onto the runway!
Cutting a spring makes the compression rate stiffer. Springs are rated by installed tension, compressed tension and compression rate. If you really want to study springs, research springs for snowmobile clutches. The Yamaha technical update manuals from the 90s and early 2000s have good graphs showing the comparisons of some 20+ springs that fit into the same application.
If you have an arbor press, you can test the springs. You need to test spring pressure for installed height and compressed height. The difference is the rate. You need to consider coil bind (mechanical touching of the coils) and flex (the spring wanting to bulge outward when compressed). The length of the spring and coil thickness will affect coil bind. The fit of the spring within the bore and coil thickness will affect flex. You can mitigate the flex by placing a solid rod inside the spring coils.
That is what I was getting at. When you cut a spring, you increase the rate. You decrease the installed tension because you have lessened the length. What affect you have upon the compressed tension will depend on the compression length and the rate.
I know it seems opposite, but a spring of the same wire diameter and material is "softer" when it has 10 coils then when it has 5. You have a longer wire that is flexing.
You're correct, of course - it's a matter of effectiveness versus efficiency.
Shortening the spring (and the point at where it starts compressing) as the plunger is lowered works, but it's stiffer as it puts the pressure on. But there's some give in when it starts compressing - versus zero on the longer one, as it's already in compression - making it more effective.
It boggles my mind that one can't find NOS oil pressure relief springs for a Type I Bug engine, and that all that is available is after market "improved" ones that have too much tension for low RPM/low temperature use. If I could find a "pull a part" junkyard with some bugs in it I'd be crawling underneath with a screwdriver and a hammer.
Went up the day before yesterday and it was much improved. At full RPM's (around 3300) I got a little oil out of the spinner, but I'm okay with that, as it's at the full 3+ quarts (there's a about a pint or so in the oil cooler and hoses to it). Oil pressure at cruise (2500 RPM) was 40, and after an hour, on landing, it was 20 at idle. Roughly twice what it really should be, but it won't hurt anything. I may just have to keep the oil halfway or a quarter above the add line on the dipstick.*
A little oil on the cowl and a few drips on the bottom of the upper wing, the right wing, and right elevator, but none on the left. Easily wiped off and not a problem. The decision to use exterior house paint on the plane has really paid huge dividends.
I also double checked that the venting for the engine case was clear, and it is, so no over pressure there.
It sure was nice to fly for half and hour the other day. Pretty bumpy, owing to the front having moved through and the sunshine heating everything up (Wednesday = freezing and snow, Sunday = 65 and sunny), but getting pushed around is just a function of what the airplane is. I had to keep the flight short as I had around an hour in the tank (three or so gallons) and am a bit skiddish about pushing the minimums - and both my Jerry cans were empty, so no filling her up beforehand.
I improved the engine baffling, making up some strips of leather folded over flexible cardboard and putting them along where the aluminum sheet projects to the cowl. It seems to work just fine. There's some spots along the firewall where the cowl doesn't quite sit flush against it that I'm going to mark up and fabricate some sort of soft blocking of it. It may be as simple as some duck tape folded part way over itself and attached to the firewall.
Culver is cutting me a new propeller, as the one the sent me was 60x27 instead of 62x27. It doesn't really matter - I don't think that extra inch of length on both ends will really improve anything - but when I mentioned it to them they immediately said they'd cut a new one for me and send me a shipping label for the current one when it's done. Now that's customer service! It'll be interesting to see what finish Alaina up there will put on it (I just leave it up to her with the instruction to "make it pretty.").
Next up is improving the combing around the cockpit and adjusting the gun. I did the combing in the most get-it-done manner I could, slapping some scrap faux leather over a bit of garden hose and pipe insulation and wrapping over with a long boot lace to keep it in place. It looks way better than it should, but it's not really as secure as I'd like it. So I procured some leather from a recliner someone was throwing out (they put it on the curb for the trash man and in short order the back panel of it was cut away - always, always carry a knife!), and it has a nice section on the bottom with the pile part of velcro where it attached to the bottom of the chair. That section will be used for the very rear of the cockpit, and I have industrial velcro that will hold it in place across the back.
So I'll remove what I have and either recycle it if I can, putting some eyelets in it and lacing it properly around the edge with some leather strap (okay, leather boot laces), or just make new, as I think I have enough.
My gun is too far forward and set at an angle to where the convergence would be about 15 feet in front of the prop. The latter would be funny if it didn't actually bother me, and the former is a matter of aesthetics. It just doesn't look right. I'm also hoping that moving the gun back four inches will make it more stable and I can use it as a viable camera mount. As it is now it vibrates just enough to make the camera work suspect and needing serious editing to make it worth showing.
* Checking the oil level isn't as straight forward as one would like. I have to lift the tail to bring the oil pan level, wait a little, and then check it. Since the dipstick is at the very forward edge of the engine (and thus at the high point), I don't trust whether or not there's a little daub of oil on the tip and call it good.
That's right... but it's an av engine now because of the mods! I think I'd make a good politician the way I word things vaguely like 'many av engines...' and such! lol Are you going to fly in to the Dayton Dawn Patrol this year?
Yep, I have the EMPI springs, and as one can see from that thread, not only are they longer, but are thicker with more coils.
I think I'm going to table the oil pressure stuff for awhile, as it's close to being where I want it and everything is operating safely. I can tolerate a very small amount of oil on the cowl.
Next up is the radio.
I've worked out the squeal-on-transmit with some ballast magnets on the headset wires (pretty common), but now it's on to come up with something better for powering the portable radio itself.
One of the neat features of a handheld radio is that the transmit strength and the battery power are directly related, and it's a straight line descent. Twice now I've been caught with the battery being too low to either transmit properly or even at all - though it will receive fine. A really super cool feature of ICOM radios is there is no battery charge indicator, because why would an operator of the radio ever want to know how much charge is on it?
So the plan is that when the battery eliminator comes (it clips on in place of the battery and runs off of a cigarette lighter 12v connector) in the mail I'll do some minor surgery:
Have the alternator go straight to the battery and not through the switch on the right. It works and I'm satisfied I don't need it.
Move the master to the right side switch position. This solves the wires running under my compass (all the wires come in from the right and under it), and it will actually point in the right direction when the engine is running. There will still be a pair of wires running to the start button, but I don't think that's going to be an issue.
Make the switch on the left the "radio" one, and run it to a combo 12v connection with 2 USB power outputs that will be mounted just on the outside of the left part of the seat.
Plug the radio power into that and done.
Both the battery eliminator for the radio and the power output connectors have voltage regulators in them, so I don't think I'll cook the radio or (hopefully) have a lot of noise from it. And if I need to charge my tablet, I'll have a connector for it.
I'm waiting on weather and whatever the docs tell me about my right shoulder tomorrow. Old injuries have flared up and I need the body mechanics to do a diagnosis. I imagine they'll tell me it's arthritis and bursitis and to just suck it up.
She put stickers on the new one, which I was very apathetic towards either way. One can't see them when the engine is turning it and I'm at 1,000 feet AGL.
Naturally I idiot proofed the torque order:
Why all the fuss? Culver cut the replacement prop at 60" instead of 62".
I'm building up the gumption to do the wiring stuff, but the weather is just crap.
Yep. They'll inspect it and put in the "reconditioned" bin (that's a bit too frugal for my likes, as a new prop is surprisingly inexpensive) or sell it as a decoration.
On the latter, it's cheaper to have a new prop cut than buy a replica in a lot of cases.
And yep, it's the camera angle and placement of the props, but the new one is two inches longer. Doesn't sound like much, just an inch on each blade, but it does make a difference.
And yep, it's the camera angle and placement of the props, but the new one is two inches longer. Doesn't sound like much, just an inch on each blade, but it does make a difference.
On the question of why anyone would put a "used" prop on their plane, it's actually pretty simple.
First off, Culver will take my prop, inspect it, checking the balance, bolt holes, etc., and if it's okay put it on the market (at a reduced price). Unless one knows from the invoice, it will be indiscernible from a new one.
Second, there are guys who tinker with props. Me, I'm no scientist when it comes to stuff like that and asked for "whatever is the best balance for climb and cruise, leaning towards climb, for the engine you're building for me." Their experience with props, engines, and even the type of aircraft I built came up with the size and pitch, and I deferred to their judgement. Apparently it's enough of a difference to where they immediately said they'd cut me the new prop.
I know a lot of guys who experiment with different prop lengths and pitch, looking for just the right combination of pitch and length to get the "best" performance. Culver will re-pitch or shorten a prop for a nominal fee, and guys do that, too.
In my case, the new prop - which is the same size and pitch as the original prop - should climb better but be a tad bit slower at cruise...and slow me down on final better...than the shorter one. I haven't dove into the data to really suss out the true numbers, as an estimated three or five miles an hour means nothing to the kind of flying I do, and it didn't seem that much different.
So if one is going to go through three or four props in an effort to find the "right" one, getting a used prop from Culver is the way to go from a financial standpoint.
All the connectors were taped up, and one can see the in-line fuse on the far left. Yesterday's learning curve experience showed me just how important it is.
The plugger in thingie also has two USB outlets, so that if I need to I can charge my phone or tablet.
I had thought about running it through the master power bus, but ruled that out on the basis that I usually listen to the weather and stuff before cranking the engine, and it might be better to have this on a unique circuit.
I like the fact that it has a light on it showing power is being applied. It's a warning that I need to turn it off if I've been using it during maintenance or something.
Second, the installation itself:
I feel all fancy having a switch labelled RADIO (Mike says it should have been labelled AVIONICS to reach full hubris), that's for sure.
Yes, that is indeed yet another appearance of industrial Velcro holding it in place. The stuff is incredibly solid. I hooked the radio's power connector to it and pulled mightily. The plug came out of the thingie rather than give loose of the Velcro.
So now, with the battery replacer on the radio, I don't have to worry about not having enough juice to transmit on it. I'll still carry a battery pack (one with the AA batteries in it to be sure it's fully charged) with me in the aircraft, though.
I also moved the antenna from the windscreen back as far as I could into the fuselage and still reach it. I need to find a spare rubber duck antenna, as in order to use the radio as a handheld I have to remove it from the extension cable on the aircraft...a real pain in the tail end.
From inside the hangar I could send and receive to the FBO. What I haven't done is pulled the airplane out, cranked it, and see if there is any electrical interference. I may try that today.
We had a rare and unique break in the weather that was perfect for flying, and I wasn't the only one out at the airport to take advantage of it!
My radio configuration worked a treat! Everyone said my radio was loud and clear* and there was zero squealing all day.
Moving the radio into the fuselage as far back as I could get it (Yet again, industrial velcro to the rescue!) also improved my reception to the point I had to adjust the squelch to get rid of some very distant folks hissing at me. But that one guy waayyy up in Fort Payne was sounding smooth as he did touch and goes.
The mental additions to the checklist were pretty much automatic. Starting up - Radio switch on, radio on, check weather and adjust altimeter, radio off, radio switch off, Master on, pump the throttle a couple times, press starter, when RPMs settled, radio switch on, radio on. Shutting down - Radio off, radio switch off, master off.
No weird noises from the charging system, either.
I did clip a battery pack (the one that uses AA batteries) to the outside of the seat out of the way as a backup, though.
The new prop performed wonderfully. While an extra two inches in total length isn't much and I wasn't looking for huge differences, in fact it just felt better. It could be that I trained myself to it, as the original was a 62x27 and the replacement was a 60x27 - and when Culver heard they shorted me (literally), they replaced it gratis - or the fact that it was such a great day and I was in an outrageously good mood, but I pretty much greased every landing - and using different profiles on landing.
With the shorter prop it seemed like I was always too fast by a tad, but the extra drag of the larger prop put me right where I need to be.
The nice thing about piloting an aircraft who's design is dedicated to putting as much drag as possible by throwing wires all over it is that one need never slip to drop altitude. Just reduce the throttle to idle and ride the down elevator. The fast one.
* A friend's KR2 has an odd antenna arrangement and can't receive over anything but mid range distance and handhelds not at all, and one fellow said it sounded like I had my head stuck out of the window.
...and just like that the weather has gone to sh*t, and is forecasted to be that way for the next couple of weeks.
Next up is to improve the combing around the cockpit. I did a real "throw it on there" job with that, just whipping some fake leather over sections of garden hose and pipe insulation and wrapped around it with an extra long black boot lace.
I liberated this box sort of thing covered in fake leather from my neighbor (who was going to throw it out) as well as the back of a leather recliner set out for the trash man a few weeks back.
So now I'm going to go back and cut new sections, put eyelets on the holes, and lace it along the cockpit.
The seat also needs to be re-covered, as well. The cheapo fabric I used is fraying, and since one has to step on the seat to get in and out, the fabric cushion bottom is dirty. So I'm thinking I might have enough faux leather to cover both.
The seat also needs to be re-covered, as well. The cheapo fabric I used is fraying, and since one has to step on the seat to get in and out, the fabric cushion bottom is dirty.
Ah, something I can offer advise on! I have to step on the seat of my flight sim cockpit getting in/out as well, so I bought one of those el cheapo foam cushions they sell for deer hunters to sit on in their tree stands. It stays in the seat, I step on it and I can sit on it as it adds a bit of extra cushioning. If/when it wears out I'll just get another for $5.
Weather was impossible for flying, so I decided to start tackling the combing. Things were going pretty good until a parade of "helpers" started showing up to ask questions, make random observations, and generally slowing things down - with the exception of one of my EAA brothers who was up there and dove in to actually help.
The material is big enough to double over and reach around, so no sewing! I just ironed a seam in it, threw in the eyelets every two inches on one side, spray painted the inside black (the inner cloth backing was silver), put some 90 spray adhesive on it, and folded it back.
I didn't put eyelets all the way through because the only decent size I could find were still fairly large, and I wanted to disguise the holes where the leather boot lace went in and out of the sheet metal.
The weather was turning to total crap and I was beginning to flag, so here's where I left off with the initial fitting of one side:
The top around the cockpit isn't smooth, as one can see, and I have some ideas on how to make it so....but then again, I kind of like the folds, too.
The join is now at the front, and the piece is big enough to go all the way around. The center piece at the back is held in place with - what else - industrial velcro.
Great, Dart. Why the mirror, by the way? Do have Eindeckers patrolling around where you fly?
It's the only way to properly do a control check. With the shoulder harnesses properly tightened one can't turn enough to see the rudder.
But I have bigger worries than Eindeckers. 100 miles north in Huntsville lives a Fokker DVII. 80 miles south outside of Montgomery is another Fokker DVII. So far they've been too scared to venture into the Birmingham Salient, but one never knows....
Wow. Just knowing you're there is scaring the hell out of them. I'm impressed. Stay vigilant, though. Some Hun may get brave and try to make a name for himself.
A lot of digging and begging to experts came up with the answer on the coaming....they couldn't make it work the way I'm trying it, either, back in The Day.
They seamed the material in the middle, with an inner piece and an outer piece.
So, neat. Next time up I'll make the new patterns for that, cut the leather, put the eyelets in the outer piece, confirm fit to the inner....and put the old crappy coaming back on.
Well, I started out throwing away the old foam core and installing a new one that went all the way around:
It actually made me a little sad that the aviation grade pipe insulation wouldn't hold up to the stresses of use, as it looks fantastic just as it is.
I did a LOT of trial and error on this whole coaming thing, ruining a lot of old sheets and stuff trying to make templates. I finally just dove in with the leather itself. For the center I just TLAR'd it with an Xacto knife.
I went to work with a zillion little stick pins and, to keep it from buckling as it went around, simply cut slits on the inside to relieve the pressure.
The big question was how I would line it back up after removing it to put in the eyelets. Aha! Measure and cut the holes for the eyelets in situ, mark the locations, drill the holes, and then just line them back up! Super Genius, if you ask me.
Look at the precision of those Sharpie markings!
Slather the inside of the leather(ish) material with Weldwood contact cement along with some 3M 90 to help saturate the fabric side of the leather(ish), put it back on, lace it up, and pin in place to let it dry.
I had to close the hangar doors as it was starting to rain right though it, so no picture of the front of the cockpit coaming. I cut it in the center, as I wanted room to work with the leather on the rest of it - the piece looked much like a commercial toilet bowl seat when I got done - and since there isn't a grand curve there got away with a small piece with an eyelet on each corner to sew into the main piece and just glued it down.
It's definately a case of "better enough" over the "gooder enough" coaming I had before. I may come back at some point and fabricate a single piece to go around the inside to cover up the saw toothed leather on the foam, but this will work for right now.
Oh, and because I've only prostituted the video in two other places on the site:
Great work! And excellent vid! All that loose looking fabric around the upper center wing area is interesting. Is that be cause of all of the cut outs there?
No, it's because I didn't replace the center section after I flipped the plane. I just sort of bent it back out the upper piece of sheet and it doesn't lay quite flush.
I need to order some fabric so I can make a new one and cover it, along with the wheels. Oh, and buy more paint.
Today was definitely a day of education in piloting Babette.
Winds were calm, sky was clear, and up-uppity-up I went. A couple minor burbles as I climbed all the way up to 2,000 feet (AGL, too!), but then it was hands free flying! I even did a little dance in the cockpit as I sang (fortunately over the wind and distance nobody was endangered).
On the way back to the field I descended and performed an okay-er enough turn about a point using a cell tower. A flag didn't start rising from it's base, so I gave up on that, ascended again, and headed back to the field.
A check of the AWOS brought no surprises. 190 at three, it said. Okay, runway 22 it is.
With the sun coming out and warming things up, it was getting a little bouncy, but nothing too impressive, but as I turn base something just feels wrong. I'm going to have to do some minor pilot type stuff to get lined up properly for final - usually I can hit the mark in a smooth half circle.
Hmmm, I'm crabbing to keep the line, and then slipping to hold it. Okay, so it's a tad more than a gentle crosswind. Simple enough to do, I'll just add a touch of power, fly her down, kiss the wheel, bring the other down, then the tail and done. Except it wasn't a tad. I catch a glimpse of the windsock in the middle of the field and it's 90 degrees to the runway and sticking straight out. Three knots my tail dragging end!
Touch a wheel a bit more firmly than I wanted, tiny bounce, but it's a bounce, so let's adjust and go with it. Down again, smaller bounce, other main touches, gust, up in the air, and I'm on the right third of the runway.
Oh, heck no. Firewall and go around.
Well okay, then. 90 degree crosswind at seven or ten gusting to whatever, I reckon. I'll give it a shot, and if it doesn't work out bail from the pattern and land differently.*
Air is getting pretty dang yucky, and I was not liking it very much. I wrestle her back around the pattern, widening it up, determined to use every bit of the 5,000 feet of runway if I have to. The Nieuport is just whipping across the ground and I'm lining up on final when the windsock snaps 90 degrees. Oh, good not a crosswind. Now it's a tailwind. Ah.
Easy as punch. Pick her back up, go into the downwind leg which is amiable since the other end is a right hand pattern. Radio to the lonely ether around the field what I was doing, line up again - mindful that the winds are being tricksie today - pick up a slight crosswind, put her down, and taxi off.
Turn over to AWOS. Winds 190 at three. I guess it hadn't caught up to the news of the day.
Naturally, like all things aviation, I putter up to the grass and pull off to holler at some folks out to their hangars for the day and the wind just dies down. I climb out, we all laugh, and I get to hear great stories about shifting winds and stuff.
I'm debating about making the video, as it's kind of more of the same. Then again, we don't get a lot of go-arounds and switching ends of the field. I had the camera on the wrong side to get the windsock, though.
* The Talledega Speeway was built on a WWII airstrip used for training bomber pilots, on one of the remnants on our side of the fence is 1,800 feet of perfect pavement that is away from everything and at a 90 degree angle to the new one NASCAR built. I would not be the first to ever use it.
Went out yesterday to put on a pitot/static tube on the aircraft.
It actually went pretty straight forward. I took a peak at a Citabria during some hangar talk and it's static port tube, drawing some measurements from it. Some epoxy at the front, some super tiny holes drilled, tubes cut, annealed, etc. and voila!
It's not super pretty, but what on my aircraft is?
Will it work as it should? I don't know, but it looks very airplane-y and might. At least my ASI won't be stuck on zero.
No expert by any means but that Pitot tube looks like it is extending out pretty darn far. It looks to be about 3/8" in outside diameter from the pics. From my machining background it would not surprise me if it vibrates a lot while you are flying. Might even start whipping around like a propeller in the right conditions.
It's solidly anchored, and at worst would bend back one way or another. Not a lot of vibration out there, and at most it'll do about 70 mph.
Now all I need is a decent day to go flying with it and see if A) it's okay, and B) gives a reasonable amount of accuracy with the ASI. If it's +/- 5 mph I'll be okay with it.
Heck, it's not like I actually look at the darned thing...I just figured that I ought to have the airspeed indicator needle move since I paid good money for it!
I forgot to add that while they're not actually graveyards on the approach, they're overfill camping areas for the raceway - ones that probably won't ever be needed now that the height of NASCAR popularity has passed - so they might as well be.
I forgot to add that while they're not actually graveyards on the approach, they're overfill camping areas for the raceway - ones that probably won't ever be needed now that the height of NASCAR popularity has passed - so they might as well be.
Everything has ups and downs in popularity. Give NASCAR the right gimmick or driver and its popularity will likely soar again. Then the cycle of popularity vs indifference will repeat itself as that driver or gimmick fades in popularity.
Pitot tube and static port worked really well flying today!
No real wind, but seriously bumpy - like riding a dirt road and an elevator in turns!
But I must say I finally put together the landings I want, coming in high and rounding it out to kiss the mains when landing. More incredibly, not only was it on the centerline but there were witnesses!
Naturally, though, I didn't mount the GoPro to capture it.
1) Removed the brakes. Didn't use them anyway, and couldn't resolve the slight rub they had against the drums. Turns out the drums aren't as round as advertised. Maybe I damaged them in some way. Anyhow, I pulled them.
2) New bearings on the wheels. They supposedly came pre-greased, but Worksman thinks that anti-rust inhibitors are grease and they ain't. Wheels had about two inch lateral slop on them thanks to the burned out bearings, which is probably a contributor to the "Drift" video. New ones installed, but with a proper bearing grease packed into them.
I am exploring better alternatives, including a brass bushing that goes the whole length of the hub with a grease fitting.
3) Re-re-adjusted the mixture of the carb. It was too rich, and my adjustment made it too lean. Third time was a charm, and she's running great. I think going from 40 degrees to 80 might have something to do with it, or not.
I know that going from a true altitude of 540 feet to a density altitude of 3,100 feet does make a difference in taking off. Instead of jumping into the air like a crazy spring, she now walks up the stairs.
Oh, and I finally had the camera up and on for today's flight, and thought I'd make a little video of the landing - because that's where the hilarity usually ensues. This one had me a bit perplexed:
When I put on the oil cooler, I simply put bolts through the bent steel mount and the oil cooler itself.
Turns out that vibration from the engine and flight work hardened the aluminum of the oil cooler mount, and on my last landing - which wasn't as good as the greaser but better than most - the right side of the oil cooler attachment tab failed. Not as in "pulled through the washer" or "cracked," more like "big chunks of the mount tab just came away."
I'm finally going to have a chance to go out and evaluate whether I can salvage it or throw it out and buy a new one.
In hindsight, of course I should have ran a strip of metal on the underside of the cooler and of course put in more bolt holes to even the stresses.
Well, this is why one has a 40 hour test flight duration - to find out stuff like this.
Oh, and for those wondering "what would happen if the oil cooler came off?" the answer is "loss of all oil and the pressure it makes in about the time one could say 'what was that noise?' and landing RIGHT THEN with an engine out."
Would the addition of rubber or neoprene bushings to absorb the vibrations be feasible?
Yep.
I spent a good chunk of the day measuring and figuring, and so it's going to be a much more reduced profile, a thick rubber strip between the oil cooler and the two metal pieces that will hold it, and a strengthening cross member.
Reducing the angle of the oil cooler solves a lot of issues:
1) I'm cooling a bit too well, and the engine isn't getting up to full operating temperature. 2) With the oil cooler tilted as much as it was, it was really taking a beating with both the prop pushing air on it and the vibration on the engine. 3) It's reducing drag. Hahahahahahaha, I actually typed that! I may get an additional two feet per hour in speed increase.
So to show you what mounting to the oil cooler tab without a reinforcing strip underneath will do:
Metal completely failed!
So the plan, as I mentioned, is to reduce the angle of the radiator, put strips underneath, add some vibration stopping baffling rubber material in there, and try again.
Had to do some math problems. Pythagoras, you magnificent b@stard, I read your book! (Mathematics and I are in a long standing war, you see)
Because I'm using a thin mild steel for this, I decided to double it up. Plate that will go underneath is also steel.
Ready for paint!
Here's the difference in angles between old piece (black) and new:
Over the past two days I have endeavored to make probably the best example of craftsmanship in regards to my aircraft to date.
Both sides matched each other nearly perfectly (I'm sure a micrometer could spot a discrepancy), and each side was made of two sheets of steel bent to perfectly nest within each other.
The holes all went where they should have gone, and it installed easily with the baffling material to ensure vibration would be at a minimum.
Even the paint is perfect and smooth.
What I didn't take into account in my initial measurements for the reduced profile is this hangy-down part right at the end of the engine block before the starter. Said hangy-down part is 3/16" too long for the oil cooler to traverse under the engine.
Of all the scrap parts I've ever made, I can't think of a single one that quite matches my pride in its manufacture.
So here's to you, perfect oil cooler mount that is less than a quarter inch too short and therefore has to be thrown on the salvage pile; know that the one that will follow and actually fit onto the engine will be no less dear to me.
Dart, forgive me if I read your posts wrong Crushing a layer of rubber between the two parts will not work. You must isolate the parts with a rubber fitting between them. The mounting bolts of the oil cooler should have a collar that passes through the rubber grommet of the bracket. A good example would be the exhaust silencer of a 2 stroke dirt bike.
Dart, forgive me if I read your posts wrong Crushing a layer of rubber between the two parts will not work. You must isolate the parts with a rubber fitting between them. The mounting bolts of the oil cooler should have a collar that passes through the rubber grommet of the bracket. A good example would be the exhaust silencer of a 2 stroke dirt bike.
edit: or the radiator of most bikes
That's why we show our work.
On the upside, where it meets the engine, there's going to be isolation.
I guess I should flesh this out, as I kind of brushed over it.
Where the mount goes onto the engine, which is the primary source of vibration, it's going to be isolated with a rubber mount with a bushing in the middle of it that the bolt goes through.
The mount itself is on the rubber, off of the engine itself.
The bottom part, the squishy bits, is really just to take some of the shock and friction from the plates above and below the oil cooler itself. The new version of the mount has a steel plate underneath, so that it's holding up the cooler. I also put in two more bolts to even out the stress points.
Will it work? Heck, I dunno, but it'll be better than what I have.
I also have a new oil temp gauge on order, as I think it's a lying sack of [redacted]. The VDO "royale" gauges seem to be unreliable; the tach in that version was kaput out of the box, and no amount of dip switch tomfoolery would ever get it to work. So I'm going with the standard black one.
With the last one a beautiful failure, I tried again, making it larger. My reduced 35 degree angle turned out to be much closer to the original 45, though.
And done.
Of note is four things here:
1) Steel is doubled up. I have no idea if this is going to be an improvement or not; my thinking is that it's going to half my chance of a catastrophic failure before detection.
2) Rubber grommet at the engine mounting points, with washers on both sides larger than the holes. This is to hopefully reduce the vibration on the piece, and if the rubber fails, at least the mount won't fall off the engine.
3) One can't see it, but there is a steel plate under the oil cooler itself holding things together. My first installation had the nuts going just to the cooler itself and it's soft metal. Now it will have to think of a different way to fail. I also put in two more bolts to even out the load on everything.
4) The baffling material on the cooler between the mount and the strip underneath isn't there to prevent vibration as much as it is to reduce the friction between the steel mount and the steel strip against the cooler.
Oddly enough, when I enlarged my mount measurements and bent them, I came pretty close to what was there originally.
Everything ran great and no leaks.
For those wondering where I get my engineering inspiration, note the decal.
Dart, I like the design and your explanation. I have one opinion.
The hi temp silicone material between the cooler and the mount is a good choice, but I hope you allow the bolts to tighten upon a collar (or a shoulder) and not simply crush the material. edit: LOL, staring at your pic and thinking about the cracking. You make me remember the problems we had with the Decker expansion chambers for the early 90's SeaDoo.
Edit 2 I guess you would not need a bottoming collar if you safety wire the nuts and do not overly crush the silicone material.
The material is just a sandwich between plates; bog standard locking washers and nuts. On the bottom is a steel plate that runs the entire length of the cooler.
I threw three rivets up the front side of the mount on each side as well, to keep the two pieces from grabbing air and fluttering. I actually had a super experienced aircraft mechanic look at it (Dude is a friggin' legend, or should be. His last job was repairing DC-3 engines in Scandinavia, where the company paid for his trip out and time there) and he gave it a thumbs up.
Funny thing is that at first he didn't even want to speak to me or look at my aircraft. Crazy homebuilts with VW engines make his eye twitch. Then one day I stopped by his hangar to say hello and his little dachshund walked over and sat down next to me, accepted my hand and a scratch behind the ear.
Money can't buy character references like that, and I rose about a zillion percent in his books. Since then he's looked at the aircraft and made pointed observations both positive and negative, but in the main they've been positive. Indeed, I'll probably implement a couple of his recommendations in the future.
I did a big preflight yesterday and took her around the patch - she really flew well.
I'm still suspicious of the oil temp readings, though. It barely cracked 120 degrees by the gauge. True enough I've got a humongerous oil cooler, the engine is well baffled, and am running at around 2200 RPM's at cruise, but that seems really low (considering the ambient temperature was about 90). I'm debating installing a non-electrical temp gauge as a diagnostic tool to see if it's the truth or not.
Hahaha, there's the funny bit - VW never came up with temperature specifications for the Type I engine.
The Industrial Engine Division of VW came up with a suggested range of 170-220, and a caution above 250. That's about where the idiot light on a VW bug goes off on oil temps. I'm indicating around 130 degrees, just a smidge above the bottom of the gauge's range.
Since VW didn't really publish temp tolerances, the Cylinder Head Temps (CHT) is really a collection of combined wisdom. Anything under or around 350 is good, anything over 450 bad. That's a huge, huge tolerance.
The bonus plan is that all air cooled engines depend on ambient air temperature to cool them. So today when I flew at 95 degrees ambient (brought down to about 90 as I climbed up), the engine is going to run a little hotter. It's enough to where more than one experten has suggested that CHT's and even oil temp gauges on VW engines are just borrowing worry. If it runs, it runs. Don't tax it too hard when it's hot out.
It's also not unreasonable that my oil temp readings will be on the low side.
A) I've got about as good an oil cooling setup as one could make. B) I'm working off a sensor at the back of the engine, so it should be cooler anyhow.
The downside to oil not getting up to 170 or so is that any water in the oil will tend to stay and not boil off. That's it. This is actually a huge problem if an engine sits. In an engine like mine, it gets a lot of use, and even bringing it up to 120 will probably boil it off - plus that's the total temp of the pool of oil; it's much hotter in other places in the engine, like when it's covering the crank and camshaft.
Hot oil also lubes better because it's thinner, which is why I'm running the recommended 20-50 rather than 30W.
While I don't have a CHT, I did a little unscientific check after landing and the long taxi by placing a thermometer on the heads themselves. It's unscientific because the fins on the head aren't the best place to check it. Plus, measuring the temperature after a mile of walking pace taxi should make the temps higher. I came away with 320 degrees. Spot another 40 just for fun, and it's 360, which is in the green zone.
The biggest thing is that I'm not asking much of this engine. I climb out at around 3100 RPM, and quickly go to a just-above-cruise of 2500 RPM and then cruise at 2200.
It's almost a vanity project, like the altimeter and airspeed indicator. Since it's on the panel, I want it to work.
[edit]
If you want to see a layout of today's very short flight with all sorts of data, 3D track, etc., click on this:
1) I tried to force her into the air on takeoff, which she wasn't having. Damn you, density altitude! 2) I've been shooting for better climb rates. I don't like the profile that gives me 500 fpm climb. She's pretty nose high, and it feels slow. 3) While they were in the distance, I noticed the clouds were starting to produce rain, and I didn't want to deal with the wind that would generate. 4) Plus it starting getting bumpy. 5) Now that I've started really getting a handle on wheel landings the last two times out I've three pointed her. Today I did a marvelous flare right at the stall. Unfortunately I was about a foot or so too high, so it was a minor three point bounce and then the three point landing. Again, it's nose high and visibility is super crappy.
One of those times where I think to myself "why bother with the GoPro" and then curse myself later. The reason I climbed so high was there were some singular puffy clouds at 5K, and I flew up and around them, pretending they were balloons.
This is one of my favorite things to do when they present themselves, and I have yet to bring along a camera when it happens.
[edit]
GPS track is a little off on landing. I was lined up for and landed on the runway.
Woah that Cloudahoy site is awesome! Really cool to be able to go 3d mode on your flight. If you gopro it then we can go along for the flight via what you upload to site?
Speaking of losing oil quickly, my old and trusty 308 V8 spat out the oil line from the rear of the gauge (brass fittings with olives) one morning, by the time i smelt the oil she was nearly empty. Filled up the passenger side of the floor with near three and a bit litres of oil. Bonus, that floor pan will probably never rust
The glue may not conduct electricity but I bet that metal can it was packaged in will. I am finding it intriguing watching your videos and am looking forward to your next video on the fabric. I have seen, and I stress the word seen, it done at Planes of Fame a few times and will be interested to see how your method compares to theirs.
The funny bit about that whole hacksaw part is that Clark's "help" in holding the end of the aluminum strip was the exact opposite of help - he was putting tension on it, forcing it to act like a spring and out of my hand. Indeed, both Mike and Clark were being the opposite of help that day (which happens sometimes) and eventually realized it and wandered off.
I fixed the rudder stops the next day, as I had the center section on and wanted to go flying!
The wife says my editing skills are getting better, and is going to get me a wireless microphone so the audio isn't total crap. I'm also trying to keep them to five minutes long; like most strong smells I'm best tolerated in small doses.
I'm not really sure exactly why I'm making them - there aren't enough views or interest in them to feed any sort of ego, but it's sort of fun.
Plus it will help in case I ever need to repair what I'm fixing. The whole problem with that center section is that it's one area I didn't document when I put it together, and since I have the memory of a goldfish I'm having to re-invent the wheel.
At any rate, any suggestions or criticisms of the videos would be great.
I kind of drove Robert Baslee of Airdrome Aeroplanes nuts when I'd call with a question because of my inability to name things properly.
"So I'm working on the wing, and the thingies that hold the cross wires and the cross tubes are in the way of the rib joiney bits so it won't work like the plans. I can move the rib over a little, right?"
He'd respond with "Yes, if the tang that supports the drag-anti-drag wires and the wing compression strut is interfering with the placement of rib mounting bracket you can relocate it to ensure clearance."
I don't know if I told this story in this thread, but I'm somewhat infamous in that circle of builders for talking "doo hickey."
When I went down to Sun N Fun, I got a chance to talk to Robert in person since I first started building, and I got a chance to ask about stuff I'd done and managed to get to work in a Rube Goldberg sort of way, wondering how I should have done it. The big thing was the leading edges of the wings, which on my plane look like I've flown through repeated hail storms. I never figured out a way to make them in a way that looks good.
"Well, it's easy. Instead of trying to make a big U like you did, we do it in halves, using two sheets. I honestly don't know why you didn't do it that way. It's in the instruction book."
I went all googly-eyed at him. "INSTRUCTION BOOK?! All I got was a pile of hand drawn picture line drawings and a DVD showing Butch Witlock's DVII build!"
He went all quiet, then grinned.
"Oh, yeah," he admitted, "the instruction book we made up after you built yours. I didn't realize I actually needed to include one before then."
To his credit, while he firmly states that his airplanes can be built by an inexperienced builder using only basic tools in the space of a single car garage - and he's right - I was the first to put the theory to actual test. Everyone else prior to me had at least one aircraft build behind them or had experience in the area (A&P's etc.), so a set of line drawings with minimal notes on them was just fine.
Well at least you proved him right Dart, like a lot on here we have all been following your build with great interest and you do tell it in a most entertaining way.
In all seriousness your inexperience may end up saving someones life since now they will have a better set of instructions than you did when they start their build. I would request one of the instruction booklets from him just to read it if I was you though. I am guessing it would probably give you some insights on other niggly areas you want to rework over time.
Curious if you ever gave Robert Baslee links to your website and IL-2 instruction videos.
Well, I think the cleco is meant as a temporary connector to hold everything in place to make sure you got it right. Once you've started riveting and realized you've screwed up, your effed.
Yeah, I know. I just had so little actual sheeting that they weren't necessary...and for little jobs like putting in the hickey floggers, it would have been overkill. Just setting in a rivet to keep things aligned worked well.
The coaming around the cockpit is devolving into complete crap. The outer edges are curling up and the inner edges where I made little tabs all curled on up as well. I put some duct tape to the tabs on the inside of the fuselage to tame them down, but it's clear I'm just going to have to put down the money on some actual leather.
Took Babette around the patch this afternoon once the fixes were done - very bumpy below 3,000 feet, but manageable.
Still refining the max climb "V Speeds" and I think I've just about got them. She managed 500 to 550 fpm climb out today at around 51 mph indicated and the nose far too high up for my liking. Density altitude for my 540 foot ASL airfield was 2150, too (though it barely topped 90 degrees - Autumn is here.).
I'm going to give up on three pointing her for a little while, too. Conventional wisdom is that in this type one should always wheel land, but I've seen some guys just ace them. Me, well, I'm baubling around all three wheels and making a mess of it. Part of it is the pavement, and part of it is my unwillingness to fly her down to 35 mph....it just seems unnatural. So I ate up about 400 feet of runway in bouncy bounce hilarity before just picking her back up, getting the tail up, sticking the mains and letting the tail fall on her own.
Good Lord! Don't mess up the hickey floggers! Every aircraft engineer knows it's the most critical part of an airframe. You'd never get off the ground.
Been enjoying this thread for ages, popping in once in a while with a Congrats mixed with a heavy dose of envy. Out of curiosity, I just went back to Page 1 to rediscover how the Babette saga all started
This is what I got on Page 1:
"Direct control, fabric over aluminum frame. Loads to do before it's done."
hmmm... Have the early bits been lost over time? I hope not ! or was the thread started somewhere else, and I have since forgotten ?
Oh, lord, I didn't realize I had been pimping out my airplane all over SimHQ!
Took her up and around on patrol today and found out that sewage treatment plants in the summertime can really project themselves, even at 3000 feet altitude.
No joke, I loved every thread Dart. Heck, going back and reading them is just as entertaining as the first time which says a ton about your writing skills.
Over 90 degrees in the early afternoon, so lots of thermals and baubles and bumps below 2,500 feet, and thanks to scattered clouds at 3,500 an inversion layer at 3,000 that was super squirrely, tossing me about. So I tried to work just below the layer, which was of course invisible.
Tomorrow I go to my first fly-in! Just a small one over at Greg Koontz's place, but it's in my 25 mile test flight radius and he puts on a great aerobatic display. l'm kind of expecting that most folks will look at my plane and say it's a hunk of junk and other bad things, but I don't really care. She's my patched, dented, no-three-rivets-in-a-line little light aeroplane with paint runs and I love her.
Here's the flight data, though the GPS or software is a bit, um, questionable on takeoff and landing. Trust me when I say I did not line up to the right of the runway or do a smooth lateral warp move to the center. It also didn't take me over 700 feet to land - I floated her along and did a nice wheel landing so I wouldn't have to taxi half a mile to the turn-off.
Though I forgot my sunscreen and wound up with a massive sunburn, a good time had by all. A few notes:
1) I really, really liked the airshow they put on. Five aerobatic acts, each different in style. We got the tumbly "hell no" routine from a guy in a biplane, the amazing high G routine, the grace of a T-6 doing loops and rolls, a super low routine with crazy, crazy slips, and Greg himself showing off "grandpa" aerobatics in his Decathalon ("folks, these are the things you will learn when you attend the classes here,"), which I find graceful and appealing.
2) Ten bucks and lunch with it. Lunch being ribs and pulled pork, which was awesome.
3) Landed with a bounce at the end of the strip for over-thinking it, picked it back up, and did a fine wheel landing where I wanted to in the first place. Nobody seems to have seen it.
4) Since I arrived a bit early, they parked me up front! I let kids have their pictures taken in the cockpit, which really brought out some smiles. Nobody said bad things about my beloved Bebe.
5) That grass strip is really rough, as other pilots were telling me. I landed a bit long of the rough bits, and didn't really pay attention to just how rough as I did a slow taxi over it. On takeoff I hit a rut or a bump or something and got a little kaywhompus. Had to do some pilot stuff to get her straight, but up she went to go back home.
Probably would have got more than a few frowns but as quick as your Bebe slows down you could have landed right before that pond and still had twenty minutes of taxi time to your parking spot.
BTW bounces are all about airspeed and attitude. If you 'grease' the landing, then no bounce as your flying attitude and ground attitude are the same (doesn't matter if a wheel landing, or three point, just that you don't "hit" the ground hard enough for momentum to carry the tail down (and you don't want to have it carry the nose down...)
Grass mainly differs from concrete in that it *can* be softer and draggier (increasing the risk of a higher speed wheeled landing causing a nose-over), but when cut short and not excessively soft there isn't much difference to asphalt or concrete.
You can fly the aircraft down to a three point attitude and then allow it to settle with no risk of bounce, but this can cause issues with lateral and directional control, and ability to safely apply power to abandon the landing if three point is at or beyond the incipient stall angle. Even with some margin over the three point attitude, a lower approach speed and a hold-off can result in less bounce. Finding the sweet point between control and ability to settle below a flying speed in the landing attitude is potentially tricky, so a modicum of bounce is better than bending things.
Dart, so you were that Birmingham call. You should have left a voicemail.
Didn’t even come close. Just a little rain and light wind. Had bad weather flying to Virginia Beach last Saturday. Week later I attended the Military Aviation Museum airshow. Really, really good. You would have liked it. This years theme was Biplanes and Brews. Several local breweries had their beer there.
It is one of the best aviation museums. Almost all of the planes there fly. Even the Russian stuff. I have a bunch of pictures if it wouldn’t bore you all.
Ok, Ok, Ok. You are in my contacts list. After waiting over a year to be invited to come back for another visit, I figured I’d been dumped.
What did you think of that Military Aviation Museum ? Not only did they fly all those, it was more than the usual couple patterns and that was it. Nope, they flew these for about a half hour each. Fast flybys, slow flybys , touch and goes, etc. New aircraft would go up and they would do group flybys. One of the best shows I’ve been to.
Even the remote control stuff was good. These were big models; either 1/3 or 1/2 scale. The 1/2 scale were huge and when flying they could be mistaken for the real things.
I rarely leave voice mails, as usually it's just pissing in the wind. Goodness knows I only check mine every week or so!
LOL Dart, You remind me of some that look for my motorcycle repair. I have a basic landline and a simple tape answering machine. I can not tell you how many times the only message left is "this is xx, call me back". if you call, leave a name, number, and time of call.
I usually make up a little song when I do stuff like that.
There are few things more fun in flying than playing with little puffy clouds, flying around them and watching them go past. This is where a slow aircraft really pays off, as I can really enjoy them.
Like any maneuvers, though, one has to really check the sky for others. My head's on a swivel not for dramatic effect!
There was actually a donut of a cloud that was large enough for the airplane to fly through!
It didn't show up well enough on camera, though, to be worth anything.
I have to replace the valve cover gasket on the right side - it's leaking! But since I'm right about at valve adjustment time anyway, it was going to get thrown in the trash anyhow.
For some reason I can handle straight crosswinds from the left a lot better than from the right. Maybe it's a function of the way the prop spins,* but the other day I went up to find the wind shift to 90 degrees from the runway at about 5 mph.
Keeping the wind on the right it was kind of an ugly affair. I landed her okay, but it was just rough. So I took off again and went the other way, with the wind to my left. No problems at all.
The wind actually favored the other end slightly at the second landing, so I had the tiniest bit of tailwind.
* My VW rotates the prop in the opposite direction of certified ones.
This is strictly speculation but it seems reasonable to me that the plane would be easier to handle when the prop is turning in the opposite direction to the crosswind. It would seem to me that when the prop is turning with the crosswind you have to fight not just the crosswind but the torque of the prop which naturally wants to propel you in that direction so you are fighting both forces working together to keep the plane under control. When it is turning against the crosswind the prop torque is cancelling some if not all the crosswind forces out.
It's 40 hours, as I have an experimental engine...and I'm a few hours short. Not that it matters a whole lot; while I'd like to fly down to Shelby County and maybe over my house, it's not a pressing matter.
@ CAVU: Yeah, I sent them a little blurb explaining the aircraft and telling them how nice the day was.
With that curve in the river I thought you might be flying over the Seine for a moment. https://youtu.be/W_NQUaCgENU?t=50s Just needs to be a bit wider.
Hey Dart, you might be pleased to know that YouTube suggested one of your videos to me under the heading of "Kermit Weeks Hangar viewers also watch..."
My YouTube channel is pretty much a vanity project based on the number of views and subscriptions. Oh, well, since the Internet is theoretically forever, it's a legacy thing that my ancestors can laugh at.
A couple of weeks ago I had my second real scare in the aircraft, and the largest of the two. The first was when a bit of coaming foam jammed a rudder cable for a minute, but freed itself. That was disconcerting.*
This latest was when I replaced the valve cover gaskets and the left one didn't seat properly and shifted on takeoff. Climbing out and diverting from the pattern early to let someone else take off, I did my usual scan of the aircraft to see a river of oil coating the left wing! I immediately told the traffic what was going on, did a nice little three quarter circle, and bounced her in for a very short landing for the first turn off.
She still had two quarts of oil left when I shut her down, temps were fine, as was the oil pressure. No harm done to the aircraft. I replaced the valve cover gasket, making triple sure the contact cement to hold in in place was at full tackiness before installing it on the engine.** It's amazing just how much oil goes through the valve covers.
The same day I had to do a little circle on the taxiway before the run-up area to allow a guy to land. First time I ever needed brakes, and it would have been nice to have them.
So yesterday I went up to the airport and put the brake shoes back into the housing, adjusting them to be very light, enough to slow and stop the aircraft from taxi speed in about a third the distance of rolling with the engine off (but with the engine on).They will hold the aircraft in place at and just above idle.
The oil leak was very annoying outside of the whole engine wrecking/forced landing possibilities. The Hobbs meter is showing 39.1 hours. While I actually have more flight time than than in the aircraft and have crossed the 40 hours to leave Test Phase, I decided long ago to use the Hobbs for that just to make the books look logical. I'm looking forward to putting the magic words in the logbooks and travelling to exotic places outside of the 25 nautical mile circle around the airfield such as Shelby County Airport, Fort Payne, etc.
Lots still to improve on the aircraft, though:
First, I'm going to pull the fuel level cork, dry it out completely, and put a thin film of JB Weld on it. None of the varnishes I've used on it have held up, and once again it's sodden and not floating properly. While I'm a firm believer that the only time one has too much fuel on the aircraft is when it is on fire (I generally fly with a full or near full tank), I also think it's a good idea to know how much fuel one has on board the aircraft.
Second, I'm going to have to pad the back of the seat. While she's a fun aircraft to fly, having a sheet metal back means it gets a tad uncomfortable after an hour. I have a cushion made for cars right now, but it's not cutting the mustard.
Third, those wheels need covering. While there were Nieuports flying around without them during the war, she'll look a lot better with them. I'm going to do them at the same time I epoxy the cork, as the plane will be down while the wheels dry.
Fourth, the coaming is still s--t. It's minor, but irritates me to no end that I seem to lack the skill for what should be a minor task.
Fifth, time to touch up the paint on the metal bits. I've got some Krylon flaking off here and there, owing to a poor job of priming the metal. I may resort to stripping it off, lightly etching, re-priming, and re-painting.
All told, though, I'm pretty satisfied with the aircraft. She does everything as advertised, both good and bad, and is just enough of a handful to make things interesting without being scary. Between her German accented French and my Southern drawl, we've come up with a common language to speak to each other with.***
Yes, there are some other minor things I want to tweak as well, but they're well down the list.
* Flipping the aircraft wasn't scary in the least. There wasn't any time to get scared, as it happened too fast. "Wait, what's going on here? Oh, I'm upside down. Crap."
** This is fairly standard practice in VW engines, as the cork gaskets can move away from the valve covers to allow leaks when seating them. Applying a bit of contact cement prevents that.
*** I figured out that while she's French, she must come from Alsace. She responds to German without question, as if it's her first language. And yes, I'm a nut who talks to his aircraft using bits of three languages.
Oh, and the airport manager had words with Mike for chasing my plane down the runway in his car.
Since the airport is changing management from NASCAR to the city in a couple months, neither had their hearts into the discussion and nothing came of it. The manager tried to act stern and Mike tried to act contrite. Both agreed they were convincing enough to let the matter pass.
There are so many violations on the running of the airport that the manager isn't going to press any matter with the FAA, starting with the gate that grants access to the field being held in the open position because they don't want to spend the money to fix it, hoping to pass it on to the city when they take over.
Most likely. I think the guy who likes to take off from the taxiway (yeah, we have a guy that does that) and buzzing the field will come to a halt.
If - and that's a big if - they hire a competent manager. If they go cheap and just hire some dude (or any of the people that work there now) it might not change.
One of the supposed line guys could have had the job, but he's surly and rude; when the lady who will be running the new airport board came to visit he studiously ignored her and didn't seem to care who she was when she introduced herself. Part of running a small airport is like running a hotel - one has to make the guests feel welcome.
The biggest change is going to be that the people working the airport will only be working the airport. NASCAR only really cares about the track, and would have the airport guys out there picking up trash on the road outside the track, cutting the grass after they picked up the trash, etc., while the airfield grew tall and paper flew around. Any maintenance on the field is either slow or non-existent, and when it finally happens we hear about how they don't like to pay for it.
Hell, the current manager, who's an otherwise nice guy, likes to talk as if FAA airport funds are coming out of NASCAR's pockets. AWOS was broken for six months at one point, and it only got fixed because the governor flew in to our field and the pilot mentioned it to her. The main security gate remains in an open position because it would "cost too much" to run a new wire from one side to the other so the sensors knew to let someone out. The management isn't going to call the FAA on anyone for the latter - they're violating Home Security as well as FAA regulations.
There are upsides, though, that we're losing. When I flipped the aircraft, there should have been a call to the FAA, but instead they helped me tow the aircraft to the hangar behind a riding mower after I flipped it back over. Nobody saw nothing.
Our hangar rents are a little below market value. Not too much, but I can see rent going up fifty bucks a month. I don't think folks will complain too much if at the same time they patch the roofs to where they don't leak.
What I saw going on at your little airport was how Chino used to be according to the stories I heard from the old timers before the FAA cracked down on the place for runway incursions and forced the county to install a fully staffed Control Tower to boot. Crossing the Movement line with a car would have caused all sorts of headaches these days for the individual that made that mistake. Our access is gated but at least 3 to 4 times a week someone breaks off the gate arm at all of the access points with a trailer. It happens so often it almost seems deliberate. Maintenance guys never run out of work fixing them though.
Good story. Open cockpit is different. I’ve been flying an Ercoupe with the canopy open. There is enough activity that I had to put a second windsock on my mike since the Bose A20 was being triggered too much with just the single sock.
We had a rare break in the weather yesterday so I popped up to the airport.
She flew great, and so I stayed up, just flying around and wishing I'd of opted for the scarf and mittens along with the parka. I started shivering on the way back to the field.
The Coosa river between the dam up towards Gadsden and the big one that makes Martin Logan lake is way up, thanks to all this rain we've been having. They've done their best to limit the flooding, but it's no joke:
I hadn't expected this kind of break, so none of the batteries for the cameras were even close to charged - the GoPro was flat, and my el Cheapo one had about a third of a charge.
The neat thing was that after I pulled the cowl for the post-flight checks, the Hobbs read 40.3 hours. I can put her out of Test Phase!
While I actually have more than 40 hours in flight in the plane, I decided that in order to keep the paperwork straight I'd go off the Hobbs. The reason they don't match is that since the Hobbs is connected to the master switch, any time I do maintenance or work on the electric stuff. Rather than have it inflated, I usually disconnect the Hobbs when doing such work. Naturally I forgot to re-connect it once or twice.
Got the shivers just thinking about flying in an open cockpit in that weather.
Wheels
It's not the cold so much as the cold with the humidity - it cuts right through a body.
Tomorrow morning is 31 degrees (either Zero or -1 in Metrics), which is cold. But it's also projected to have a humidity of 62 percent. Sixty-two. There's so much water in the air that it won't insulate properly against the cold.
How one can have water vapor in the air when the air is below freezing is beyond me, but that's winter in the South.
I lived off and on for ten years in Montana, and spent a year in Alaska - it never felt as cold as it does in Alabama.
I've been putting together this Summer's list of improvements to the aircraft, and it's fairly short - but involved.
The last flight around I took the little lumbar pad I've been using and flipped it sideways so it ran all the way up the seat with much relief. Yeah, I'm a little slow sometimes and should have figured out I could do that a long time ago. So coming up with a pad for the seat back is pretty high on the list.
Part of the discomfort is that I tend to really crank down the shoulder harnesses, probably tighter than they need to be. However, this habit served me well on the morning when I inverted the aircraft on the ground. So thick padding it is.
I'm going to cover the wheels. It's an afternoon's worth of work, but one I've been putting off for no particular reason. Purely aesthetic, as the plane is such an exercise in drag that I don't think it will seriously improve airspeed.
While I'm at it, I need to replace the wheel bearings again. They're really inexpensive, so I bought a bunch of them and it's dead simple to do. It doesn't take much on the grabby grooved pavement to make them sloppy. Fifteen minutes for all four.
Replace the oil cooler with a standard sized one. This winter I blocked off most of it and still didn't get up to full operating temperature. It did get closer, and with it the oil pressures approached more closely to what is optimal. Whipping up a mount for it to hang below the engine will be a snap.
Here's the big one - pull the fuel tank. The flashing from the welding on the neck on the inside makes putting in the cork float a real pain, and the only way to file it down and remove the slivers of aluminum is to flush it completely. So the wings come off, the rivets drilled out for the top of the fuselage, and up and out it goes.
I'm toying with rotating it 180 degrees and putting in a sight gauge. The issue is that Robert put the access for that on the opposite side of the fuel output at the bottom, meaning I'll have to either work out some sort of system to work the fuel cutoff lever or do without it completely.
I will also make a neck to fit the top of the fuel tank that accepts an actual gas cap rather than some cobbled together PVC fittings.
Since the wings will come off, they'll have to go back on, which leads me to my last real task - properly safety wiring the turnbuckles. My current job is barely adequate, so I'm going to use the double wrap technique to hold them more firmly (as I did the turnbuckles for the rudder cables).
See, that is where having built your own plane separates you from us “store bought” airplane fliers. You say it matter of factor where I would look on that as a monumental task and risk.
In your shoes I would just put up with that difficult location.
Meh. It's just an airplane. One fixes it just like any other machine.
That bi-annual flight review is today!
Every time it rolls around I try to do something different to stretch my skill set, and this one is in Tuscaloosa, the nearest controlled airfield to me (besides Birmingham, and nope). I did the studying, so talking to ground and tower shouldn't be that big a deal.
Yesterday was kind of funny. The weather forecast was for a pretty windy day, but I had to drive up to the airport to fetch my logbook for the flight review. It pains me to drive all that way not to fly, but hey, I should have been thinking ahead.
Well, surprise, surprise, surprise! The weather broke in my favor for once, and it was fairly light and variable wind, so up and around I went for about an hour. With all the controlled burns they're doing in the national forests, though, there was a lot of smoke. The upside was that it pretty clearly showed an inversion layer full of bumps, making for a pretty smooth flight.
Going to be weird piloting an airplane with a steering wheel, flaps, nose gear, etc. Oh, and doors. Doors on airplanes! Weird.
Yesterday was my bi-annual flight review, and as always I threw something new in the mix - talking to a tower.
Not really a big deal in Class D airspace, that's for sure, but I'd just never done it.
We flew in a Cessna 152, which is pretty fancy. In addition to all sorts of whiz-bang gizmos (artificial horizon, vertical speed indicator, built in radio), it had other odd stuff like a yoke, flaps, trim, and even a mixture control, but I managed not to become overwhelmed by it all and just fly the airplane.
As we're doing the paperwork afterwards, another instructor came in and asked what we were doing, and my instructor said that "He's a Sport Pilot doing his Flight Review. He's surprisingly good."
That assessment of my skills in the air was instantly hard coded into my memory.
Funny story about that. I had flown the week prior, but winds were too high beyond that.
So the day before my Flight Review I checked the weather forecast and it said projected 13 mph winds. Ug. But I had to drive up to the airport anyway to grab my logbook, and was a bit miffed over it.
On the way up I started to notice the flags at various places weren't flapping so much as just being pushed around their poles. I started to perk up. Got to the airport and the windsock was sort of just milling about.
Well, simple enough for that - up and around I went for an hour!
On the C152, since I wheel land the Nieuport exclusively, landing a trike is no problem. It's exactly the same, really, in that after the mains stick one gently moves the stick forward. Rather than falling back on the tail wheel, it just sticks the nose wheel instead.
I've got about 115 hours, with almost 45 of it in the Nieuport. It's a little crazy to jump into a squirrelly little airplane like mine with low hours when one thinks about it, but then again I never really grasped the whole danger avoidance thing very well. I fully embrace risk mitigation - I'll scrub a flight before it begins if something doesn't feel right - but on balance I accept the risk that has to be mitigated.
It is true that it's not the hours but what one does with the time. I normally have a pilot skill that I practice while I'm flying around, so it might just be a 45 minute flight that goes nowhere, but it's quality time.
I did make the instructor chuckle once. We had done the standard "perform a 45 degree turn in a circle to the left, then right," blah blah stuff and he said "Turn one eight zero and maintain direction and altitude for three minutes." Oh Lord. "Straight and level flight? I had no idea you were going to demand witchcraft!"
Normally one is asked to perform stalls, but he didn't. I asked afterwards why not, and he said if a pilot can perform coordinated turns consistently through all maneuvers, including climbing and descending turns then stalls are just icing on the cake. Plus we hit a nasty bit of chop in the air that I had to do pilot-y stuff to put right that seemed to make him confident in my ability.
Of course I'm an old soldier, and know that half of any examination or inspection is attitude. One has to be confident without being cocky - I went with "we're both experienced pilots, one of which needs simple validation of basic skills and the other that is going to do just that." Worked a treat. It didn't hurt that I pretty much aced the radio work, which is why I was there instead of someplace else. Not that Class D airspace with light traffic is stressful - not like when there's three in the pattern to land and three on the ground wanting to take off on an uncontrolled field.
No, here in the USA all pilots have to do it to remain current.
I know a couple of folks who are way past due that still fly, heedless of the regulations, but if there's a wreck they are in harm's way and open to all manner of legal problems.
One can't fail a flight review. The worst that can happen is the instructor refuses to put the magic BFR in writing, and insists it is simply supplementary training.
Then the savvy but weak skilled pilot insists the instructor credits it on the FAA WINGS website, takes a few online courses and maybe attends an FAA seminar, and the FAA gives him BFR credentials anyway.
Oh, that's not dancing - that's just kind of shuffling around. But to answer the question, yes, one can two-step to K-pop.
Here's part two to the covering:
A few notes:
1) I should have covered this side first, so I could cover the wheel completely and still have access to the nuts for the bolts of the brake drum. 2) I could have simply put the drum over the side I had already covered, but I didn't want to paint over the stripe or have the air hose hole patches on both sides (though I would have left them uncut). 3) I managed to bugger up the painted side even though I put down a moving blanket on the bench, and went back later to touch it up. 4) I wound up tightening the fabric a little once it was done, which wasn't a big deal. Latex paint is extremely flexible so no cracking.
And last, to make removing the wheels easier, I had to loosen the brake cables. So they need to be re-adjusted, which is a two man job - one at the brake end and one on the lever inside to ensure that they're grabbing okay (but not too much) and the same amounts. Both brakes go to one handle, so the latter is pretty important.
After "helping" Mike remove and replace all the seals on his C150's nose wheel strut, we spent some time sussing through where to put a sight gauge for fuel in the cockpit and how to run the lines.*
I think we came up with a solution to where it will be along the right side of the fuselage, running along one of the vertical tubes just in front of the seat.
It's this year's Big Project with the aircraft, and a result of not knowing what I didn't know in the first place. It's probably a week's worth of work - one day to take the wings off, remove the sheeting and then the tank; one day to clean the tank up, fabricate and install the filler neck; one day to install the tank, fabricate the sight gauge, and install it; one day to put the sheeting back on, mount the wings, and re-rig the plane. It could go faster or slower depending on how it goes and life's demands.
I also want to come up with some sort of filler neck to where I can easily be filled up at an airport. As is stands now, there's not enough room between the upper wing and the fuel tank to fit a standard AVGAS nozzle. I managed to sort of crook the nozzle and put gas into it when I did my trip up to Gadsden, but it was goofy and terrible and I wound up with some spewing back up onto the aircraft.
Before that, though, I really have to improve the seat cushioning. It sounds silly, but if I'm going to fly in longer stretches it's got to be done - as it is, a couple hours in the seat gets downright painful to my back, enough to where I'm actually sore the next day.
Part of the discomfort is the fact that I snug the shoulder straps down, which means I'm pressed against the back of the straight metal sheeting in kind of a bend. As I learned rather dramatically, it's better to put some padding on the back of the seat than to keep the straps loose.
While the aircraft's controls are light, one is constantly piloting while in the air, unless it's perfectly smooth....and it's rarely perfectly smooth. My last hour was a damned wrestling match against moderate turbulence the whole way!
Not to say I wasn't having fun, mind you - she's just a gem to fly!
* Mostly I "helped" by digging into my toolbox and scrap pile, drinking coffee, and watching.
I tackled the back seat cushion, and in typical fashion completely throw out the original plan and just make something dead simple instead:
Not shown is making a holder out of that exercise mat for the two buckles of the shoulder straps that adjust the initial length. They were at just the right length to where occasionally they'd rotate and poke me in the shoulder (they route under the back of the cockpit and then up). After making a simple rectangle with some slits in it for the strap to wind through, I covered it in duct tape and then a strip of faux leather to make it look less crappy.
Babette is all in pieces, as I decided to knuckle down and improve the whole fuel tank issues.
I've got all the hardware assembled for the sight gauge, and an actual filler neck is on order, so I'll go up and work on that tomorrow or the next day.
I was pretty surprised at how far off from what I thought was in the tank and what was actually there. I had guessed about four gallons, but it was seven!
The good of that is that I had more than I thought; the bad is that I was shorting myself two hours of flight duration.
Dart, Forgive me, I have not followed you thread for a bit. How did you work out the wheel brakes? You were having problems with axle movement taking up the slack with your cable operated bands.
I solved the problem of the band brakes by taking them off, throwing them in the trash, and getting some drum brakes.
Since two of the three possibilities for why they locked up on takeoff and caused me to invert were mechanical (and the third, that I was applying them myself due to the handle being on the stick solved by moving it to the side of the cockpit), I just went another way.
I flew for most of a year without them at all, which was fine. 99.9% of the time I don't need them. One day, though, I had to hold up for an incoming aircraft and wound up doing a big circle at the end of the taxiway, which caused me to rethink their necessity.
Indeed, right now they've not adjusted and are a fashion accessory; I require a helper for that and it just hasn't been pressing enough for me to enlist aid.
I appreciate that...now that Summer is here, when the plane is back together and flying I'll invite you up again!
One of the other problems I wanted to deal with was moving gas from cans to the aircraft in a way that was measurable, predictable, controllable.
Here is the Fuel Dispenser 2000:
Easy as punch! Put gas in, put the cap with the hose connector on, place it on a step ladder or something, remove the breather hole on top, put the hose (not shown) into the aircraft tank, turn the lever and watch it go.
The sight gauge is to let me know how much I've dispensed.
The biggest threat is inverting (as I well know), and when that happens the gas goes out of the vented cap and onto the upper wing.
Open cockpits make for easy egress, though.
Seriously, it's actually designed for safety. The access points for the line are on the back side of the tank, and it's heavy fuel line for most of the way fairly loosely tied down to the airframe. The sight gauge is velcroed in and thick tybex.
If the wreck is serious enough to have the lines break, any fuel leaks will be just a cherry on the top.
Very variable wind made for an interesting landing.
I had been flying around for a little over an hour with some standard bumpiness - it is Summertime here in the South, after all, and I was flying mid-day - and figured I do a straight in approach since I rarely do them and it's good practice. The windsock was dancing all around, but showing around 5-7 miles per hour wind.
(A little less than three minutes)
Head GoPro was at narrow field of view for some other stuff I was doing while putting in the fuel tank, and I forgot to change it back.
Winds are back up to Nope levels, so it's a waiting game again.
My fuel sight gauge is giving me errors on the top half of the tank (which is a great improvement over the inverse), with the fuel just sticking at around 8 gallons until it goes to 6....at which point it hops down and reads accurately.
I did all manner of awesome trouble shooting, thinking that maybe there was some sort of pressurization of the tank going on, putting suction on the fuel in the return line to the tank, but that wasn't going anywhere in a hurry. The tank is neutral pressure, vented in two different ways (the cap is vented and there is a vent line on the filler neck), so that's not logical.
Then when I was flying this weekend I noticed there is a trap in the return line that holds fuel. Dammit. Also, hurray!
The trap is caused by the tube in the sighting portion just a bend over at the top, which makes a hump. I should be able to simply put in a 90 degree join there to bring it straight over and down, which hopefully will solve the issue.
New, much smaller oil cooler arrived this week, but it may be a bit before I can put it on.
Ron and Don Wade, the guys who restored the give-away Cub for EAA Oshkosh, have their "Rat Cub" on the cover of SportAviation, a shelf of awards for aircraft, etc., etc., got a hold of me and asked me to come out and help them with a few projects for Oshkosh this year, as they have a ton to do on a skeleton display (airplane less covering) and a few other projects. Well, they're great guys and let me dip into their scrap fabric bin before, so I naturally said I'd be more than happy to lend a hand.
They've seen Babette, so I didn't feel like I had to stress too much that my skill level may be a bit below their level of craftsmanship.
Apparently it was gooder enough, as after a day of fabricating minor parts and asking questions before tearing stuff up on a custom design aircraft they offered me a full time job with them. On the construction side - no way they'd let me set foot in the covering rooms.
Ron said they need a generalist that can problem solve and keep things simple, as they have an avionics guy, an engine guy, etc., so I fit the bill.
The vibe in the shop is very much "let's get it done without any drama," which is very cool. Everyone helps everyone out, and when it's a one man job, leave that one man alone.
A workplace full of adults. Very nice.
The bad of it is that I wasn't intending to go back to work until next year, and it's A) a day job, and B) has responsibility and expectations.*
Fortunately, the hours are a bit flexible - some days one will work late, some days one can cut out early. The wife has some doctor's appointments I have to carry her to, so we talked about that beforehand. Half days are okay, so long as they get a heads-up. Oh, and not a quibble about me missing a couple days next week for my colonoscopy.
Then again, I didn't bark at coming in today (Saturday) to do some stuff. Since everything is task oriented - for example today I had to help put the tail feathers and rig them on one plane, and take apart the tail feathers of another, flip a piece so the grease fitting faced the right way (hurray, not one of the things I goofed up), and put them back on, there are natural stopping points that can dictate work hours.
I did screw up drilling the bolt holes for the rear of the horizontal stab on the skeleton plane - I let my helper distract me and they're not even close to lined up with each other - so it's going to be a PITA fix after Oshkosh. It's completely airworthy, just ugly, and in this shop pretty matters. They were pretty cool about it, to be honest....I figured they'd say "hey, thanks for all the help you've given us, but I think we're good from here on out."
The funny thing is that the two forward bolts on the horizontal stab are perfect, and they're the ones that are difficult to drill...but I did those on my own.
OTOH, the rear seat/cargo area/flooring system we're doing is about 50% my ideas - which mostly consisted of trying to eliminate fasteners and simplifying things as much as I could. And all the controls and floorboard was them just turning it over to me to do.
Now for the hilarious bit of the job, which is learning the real names for tools and techniques. Turns out the "dimple tool" is really a countersink drill, and "dimple washers" are Tinnerman washers.
* I absolutely LOVED being the nighttime security guard, as it was a nighttime job (freeing up my days) and completely without any serious responsibility or expectation beyond being there and not sleeping.
I kind of fell into some of the shakers and movers of aviation by accident, mostly just by walking up and talking to them, making them laugh, and shaking hands.
I'm at the very bottom of General Aviation and homebuilt aircraft, which is very entertaining. The aerobatic guys I know do these fantastic airshows flipping planes end over end, and I am happy to not bounce the plane five feet high on landing. It's interesting that these folks are mostly commercial airline pilots with tens of thousands of hours, fly aerobatics as a summer job, and aren't the least bit arrogant (why would they be?) and are happy with anyone who is enthusiastic about flying.
Ron and Don came by the EAA meeting one time, and offered to give us a tour of their shop (which we took advantage of). While they're tube-and-fabric kinds of guys, they're on a whole different level than I am - but so few people are doing fabric covered aircraft nowadays it got their attention.
[edit]
Of course I might go in tomorrow and they tell me "thanks for the help, we have it from here." I'm almost expecting to get fired for not having the skill levels required.
I would guess it's your absolute willingness to learn and try things out, zero pretense to being some kind of know-all top dog (yet confidence in your ablility to handle stuff) and your focus on getting a clean job done that makes working with you a pleasure. And as such I wouldn't be surprised if you get to retire at that shop, after having worked on and maybe flown a whole lot of cool aircraft.
Good luck on the Colo, and I hope the Wife Unit is also okay? You didn't mean "carry" literarely I hope?
All of this^^
congrats Dart, sometimes it's being in the right place at the right time.
Best of luck on the colonoscopy and wishing all is well with your wife too.
"Carry" in the Southern sense - being a driver for her.
Spousal unit is super cool with whatever I do, as things tend to work out for me.
While she has absolutely zero interest in anything aviation, she's backed me to the hilt on learning to fly and building an airplane - even though it's completely rediculous when one says it out loud - mostly because she knew from the start that I have an adventurous streak that needs an outlet.
While I'm not overly superstitious, I do believe in (small l) luck. I've beat the odds for injury or bad happenstance too many times not to, a small nudge in probabilities in my favor, or meeting the right person to help me with a situation....or being the person that can help someone else out at the right time and place.
A lot of that is attitude and keeping one's eyes up, but some of it ain't.
Anyhow, back to planes!
Once I get the oil cooler situation improved and the top fuel sight tube moved up to the filer neck, I'm going to start thinking about a panel mount radio. If I can find one of those round ones for less than the cost of a used car, I think the tachometer is going to get fired and replaced with commo gear. It's not like I ever look at it.
The handheld with antenna mounted in the fuselage is okay, but the xmit range isn't great and while I'm readable it's not great. Part of that is being in an open cockpit, but part of it is just asking the radio to do more than it's meant to. Plus it's a wirey mess and not the simplest thing to change freqs on...I'm eyes down while flipping it right side up and pushing the select button, and if I have to enter a freq it's a chore.
I balled the plane up yesterday. Must have been a fuel leak somewhere, as she went through seven gallons in 40 minutes (three an hour is the norm).
Choices were road with traffic, power lines, or fifty foot tall trees. I took the trees, naturally, did a fine landing at the top, and she fell straight down.
Broken rib and some stitches is all I got for it.
After I heal a bit, I'll strip the fabric and see what's salvageable. Tail feathers untouched, left wings look good, fuselage and gear are toast, engine needs a good tear down. Amazingly, the prop was untouched.
Well, I didn't get that repairman's certificate for nothing!
"I do believe in (small l) luck. I've beat the odds for injury or bad happenstance too many times not to, a small nudge in probabilities in my favor". (The Universe is always listening.)
The ribs and the stitches notwithstanding, your luck seems to be holding well. I am and I am sure all here are, glad you are mostly intact.
Will you still be able to do the work at the new job?
Do you know who Fifinella is? I think she stowed away on your last flight.
Yep, but I'm not posting any or saying much about it until the FAA and I have our conversation on Monday.
I don't expect much out of it, as they saw photos of the wreck, learned I didn't need any treatment at the scene, and released the aircraft for removal from the side of the road without coming out.
Very glad you're OK Dart. The plane will fix. You were faced with a hell of a choice over landing places. Pity the trees weren't stronger/ closer together!
Very happy to hear you are good, very sad that your beautiful plane got cold-deformed in the process.
I truly envy your resilience in sticking with it and hope you'll have a good autum/winter to rebuild. It's one reason I never got seriously into racing motorbikes - these guys end up wrecking and rebuilding once or twice a year.
Bloody hell...sad to read what happened to your lovely Bebe after all your work and a previous prang. But glad to read that you came out of it able to fix her up again! I wonder what your Good Lady had to say about it
As others have said, thank goodness you only have minor injuries. Things can be rebuilt/replaced.
Ah yes, the FAA. Odd, they can be even handed or harshly heavy handed. As always in investigations - cooperate. Answer questions, but don’t jabber. Short clear responses. Don’t offer information they haven’t asked for. They have a job and that doesn’t include being your friend. It may help to read the rags and make sure that you were in compliance. Have paperwork available.
But my gut tells me that you’ll be alright with them. You’re not the sort they are gunning for.
If you need any help recovering the plane, transporting, or repairing let me know. You are just a short flight away. I have a capable A&P friend who can come along and won’t charge you a dime.
If you need any help recovering the plane, transporting, or repairing let me know. You are just a short flight away. I have a capable A&P friend who can come along and won’t charge you a dime.
That's an epitome of why I still love and participate in this community, even though I hardly touch any sims these days
Get better soon Dart, glad to hear you safely back on terra firma. Hope not too much wrong with the aircraft and you get back her back in the air soon.
Just got back from the airport where the FAA man did his investigation.
Turns out that in all the turbulence (and there was a lot) I must have kicked the barb fitting on the bottom of the fuel tank, breaking it. There was fuel residue on the bottom of the fuselage to back it up.
So not pilot negligence - it's mechanical - and I remain out of Pilot Jail or whatever happens when it's found the pilot is at fault.
The plane needs the fuselage rebuilt, new gear, to right wings, and the precautionary engine tear down (it might be fine, but the left side valve cover is bent up pretty good so I need to take a close look at it). The left wings will be stripped, as will the tail feathers, for inspection.
I won't know how much of the fuselage stuff is salvageable until I unscrew the wing around it (the wings are in a big C around it, which is impressive) and strip it as well.
Robert Baslee from Airdrome Aeroplanes (who makes the kit) called me this morning to say he's glad I'm okay and tell me he'd cut me a break on any parts or junk I need (like ovalized tubing for the gear and cabanes), which I thought was pretty danged cool.
Glad it turned out OK. Did he give you a case number or reference ?
About the airplane. Have you considered getting a Cessna 150 or such ? You built and flew an airplane so you can check off that box. It might be time to get a plane and do some flying rather than tinkering. If you still want to do some tinkering on an old airplane, an Ercoupe might be the way to go. Or get an experimental and tweak it.
I understand your desire to build and fly an airplane of your choice and dreams. However you are missing out on a lot of fun flying by being so limited.
Anyway, I stand by to help. That A&P friend would be available to help as well.
I've been doing some honest cross country flying from point A to point B lately and I find it the exact opposite of what I love about being in an airplane!
Dead reckoning and straight lines at fixed altitudes is awful.
Nope, I rebuild her and keep flying paths that look like silly straws!
But Dart, there is no requirement to fly straight lines and fixed altitude. Much of my flying is completely unstructured. Like we did when I visited you. You just pointed me around.
But Dart, there is no requirement to fly straight lines and fixed altitude. Much of my flying is completely unstructured. Like we did when I visited you. You just pointed me around.
Sounds like my lunch time flights to Kirkwall, … "oh look what is that over there..." and another detour on a 35 minute direct flight from Wick to Kirkwall The Italian Chapel is quite nice from 500ft, as are the wrecks in Scapa Flow.
That was my usual Wednesday lunchtime, quick flight over to Kirkwall to have lunch and refuel the Cessna 152 then back to Wick and work.
Stripped the fabric of the fuselage on one side when I went up today to fetch my logbook; FAA man wanted some info on how much I've flown in the last 90 days, year, total in type, total overall as he closes the investigation out.
Anyhow, while the wife was looking at me bug-eyed, I was chuckling.
Longerons are toast, but most of the gussets and cross tubing is in fine shape. Only one of the turtle deck stringers is bent, and not severely. None of the push-pull rods for the controls are damaged.
The right wing spars are segmented, but a lot of the ribs (which are just aluminum tubing) should be fine.
New firewall, side sheeting, gear and cowl, of course, and I'll have to tear down and inspect the engine.
Left wings need stripped and inspected, as will the horizontal stab and elevators, but they look pretty good.
All the hardware, with a few exceptions, looks great.
With everyone, glad to hear you are OK. With all the water I see you flying around maybe you should see about putting floats and landing gear on her this time.
Oh, and I always thought I'd try and go in between the trees if that happened to me...was taught that.
But, from the pic it looks like that option wasn't there for you. Good old southern pine stands.
The guy who taught me how to fly pretty much brow beat it into me to always be thinking about where you would try to land IF. I seem to remember talking about pine stands with him, and I don't think there was a good option.
Good job Dart.
Glad you are still with us to put it all back together again.
Good grief, how did you come out of that virtually unscathed? Lucky chap.
The cockpit looks intact without much if any damage but the left wing is completely folded up almost like a pretzel. My guess is as the wing folded up it absorbed most of the impact forces.
Its been nearly 5 years since I've made any kind of post on SimHQ. I lurk every so often and have followed your aircraft since the beginning. I bring only simple qualifications to this discussion: private pilot, instrument rating, complex and high performance endorsements, and the son of a pilot who made an emergency landing in a general aviation aircraft.
There is more to this discussion than you, an airplane, and this hobby. You've had two major accidents in this aircraft and what I don't see you reflecting on is the impact these incidents bring to family. Let me tell you a story about how aircraft accidents affect a family and what they go through when their loved one is hurt.
I've gotten the call from my mother saying my father had been in an aircraft accident and no other information is available at the time. I've seen my beloved plane sitting in a corn field with a cracked fuselage, bent propeller, broken wing tip, and a path of other aircraft parts stretching dozens of yards. I've been in an ICU room with doctors saying my father could never walk again or take care of himself and they don't understand how he is alive. I've travelled to a hospital for over a month to spend time with my father and encouraged him through his physical therapy. I've seen aviation insurance companies were the representatives were awe struck to deal with a client who survived.
5 years after the accident my father is still making progress in his physical therapy. The strain the accident put on my mother was tremendous. She went from a spouse that was newly retired and ready to see the world to a full time caregiver unable to go anywhere. My mother is an amazing woman surviving over 30 years as a military wife, they don't get much tougher.
What happens to your family if you don't walk away from your next accident? What happens to your family if medical costs for your recovery get out of control?
What is your safety worth to you? You can achieve the freedom of flight in safer and more modern aircraft. It wasn't your skill that kept you alive in this accident. It was luck. I don't know how many hours you have as PIC, but your'e not just flying a homebuilt, you are flying a primitive aircraft.
My father is a naval aviator, test pilot school graduate, combat veteran, and civilian CFI. He has over 2800 hours of flight time and nearly 400 hours in the Lancair 360 that he made the emergency landing in. He made a near perfect off-field landing and broke his back. Attached is a picture of our airplane and a link to the FAA report.
The people in this thread obviously care for you and want you to be safe. There is no flight worth taking if the risks of you coming home in one piece are low. I started flying when I was a teenager: I had one friend fly into the side of a mountain. I've had two friends run out of fuel from holding too long to land short of the runway. I've had two flying club members go off the runway, flip over, burst into flames, and burn to death. I've had my father survive a full engine failure with raw fuel in the engine compartment. Don't be a statistic for the sake of your family and friends. There are safer ways to fly and I don't know anyone that's survived 3 general aviation accidents.
Ultimately it's your decision and I understand if you want to fly your aircraft again. None of us are suggesting that you stop flying, we are simply encouraging you to reduce your risk. Gravity always wins.
One does everything they can do to mitigate risk, but at the end of the day aviation - even in certified aircraft - has it's fair share.
I won't debate your points, as that's not why you made them, and simply say that I like you, too, and am sorry for your losses and tribulations with friends and relatives in aviation.
Leaning forward into the rebuild, I've been thinking of changing the paint scheme from the Verdun camo to an ersatz Clear Doped Linen (which inevitably comes out as a light tan), but with the roundels still only on the bottom of the wings.
First, it will be a heckuvalot easier to paint, and easier to touch up with just one color versus four. Well, five, with trim.
Second, it will be a nice milestone marker in the life of the aircraft.
Every bit of fabric has to come off of the aircraft for inspection anyway (except for the tail, which is totally untouched), so I might as well do something different.
I'm going to talk to Robert Baslee about the tail wheel design as well. It's craptastic for pavement, and a lot of my "swishing" on landings is the fact that it's tilting back and forth.
My response to the same lines of reasoning on the EAA forums:
It [the forced landing] is a big deal, and I feel like I've failed to communicate my attitude towards it properly.
First, when adversity strikes, I've always looked at it, learned what I could from it, and then moved forward.
Endless second guessing and "what ifs" are, in my experience, useless endeavors. Could I have been killed or seriously injured? Absolutely. Should I let that fact alter my goals and aspirations? For me, that's a no. I'm just not built that way.
Second, I always look at what's still good when faced with adversity rather than focus on what's bad - not just in this matter, but in all matters.
It's easy to look at my poor little Nieuport and give a list of all the things that were broken - longerons, gear, cowl, etc. - and throw up one's hands.
It's just as easy to take a second look and see what's still good - a lot of tubing, the elevator push-pull rod, nuts and bolts, two wings, tail feathers, instruments, and on and on - and work from there.
In the strip down process, if something looks remotely questionable, into the scrap pile it goes. If not, why not re-use it?
The aircraft design itself is sound, and there are hundreds of examples (including the Graham Lee versions) that have flown and are still flying. Indeed, where one might see a mangled mess on the side of the road, I see and aircraft that - thanks to it's tube and gusset design - crumpled nicely to protect me from serious harm. The fact that there has been only one fatality in type (flight number one, with a bunch of factors involved) went into my decision to build it in the first place.
Would it be safer to build a Carbon Cub or an RV-7? Dunno. Maybe. But neither fit what I want an aircraft for.
The facts of the matter are that I somehow went through seven gallons of fuel in thirty-five minutes, which screams fuel leak (at least to me and the FAA man), leaving me 3,000 feet up with a stilled propeller. I did that which was required to ensure my safety and those on the ground the best I could - and since I'm here typing, it serves to validate my decisions on landing point. Say what one will about my abilities as a pilot - I never shy from the fact that at 135 hours behind a stick I'm still learning - but on that day I was on my game.
Was I lucky? Yes and no. I sure put a lot of my chips into the "lucky" column to where the outcome of the forced landing was going to be in my favor.
I flew her all the way down and landed on top of that tree. The plane had almost no forward momentum when she came down from it, and when she did, she was level to the ground (though pinwheeling a bit).
I put her down next to a road that had light traffic on it. Should I have needed serious assistance, help was a cell phone and an ambulance away; there would be no searching for me.
I let the design of the aircraft work for me. Having two big ol' collapsible wings making a cage around me as well as fuselage that would likewise collapse goes a long way to reducing G forces on a sudden stop. Where one might look at a Z shaped landing gear strut and cluck, it warmed my heart to see it.
Indeed, rather than looking at the picture and saying "wow, maybe a different design is in order," my thoughts are "wow, there is no way I want to wreck in anything else."
Know what would have been unlucky? Taking on the power lines or the road with traffic on it. Shooting for a remote field with a fence across it. Trying to extend or shorten the glide for a marginally better landing spot. Trying to stretch to Pell City and winding up in the lake.
As to an aircraft with "a history of crashes," well, I'm not looking for resale value. When I'm done with her, she'll either be donated to hang from someplace's ceiling or recycled into beer cans.
And will I improve the fuel system to prevent what we suspect happened (that in high turbulence I most likely kicked the barbed fuel fitting at the bottom of the tank, which is placed to where that can happen)? Most definitely. I was wearing my steel toed work boots that day, so I could do that without feeling it. Then again, judging from the dents at the bottom of the fuel tank, those boots probably saved me from broken toes.
No, didn't smell fuel, and yes, I saw it when it went from four gallons to nothing in what seemed to be about 30 seconds.
This isn't too surprising when one considers the fuselage is under vacuum while in flight, with the air entering from the cockpit hole - it's enough to where the fabric at the tail on the turtle deck stretched over time to sag against the stringers.
No offense meant; I'm just exposing my mindset on the whole deal.
Since it was a "high visibility" event (it made the newspaper), the NTSB exercised it's prerogatives and took over the investigation, deciding that pawning it off on the FAA wasn't good enough.
So, different forms and slightly different documentation required.
The NTSB guy was professional, friendly, and candid.
It's nice to now have two government types tell me that I was kind of humped on where to put her down, and that I made a good decision of the poor choices - and did it well. One of the reasons I picked the side of a road was I figured that I'd need trailer access for the aircraft and if there was need for it, easy access for an ambulance, something he picked up on just looking at area - and one he heartily agreed with.
He did cause quite the excitement at the airport, as one of the first things the NTSB does in an investigation is to secure the aircraft.* He showed up out there, flashed his badge, and had them change the locks on the hangar. According to folks that were out there, the less-than-sharp workers just about spazzed out about it, getting so flustered they claimed they had no way of reaching me - even though my home phone and cell numbers are on the little index card for rental information.
So I called the FAA guy and he gave me the NTSB guy's number.
Luckily I had brought home my pilot's and airframe logbooks when I was up there last, so I didn't have to drive all the way up there to fetch them (along with having the NTSB guy call out there to allow me access).
It's also good that I actually keep all the logbooks up to date. With an Experimental, airframe and engine logbooks aren't required - one need only record the last year's Condition Inspection to stay in the regulations. But I went the opposite way, keeping record of all the repairs and improvements with pretty good notes, down to recording every flight in the airframe logbook. It will be a neat bit of history that tells the tale of the aircraft itself, while the pilot logbook tells the story of me as a pilot.
I also put remarks into the pilot's logbook - since there's a big space for it, why not? The FAA guy and the NTSB guy were surprised by that, but liked it. Whether the day was bumpy, I greased the landing, bounced it, or it was just stunningly beautiful, it's there. It also shows that I'm not just goofing about, as I'll put down when I practice basic maneuvers, from ground reference to steep turns to practice forced landings (!). When I'm sitting in the old folk's home sipping whiskey and looking at the clouds, I'll also have something to thumb through and recollect the times that little biplane and I took to the skies.
The other good news is that my healing time nicely dovetails with cooler weather - I won't be fussing around with plane bits when it's 120 degrees in the hangar. I figure about the time when the weather warms back up for prime flying the plane should be ready to go back up for it.
My plan of attack is after stripping everything thus:
Fuselage - completely disassemble, figure out what's still good, put it to the side, take the scrap to the recycler, and rebuild it. It's pretty much a from-scratch build process, as the longerons are toast. The tail wheel design is going to be improved. Once that's on new gear, move to the wings.
Wings - the right wings are pretty much a complete do-over, with not much more than the bolts able to be saved. Maybe a rib or two, and the drag/anti-drag fittings can be re-used. The left wings will be stripped and inspected, and I think I'm going to take off the leading edges and re-do them in a different technique. That way they won't look like I routinely fly through hail storms.
Tail feathers: strip and inspect. There isn't so much as a wrinkle in the fabric on the horizontal stab, elevator, or rudder. I may not even strip the rudder.
Engine: Tear down and inspect. I might put the other crankshaft in it, as it's balanced better than the one in there now, and I can put on a better engine seal. Hopefully the head and the case came out without any damage. It took a big enough whack to bend the engine mount, so who knows?
I'm figuring three grand for repairs, with a *gulp" budget of five. If I wind up replacing the engine, well, that's where the upper limit comes from.
Then it's cover, paint, and put her back into test phase. The FAA man said it's up to me for how long to put it there, and I don't have to notify them about it.
* The hilarious part of "securing the aircraft" is that it's been in the hangar for a week with total access; if I was going to monkey with the evidence I'd of had plenty of chances for it. Gotta check that box, though!
Last night I had a very vivid, lucid dream about the aircraft that was enough to wake me.
She was all repaired, in a light tan take on Clear Dope Linen with brown edges, and the nose of the cowl in white, with a few improvements that I've had in mind, along with the cartoon fox in the Martin N11 skin on her sides.
And so that's what form she'll take.
It's going to take a lot of work and a small stack of cash, but I'm getting excited just thinking about it.
LOL, I just googled CDL paintshemes and ran into your Aerodrome thread from 2011. How time flies.
I actually like that idea a lot, makes the aircraft really clean and the prob and cowl stand out more. Couldn't find the Fox though. Given your wife is a Redhead the fox seems pretty appropriate.
Hey Dart, so glad you ended up with “not much more” than a fall from a tall tree... The report indicates the fuel line was connected between the rudder pedals, but without more details. Could you have inadvertently knocked it off with your feet while working the rudder?
On a side note for your new skinning, Alsace was part of the German Empire pre and during WW1
I'll have to see if I have a decent photo to show the arrangement, but the fuel tank sits middle of the fuselage, just off the inside of the firewall and in front of the pilot.
The sump to the tank is a cylinder at the bottom, and I had a straight brass barb coming down off of it and fuel line that went down, over the top of the runner in front of the pedal (which is on a hinge, so it doesn't slide forward), and into the sump drain on the right bottom of the firewall on the outside.
So it could be a couple things:
1) As I was entering (or more likely, exiting) the aircraft I had been brushing the brass fitting (there was nothing around it, and it's a tight cockpit) and weakened it, so....
2) During the turbulence it either finally broke, the tubing moved to be caught by the rudder and pulled to snap it (which I'm starting to really think about), or
3) I somehow kicked it (less likely, but possible).
As to how to make it to where that's not going to happen again, I've been thinking of more than just a few improvements.
1) Move the exterior sump drain as close to center of the firewall as I can, and if I can't , put it through the floor. To heck with having a hose near a moving part.
2) AN fitting with a little cage of some sort around it.
I may also put a lip on the insides of the rudder pedals themselves to make sure my stompers stay fully on them away from the insides of the cockpit. I do not like the idea of loops.
(On Alsace, I know the history, including the notion that they were ethnically French and the propaganda around it, which is a historical oddity. My family had folks who lived there, and after WWI moved "back" to Germany - funnily enough, some of the ties with the supposedly French people who remained still exist - though they are omitted from family trees)
I like how they mentioned it 'settled' onto the trees. I imagine you just near stalled and plopping it neatly down and having a second or two to go 'well, what now?' before it sideslipped down to the ground
It's flying and the same as driving or any other venture in a machine there is always the chance of things going wrong as we all know. Your destiny in your hands Dart and you got to live it how you want to, only one shot on this big ball of madness shooting through space. Enjoy it before you hit that exciting retirement home being forced to watch reruns of Days of our lives while wishing you were chewing on a steak instead of drinking lukewarm soup!
I finally felt well enough to go up and do some exploratory surgery on my little Bebe, stripping the fabric from the fuselage and removing the engine.
Prognosis is mixed.
The fuselage is much, much, much better than I thought. The longerons are shot, but most of the cross tubes are just fine, as well as the major gussets, which are super thick aluminum. The standard thin gussets are also fine, but I'll replace them. The side and top sheeting is toast, as is the cowling. Getting a new spun cowl is $325. Ouch. Probably a new gas tank, too, as I beat the snot out of it during the descent from the tree. Another $325. Haven't priced the tubing, as I'll have to strip the wings and see what I'll need there before sitting down with a master list. How hard did I smack the ground? I bent the control stick a third of the way down, where it goes between my legs.
My 1/4 inch thick plexiglass was cleanly cut by one of the cabane wires as well.
The engine may need serious love. The intake manifold on the left side broke where it goes into the head, and the rear bolt looks like it might have bent. It may well be that the head itself is fine, or it may mean it needs to be replaced. Sooo, it could be up to 500 bucks, if the case and cylinders are okay (which I'm betting).
Looks like my initial SWAG on the cost of repairs of 3K may just be prescient. Good thing I got a job!
Quote
I like how they mentioned it 'settled' onto the trees. I imagine you just near stalled and plopping it neatly down and having a second or two to go 'well, what now?' before it sideslipped down to the ground.
I smiled when I read that, too. I didn't hit the trees as squarely as I'd of liked to, and it was more like 1) Hit the side of the tops of the trees, 2) pinwheel straight down into the ground from 50+ feet. Babette received an extra hug for protecting me the way she did before I left the hangar yesterday. She took a helluvalot of force for me so that I wouldn't be seriously injured.
Still no final NTSB report; I guess they put my little forced landing at the bottom of the priority lists.
I'm probably going out to the airport today to take off the sheeting and start taking the fuselage apart, and most likely do two versions - one with a mic hooked up to me (which I didn't have here, as all I brought with me was the GoPro) and a silent one where I narrate over the top of myself.*
The wife said I also need to rig up some lighting. And maybe write a script. And remember that "dripping-soaking-wet" isn't one word all slurred together. And that while my belly is shrinking, I need to learn to suck in my gut ("Didn't they teach you that in the Army?" "I didn't have a gut in the Army, dear, so skipped that class.").
I'm going to try a technique on the fuselage that may or may not work. Since most of the side tubes are okay, I'm going to drill out the rivets on the damaged longerons but leave the gussets on the tubes themselves. This (hopefully) will do two things: First, it will protect the tubing, as drilling out and replacing rivets inevitably leads to elongated holes and weakened joins, and B) should make putting it back together easier, as it will be a matter of putting the new longerons in the same place the old ones were.
So it's pick up some new plywood on the way to assemble a build table. One of the MDF boards I used on the original one was destroyed, and I need something longer than just the one.
One thing I didn't mention in the video very much was the landing gear. I'm absolutely thrilled that the right landing gear tubing and the cross tubes going across are intact. Making new gear will be so much easier, as the geometry is set. I only need to make new left gear the same as the right, attach, run the cross tube over and center with cables.
* I actually really like the "make faces but don't speak" technique, as I think it's funny, requires only one take (though I usually narrate exactly what I was thinking at the time), the audio is easier to control (there is a LOT of ambient noises at an airport), and is kind of unique in the world of YouTube.
Dart the video was fine..can't attest to the audio Lost most of my hearing in 68 so CC is the best way for me,,i rarely turn the sound on to the TV and have to use headsets to listen to music will be looking forward to the rebuild..
I have so much respect for the energy and perseverance you exhibit in this project...
Me, I'm the type that when I dropped my bike, I dragged it to the mechanic and didn't want to see it again until it lookeds brand-spaking new. Machinery or other toys that I love, deformed, I can't deal with very well.
But you're going to be up there again next summer, I have no doupt.
Just catching up on your story, glad you are rebuilding and double glad you're landing was one you were able to walk away from! Look forward to continue watching your progress!
Indeed a big chap in a small plane coming out of it with 'only a flesh wound'. Luckily , unlike an old IL2 fellow Squad member of mine crashing in a more substantial kite having his goolies crushed by the stick. I applaud your optimism sorting the wreck out, when many with would just say 'bollocks to this' in a similar traumatic situation. You have spunk sirrah!
Hahaha....I didn't show it on the video, but I actually bent the stick a third the way down - talk about an iron grip!
Work is slowed by a few weeks, as a visit to the doctor today to figure out why my rib didn't seem to feel any better than it did a couple weeks ago came with surprising results.
I broke the ninth - lowest joining rib - on the left side. It's been eight weeks now, so it should be just about healed.
Well, the x-ray showed that it is indeed healing well. But somehow I managed to break the eighth rib right above it.
Dammit.
Ortho appointment first thing next week to get to the bottom of it.
Wife has declared five dollars on there being a hairline fracture missed by the doctors that I turned into an actual fracture by pushing myself too hard too early. She did not say "I told you so" because she's a decent person who knows that it would do no good to do so.
Ortho doctor started laughing as we were going over the relevant x-rays of the bunches they took.
"So, yes, it's not that uncommon for a rib to hide that it is broken, only to flex and move later. Be glad it broke and popped back perfectly at the time and you didn't have a flailed chest, where the rib cage collapses into the lung."
"I was just a bit shocked to find out it went from one rib to two. I didn't expect a Doctor's visit to add a broken rib to the list."
"You actually put a hairline fracture on this one on the right side as well. You can tell by this curve on the bone riiight here.."
"That's it, I'm not going to have this looked at any more. I can't have any more ribs broken; this is enough."
Anyhow, the prognosis is good, the drugs are shockingly mild, and I am longing for the part of my youth when I healed very rapidly when injured.
Hopefully Saturday I can go up to the airport and put together the build table and take apart the fuselage.
Last Sunday I took apart more of the fuselage and reflected on the path forward.
I may simply rebuild the fuselage from scratch, using a bit of hardware here and there, and using tubing for measurement, and the large thick gussets.
It looks like I may not dive fully into the process until after Thanksgiving; I needed this weekend off for healing on my hands (work has torn them up - I've been living soft too long!) and generally goof off.
Got back from the doctor this morning after a high resolution set of scans, which lead to hilarity.
It seems that I need to stop going to doctors, as more and more ribs seem to be broken and healing, and my medical professional and I had a good laugh over it.
Latest verdict: I broke left ribs 3 through 8 in the rear, and 6 through 9 in the front. Basically, the left rib cage cracked up and down. But since none of them really moved much or punctured anything it's all a-okay. It also explains why everything is healing so slowly.
Still about a cup (~225cc) of fluid in the lower left lung, but since it doesn't bother me and is slowly reducing they're not going to drain it. Next checkup just after Christmas, and if it's still there they'll poke a needle through my side.
Doc asked if my left arm was hurting any and I admitted that it has been aching a bit, to which she replied that I probably put a greenstick fracture in the humerus as well - but since there's really no treatment for it, there's nothing to do but to suck it up.
So waiting a couple of weeks before diving into the plane seems prudent - I'm pushing myself enough at work as it is.
It turns out that the docs did know - the last doctor showed me the lab reports beyond the ER- but they just didn't tell me the full story.*
Since it was the 9th rib that really, really broke, it was the one causing all the trouble, so they talked about it exclusively. They just weren't being very detailed in talking to me about all of it, and the rest were just cracked so they didn't share; it's annoying and certainly would have helped me understand why I'm healing so slowly.
They did tell me there was fluid in the lung, but not how much, and since it wasn't bothering me didn't elaborate other than to say "there is some fluid there." Normally it is absorbed into the body in short order, but I seem to be hanging on to mine.
The lung doc was interested in that I had been left in the dark and said she'd be talking to her peers about it...and that while the first scans showed all the cracks and breaks in the imagery their summary didn't make into the ER doctor's notes. And she apologized for not going over the lab reports themselves with me the last time I saw her; she assumed I knew the full meal deal.
* The ER report was pretty scant, listing the 9th rib as broken and separated, but since it didn't puncture anything they were cool about it. Most of the report is about things that weren't damaged - head, lungs, heart, etc. Since they recommended a follow up appointment with an ortho in the system with access to the scans and the treatment remained the same regardless of how many ribs were broken, they didn't seem to think I needed a full debrief (or a detailed report). And I didn't mention my arm, so they didn't bother with an x-ray of it (full motion, no complaints, so....). He also listed the wrong number of stitches he put on the cut over my eye - I guess I got one for free.
Got back from the doctor this morning after a high resolution set of scans, which lead to hilarity.
It seems that I need to stop going to doctors, as more and more ribs seem to be broken and healing, and my medical professional and I had a good laugh over it.
Having a good laugh? Bloody painful with broken ribs that!
At least you haven't got a fiercely affectionate 5y.o. in a nurses outfit 'nursing' you by much hugging, soaking the bed with unwrung cloths as she wiped my fevered brow and doing a little dance on top of me to make me feel better. Almost as traumatic as the accident itself.
I have to make the rounds to see where the rivets I ordered wound up. As I mentioned in the Community Hall thread, delivery companies like to mis-deliver packages to one of my Park Place friends (we have a Park Place Circle, Park Place Court, and Park Place Way in my neighborhood).
Going to order tubing this week so I can rebuild the fuselage.
[edit]
Apparently FedEx changed their minds, and it wasn't "out for delivery" yesterday. It's back in Georgia.
I came to the decision that the fuselage proper will be a complete rebuild; the gussets are coming off for patterns.
Controls and other stuff (like hardware, the seat, etc.) can be reused along with the ever important data plate.
Ovalized tubing for the gear, interwing struts, etc., will be ordered this week as well as new rivets.
I had forgotten that we used steel rivets on the large gussets around the cockpit, and so there's no drilling them out. The heads have to be ground off! Once that's done, the rest can be brought out with a center punch, though I'm not worrying about that.
I only need one example of each to replicate in quantity, so it's easier.
The other good news is that the thick gussets are very close to the spar material of a Cub, with the Cub spar being a bit thicker. My boss is donating a couple of them to me to cut up, as they fail as spars for other reasons and are scrap. Aircraft grade thick aluminum plate is big money, btw. I may get some bootleg time at the shop and use their tools, but I'm trying to avoid it...I already spend 50 hours a week there.
It's going to be fun prepping with all the gussets and tubes, which is the bulk of the effort and time. Fun like a dentist visit.
I'm slacking on video production as well, but that should pick up.
On the health front, last visit showed the fluid went away, though the ribs are slow to heal. I can't hit the sweet spot of being active enough to encourage healing without over doing it (I forget I'm injured sometimes and bite off more than I can chew).
Cutting out the circles from .040 sheet was okay - a little learning curve, but not a big deal.
Cutting out the odd shaped main structural gussets out of .090 is proving to be a huge pain. I started with a dremel cutting wheel - waaayyy too slow and imprecise. Then I moved onto a metal cutting blade on a jig saw, which was kind of hilarious. Even with the sheet clamped down with big weights on it, the blade kept grabbing and bouncing everything everywhere. Attempt three was with a carbide cutting bit, which immediately fouled with aluminum and went nowhere. Attempt four was with the electric shear I used on the .040, which wound up warping the pieces; however, for trimming them it works a treat!
This weekend is attempt number five with a cut off tool; good thing I bought about twice as much sheet as I need, as I think there's going to be some wastage.
Video of making the circles should be coming out sometime this week.
I feel your pain! Aluminium is so abrasive and it blunts tools so quickly, making patch panels for a video distribution system I was constantly having to sharpen the drills and hole saws.
When I was making aluminium handles for craft knifes I used a special water based cutting fluid/ lubricant that helped keep the tools working for longer, I could not use it on the patch panels though and the tools blunted much more quickly.
Ah the misery of trying to cut aluminium! I didn't consider that such a soft metal could be abrasive though...that explains a lot!
Aluminium oxide is used as a cutting compound, it is very abrasive, we had bars of it in the garage in various different grades from coarse to fine and it is also used on some types of "sandpaper"
Cutting out the circles from .040 sheet was okay - a little learning curve, but not a big deal.
Cutting out the odd shaped main structural gussets out of .090 is proving to be a huge pain. I started with a dremel cutting wheel - waaayyy too slow and imprecise. Then I moved onto a metal cutting blade on a jig saw, which was kind of hilarious. Even with the sheet clamped down with big weights on it, the blade kept grabbing and bouncing everything everywhere. Attempt three was with a carbide cutting bit, which immediately fouled with aluminum and went nowhere. Attempt four was with the electric shear I used on the .040, which wound up warping the pieces; however, for trimming them it works a treat!
This weekend is attempt number five with a cut off tool; good thing I bought about twice as much sheet as I need, as I think there's going to be some wastage.
Video of making the circles should be coming out sometime this week.
A couple of ideas that may help you in your quest to cut the aluminum gussets.
Now it's just rounding up a few bolts to replace the ones that became bananas, order a bit more tubing, and soon enough it'll be time to draw it out, start cutting, bending, and coping tubing in prep of putting it together!
Dart, saw an interesting thing while flying. My eyes were drawn to the wake of a small boat. This was near the middle of the state; not on the coast. Turned out it was two jet skis; one chasing another around. But the interesting thing was watching them go around small islands I noticed it appeared to be a water maze that they were chasing around. Thought it was pretty cool.
Looks like a controlled flooding area! This is why our Lake Martin Logan gets flooded over every year - it's by design, and they tell folks the minimum elevation they can build at, with zero sympathy for anything below it. Pretty shocking the first time I saw just how high it's allowed to go!
Rest of the tubing and bolts to arrive tomorrow, so next weekend things get interesting!
Where I live it is about 12m down to the water table, at my youngest and middle son's houses it is about 2m when it's high-ish and their basements are liable to flooding in heavy rain, they both have sump pumps on a float switch just in case.
Looking forward to your next lot of videos Dart, and wondering what you are going to do differently than last time with the experience you have gained.
On what to sustain, what to change, and what to improve:
Sustain:
Basic build plan and techniques. The aircraft's design proved that it will sacrifice itself beautifully to keep the soft squishy pilot pretty darned safe in case of misfortune.
What to change:
The tail wheel. It's crap for anything but grass, so it's a ground up redesign. It also means that some stuff in the tail will have to be beefed up, too. Which means I'll have to put some stuff up front to keep the CG straight.
What to improve:
Seat mounting. I had a minimalist approach on mounting the seat, and while the front part was great, the left rear seat mount and seat belt mount both failed in the wreck. That might have been the reason for zippering my rib cage.
So I'll be making up some gussets and running a tube across to secure the back of the seat, and making a secure mounting point for the seat belts.
The fuel tank and sight gauge:
First, the fuel tank is a bit small for my liking at 10 gallons. I want 15. Second, the filler neck was in the center of the tank, which meant there wasn't enough clearance between it and the top wing to properly fill it - nozzles just wouldn't fit. The filler neck will go to the outside. Second, I'm going to keep the sight gauge simple - the long tubing I had was tough to sort out and just not simple enough. Also, with the filler neck to the outside I can use a dip stick to verify fuel levels. This pushes the CG forward, of course, but wasn't that something I mentioned that will have to happen already?
Dart, did something happen to your website hosting the pictures? I'm trying to read through this great build of yours from the very start, but the pictures don't seem to be working anymore?
It may help if you put a sacrificial piece of 1-2 inch thick sheet of foam board insulation under the aluminum to eliminate the flex, then you can cut it directly over the table instead of hanging over the edge.
I may rework two of them, - when I made the lower longerons yesterday I put a bit more curve all the way to the firewall and they're not fitting as well as I'd like.
And yes, yesterday big leaps towards the fuselage. Plans drawn out onto the table and the longerons bent to fit. They match pretty darned close, which is impressive considering I used a conduit bender and went by feel.
Debating on whether or not to go to the airport today to start cutting and coping tubing - I need a day of rest, and if I don't it'll be a very long week at work.
Talked to Mr. Baslee and the ovalized tubing for the gear, rear cabane strut, and interplane strut is on the way!
I also bit the bullet and bought a decent air compressor, an 8 gallon oiled pump version, along with a new hose.
The old air compressor is pretty old and, along with the motor sounding very end-of-life, there's a leak somewhere in the tank pressure/regulator assembly. That little 3 gallon pancake compressor surely did it's job, but she's seen better day.
The new hose is to replace the old one that has patches on patches on it. I refer to it as "Old Mister Leaky."
Plus a crapton more steel rivets, along with more aluminum ones.
Up to the airport this morning to do some more work!
[off topic]
Yesterday I had a chance to get a little stick time in a Cub. Funny thing, working on the darned things every day and not flying any of them....it's kind of depressing, really.
Anyhow, we're doing some shake out flying, and the boss (who's a helluva pilot) asks if I wanna go up. Uh, hail yeah, you bet I do. Crosswinds were a bit much for a first transition flight, so I followed along for take off, flew the plane around the pattern, and followed through on landings.
A couple notes:
1) Don was delighted that I instantly started S turning while taxiing down to the runway. Not being able to see over a nose is not a new thing for me, though.
2) That whole stick-and-rudder thing is just natural after a couple years flying the Nieuport. We had the Cub *cough* close *cough* to max gross, but she did the whole turn thing real nice. First time behind a stick since the whole tree thing and it was like riding a bike (except it was an airplane and I didn't crash).
3) I intentionally set Don up for a massive slip on final during the first run around, making sure I was at least a good 400 feet too high. Sucker cheated, went long, and landed on the grass area they have set up between the runways (we took off from the pavement).
4) He made a cute remark about flying a Cessna pattern, so the next time I did a Champ/Cub/Nieuport one, which put us right over terrain built for thermals and goofy wind - which is why I swung wide over it the first time. So I got to do some pilot-y stuff as well.
5) Once again, my reputation as a pilot took a hit. Don has over 10K hours in Cubs and the like (!), and he remarked that he was pleased at how I flew the aircraft, keeping heading on climb out, coordinating turns, etc. Maybe having most of my hours in a tricky little free flying ruddered drag monster of a light aircraft granted me a skill or two.
6) One uses the wrong rudder pedal on take off and landing in certified aircraft. They need to fix that so it matches a VW. I think I may write a letter to somebody about that.
6) One uses the wrong rudder pedal on take off and landing in certified aircraft. They need to fix that so it matches a VW. I think I may write a letter to somebody about that.
Yeah, and they have been doing it wrong for so long you'd think they'd do something.
6) One uses the wrong rudder pedal on take off and landing in certified aircraft. They need to fix that so it matches a VW. I think I may write a letter to somebody about that.
Apparently some of the Russian aircraft in IL-2 GB use a VW engine as well, they get me every time when they start torquing the opposite way from everything else.
I prefer the speaking to the voice voiceover. Looking good!
I was lucky and the winds were nil, meaning the hangar doors weren't banging loudly.
There have been days I've been up there and the winds picked up from just the right direction and the noise was so loud I had to quit! The sound just builds and reverberates from every hangar on the building to where it's quite impressive.
On the list of stuff to buy, a decent camera I can hook the wireless mic to is unfortunately down near the bottom. I'm just propping my GoPro onto a tripod for these, and it picks up huge amounts of ambient noise.
I am enjoying watching the rebuild Dart. Are you finding things easier to build this time around since you already had so many solutions in your tool kit from the original build?
On being easier, it's a wash. Because I'm trying to do things a bit better than before, it takes a little more time. But overall, it's not nearly the learning experience it was the first time around.
Yesterday I was snake bit while working on the airplane. My drill has finally bit the dust, as the chuck on it is worn out and won't grip a bit worth spit any more, and everything just seemed like it didn't want to cooperate with me.
So, using the common sense idea that when one is snake bit, stop playing with the snakes, I packed it in early and just went home.
For just eyeballing your rivet spacing you do alright.
If you want it to be a little bit more consistent you may consider investing in a rivet fan though. The pricing ranges anywhere from $20.00 to an insane $100.00 depending on what can be sourced locally to you.
Yeah, I could use a fan; we certainly do at work for this kind of task.
But all of it is going to be covered anyhow, and pretty don't make it fly.
Indeed, ol' Mike Sylvester, who built a PERFECT KR-2 has been helping out and learning to bite his lip at the various build techniques.
At work, for example, putting in a gusset would be a long process. First it would be aligned, drilled just so at the ends along the longeron, and the gusset removed. The holes would then be measured out for even spacing, drilled, and fitted with clecos. Then it would be removed. All the holes would be deburred, and it would be put back on. Then the first hole for a tube would be put in and cleco'd. Then a line (much like I use) would be drawn and it would be removed. Again, a fan spacer would be used, the holes drilled, everything cleco'd back in place, and then the next tube would get one hole, the line drawn, and the gusset removed. All the holes would be de-burred, of course, once the final set of holes were drilled. The gusset would then be put back on, clecos inserted and removed one at a time as rivets were put in. At the end of the process all the shavings in the tubes themselves would be blown or vacuumed out; for those tube that can't be once they're attached, they'd be cleaned before riveting.
All for no real gain, other than aesthetics. Granted, the corollary to "Pretty don't make it fly" is "but it does win awards and command top dollar," and good ol' C&D Aviation has made more than it's share of trophy winning airplanes.
The soul of tube-and-gusset aircraft like these is ease of build. Make a hole, fill a hole with a rivet. Move on to the next one.
Mike has slowly grasped that I want to make this fuselage somewhat better than the old one, but only somewhat. There's going to be a lot of improvements that matter, but slightly unevenly spaced rivets don't bother me.
I still plan on having the plane in the air by mid August. This is entirely reasonable, as I only have to rebuild the fuselage, half the gear, two wings, re-rig, along with rebuilding the engine, covering everything (it's all getting skinned so I can inspect it well), and painting. The fuselage is actually two thirds done - my videos are behind - as I only have a few gussets on one side to finish before working up a very simple jig to make it three dimensional.
Not to belabor the point, but there's a guy who bought the Nieuport 17 kit about the same time I did; it's the same plane, but his is full scale (Airdrome kinda cheats here). I'll have built my airplane, flown it, flipped it, repaired it, flown it, wrecked it, and rebuilt it before his will take first flight. It will be gorgeous, for sure, but that's not why I'm in the airplane building hobby.
Big news on the tail wheel! I've been kicking gravel on how to improve it, and Mike told me to knock it off and he'd come up with a solution. And he did. Somehow he scrounged up a very nice lightweight tail wheel that uses a carbon fiber strip instead of spring steel, and it'll work out fantastic. Now the tail wheel won't be flopping all around and maybe I can do a landing without fishtailing all over the place.
Pretty doesn't make it fly, that is true. But even spacing insures a more equal distribution of strain forces and removing burrs helps prevent the formation of stress cracks.
This has been a fascinating project to watch. The good and the bad. It reinforces my feeling that building wasn't for me. When I had my SONEX, (which I bought already built) I would be asked, "Why didn't you build one, yourself?" It definitely wasn't for me.
Not to belabor the point, but there's a guy who bought the Nieuport 17 kit about the same time I did; it's the same plane, but his is full scale (Airdrome kinda cheats here). I'll have built my airplane, flown it, flipped it, repaired it, flown it, wrecked it, and rebuilt it before his will take first flight.
Pretty doesn't make it fly, that is true. But even spacing insures a more equal distribution of strain forces and removing burrs helps prevent the formation of stress cracks.
To what degree? Probably not a tremendous amount.
In a heavier aircraft, I'd agree. Remember that the plane weighs less than 500 pounds (226 KG), and less than 700 with pilot and fuel. There just isn't a lot of mass or inertia involved with it, especially considering the low speeds it travels at.
I did a much worse job on spacing the first time around, and in the fall out of the 50+ foot high tree, not a single rivet failed; only two gussets failed - one that I had stupidly put the seat belt mount into and one by the firewall, and it broke through the bending of the engine mount.
Also, this isn't a 50 year aircraft. Assuming I don't wreck it again, it's got around 20 years before it's scrap regardless.
Please, please understand it's not an argument or an attempt to dismiss your thoughts - it's very much appreciated.
Oh I understand and agree. But me being me, a bit anal about certain things, I would probably grab the fan spacer real quick and mark the spacing and spin a deburr in the hole for 3-4 seconds. It wouldn't be perfect and I wouldn't take as much time as I would if I were building an RV-8 but just to satisfy that little corner of my brain that would worry about such things later at 1000 ft agl over a swamp
I blame this on Dart and his dedication to his dream, which is awesome.
I stumbled onto Mike after watching one of Darts runway assaults.
I think this guy is kinda like Dart; but with unlimited funds. This crazy guy (in a good way), after having spent years getting engineering degrees, is doing insane carbon fiber home-built stuff. Silly Dart, he squandered his youth in serving the United States of America.
Anyway, this guy is very intense, very bright and one hard working MF'er.
It's very pretty! I like the line about it making for an interesting flying machine!
I think when the rebuild is done I'm going to write up a short article about the plane with some pictures and submit it to Sport Aviation.
With over half a million views on the EAA forums, the build thread is by far the most popular.
* On flight characteristics, I've long held that I'm a very average pilot, but a very experienced pilot (former Ag and show guy) told me that if I can pilot a tricky little free flying ruddered short coupled aircraft like this I'm more than okay. He had one of the full scale Airdrome N17's until he sold it to build a full scale Camel kit.
The Graham Lee kits are truly scratch built, and were a big leap in the tube-and-gusset aircraft world. Indeed, Robert Baslee from Airdrome Airplanes refused to make a 7/8ths scale Nieuport 11 kit until after Graham died and his family pretty much abandoned the business (though they will still sell plans, there is zero support).
There are some differences between the Lee and Airdrome kits that are notable:
Airdrome kits are the plans and the materials (though the tubes are roughly cut and have to be bent and coped), with the gussets prepared and all the hardware included. Airdrome planes have push-pull controls for ailerons and elevator, with cables for the rudder. Lee kits are wire throughout. Airdrome planes are heavier, with more robust tubing; Robert completely through the notion of building it as an ultralight out the window (none of the Lee planes, regardless of advertisement, were ever built light enough for that). Airdrome planes have a thicker airfoil - heck, it's a Cub airfoil. This makes the plane more sedate in the air. The Lee plans are more text than pictures, including techniques for building the aircraft, where Airdrome plans are JUST pictures.* This is a big plus on the Lee plans.
[edit] The Lee planes have the elevators separate, with each controlled by their own cables, while in the Airdrome kits they're joined with one long tube and one push-pull tube to control them. This is a big plus for Airdrome's design, as there's been at least one incident wreck where the elevators weren't in total agreement and flutter set in one Lee planes. A lot of guys with Lee planes have taken to joining them together because of this. [/edit]
In practice, there is very little difference in performance. They're both light tricky little short coupled tail draggers with no vertical stab.
Don't get me wrong - in the air they are very analogous to piloting a Champ. Landing is a straight forward wheel landing (for me - there are some aces out there that can actually three point them, but most everyone wheel lands). Take off is tail low, letting it lift away from a near three point stance. One just has to be very attentive during take off and landing is all. It's an airplane, after all. There's nothing really magical about flying stick-and-rudder.
* Apparently there is now an instruction book that comes with Airdrome kits. This is largely due to the realization that there are nuts out there that will take Robert at his word that anyone can build his planes in the space of a one car garage with simple hand tools, and maybe it would be a good idea. I found out about it at Sun N Fun, when we were talking about leading edges (which the plans have a page saying "use these sheets for your leading edges" and nothing else) and he said "Wow, no, you did that the hard way. Just put them on the top of the leading edge, riveting into the front of the spar. It's in the book."
"What f'ing book?" I replied pointedly.
"The one I made up after you built your airplane," he replied sheepishly with a grin, "Some folks really need it, I guess."
Fuselage structure is done. Now it's just gear, turtle deck stringers, seat & restraints, controls, panel, fuel tank, firewall, brakes, cover and paint. So, pretty much done.
I took a stab at repairing the cowling, which was bent up on one end like a stomped on beer can. Incredibly, results were good. A little more tweaking, a bit of filler, sanding, and she's good to go.
I also repaired the fuel tank, which is neat. I'm going to make my own float this time out of thin copper sheeting that will be a puck, and put a fuel filler neck on the side where I can get at it.
That came out quite well considering how crumpled it was. Once again I am amazed at what you will do in terms of fabrication. I’d have looked at that and said “nope, that’s done”.
Too bad you don’t have it flying yet. You are going to miss some wonderful flying weather in the next few days.
The tail wheel requires a lot of thought, as I ditched the goofy swishing tail wheel that come standard on Airdrome Aircraft was a goofy swishing mess (in all of my landing videos there's fishtailing at the end of every landing - that's the tail wheel flexing from side to side).
I went with a steel spring tail wheel setup, which required some back of the envelope engineering. Thick gussets sandwich the bottom longerons, with bushings around the bolts going to the spring. I also had to fabricate a piece for the rear saddle around the spring.
Working on it last Saturday, I was all done drilling and leaned down to put on the fender washers and nuts on the bolts - nothing special. But a gust of wind happened to decide to come into the hangar at that moment, and I got two eye fulls of dirt and debris, which probably included aluminum shavings. I quickly rinsed my eyes out with water, shut everything up, and carried my sorry butt to the eye doctor, who spent ten minutes fishing out what I didn't flush. He didn't see any metal, and, feeling a bit like a hypochondriac or a wuss asked if I had wasted his time.
No, he said, as though I probably could have kept rinsing them out and be okay, a scratched cornea is not something I wanted to experience - and I had done the right thing.
About 10 yrs ago, I got some tiny metal pieces in my right eye (grinding on my boat with WITH safety glasses), wind blew them in.
Bottom line, I have a permanent little black dot, usually out of my FOV, but it's there.
Glad all is good with you Dart.
edit: Oh, I was about 60 miles offshore, we had two like pint bottles of eyewash onboard. Plus I used about a gallon of bottled spring water. The last chunk ended up working it's way out THRU my eyelid, in my sleep.
Semi-retired from plundering, drinking and wenching, finally accepting the fact that not many young hotties are interested in a almost 79 yr old guy living on social security.
Semi-retired from plundering, drinking and wenching, finally accepting the fact that not many young hotties are interested in a almost 79 yr old guy living on social security.
Once in a while I forget though...
I feel you, we all forget. I'm almost 61 and I think of Women my age as being grandmotherly (most of them), just not interested
I always liked older women; but I found that marrying a woman who looked much younger than she was has paid off as the years have gone by.
Finalized the tail wheel and mounted the horizontal stabilizer and elevator this last weekend.
Pretty cool, they lined up just right with the fuselage (meaning I did that right), and I got a little surprise.
When we built the original fuselage five years ago, there was a twist in it. Not much, but enough to where we had to shave one of the spacers that hold it up down to make it level with the front (and therefore the wings). Well, I had kinda put that out of my mind and when it was in place the whole thing was waaayyy off level.
Much cursing for a minute, until I remembered the troubles last time. Pull it all off, laugh at myself, throw three washers on the shortened spacer, put it all back together and she's level. The fuselage is true from firewall to tail, confirmed.
Of course it all gets pulled off, as I have some repairs to make. The horizontal stab got dinged just a tad, and one of the tip bows needs some attention, as well as all four plates that hold the support tubes that come up from the fuselage. The rivnuts there ripped out of the stab and elongated the plate holes.
It's just weird that there was that much going on back there in the wreck and both the horizontal stab and elevators and straight and true (of course I stripped them of fabric for inspection). But the rivnuts were already wiggly, and replacing them was on my list of things to do before the wreck.
[edit]
I also cleaned and primed the gear and forward portion of the fuselage so I can paint them this weekend. Going blue for the inside of the fuselage, and a sort of woodish tan for the gear legs, with the fittings being black. She's going to look like a very different airplane when I'm done.
I think I'm going to march on with the fuselage, working the turtle deck, fuel tank, controls, seat, etc., and put the wings down the list.
Fuselage done and on gear, with tail feathers mounted (and then taken right back off).
Made the new control stick, so this weekend I'll hopefully be putting in the lower wing carry throughs, rudder pedals, and main controls.
Building an airplane is days of "fiddly work" where one does a lot of little things that don't seem to gain progress with sudden jumps where one goes "whoa, that's very much airplane like!"
I revised my plan to where I'm going to drive on with the fuselage until basically ready for cover, then move to wings, then engine.
I know I've been scare on the forums, and the damned website is dead (gonna have to find another provider and rebuild it) so posting photos is now hard, but folks, I'm alive.
Fuselage is in the "almost done" stage:
On gear. Controls are in. Seat is in. Floor is done. Firewall mounted. Turtle deck done. Entry step complete.*
I had Ron Wade (master of all things metal) of C&D Aviation (where I work) help me fabricate a good fuel float, which is going to work great.
As y'all know, I wrestled with fuel monitoring the whole time, and while my wreck had nothing to do with it (since I couldn't get reading that were satisfactory to me, I always topped it off at every stop), it still bugged me to no end. The problem is that the tank is wide but not tall. It's a gallon an inch, and the tank is ten inches tall. Traditional floats are designed for tanks that are narrow but tall - meaning that the darned things are narrow and tall, too. They hit the bottom of the tank when it's half full.
My long tube reading system worked, but I never liked it, as it was down and to the right inside the fuselage, meaning that eyes were down to look at it. It also suffered from tail down/tail up syndrome in inaccuracy (as all fuel sight tubes do).
The solution needed is a puck that will sit on the top of the fuel, not below it. So we made one out of thin tin (the copper we had was too thick), and it turned out great.
Cameras kinda crapped out, and I whipped out my phone for some of it, so I might be able to cobble together a video.
How we did it:
Cut a circle the size of the float we wanted (about four and a half inches) in MDF board, sanding down a small bevel around the edge, and sanding the plug out of it a bit to increase the kerf. We took the MDF plug, dug up a three inch pulley, put a nail in the center of it, and drew around it onto the tin, and then cut out the circle. On the MDF with the hole in it, took a bit of scrap wood, drew three lines going to the center of the hole (we really should have done this before cutting it out), and made marks on the lines and the wood to where the wood would hit the edge of the tin. Pretty cool centering technique; just put the tin down, push it with the stick until the lines agree on three sides. Put the MDF plug on top of the tin and repeat centering technique. Into the press with it (one of the big reasons I asked Ron to help), where in less than a minute we had pushed the tin into the hole to make what looked like an ashtray. Tappy-tap with a hammer around an idler bearing for a Sherman tank track - yep, we have one and use it for all manner of riveting and stuff - until it's a nice dish. Measure around the lip, cutting a clean line (a little less than an inch). Using a small set of smooth pliers, we bent up the edge of the dish to bring it to 90 degrees, checking for flatness on the welding table. We set this down on the sheet of tin, took an AN3 washer with a sharpie in the middle, and drew around the dish, and then drew around the dish as well. After cutting out the circle, we took the pliers and bent up the edge of the flat piece to 90 degrees. The dish went into this, and we beat this down to seam it them together. Heat and solder the join for water tightness, We then tinned a bit of 1/4 inch copper tubing (after making some flanges on it) and soldered it to the center of the float for the rod that will go up out of the tank to tell me how much fuel is left.
A week in water and no leaks, and with the rod she floats with about an eighth of an inch below the waterline.
Since the fuel flows out of a hole in the bottom of the tank and the float is flat and larger than this hole, I'll disaster proof the system by soldering some short pegs around the hole at the bottom of the tank in case the float ever gets a leak and sinks.
* Originally one stepped on the lower longeron with the left foot, bringing the right foot over the turtle deck to step on the seat, much like mounting a horse. But since I made the fuselage deeper, I found that my old stiff self was having trouble with it. The fix was to make a step that is four inches up from the longeron. Now I can get in and out of the aircraft easily.
Don't know; I've constantly underestimated times required.
I should have rebuilt this at the house, rather than the airport; it's a real time investment going up to the airport (an hour drive one way), and if I need something it's not a quick drive to anywhere to get stuff. The problem is space; I needed the old fuselage as reference. so double the room requirement.
For the wings, the longest time requirement is bending ribs, and I can certainly do that at home, as it's a simple jig and just long tubes to bend in it, and another jig to assemble them.
Here's a quick walk around video I made at the request of of the EAA forums.
I hope you get the correct degree of balance of Llamathrusts on the rebuild Dart, the inbalance of which I believe was the root course of your previous prang!
Just got back in town and so the gear-and-tailwheel video should go up this week.
I'm waaayyyy behind when it comes to working on the plane and making videos.
Weekend before last I worked up the top sheeting for the fuselage, which is kinda a big deal. Now that it's done, I can mount the fuel tank, which means I can run fuel lines and also the throttle cable (it goes over the fuel tank); with that out of the way I can mount the battery and run the wiring.
That gets out of the way I can make the side sheeting.
Fuselage is getting real close to being finished and ready for cover.
Fuselage is wrapping up, with just a few things to do before waiting for cover and paint:
Mount the side panels forward. Make a better mount for the throttle cable. Make a much, much better brake handle mount. Sheeting over the cockpit area. Re-make the rudder stops.
The new wheels need the brake drums mounted, which is always a huge pain.
Going up to the hangar in just a little bit to see how much I can get done.
I always liked older women; but I found that marrying a woman who looked much younger than she was has paid off as the years have gone by.
Finalized the tail wheel and mounted the horizontal stabilizer and elevator this last weekend.
Pretty cool, they lined up just right with the fuselage (meaning I did that right), and I got a little surprise.
When we built the original fuselage five years ago, there was a twist in it. Not much, but enough to where we had to shave one of the spacers that hold it up down to make it level with the front (and therefore the wings). Well, I had kinda put that out of my mind and when it was in place the whole thing was waaayyy off level.
Much cursing for a minute, until I remembered the troubles last time. Pull it all off, laugh at myself, throw three washers on the shortened spacer, put it all back together and she's level. The fuselage is true from firewall to tail, confirmed.
Of course it all gets pulled off, as I have some repairs to make. The horizontal stab got dinged just a tad, and one of the tip bows needs some attention, as well as all four plates that hold the support tubes that come up from the fuselage. The rivnuts there ripped out of the stab and elongated the plate holes.
It's just weird that there was that much going on back there in the wreck and both the horizontal stab and elevators and straight and true (of course I stripped them of fabric for inspection). But the rivnuts were already wiggly, and replacing them was on my list of things to do before the wreck.
[edit]
I also cleaned and primed the gear and forward portion of the fuselage so I can paint them this weekend. Going blue for the inside of the fuselage, and a sort of woodish tan for the gear legs, with the fittings being black. She's going to look like a very different airplane when I'm done.
I think I'm going to march on with the fuselage, working the turtle deck, fuel tank, controls, seat, etc., and put the wings down the list.
Oh, it'll be there somewhere this time. My wife absolutely hates the Kitty in the Ring - it's too "Japanese Girly" and silly for her liking. I'm reckoning that it will be right at home on the left front fuselage panel next to the Evil Corporation logos (If you recall, I had an Aperture Science decal. It will be joined by Umbrella Corporation, Waylen Utani, Vault Tech, and OCP.
I really liked the cartoon fox that I used in one of the AAR's. Indeed, I liked the paint scheme over all, and it has distinct advantages over the Verdun camo.
First, it's a lot easier to do. Camo is a PITA not only to put on, but to touch up. Granted, I cheated and used standard colors from Sherwin Williams, but having to buy multiple colors was more expensive than it needed to be.
Second, it will be lighter. While each color was painted in it's unique area, I used more paint than I wanted to in order to get it right. One color will be easier to get a consistent cover and look with.
Third, Verdun was a snapshot in time and place in WWI. It's sort of like how everyone puts invasion stripes on WWII aircraft - they were only there for a very short time in a specific area. By the end of July they were all gone.
For those forgetting, here's my mythical 87 Escadrille fox:
Oh, it's gonna have to be a whole new weight and balance.
There's a lot of "seems right" give and take going on here. The tail wheel is heavier, but the turtle deck supports are a lot lighter. The biggest deal is going to be paint. Since I'm not going with the camo this time around, that's going to take a bunch of weight off, particularly the tail. I'm embarrassed about how much paint I wound up putting on the horizontal stab and elevators....didn't really realize how much until I stripped the fabric.
As to the vice, yeah, I need to come up with a portable non-PITA way of locking it down for stuff. But the ability to just pick it up and place it anywhere is invaluable. Also, the video is sped up 8 times....so it's not creeping that fast.
@ Argon: There really wasn't any other way to do it. Besides, there was an aluminum plate between me and the drill bit.
The first is the brake installation...well, the new improved handle for the brakes and running the cables, anyhow, with a little bit on the actual drum brakes themselves.
With that, I realized that work on the fuselage is pretty much finished until the engine is ready for mounting, so it's on to wings.
There's some special hardware in the busted wings I needed, so first I had to strip them down...and strip the good lower wing as well for inspection.
Work is slowing, though. I've got a disk in my neck that is working in concert with arthritis to pinch the nerves that go to my right arm. If anyone knows the pain of sciatica, imagine that in one's arm instead of the leg. Docs did the anti-inflamitory goop injections, which I give a C minus in grade. It no longer feels like a piece of rebar was rammed through my shoulder blade, ripping off the arm, and then duck tapped back on, but it's day-by-day on how useful I am. Thursday I woke up to what I can only describe as a charley horse in my tricep, followed by lightning bolts. Sucks. Friday was Pulled Tight Like A Drum, but today it just aches with pins-and-needles like it's just waking up from falling asleep. If it doesn't improve they'll just have to go in and remove the disk and fuse the two vertebrae.
I have self diagnosed myself with Carpal Tunnel, mildly jokingly. Yet to see the doc because i'm a male, and stubborn, with a sprinkle of stupid. Invested in a compression glove that relieves it quite a bit and also helps with MJ impressions. Also i have changed the way i hold my phone and am far more aware of hand positioning with mouse and keyboard and many other basic tasks. Getting older sucks, but at least we have our good looks, and love of aircraft to keep us going
I am getting old as well. Fortunately am healthy enough to have just passed another Flight Physical. Every pilot worries when going for one. Men in their 30’s fail them so I feel good about it.
I am getting old as well. Fortunately am healthy enough to have just passed another Flight Physical. Every pilot worries when going for one. Men in their 30’s fail them so I feel good about it.
I am getting old as well. Fortunately am healthy enough to have just passed another Flight Physical. Every pilot worries when going for one. Men in their 30’s fail them so I feel good about it.
Basic Med for the win.
I know a lot of pilots that are using their regular doc for flight physicals to avoid "gotchas." And, as Dash says, at some point you can forgo physicals altogether and fly under Light Sport rules.
Indeed, one of the reasons I went Light Sport from the beginning is to avoid the expense and bother with physicals. Not that there's anything to make me believe I would get a busted ticket; I just think it's a requirement that has long exceeded it's value.
Upper right wing stripped, new flying/drag wires installed. Ribs for all wings bent, waiting for trim to fit spars. Upper left wing spars drilled, waiting for fitting the compression struts, drag/anti-drag wires, and tramelling.
And that's where it is.
Medically, good news and bad news. I had a biopsy done on the lymph nodes in my chest (lovely large cross cut scar on my neck), where they found out they're just over-achievers. No cancer. I'm a bit of an oyster, with my body making little accretions around little bits of something; no further intervention required, as it should slowly resolve itself.
On my neck, the super duper scan (which was hilarious - they injected a dye into my lower spine and flipped me on my head to let the goop drain down to my neck) showed the doc that his original plan of intervention was off. Instead of going in from the front and removing one neck bone, he's going in the back, cutting in a channel in the bone, removing some disks, using the bone he's taking out to make splints between them, and holding the whole mess together with a couple rods. The good news is that in five years I won't be a cripple. The bad news is I'm looking at five or six months of suck, starting with 4-6 weeks of 24/7 hard neck brace. At least it's not a halo. After that I'll be able to take it off to wash underneath it for another couple months. That is going to be one nasty brace.
The meds they've had me on are less than ideal, making me a staggering mess by the time the afternoon comes around. Apparently this is acceptable, as he's just now letting me ease off on them, and was pleased that I stuck to them. It also meant that I couldn't work - power tools and sharp pointing things while uncoordinated isn't a good thing.
It makes me a little crazy about the plane. It's that part of the rebuild where six full days of work and it could be wings on fuselage, either rigged or ready for rig and cover.
Well, it was either this surgery or in five or ten years fall down and drop things all the time as my spinal column was chewed into. Oh, fun fact: damage is probably due to some sort of chemical agent, such as sarin gas. You know, the stuff that didn't cause the M8 chemical alarms to go off during Desert Storm? I may have to talk to the VA.
I'm actually in high sprits over this, as it means the problem was caught early and can be fixed.
Oh, and all these scans and crap? Well, I wouldn't have had any of the initial work done up on any of this if I hadn't of put my precious little Babette into a tree next to a road. None of it is directly related to the wreck - it was just broken ribs and a pretty neat scar on my face - but without it, I'd be screwed.
So she saved my life in the crash by collapsing so beautifully and taking the hit for me, and then opened a window for the docs to find other stuff that could have left me a cripple in my old age.
I know it's just a machine, but damned if I don't love that little Bebe.
So she saved my life in the crash by collapsing so beautifully and taking the hit for me, and then opened a window for the docs to find other stuff that could have left me a cripple in my old age.
I know it's just a machine, but damned if I don't love that little Bebe.
It's good to see something so beneficial come out of that crash. "Serendipitous" comes to mind. Your positive attitude is admirable, and should serve you well in the coming rehab/recovery. I hope that all goes well for you.
Hope the whole stuff works out as easy as possible, Dart. You're indeed an example of a high-spirited guy with drive, dreams and positive attitude. Thanks for sharing.
To be honest, I don't know how anyone could be downhearted about something like this. Imagine 50 years ago a doctor walking up to a person and saying "Hey, you're going to become a cripple in the next five or ten years because your neck bones are shifting all around." And that would be it. You'd be resigned to your fate.
Well, it's not 50 years ago. A lot of poor #%&*$# didn't have high resolution scanning and either wound up as functional invalids, or were part of the learning curve on how to do neck surgery next to the spinal column without making it worse since then. I'm reaping the rewards of technology and medical research.
I'll trade six months of total suck for thirty years of being able to walk around unassisted every single time.
Oh, and one of my questions was "after recovery, will I be able to drive?" which got me a goofy look. "Of course." So I'm good to go as a Sport Pilot.
How's your employer handling this? Hope your beautiful gig at that aircraft factory isn't under question...
Edit - of course not at all my business if you don't want to share Just curious because I'd like to understand the situation how such things are handled in US work law.
Oh, no problems with work; it's like being part of a family. I'm on "unpaid medical leave" and not fired. It'll most likely be May of next year before I can start work; so they locked up my toolbox and rolled it out of the way, waiting for me to come back.
I'm not sure if they'll formally drop me from the rolls to save on worker's comp or something, or keep me on the rolls for tax purposes. It doesn't matter, as the door is wide open for me to come back.
It's pretty neat when your boss calls you and asks if everything is okay and if you need anything. They want me to come by for lunch this next week just to see me.
Employees don't get paid sick leave in the US still? My wife, with a serious heart condition exacerbated by delays for surgery due to Covid restrictions received 3 months full pay from her employer and then six month Statutory Sick Pay from the UK Government. But employment legislation has it's advantages and disadvantages. I suffered greatly financially as a small business employer supporting maternity leave and a member of staff with long-term medical leave. Not only having to pay salary, but also being unable to fill their vacant positions until they confirmed their intention not to return to work some months later.
But I digress. I wish Dart well in his endeavours, and may he soon 'Slip the Surly Bonds of Earth' but in a good returning way I hasten to add! May the force of the Llama Thrusts be with you sirrah!
The company is way too small for that. We have six of us on the payroll, including the owner; there's Workman's Compensation if one is hurt at work, but that's it. No company health insurance, no dental, no sick leave. I suppose I could apply for temporary disability with the government, but it's going to be short in duration and probably approved about the time I'm healed; the fact that I get an Army retirement check means they'd most likely dock that check in favor of the other.
Quick update - surgery went well and I'm home after two days in the hospital. Nice pain medications to help out, along with this "bug zapper" neck collar I have to wear four hours a day. It send out electro-magnetic waves that stimulate bone healing, and according to the research, increases it by a third. A third.
The scar is going to be epic, as it starts about level with my ear holes at the center of the back of my neck and goes down to between the shoulder blades. Loads and loads of metal staples holding everything together.
That the hard neck brace is a PITA is an understatement, but it is what it is. In a couple of weeks I can start taking short breaks from it. Right now it comes off only for a quick shower, a shave, and changing out the dressing on it.
Doc says eight months and I'll be 100%. Cool. I won't lose any motion turning my head left or right, but will lose some looking up and down. Putting my chin to my chest will be impossible, but oh well - how often do I do that?
I sometimes still think about all the fun we all had on the Arma island (original). Great times man.
Glad you are doing well. Good here. Rumor has it I am about to graduate from college in a month or so after 45 years of trying. Working my butt off to graduate, 30 plus hours on my computer(s) at least per week.
Turns out I'm just paranoid. A lot of the pre-operative symptoms retujrned - numbness in my hands, etc., and the Dr. called to explain that it's normal. Everything has been so compressed for years that there's swelling and even some movement of nerves and blood vessels in the tunnels he enlarged; uncommon but not unusual.
Awesome link! And it fit perfectly for what I came to post about.
I've been thinking a lot about the aircraft lately, and this of course translated into having dreams about it, which I always take seriously. A lot of times I'll chew on a problem and then have a dream about it that either holds clues to the solution or provides them outright. The panel layout that adjusted for the mounted radio was a wake-up-and-draw-it-out moment.
One of the questions was about that 87 Fox I had on my plane in Rise of Flight as well as what color to use on the edges. I had done them in blue, but there's a lot of evidence they were dark gray or brown.
Well, the last couple of nights I've approached the aircraft, and last night I made sure I paid attention to the details - the Fox's position and going with brown trim looked pretty good, so that's what I'll go with.
Oddly enough, she flew even better than before, which I'll credit to the fact that this time the fuselage doesn't have a twist in it, but that it was a dream, so naturally it would; it's rare I dream of a problem (but when I do, chances are I'm tearing whatever part of the aircraft that acted up to inspect it. The last time I had a bad dream about the airplane it was about the fuel system and I ignored it. Yeah, I had it a couple weeks before a fuel fitting failed and I wrecked her).
I'm kind of uncertain as to whether or not the improved tail wheel mount design is going to work; my dream landings were all okay, but nothing special. I need to dream land her a little hot and bring the wheel down to see if she'll have the same problem as the last one.
Two more weeks of the hard brace, then to a soft one! At this point I'm pretty much healed, so I'm actually fighting it, trying to move my head around.
In the meantime I've been gathering things I'll need for the next steps, bits of hardware and crap. I had the wife drive me up to the hangar to drop some of it off and make sure everything was okay - and she was suitably impressed with the state of the aircraft.
Indeed, she didn't realize just how close I am to putting it together.
No picks of the aircraft, so here's some other hardware I picked up:
![[Linked Image]](http://www.darts-page.com/images/Nieuport/prep005.JPG)
![[Linked Image]](http://www.darts-page.com/images/Nieuport/prep006.JPG)


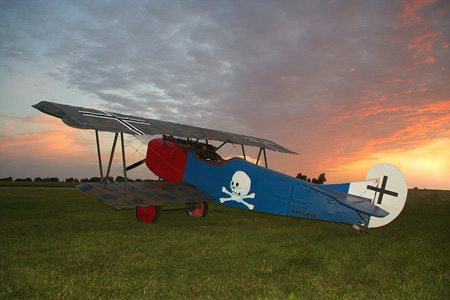


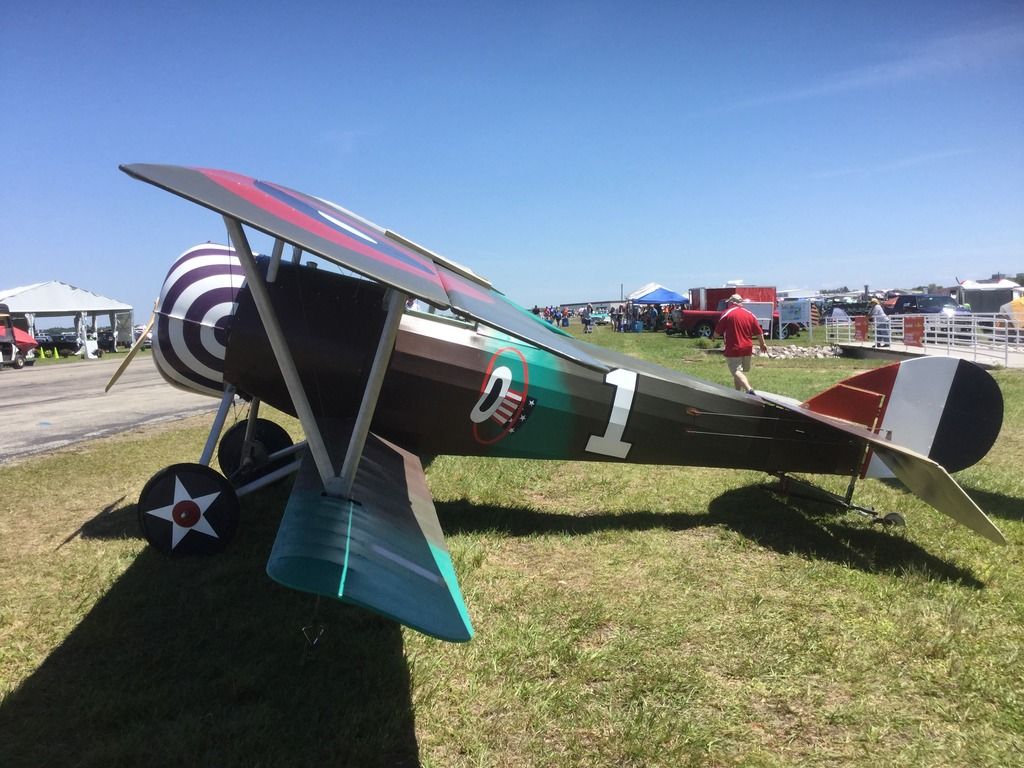

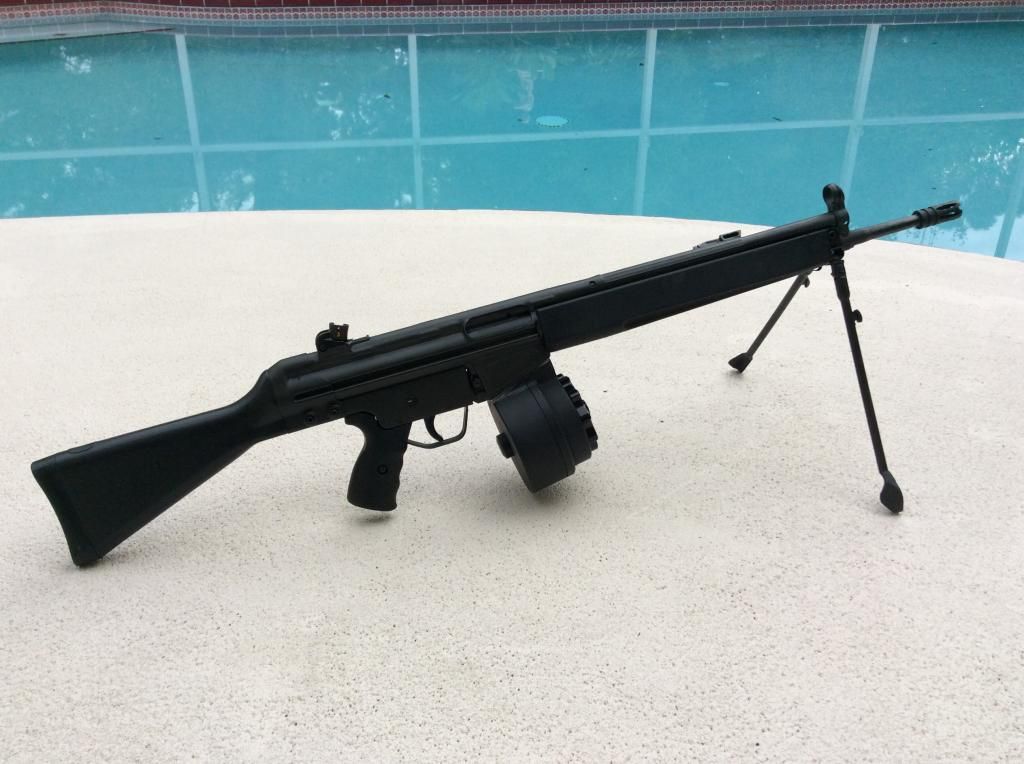


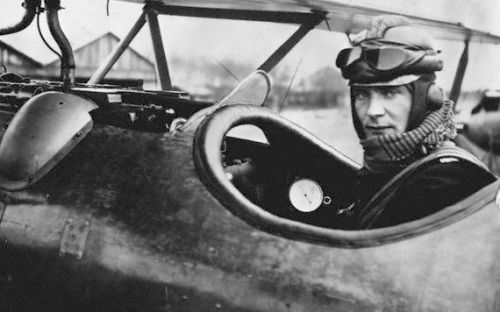


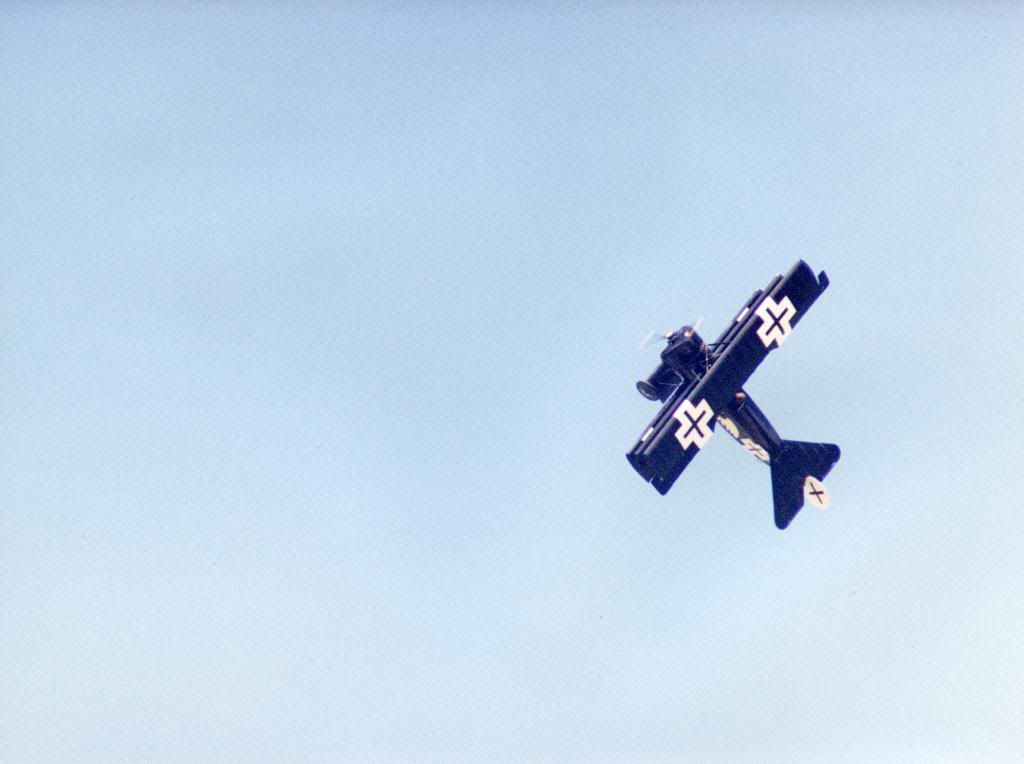


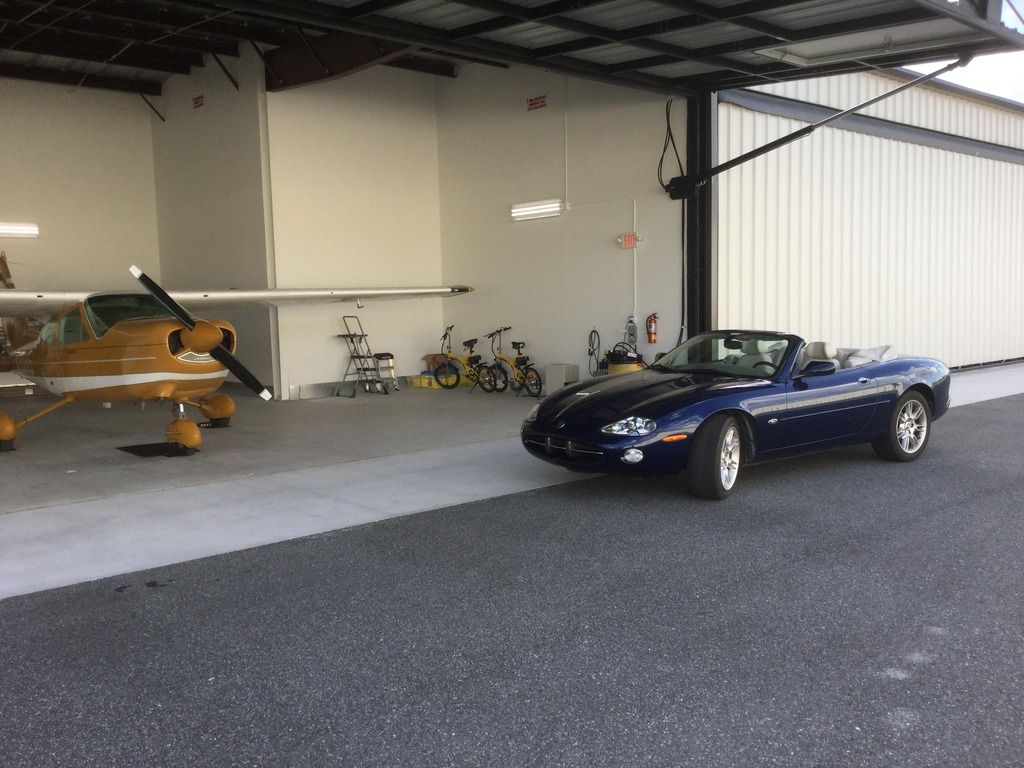


![[Linked Image]](http://i136.photobucket.com/albums/q161/oldgrognard/IMG_6864_zpsi7lyb4bl.jpg)
![[Linked Image]](http://i136.photobucket.com/albums/q161/oldgrognard/IMG_6865_zpsmiv7qabx.jpg)
![[Linked Image]](http://i136.photobucket.com/albums/q161/oldgrognard/IMG_6877_zpsqs3ok9gw.jpg)
![[Linked Image]](http://i136.photobucket.com/albums/q161/oldgrognard/IMG_6880_zpsv8godyje.jpg)
![[Linked Image]](http://i136.photobucket.com/albums/q161/oldgrognard/IMG_6881_zps4iollsr4.jpg)
![[Linked Image]](http://i136.photobucket.com/albums/q161/oldgrognard/IMG_6878_zpshwim1i0c.jpg)
![[Linked Image]](http://i136.photobucket.com/albums/q161/oldgrognard/IMG_6879_zpspaxzui8l.jpg)
![[Linked Image]](http://i136.photobucket.com/albums/q161/oldgrognard/IMG_6882_zpsyyxgrujs.jpg)
![[Linked Image]](http://i279.photobucket.com/albums/kk157/ANGPHOT/c2e913b9.jpg)
![[Linked Image]](http://images.thetruthaboutcars.com/2013/03/800px-VWGolfHarlequin-450x337.jpg)
![[Linked Image]](http://imgur.com/sWKzYkR.jpg)
![[Linked Image]](http://imgur.com/SLDPOaL.jpg)
![[Linked Image]](http://4.bp.blogspot.com/-gBpfn7-eaGQ/T6EXSEC_Z0I/AAAAAAAANpU/5zLw-98QVy4/s1600/Scan10409_tmp.jpg)
![[Linked Image]](http://www.darts-page.com/images/Nieuport/engr001.jpg)
![[Linked Image]](http://www.darts-page.com/images/Nieuport/engr002.jpg)
![[Linked Image]](http://www.darts-page.com/images/Nieuport/engr003.jpg)
![[Linked Image]](http://www.darts-page.com/images/Nieuport/engr004.jpg)
![[Linked Image]](http://www.darts-page.com/images/Nieuport/engr005.jpg)
![[Linked Image]](http://www.darts-page.com/images/Nieuport/engr006.jpg)
![[Linked Image]](http://www.darts-page.com/images/Nieuport/engr007.jpg)
![[Linked Image]](http://www.darts-page.com/images/Nieuport/engr008.jpg)
![[Linked Image]](http://www.darts-page.com/images/Nieuport/engr009.jpg)
![[Linked Image]](http://www.darts-page.com/images/Nieuport/engr0010.jpg)
![[Linked Image]](http://www.darts-page.com/images/Nieuport/engr0011.jpg)
![[Linked Image]](http://www.darts-page.com/images/Nieuport/engr0012.jpg)
![[Linked Image]](http://www.darts-page.com/images/Nieuport/engr0013.jpg)
![[Linked Image]](http://i136.photobucket.com/albums/q161/oldgrognard/IMG_0325_zpspmjaegx7.jpg)
![[Linked Image]](http://i136.photobucket.com/albums/q161/oldgrognard/IMG_0329_zpsj3ajmq26.jpg)
![[Linked Image]](http://i136.photobucket.com/albums/q161/oldgrognard/IMG_0326_zpsvdht2ine.jpg)
![[Linked Image]](http://i136.photobucket.com/albums/q161/oldgrognard/IMG_0327_zpskari7gjm.jpg)
![[Linked Image]](http://www.darts-page.com/images/Nieuport/engr0014.jpg)
![[Linked Image]](http://www.darts-page.com/images/Nieuport/engr0015.jpg)
![[Linked Image]](http://www.darts-page.com/images/Nieuport/engr0016.jpg)
![[Linked Image]](http://www.darts-page.com/images/Nieuport/engr0018.jpg)
![[Linked Image]](http://www.darts-page.com/images/Nieuport/brake013.jpg)
![[Linked Image]](http://www.darts-page.com/images/Nieuport/brake014.jpg)
![[Linked Image]](http://www.darts-page.com/images/Nieuport/brake016.jpg)
![[Linked Image]](http://www.darts-page.com/images/Nieuport/brake015.jpg)
![[Linked Image]](http://www.darts-page.com/images/Nieuport/brake017.jpg)
![[Linked Image]](http://www.darts-page.com/images/Nieuport/brake002.jpg)
![[Linked Image]](http://www.darts-page.com/images/Nieuport/pre-rig001.jpg)
![[Linked Image]](http://www.darts-page.com/images/Nieuport/strut001.jpg)
![[Linked Image]](http://www.darts-page.com/images/Nieuport/strut004.jpg)
![[Linked Image]](http://www.darts-page.com/images/Nieuport/Nieuport_fixed.jpg)

![[Linked Image]](http://www.darts-page.com/images/Nieuport/in_air_m001.jpg)
![[Linked Image]](http://www.darts-page.com/images/Nieuport/in_air_m003.jpg)
![[Linked Image]](http://www.darts-page.com/images/Nieuport/starting_final.jpg)
![[Linked Image]](http://www.darts-page.com/images/Cloud_Ahoy.jpg)
![[Linked Image]](http://www.darts-page.com/images/Nieuport/winter_wear.jpg)
![[Linked Image]](https://cdn.jetphotos.com/400/6/20507_1446521272.jpg)
![[Linked Image]](http://www.darts-page.com/images/Nieuport/neu_prop002.jpg)
![[Linked Image]](http://www.darts-page.com/images/Nieuport/neu_prop005.jpg)
![[Linked Image]](http://www.darts-page.com/images/Nieuport/neu_prop003.jpg)
![[Linked Image]](http://www.darts-page.com/images/Nieuport/Radio001.jpg)
![[Linked Image]](http://www.darts-page.com/images/Nieuport/Radio002.jpg)
![[Linked Image]](http://www.darts-page.com/images/Nieuport/comb002.jpg)
![[Linked Image]](http://www.darts-page.com/images/Nieuport/coam001.jpg)
![[Linked Image]](http://www.darts-page.com/images/Nieuport/coam002.jpg)
![[Linked Image]](http://www.darts-page.com/images/Nieuport/coam003.jpg)
![[Linked Image]](http://www.darts-page.com/images/Nieuport/coam004.jpg)
![[Linked Image]](http://www.darts-page.com/images/Nieuport/coam005.jpg)
![[Linked Image]](http://www.darts-page.com/images/Nieuport/pitot004.jpg)
![[Linked Image]](http://www.darts-page.com/images/Nieuport/pitot005.jpg)
![[Linked Image]](http://www.darts-page.com/images/Nieuport/cooler001.jpg)
![[Linked Image]](http://www.darts-page.com/images/Nieuport/cooler002.jpg)
![[Linked Image]](http://www.darts-page.com/images/Nieuport/cooler003.jpg)
![[Linked Image]](http://www.darts-page.com/images/Nieuport/cooler004.jpg)
![[Linked Image]](http://www.darts-page.com/images/Nieuport/cooler005.jpg)
![[Linked Image]](http://simhq.com/forum/files/10000.png)

![[Linked Image]](http://www.darts-page.com/images/Nieuport/cooler006.jpg)
![[Linked Image]](http://www.darts-page.com/images/Nieuport/cooler008.jpg)
![[Linked Image]](http://www.darts-page.com/images/Nieuport/cooler007.jpg)

![[Linked Image]](http://www.darts-page.com/images/koontz_park.jpg)
![[Linked Image]](http://simhq.com/forum/tmp/12445.jpg)

![[Linked Image]](http://www.darts-page.com/images/Nieuport/gas_can.jpg)
![[Linked Image]](http://www.darts-page.com/images/Nieuport/sight_gauge.jpg)
![[Linked Image]](http://www.darts-page.com/images/Nieuport/gas_cap.jpg)
![[Linked Image]](http://simhq.com/forum/tmp/17968.jpg)


![[Linked Image]](https://www.dhresource.com/0x0/f2/albu/g7/M00/A9/FF/rBVaSlqT4wmAMWHQAAuV74zf4OQ184.jpg)
![[Linked Image]](https://i.ebayimg.com/images/g/Ck8AAOSwq8FbO9NH/s-l640.jpg)
![[Linked Image]](http://www.darts-page.com/images/Nieuport/prep005.jpg)
![[Linked Image]](http://www.darts-page.com/images/Nieuport/prep006.jpg)
![[Linked Image]](https://simhq.com/forum/ubbthreads.php/ubb/download/Number/25288/filename/rivet_fans.gif)


![[Linked Image]](http://www.darts-page.com/images/Nieuport/meeting.jpg)