|
#4332091 - 01/27/17 06:55 PM
 Re: MMJoy/MMjoy2 - Build your own USB controller
[Re: Forsaken_joystick]
Re: MMJoy/MMjoy2 - Build your own USB controller
[Re: Forsaken_joystick]
|
Joined: Dec 2016
Posts: 454
Kb1rd1

Member
|
Member
Joined: Dec 2016
Posts: 454
|
Erichos, I have to disagree with your analysis of the diode problem. I'm a proponent of diode-less single row matrices, but if you have two buttons pressed in a row, it can trigger a button in the row more distant - ghosting. The three button press problem is masking and it will occur in the column farther from the three buttons pressed, in the far row. Electricity will follow the shortest path.
If you leave the diodes out on a two or more row matrix, sooner or later, you're going to get weirdness. It might not manifest all the time, but in a world where an extra AMRAM means the difference between life and death, I'll put the diodes in. The worse case in my mind is you have a store release or staging action where not commanded. The masking issue is probably less severe in games as you might actively remember the masking issue and let up on buttons.
Diodes are cheap and they allow an immediate expansion capability to new rows. If you have a fixed form joystick like a TQS that you can wire up single row, fine. If you're making a frankenstick or a button-box, put the diodes in if there is any chance you will ever add that second row, just to save yourself the time and annoyance of soldering to already placed switches.
You're right that if you're commanding single buttons only, you won't see the problem. When I'm cranking, banking and popping flares, I don't want to see my goal popping payload go flying away into the dirt and I have to RTB just to re-arm. Just wanted to note for others that I am not sure a TQS could be wired directly especially if you want to add a HAT to replace the now useless Eraser Nub like I did, at least mine couldn't be, there are too many buttons for a 1x10 matrix like I had setup originally , and if you want to add a few Push button Encoders or other extra Buttons, a Matrix will be needed. **caveat...I am no expert in these matters though as noted  KB. I think you have to add one more wire for an extra row/ column I gave the New Hat (from an old X-Fighter stick) 5 new Wires with SolderMonkeys help ( see other thread in Sig for how to pic)..... **edit I don't see Sig. for some reason so here is SM's Posted pic, 4th post down: X-Fighter Wiring Pic (1) Row and the 4 columns for the buttons and did the same for the TQS Radio 4 way button with a Row wire from the ribbon cable (yellow) and connected the other 4 wires midway on the 4 Columns wires (2x4) and slowly built up a 4x4 matrix with the other Buttons in the TQS by adding more wires midway on each column wire . I think I may need a 5x4 matrix actually I just picked up an Encoder and a few pushbuttons too. KB
Last edited by Kbird; 01/27/17 07:24 PM.
|
|
|
#4332100 - 01/27/17 07:19 PM
Re: MMJoy/MMjoy2 - Build your own USB controller
[Re: Pilot_B737]
|
Joined: Dec 2016
Posts: 454
Kb1rd1
Member
|
Member
Joined: Dec 2016
Posts: 454
|
Does it works with win10? Any problem? Not with MMJoy2 and Win10 ...Erichos has suggested using Firmware 2016-08-18_Upd. rather than the new 2016-11-01 version though, due to the odd bug in MMjoy2 like it not reporting Axes in the "Used" Box like I have. it is here : 2016-8-18 FIRMWAREJust make sure that the Firmware location is correct on the Firmware Tab before hitting the Arduino Reset button. The Wiki is here : MMJoy Wiki
Last edited by Kbird; 01/27/17 07:43 PM.
|
|
|
#4332630 - 01/29/17 12:24 PM
Re: MMJoy/MMjoy2 - Build your own USB controller
[Re: Sokol1]
|
Joined: Nov 2001
Posts: 3,955
Sokol1
Senior Member
|
Senior Member
Joined: Nov 2001
Posts: 3,955
Internet
|
|
|
#4332718 - 01/29/17 06:42 PM
 Re: MMJoy/MMjoy2 - Build your own USB controller
[Re: Pilot_B737]
Re: MMJoy/MMjoy2 - Build your own USB controller
[Re: Pilot_B737]
|
Joined: Dec 2016
Posts: 454
Kb1rd1
Member
|
Member
Joined: Dec 2016
Posts: 454
|
I am sorry, but it is not clear for me.
Works or does not works with win10?
It works , thought I was Clear sorry.... Does it works with win10? Any problem?
Not with MMJoy2 and Win10 ...
|
|
|
#4332855 - 01/30/17 06:27 AM
Re: MMJoy/MMjoy2 - Build your own USB controller
[Re: erichos]
|
Joined: Dec 2016
Posts: 454
Kb1rd1
Member
|
Member
Joined: Dec 2016
Posts: 454
|
Hi Erichos , thanks for posting , so you think I should use version [20160818upd1] not version [20161101]? I think I have it worked out now , I had a single 1x8 matrix and a single switch above, and could not work out how to program the rest but I finally figured out I was thinking about the Matrix incorrectly (electronics Noob) and I had the wiring scheme wrong, so looking at some of Mega_Mozg's Images of his setup for a 6x6 matrix in MMjoy2 and one from someone else on wiring a F22+TQS to a Bodnar Board , I knew it was how I had it wired/linked to the Arduino not MMJoy2 ie. it was a wiring issue. I did a scheme of my own and it seems to work now but I am not 100% sure it is "correct" .... it is posted here in my FLCS+TQS Conversion Thread if you have time to look...(link in blue) My TQS Wiring Scheme http://SimHQ.com/forum/ubbthreads.php/topics/4331213/Re:_F16-FLCS_+_TQS_(Original)_#Post4331213 KB. Hi Kbird, I only recommend you use version [20160818upd1] but as I said button matrix must work at any version. I looked at your scheme, sorry but it is not very transparent :-) so I redrew it without changes and I hope it is clearer now, maybe :-) Here is your scheme: 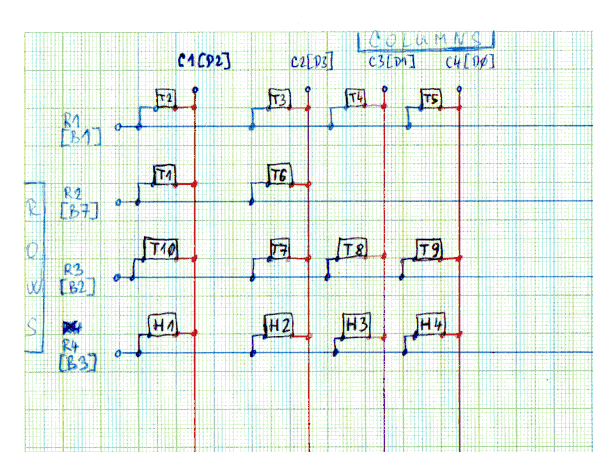 Important thing is to set MMJoy2 correctly: 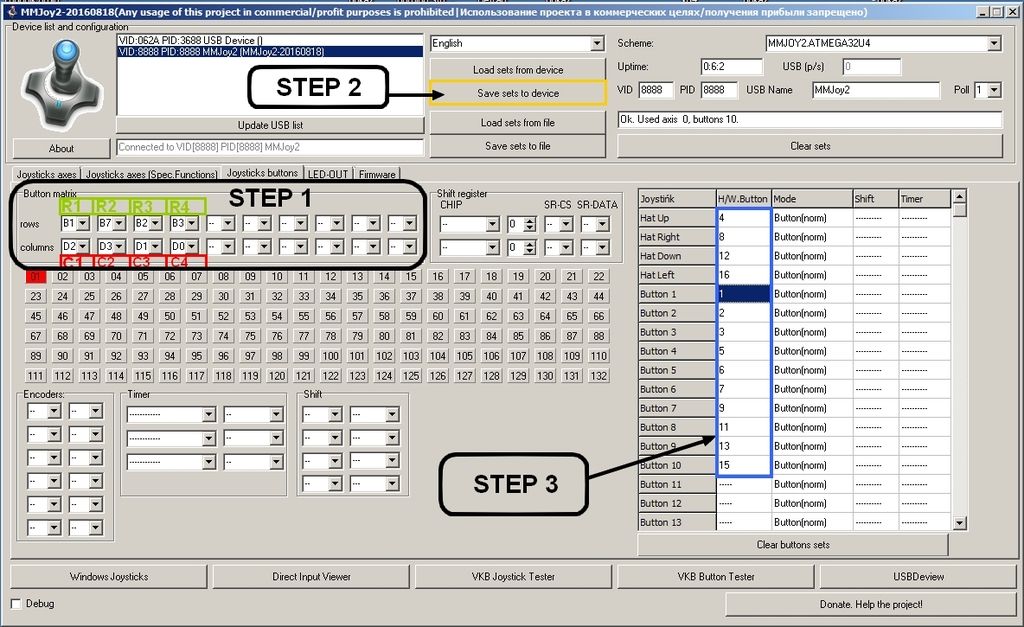 So connect your Arduino and click "Load sets from device". Then we start setting. Step 1: set which pins you use for ROWS and COLUMNS Step 2: click "Save sets to device" from now if you push any button you have to see red square with number 01-132 on the left side of MMJoy2 window (there is 01 in my picture because I pushed button connected between ROW1 and COL1 and press "PrintScreen" on keyboard) Step 3: now you can set which H/W.Button will be displayed as button in Windows. Doesn`t matter if H/W.Button 01 will be Joystick button 05 or 25... It is up to you. But OS Windows knows only 32 buttons and 1 HAT so SUM=36 buttons. Step 2: again send your settings to Arduino Now you click on the left-down "Windows Joystics" and then "Properties" and must see this: 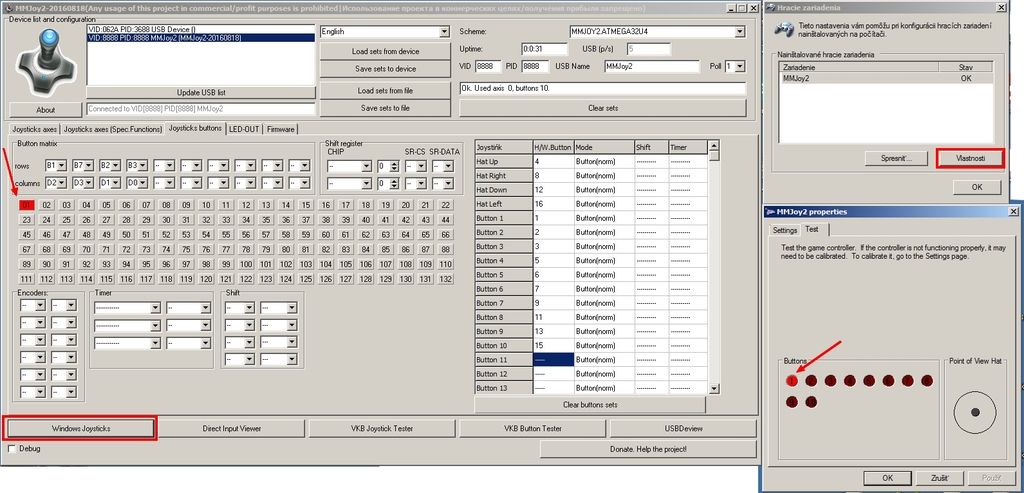 If you push the button 01 you have to see red square with number 01 on the left side of MMJoy2 window and red circle button 01 in joystick properties window. That`s all :-) I hope you do it now. @erichos ...Thanks again my Button Matrix is now working properly in MMJoy2  If you have time would you mind posting a pic of how to Set Up an Encoder in MMJoy2 please.... I have a 24 position Rotary Encoder like this one Rotary Encoder https://www.adafruit.com/product/377Maybe I have it wired incorrectly? the MMJoy Wiki image of encoders is a bit confusing to me but I have... - the center pin to a Row [D7] ( thought to GND but Wiki seems to say Rows and Columns) - one outer pin to Column [C6] - one outer pin to Column [E6] I assume the Column wires still get diodes and that they face the Encoder on the wire..... Thanks KB.
Last edited by Kbird; 01/30/17 07:04 AM.
|
|
|
#4333127 - 01/30/17 08:48 PM
Re: MMJoy/MMjoy2 - Build your own USB controller
[Re: Sokol1]
|
Joined: Apr 2016
Posts: 63
erichos
Junior Member
|
Junior Member
Joined: Apr 2016
Posts: 63
Slovakia
|
Hi Kbird, so make connection like this: 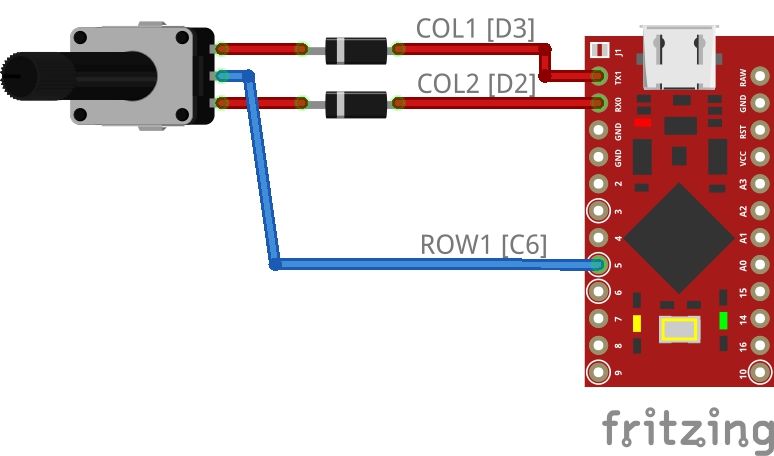 Open MMJoy2 and start setting: 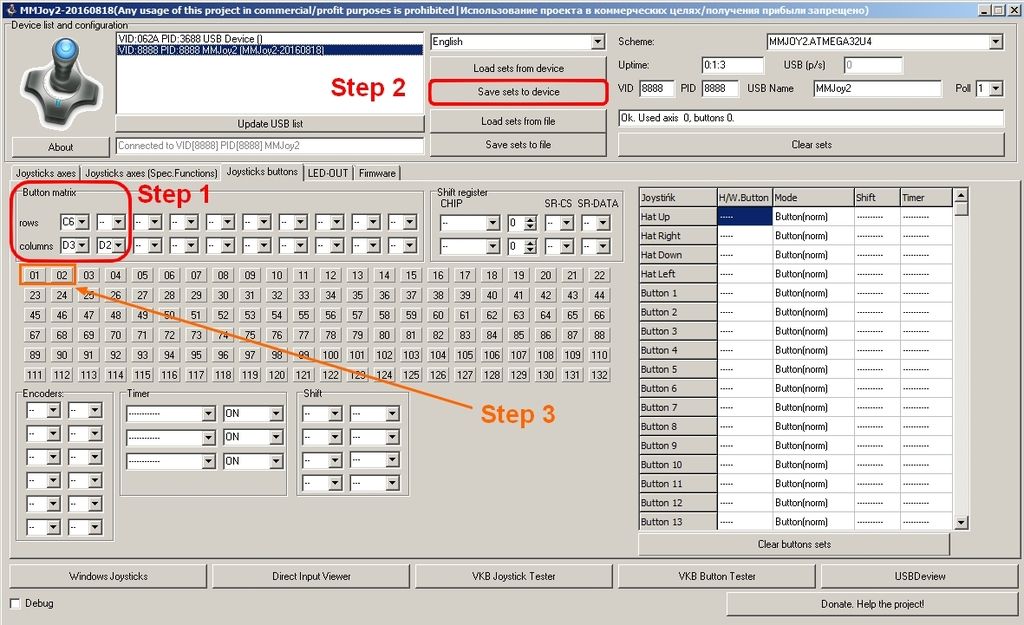 Step 1: set Columns and Rows. Step 2: Save sets to device. Step 3: now turn the rotary encoder left/right to find out which H/W buttons are active (they are blinking RED). In my example is Enc connected to buttons 1 and 2. 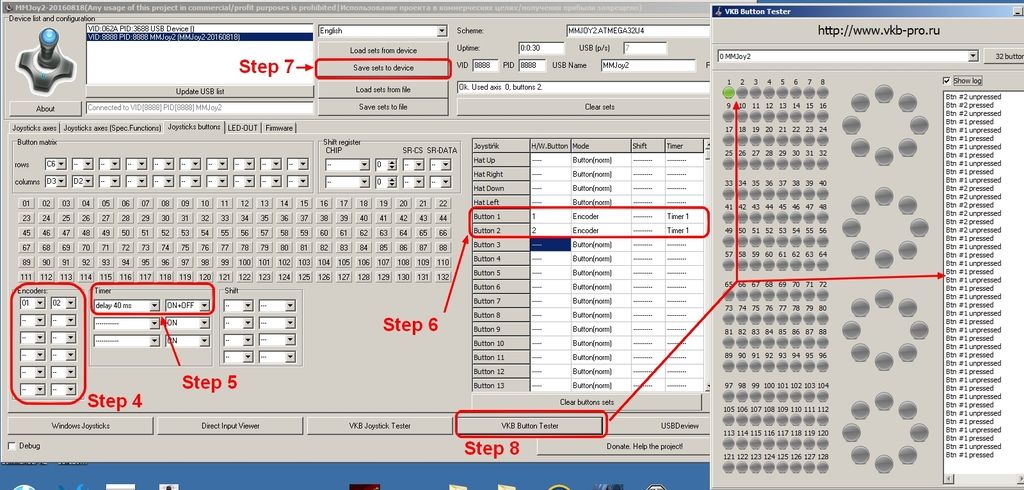 Step 4: set that button numbers that were blinking during turning Enc. Step 5: set Timer, delay as you want, it`s up to you, 20ms is fast, 40ms is standard (for me). Step 6: set this, I think it`s clear on the pic. Step 7: Save sets to device. AND FOR NOW you cannot see blinking H/W buttons on the left side during turning Enc. It is NOT mistake, it`s OK. Step 8: click VKB button tester (or Windows Joysticks) and here you can see result of your work - blinking button 1 if you turn Enc to the left and button 2 if you turn Enc to the right (or vice-versa). That`s all Kbird. I hope it is clear for you. EDIT: I want to add some info about Delay setting, there is a difference between Timer ON+OFF and ON, you can test it. If you need only impulse generator, set 20ms and ON+OFF, that means the Enc generates single pulses with pulse length 20ms, it is useful for trim tabs, manual gear operating and so on... But for operating compass or radio freq you can test setting Delay 120ms/ON and now if you turn Enc fast, it generates 1 long pulse so it is good for primary inaccurate setting and slow turn generates single pulses for precise setting. It is very handy for compass setting, radio freq setting and so on...
Last edited by erichos; 01/30/17 10:26 PM.
|
|
|
#4333193 - 01/31/17 12:08 AM
Re: MMJoy/MMjoy2 - Build your own USB controller
[Re: Sokol1]
|
Joined: Dec 2016
Posts: 454
Kb1rd1
Member
|
Member
Joined: Dec 2016
Posts: 454
|
Hi Erichos , Thanks Very Much I would never have gotten past Step 4 to 5+6+7 (that is where I was stuck) , not by looking at the Wiki anyway... I think those two posts you made for me should be included in the Wiki or made "Sticky" they are both great and easy to Follow for any one , even MMJoy noobs . I see you used different columns and Rows than I did , is there a reason for that? or was it just the ones you used for the example and I can use any of the MMjoy Button Pins? KB.
|
|
|
#4333265 - 01/31/17 05:13 AM
Re: MMJoy/MMjoy2 - Build your own USB controller
[Re: Kb1rd1]
|
Joined: Aug 2016
Posts: 7
Pilot_B737
Junior Member
|
Junior Member
Joined: Aug 2016
Posts: 7
|
I am sorry, but it is not clear for me.
Works or does not works with win10?
It works , thought I was Clear sorry.... Does it works with win10? Any problem?
Not with MMJoy2 and Win10 ... OK! Thank you! Sometimes better to ask again to clarify )))
|
|
|
#4333302 - 01/31/17 11:26 AM
Re: MMJoy/MMjoy2 - Build your own USB controller
[Re: Kb1rd1]
|
Joined: Apr 2016
Posts: 63
erichos
Junior Member
|
Junior Member
Joined: Apr 2016
Posts: 63
Slovakia
|
Hi Erichos , Thanks Very Much I see you used different columns and Rows than I did , is there a reason for that? or was it just the ones you used for the example and I can use any of the MMjoy Button Pins? KB. Hi Kbird, I used these pins because at my test board I have these pins as button matrix. But you can use any pins usable for button matrix, it is up to you, this was only example.
|
|
|
#4333409 - 01/31/17 04:41 PM
Re: MMJoy/MMjoy2 - Build your own USB controller
[Re: erichos]
|
Joined: Dec 2016
Posts: 454
Kb1rd1
Member
|
Member
Joined: Dec 2016
Posts: 454
|
Hi Erichos , Thanks Very Much I see you used different columns and Rows than I did , is there a reason for that? or was it just the ones you used for the example and I can use any of the MMjoy Button Pins? KB. Hi Kbird, I used these pins because at my test board I have these pins as button matrix. But you can use any pins usable for button matrix, it is up to you, this was only example. Thanks for the confirmation Erichos , that is what I thought but wanted to be sure . Is there a MMJoy tutorial somewhere online I have missed ? or do you just know this stuff from years of playing around with it? I don't think I would of gotten step 4 on my own I actually thought that was for telling MMJoy what buttons to use for the encoder , 24 in my case , ie use buttons 57-80. KB.
|
|
|
#4333442 - 01/31/17 05:56 PM
Re: MMJoy/MMjoy2 - Build your own USB controller
[Re: Sokol1]
|
Joined: Apr 2016
Posts: 63
erichos
Junior Member
|
Junior Member
Joined: Apr 2016
Posts: 63
Slovakia
|
Kbird, you have missed no tutorial :-) everything what I know about MMJoy2 is from this forum and from my own testing. But I am interested in electronics many years, it`s my hobby and my job. MMJoy2 author wrote at page 101: firmware support special modes only for first 32 buttons and HAT. of course "Encoder" is special mode so you have to use only first 32 buttons for them. OK?
|
|
|
#4333445 - 01/31/17 06:01 PM
Re: MMJoy/MMjoy2 - Build your own USB controller
[Re: erichos]
|
Joined: Dec 2016
Posts: 454
Kb1rd1
Member
|
Member
Joined: Dec 2016
Posts: 454
|
Kbird, you have missed no tutorial :-) everything what I know about MMJoy2 is from this forum and from my own testing. But I am interested in electronics many years, it`s my hobby and my job. MMJoy2 author wrote at page 101: firmware support special modes only for first 32 buttons and HAT. of course "Encoder" is special mode so you have to use only first 32 buttons for them. OK? Ok thanks another good Tip , I would not have worked that out either without asking more questions, I guess it uses only 2 buttons correct eg 1 and 2 in your example. (not the Encoder detent count , which in my case is 24) I think you need to start a MMJoy Programming Tips/Tutorial Thread perhaps KB.
Last edited by Kbird; 01/31/17 06:09 PM.
|
|
|
#4333471 - 01/31/17 07:29 PM
Re: MMJoy/MMjoy2 - Build your own USB controller
[Re: Sokol1]
|
Joined: Apr 2016
Posts: 63
erichos
Junior Member
|
Junior Member
Joined: Apr 2016
Posts: 63
Slovakia
|
Yes Kbird, every Enc takes 2 button positions, one position for left turning (eg. button No.1) and second for right turning (eg. button No.2). If you have a Enc with push button (eg. button No.3) you need 3 positions for 1 Enc. Your (and my too) Enc has 24 detent count that means the one 360deg. rotation of Enc, generates 24 button pulses. Is it clear now?
Last edited by erichos; 01/31/17 10:34 PM.
|
|
|
#4333501 - 01/31/17 09:06 PM
Re: MMJoy/MMjoy2 - Build your own USB controller
[Re: Kb1rd1]
|
Joined: Nov 2001
Posts: 3,955
Sokol1
Senior Member
|
Senior Member
Joined: Nov 2001
Posts: 3,955
Internet
|
Is there a MMJoy tutorial somewhere online I have missed ?
No, there's no MMjoy2 tutorial or manual besides what you find in this forum/Wiki or Google pages. Besides this Mega_MOZG was always adding/removing features, so MMjoy2 is always "Beta/WiP". I wold like a MMjoy2 version without that War Thunder features (LED, Panel...) but with more useful ones like keyboard Windows modifiers emulation (Alt, Ctrl, Shift...), but I will not ask for this, due the freeware nature of the project. 
|
|
|
|
|
Exodus
by RedOneAlpha. 04/18/24 05:46 PM
|
|
|
|
|
|
|
|
|
|
|
|
|
|
|
|
|
|

