If you want to use dumb bombs at the end of the attack with max Mutual support this is a way, and why:
Originally written by John "Zambo" Zambie.
Target Area Mechanics I altered data to match the A10C.
Target Area Mechanics is a way of operating in the air-to-ground target area while maintaining maximum mutual support. I'd like to take this opportunity to describe for you the basics of Target Area Mechanics, but before getting into the details, however, it is important to first understand the concept of Mutual Support and the geometry of the Attack Cone.
Many of you know that most fighters fly in combat spread position most of the time. Combat spread geometry can vary, depending on local SOP, but basically it involves the wingman flying about one mile abeam lead.
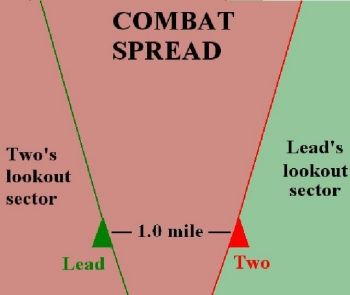
COMBAT SPREAD FORMATION AND PRIMARY LOOKOUT RESPONSIBILITIES
In this formation, the wingman looks not just at lead, but also through him in order to acquire any threats approaching from the left. Lead scans through dash two in order to acquire threats coming from the right. It is important for two to be directly abeam lead so that lead doesn't have to look back over his shoulder to see his wingman. The one-mile distance between them exists for two reasons. First, this makes it harder for a bandit to visually acquire both aircraft (especially if dash two is a couple thousand feet above or below lead's altitude). Second, it provides turning room within the section so that if one fighter becomes engaged, his wingman, the free fighter, has room to turn nose on to the fight and prosecute the bandit. This is the basis for what is known as "mutual support", which is a fancy way of saying, "I'll watch your back, and you watch mine." Also note in the example above that dash two also has primary lookout responsibility to the front. This is so that lead can spend more time operating sensors and communicating in order to build his situational awareness.
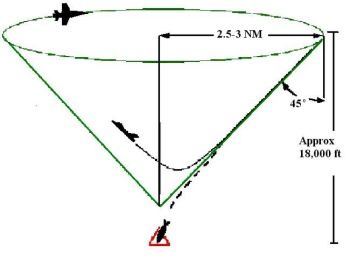
MEDIUM ALTITUDE ATTACK CONE
The attack cone is an imaginary cone in space above the target. It has a specific radius and dive angle associated with it. The exact dimensions of the cone are determined in pre-mission planning. Although modern jets will automatically compute the trajectory of free-fall ordinance, pilots still strive to be on the briefed attack cone. This is in order to maximize weapon accuracy and minimize the exposure to the threat by arriving at the minimum slant range to the target at which they can release and still pull out of the dive above the threat's maximum effective altitude. Realize that a pilot can roll in on the target from anywhere on the attack cone and achieve these optimum parameters.
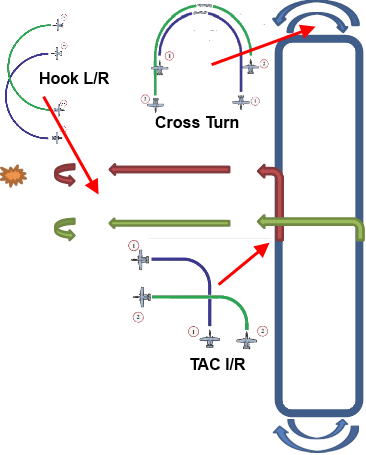
So how do we arrive at the attack cone and prosecute the target while maintaining mutual support? This is the art of Target Area Mechanics. While there is no one correct way to do this, we do have a number of generic target attacks that we can build from in order to minimize our risk in the target area. The first of these is the Standard (or Welded) attack.
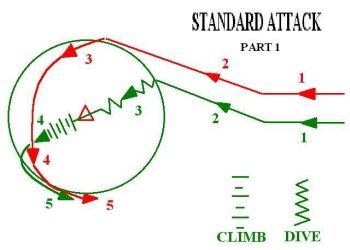
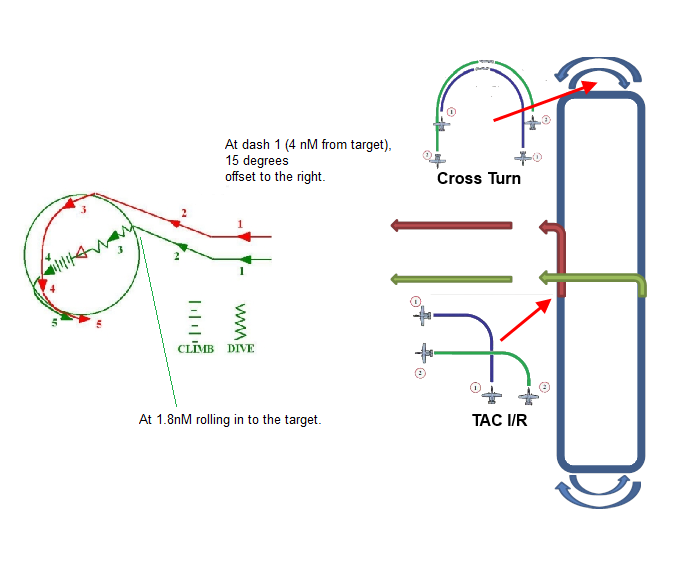
The above diagram depicts a standard or welded attack. It can be to the left or right. Both fighters enter the target area in combat spread at time 1. At about 4 NM from the target, the flight leans to the right about 15 degrees or so. This initial offset direction is how we name the attack, in this case, "standard right". This has the effect of pushing dash two out in front slightly, as shown at time 2. At time 3, lead has arrived at the attack cone (indicated by the green circle), and has rolled in on the target. Notice that dash two remains up at altitude in a position to look through lead into the target area. Two's responsibility during this time is to watch lead's back while he concentrates on his attack run. Off target at time 4, lead should acquire dash two coming across his nose as he is climbing back up to altitude. Lead turns to follow as dash two arcs out to the attack cone in order to arrive in trail at time 5.
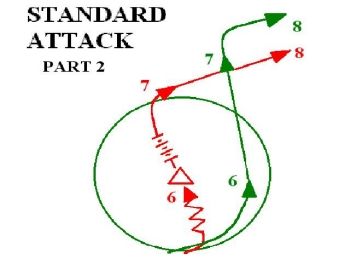
From the attack cone, two rolls in and prosecutes the target while lead looks through him into the target area (time 6). As dash two comes off target, he makes a hard right turn and acquires lead coming across his nose from right to left at time 7. Lead makes a hard right turn to expedite the return to combat spread formation as shown at time 8.
Advantages of this attack are that the cover element is always near the target in a position to engage and suppress any popup threats. A disadvantage is that each aircraft spends a long amount of time in the target area. For this reason, this attack is rarely used from low altitude.
There are times when both aircraft must attack from a certain general direction. In this situation, a same-side attack might be the way to go.
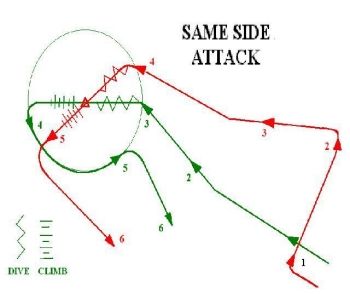
As the flight ingresses, dash two generates separation from lead by turning 90 degrees to the threat axis about 6 miles from the target while lead continues inbound. This separation maneuver is performed in the same direction as lead's planned offset. The example above is a same-side right. At about 4 miles, lead offsets to the right just like in the standard attack. After about 15 seconds of flying with the target in the beam, dash two turns back inbound. The optimum separation from lead at this point is about 2 miles, which equates to 30 seconds separation at 250 knots. As dash two's nose comes back toward the target, lead is entering the target area. As lead rolls in on the target, dash two is now in a position to observe the target area in order to watch leads back. As lead is coming off target, dash two is approaching the attack cone. Dash two rolls in at time 4 when lead turns back enough to get his eyes into the target area. Lead continues around the attack cone during dash two's run, and makes a hard right in order to rejoin dash two in combat spread at time 6.
This is a good attack for CAS, because it puts both aircraft in a position where the FAC can control the flight and offers enough time between aircraft so that the FAC can give aiming corrections to dash two based on lead's hits, i.e., "from lead's hits, north 50 meters." A disadvantage of this attack is that both aircraft come in from the same general direction, which decreases dash two's survivability because it's now easier for the enemy to spot him.
Another attack, which increases surprise and survivability when a restricted final attack heading is not required, is the split attack.
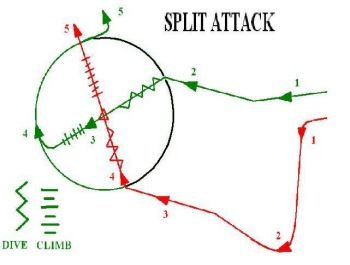
In the split attack, dash two takes a separation maneuver similar to the one performed in the same side attack, again at about eight miles. This time, however, he separates opposite the direction of lead's briefed offset. The attack is named for the direction of lead's offset, in this case, split-side right. Since lead is offsetting right, dash two splits to the left. Lead's attack and dash two's separation are nearly identical to that executed in the same side attack. At time 2, dash two's nose is coming around to the target area as lead approaches roll-in. As lead comes off target at time 3, dash two is approaching roll-in. At time 4, lead has eyes in the target area as dash two starts his attack. Lead arcs around the attack cone during dash two's run, coming across his nose from left to right. As dash two exits the target area at time 5, lead turns hard left in order to arrive back in combat spread.
This is by far no all-inclusive list of possible target attacks. Each fighter community has it's own set of pre-planned target tactics. The most important thing to take away from this discussion of target area tactics is that these attack procedures are not written in stone. Instead, they are starting points for planning an attack, and should be tailored to meet the requirements of that flight. For instance, in the split attack shown above, if the flight wants to egress back in the direction from which they came, it might be better for lead to turn left off target and arc around to the south during dash two's run. Then two could come off target to the right and the flight could rejoin heading back east out of the target area. Another tactic is to have lead come in from low altitude while dash two follows from high altitude.
The myriad combinations of terrain, weather, and threat should always dictate your tactics, and you should plan each attack so as to make the best possible use of mutual support for that situation. Remember, keep your head on a swivel and realize that the threat that you don't see is the one that's going to kill you. Good target area mechanics will help you see the threat and survive to fight another day.