|
#3997660 - 08/18/14 09:09 PM
 Re: MMJoy - Build your own USB controller
[Re: Sokol1]
Re: MMJoy - Build your own USB controller
[Re: Sokol1]
|
Joined: Nov 2001
Posts: 3,955
Sokol1

Senior Member
|
Senior Member
Joined: Nov 2001
Posts: 3,955
Internet
|
Seems that use USB cable is a bit tricky, due restrict time to type the commands... and since USBasp is cheap, most prefer the "easy" way.  https://code.google.com/p/mmjoy/wiki/UpdateFirmware_eng https://code.google.com/p/mmjoy/wiki/UpdateFirmware_engInstructions for use USB cable and Flip (Google translated from Russian): Notes on using the native firmware bootloader and program Flip. (Information for users who assembly the controller from scratch) Microcontrollers "AT90USB646" and "ATMEGA32U4" from the factory have built bootloader - built-in loader flasher. Therefore properly assembled one when connected to the computer immediately recognized by the operating system. For firmware update you should download and install the free software from the site FLIP ATMEL. Link to the site download http://www.atmel.com/tools/flip.aspxTo activate the loader, follow these steps. On the boards with buttons: - Connect the board via USB - Press button RST - Holding the RST, press the button HWB - Hold down the HWB, release the button RST - Release the HWB On the boards without the button, with a jumper HWB: - Set jumper HWB - Connect the board via USB - Remove the jumper HWB If done correctly the OS will detect the new device. The name used by the microcontroller, respectively. If the operating unit is determined with an error in Device Manager, you must find the device and update the driver by specifying the source directory with installed Flip. Sokol1
Last edited by Sokol1; 08/18/14 09:17 PM.
|
|
#3997979 - 08/19/14 03:49 PM
 Re: MMJoy - Build your own USB controller
[Re: mega_mozg_13]
Re: MMJoy - Build your own USB controller
[Re: mega_mozg_13]
|
Joined: Aug 2014
Posts: 17
Lorphos
VR guy
|
VR guy
Junior Member
Joined: Aug 2014
Posts: 17
Germany
|
Hi mega_mozg_13, you're the man!
Lorphos NO NO NO "USBasp"!!! Use "JoyLoader" software for firmware updates.
OK, no need to buy the USBasp, instead I use JoyLoader during the 8 seconds that is it in bootloader mode, got it!
|
|
|
#3998511 - 08/20/14 05:40 PM
Re: MMJoy - Build your own USB controller
[Re: Sokol1]
|
Joined: May 2014
Posts: 16
Red_Yeti
Junior Member
|
Junior Member
Joined: May 2014
Posts: 16
Germany
|
OK, no need to buy the USBasp, instead I use JoyLoader during the 8 seconds that is it in bootloader mode, got it!
Tested today and it works as described. But had to use arduino IDE to get the right COM-Port.
Last edited by Red_Yeti; 08/20/14 05:41 PM.
|
|
|
#4005743 - 09/05/14 10:39 PM
Re: MMJoy - Build your own USB controller
[Re: Sokol1]
|
Joined: Sep 2014
Posts: 1
deee
Junior Member
|
Junior Member
Joined: Sep 2014
Posts: 1
|
First of, very, very nice job mega_mozg_13.
I'm in need of advise. I have a Leonardo, but i do not understand what the schemes are in mmjoy loader and which hex file to load to be able to support 8 axis etc. I have not found any explanation for scheme/hex void 6/36 nor YoZHeg 888. So which scheme/hex to use?
Just some more info: I downloaded the mmjoy_software[20140528_update2] and also 20140702_u1 from beta directory, but there's no leonardo option. The screenshot seems to indicate, that you used the pro micro FW for the Leonardo, is that correct? I hope there'll be a leonardo scheme/hex, if others can't be used.
Ok, i uploaded the pro micro FW to it for now. Had a little difficulties getting it programmed. So here's a little explanation for others:
1. Start MMjoy loader
2. Select scheme, crystal, and hex.
3. Go to device manager (from the device management or devmgmt-button), open ports (COM & LPT).
4. Press reset on the board, the device manager might refresh and show the com port.
5. After the 8 seconds of boot time, the com port might change, device manager refresh, as it did with me(which caused the difficulties), but you need to use the com port when in boot loader mode.
6. Type the port to port input (like COM5 for example)
7. Select bootloader type arduino
8. Press reset on the board and within the bootloader time (light doing the "heartbeat"-thing), press "upload firmware"
Also, found what the void 6/36-type is, in the wiki, MMjoy2 page, but don't know what YoZHeg 888 is.
Last edited by deee; 09/06/14 12:29 PM.
|
|
|
#4020734 - 10/10/14 03:11 PM
Re: MMJoy - Build your own USB controller
[Re: Sokol1]
|
Joined: Nov 2001
Posts: 3,955
Sokol1
Senior Member
|
Senior Member
Joined: Nov 2001
Posts: 3,955
Internet
|
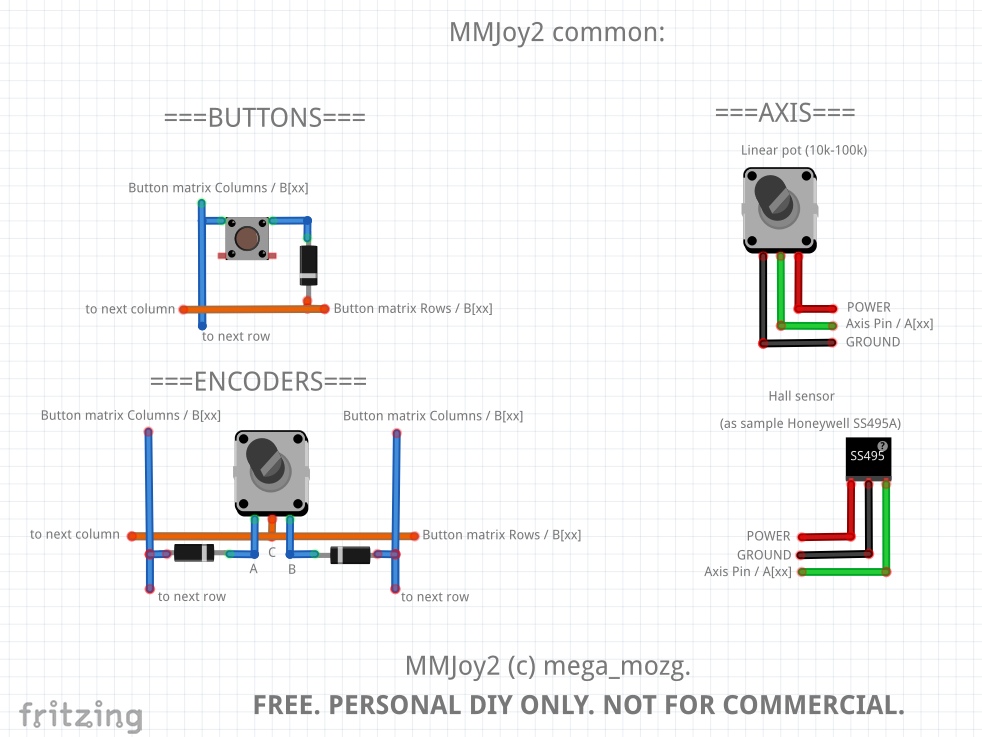
Check diode orientation, on above example they are placed with strip toward ROW.
|
|
|
#4023723 - 10/17/14 04:44 PM
Re: MMJoy - Build your own USB controller
[Re: Sokol1]
|
Joined: Jan 2010
Posts: 464
tirta
Member
|
Member
Joined: Jan 2010
Posts: 464
|
hi mega_mozg, hi sokol1, it is very nice to see you guys here.  I am excited about the new mmjoy2_beta, so it has total 16 axis and 64 buttons? and it only use one arduino pro micro? is this correct? how fast is the speed?
|
|
|
#4023800 - 10/17/14 06:28 PM
Re: MMJoy - Build your own USB controller
[Re: Sokol1]
|
Joined: Nov 2001
Posts: 3,955
Sokol1
Senior Member
|
Senior Member
Joined: Nov 2001
Posts: 3,955
Internet
|
Tirta, Yes, this last firmware create two "virtual" joysticks with one physical board, with 8 axis, 32 buttons each, this allows all buttons to be seen by Windows without use of keymapper's, simplifying map in games. To be USB 2.0 the board need use ATmega32U4 like these Arduino, but you can build your own board (maybe not cost/effective if compared to Chinese ones): https://code.google.com/p/mmjoy/wiki/MMJOY2Sokol1
|
|
|
|
|
Exodus
by RedOneAlpha. 04/18/24 05:46 PM
|
|
|
|
|
|
|
|
|
|
|
|
|
|
|
|
|
|