I'll add new information as it becomes available to me...
Pro Tip: anytime you try ANYTHING, do it on a new layer!
Naming Convention Here's OVStachel with a tip on skin naming that may save you some aggravation later on:
Originally Posted by OvStachel
This is actually correct.
For a skin, use the format...
Off_(aircraft type)_ace_t_(squadron) (year)_(your pilot name)
ex: Off_Alb_DIII_OAW_ace_t_Jasta 3 1917_Otto von_Stachel (you don't need the under score for your skin.. but I do it anyway.
OvS
Here's some more info on naming:
Originally Posted by jerbear
Hi Becker - 1- go upper left on Gimp to File > On drop down choose "Save as" > put in your file name and leave it as .xcf file > Save it in your documents file. This is only a backup and has nothing to do with export or converting to DDS. 2- go back to File > choose "Export as" on dropdown > enter you file name but change it to a bmp file. Example: Fokker DVII.bmp. > There is a dropdown list on the bottom of your export window that will say " "All export images" choose the dropdown that says "Windows BMP image (bmp) make sure you have bmp in your file name not xcf. > choose desktop as you file destination on the left side of the window.
3 - Hit the "EXPORT" button and another window will appear that asks is you want compatability options or advanced options > choose advanced options > you will be given three options 16, 24 or 32 bits > choose 24 bits and then click on "EXPORT" this will send the bmp file to your desktop.
4 - now open your DXTbmp app. in the upper left clock file then open, this will show you all the images on your desk top. > click on the bmp image you sent to desktop, then open, it will appear on DXTbmp.
5- again go to file and choose "save as" this will give you a drop down that will have DDS Texture along with some other options > click DDS texture > the file name will be on this new window but you will not see your image > change the image name so you will not confuse your new DDS image it with the bmp that is alerady on your desktop. > click on "save" and it will send the DDS image to your desktop. 6 - from the desktop you can cut the DDS image and paste it into you picture file or wherever else you want it. > you must now name the image in the correct WOFF code such as off_Fokker_DVII_ace_t_Jasta 13 1918_Hans_Butthead. 7- I usually make a copy before cutting the DDS and pasteing it in the WOFF skin folder. You can, of course put the image directly into the skin folder from desktop but I like the extra step.
This procedure should give you a DDS file of the correct size. I know it looks like a lot of step but it is very easy and becomes second nature and intuitive after a few times.
Holler if you have trouble and I or someone smarter will get back to you.
Jerry H
Fullofit offered up some useful tips for using GIMP:
Originally Posted by Fullofit
Here are some tips/shortcuts for GIMP. You can zoom in and out by using the "+" and "-" keys on the keypad. I find it faster than selecting and switching the mode from the menu. For the part where you were cutting out the background behind the cupcake you can press the "Delete" key instead of edit/cut from the right-click menu. When scaling the cupcake, you can use the "scale tool" from the long toolbox on the left side. This will give you a preview of the object as you scale it, instead of guessing by typing in the scale value. Finally, when duplicating the cupcake, I suggest to duplicate layer. This way you will avoid accidentally moving the first cupcake, like it happened in the "fast forward" sequence. You can also move the second cupcake directly down by pressing the directional arrow keys - should help with precise positioning.
I decided I wanted to come up with a new paint scheme for Rick Rawlings flying the N17.
I wanted an alternating red/black pattern on the cowl, but had no idea how to divide it. So I added some color swatches to help define where things were going to be: I was then able to use the ruler in GIMP to come up with a cowl that works pretty well: You'll notice that despite my measuring it, the bars are still not evenly spaced: For more on that, see Olham's tip below!
Then I decided I did not like the basic white body paint and wanted to do something different. I figured gray would be cool, so I painted (on a new layer, natch!) the body gray: Yikes! That looks terrible! But, by using the Layer properties and layer opacity (circled in orange above), I can get some cool effects. Multiply produced this: Nice! But I decided to go with Subtract: That gives it a nice cool charcoal appearance that looks like this in game:
You can raid other skins and cut and paste them into the one you are working on. Here's a brilliant Albatros by RAF Louvert:
And here is his explanation of how he got the upper wing to work:
Originally Posted by RAF_Louvert
OK Rick, here goes. Just remember you asked.
In order to keep all the subtle wing detail and texture I chose not to do the stripes as an opaque overlay but rather as a colored layer of the existing top wing found in the WOFF Alb skins. To do this I first grabbed a clip of the red top wing surface from MvR�s Alb found in the �WOFF� skins folder. Using copies of this clip I then changed the hue and the intensity to achieve the yellow and blue I wanted for this project, placing the yellow layer on top of the blue layer.
Next, working in a transparent layer, on top of the yellow layer, I snapped the edges of the diagonals using 2-pixel-wide lines in the same average color as the blue layer beneath. I laid out these lines for the portside first then duplicated the layer and flipped it horizontally in order to have a mirrored layout. I then made minor adjustments to both of these layers until the point of the center inverted �V� was exactly in the middle of the wing and slightly back from the leading edge. After this I merged the two layer together, saved a copy of the merged layer for the �just in case� scenario, and then merged the �lines� layer onto the yellow layer. At this point I had a yellow top wing with narrow blue diagonal lines on it.
Now comes the magic. Using the �wand� tool, I highlighted the areas that I did not want yellow in this layer and simply deleted them. Viola! You have a top wing that has alternating blue and yellow diagonal stripes and you still have all the subtle details and textures. BTW, I did the 2-pixel-wide lines in blue so that any tiny bits left behind by the �wand� tool would not be seen as they would match the blue layer beneath.
I then added another transparent layer to snap the narrow black dividing lines between the colors. A few adjustments to color intensity and the top wing stripes were done, or so I thought until I took a test run in the sim and found all the wrap distortions on the wing. At this point all a person can do is either scrap the idea altogether or start making minor adjustments until the distortions are nullified. I went with the latter option as I am a glutton for punishment.
I should mention that the crosses and aileron hinges were laid on top of the finished wing in their own layers so that I could fine tune the placement of these items.
A lot of work indeed, but outstanding results. Here's how the texture looked in the .dds file: You'll notice there are some places that are offset. This is because the model is not perfectly smooth, so there is some distortion. You could play around with it for a bit, or you could try Olham's idea:
Originally Posted by Olham
A tip for those who are getting desperate with distortions: if you can work with layers, you could copy milimeter- or math paper from a web pic, and put it on the wings and fuselage. Either half transparent, or, if you can't do that, you must cut it so, that you still recognise enough of the underlying skin parts.
Over that layer, you work out your paint job. Now make a DDS-file from that, go into WOFF and make screenshots from all angles. Make corrections and repeat that proceedure. When everything is fine, switch off the math layer or delete it. That may help you to aligne the stripes correctly (although with my "Quillfish" Alb I gave up at some point and thought "What the hell...!")
So, if you took Olham's advice, you could find a pattern on line like this:
If you put that as a texture over your basic Nieuport skin, you would get this: Interesting, but if you drop the opacity and change the layers properties, you get this:
These should help you line up some of the peculiar bumps and protrusions of your 3D model overlaid by a 2D skin... then just delete the grid layer when you are done!
Here, Cavaliere57 talks about selecting and changing colors directly, and uses Photoshop to do so:
Originally Posted by Cavaliere57
Rick asked me to explain a couple of things after i published my Camel skin, in the screenshot thread, here we go. I use Photoshop CS6 64bit,but it applies with most all versions of Photoshop,except probably those prior to the CS series but only because something has changed in the Tools menu,basically they relocated something here and there.
Here is the basic Camel skin from which to start
starting from the background layer (the only one present at this point)select the upper wings and elevator surfaces
now with Ctrl-V copy the selection,and then Ctrl-C to paste it as a new layer,rename it as you wish,I use parts names
as you can see we have a new layer with only upper wings/elevator surfaces ( I have disabled the background layer to have a better view of it)
with the new layer active,from Selection menu,reselect again
from the Image menu,select the Substitute Color Tool
from the Substitute Color mask,clicking on the upper thumbnail,activate the color picker
point it to the brown on the wing
you now have a working color selection to work from,move the slider to the right to catch all the brown hues
now moving the lower sliders,get the color you aim for,desaturate always a bit and do not brighten too much,instead go for darker shades
now go again and select the lower wing/elevator surfaces,on a new layer, and chenge their color as well
we now have Green wings and light azure lower surfaces
From the Background layer,using the Lasso Tool instead of the previous Rectangular Selection Tool,select the lower fuselage section,as always Ctrl-C and Ctrl-V to paste as a new layer,name it and go changin' the color again,but this time keep active the lower wings layer,so to match colors
repeat the process with the rudders
we now have a Camel with green body/wings and azure lower surfaces,and five more layers
starting always from Background layer,select (wit Round Selection Tool) the wheel,and repeat all the process
Now select with Rectangul selection Tool,the engine cowling,copy and paste as new layer,rename it,and create stripes like these,with the Rectangular selection tool,and color them as the fuselage
et voila,our Camel is nearly ready to go
Let's add an emblem and some text
save as .dds directly from Photoshop
and here we are!!
Sometimes layers can save you in a different way... Here's the Amerispad skin I was working on for my latest challenge: I spent quite a bit of time working on it and liked the basic idea, but when I looked at it in game, I was getting this: It's not terrible, but it's just a bit too garish, too primary colors... Now I could go back and re-tune all the color layers, but I asked myself what I wanted to accomplish, and I decided I just wanted to take it down a notch, just de-saturate a bit on the added colors. So I created a new layer and put a bit of tan over the other colors: Then by dropping the opacity of the new layer waaaaaay down, I got this: In game, that looks like this:
which was much closer to what I wanted in the first place. Using a couple of layers like this, you could add progressive grime as you plane ages, if you want the ultimate realism, which that flag skin certainly isn't!
Nietzsche just revealed a fantastic new camel skin:
Here's how he did it:
Originally Posted by Nietzsche
Well, I use the Gimp. First Thing I do is, "cutting out" everything and turning the Parts into different Layers (makes future Modifications more easy). Then I turn all of it into a Grey "Color" of the same Brightness. If I want to add a little Depth here and there, I play around with Color-Curves. Then I rebrush everything, that I don't want (Stripes, Numbers etc.). Next, I multiply the Layers and tint them. After that, one can use different "Eraser-Rubbers" to get a Pattern, or one can sharply cut out Areas for Stripes or so. When finished, I combine all the Color-Layers and use a fuzzy Brush to erase some of the Color, so it gets grey again - looks like the Paint-Job is peeling off here and there. In the End, you can finish your Texture "by Hand" with a bit extra Mud, or Ornaments or whatever you like. If you want good Camo-Colors, use light Versions of Brown, Green and Yellow, fade away most of the Color and add a Bit of Blue into them. I hope, that helped a little.
Here's more Nietzsche goodness!
Originally Posted by Nietzsche
Okay, I've tried to make a Tutorial about Layers and Transparency for the Gimp. I hope, that I managed to make it understandable for those, who are relatively new to the Gimp as well (that was my focus)
end result:
Originally Posted by Olham
I have researched the German Lozenge camouflage a bit (mostly at [b][color:#000099]THE AERODROME[/color][/b] website). I also saw Lozenge fabric on a Halberstadt tailplane in the BERLINER TECHNIKMUSEUM, and took a photo.
From what I have found, I have then made 5-colour and 4-colour Lozenge fabric for both, upper and lower surfaces. Lozenge camo was screen-printed on endless panels of canvas with a width of ca. 4.5 feet (if I remember that correct).
My 'panels' here are layed out horizontally, but on an aircaft wing they were used "vertically", or better: in flight-direction. Everyone can copy and use my Lozenge camo for their own skins - enjoy the skinning!
Last edited by Rick_Rawlings; 11/20/1903:32 AM.
The older I get, the more I realize I don't need to be Han, Luke or Leia. I'm just happy to be rebel scum...
I need some help, please. I'm wanting to paste a purple heart onto the fuselage of my Pfalz, but all the .jpg files I find on the internet are hearts on a white or black background. The Pfalz fuselage is gray.
In gimp, is there a way to "lift" the heart off its white background and paste it onto the fuselage. The way I've tried so far, with mixed results, is to paste the the .jpg onto the fuselage as a new layer, then try to erase the white part around the heart. This is tedious and difficult. Thus, I'm hoping that there is a much easier way to accomplish this.
Thanks for any advice or suggestions.
I7-9700k@4.9 GHZ 16 GB RAM GTX 2080 8 GB VRAM 2 x 1 TB SSD 32" Dell S3220DGF curved gaming monitor @ 2560 x 1440p @ 165 Hz Sound BlasterX G6 External USB sound card Beyerdynamic DT 770 Pro Headphones Thrustmaster TM16000 FCS HOTAS Logitec Pro Flight Pedals TrackIR 5
Slick, once you paste your heart in as a new layer, use the "magic wand" tool which looks, well, kind of like a magic wand! It is up by the lasso looking tool at the top of your tool dock. Touch the white area once and that should select all the white. Then right click and cut and it should be gone, with maybe some minimal erasure cleanup after. Let me know if that works or makes sense...
The older I get, the more I realize I don't need to be Han, Luke or Leia. I'm just happy to be rebel scum...
Slick, you can also open the image "as layer", scale it to the size you want, right click on image, "layer", "transparency", "color to alpha". Whalah, only the image is left.
Never approach a bull from the front, a horse from the rear or a fool from either end. BOC Member since....I can't remember!
gaw, if you have more than one layer, make sure the layer you want to work on is the activated one. Otherwise you cannot work on it's content.
If you have inserted a JPEG or whatever, and want to delete the white surrounding your object: - highlight the layer in the "layers" menue - select the white with the "magic wand", and delete it with "delete"
It is also possible in Photoshop to open a JPEG or other picture, unlock the layer in the "layers" menue (which puts the image over a transparent background now), and then select and delete the white. The image you now have - let's say a purple heart over a transparent background - can be saved as a GIF format. A GIF allows transparency.
Now you could always copy and paste that Purple Heart GIF into any skin works, and it should show no white surrounding.
Vice-President of the BOC (Barmy OFFers Club) Member of the 'Albatros Aviators Club' - "We know how to die with Style!"
I searched every file in the WOFF directory with no luck.Its no big deal as I just wanted to rotate the compass so that when I look at it I do not have to do the calculating in my noggin of where its actually pointing.
Alrighty...just downloaded Gimp and now am getting ready to watch the video. Hopefully I'll be painting shortly. Always like a personal skin when I get 5 victories. Kind of an award to myself especially since I don't often live that long.
EDIT: Very nice job on the video Rick. Even a graphics nit-wit like me should be able to do some passable work now. Layers! Gotta remember to use layers!
Yes, forgetting to put everything in a new layer has caused me multiple headaches... also, don't forget that you can drag layers around in the layer dock to get the one you want on top, so if you can't see something, make sure that layer is above the others. Oh, and ask questions! We have some great artists on here and if you can think of something you want to try, they can point you in the right direction!
The older I get, the more I realize I don't need to be Han, Luke or Leia. I'm just happy to be rebel scum...
The layer thing is working just fine though I find paint.net a little easier to use perhaps as I did a few skin mods in the OFF days.
One thing I am finding is with the opacity of colors on a layer. In the paint.net preview screen I give the color opacity so the original aircraft detail is still visible underneath. However in the sim the color looks quite solid with no detail visible. Now this could be due to a million factors, lack of experience being A#1, but do you find in preview Gimp is more aucurate as to how the skin will look in-game? If you have any experience with both programs that is.
Hey Duke, I've never used paint.net, I think Louvert does though, and he gets masterful results, as you can see on the first page. Maybe he'll see this and chime in. Perhaps there is a "commit" option you need to click to get the preview to show up on the final screen? From what I've seen, GIMP is pretty much a WYSIWYG kind of deal: It pretty much shows up as it will in-game.
Maybe post some screens of what you are geeting in paint, vs. how it looks in game and we can help more?
-Rick
The older I get, the more I realize I don't need to be Han, Luke or Leia. I'm just happy to be rebel scum...
Just a question for aircraft that have numbers on the side of the fuselage.
If I look at the Camel_sqd_t the fuselages point left and right and the number is easily visible - B6224 If I look at the Default_t_1916_Bri of the Sopwith 1� strutter both fuselage sides point left and one of the sets of numbers is a mirror image of 9488.
So, firstly, why is this? Secondly how do we do mirror image letters and numbers in GIMP?
Jim You can cut out the fuselage and flip it horizontal so it is not mirror, do the lettering, and flip it back. This is a very brief description but I think it will give you a lead. You can also create a mask layer and then generate the letters and then flip it horizontal to get mirror image and then place it appropriately
(System_Specs)
Case: Cooler Master Storm Trooper PSU: Ultra X3,1000-Watt MB: Asus Maximus VI Extreme Mem: Corsair Vengeance (2x 8GB), PC3-12800, DDR3-1600MHz, Unbuffered CPU: Intel i7-4770K, OC to 4.427Ghz CPU Cooler: Cooler Master Seidon 240M Liquid CPU Cooler Vid Card: ASUS GTX 980Ti STRIX 6GB OS and Games on separate: Samsung 840 Series 250GB SSD Monitor: Primary ASUS PG27AQ 4k; Secondary Samsung SyncMaster BX2450L Periphs: MS Sidewinder FFB2 Pro, TrackIR 4
Thanks I'll give it a try. I want to create the most famous Camel of all - B6313
That camel was already created by me in OFF and now it exists in WOFF. In all it's variants I believe it is still available as a download from CA
Last edited by Robert_Wiggins; 10/18/1404:32 PM.
(System_Specs)
Case: Cooler Master Storm Trooper PSU: Ultra X3,1000-Watt MB: Asus Maximus VI Extreme Mem: Corsair Vengeance (2x 8GB), PC3-12800, DDR3-1600MHz, Unbuffered CPU: Intel i7-4770K, OC to 4.427Ghz CPU Cooler: Cooler Master Seidon 240M Liquid CPU Cooler Vid Card: ASUS GTX 980Ti STRIX 6GB OS and Games on separate: Samsung 840 Series 250GB SSD Monitor: Primary ASUS PG27AQ 4k; Secondary Samsung SyncMaster BX2450L Periphs: MS Sidewinder FFB2 Pro, TrackIR 4
Just a question for aircraft that have numbers on the side of the fuselage.
If I look at the Camel_sqd_t the fuselages point left and right and the number is easily visible - B6224 If I look at the Default_t_1916_Bri of the Sopwith 1� strutter both fuselage sides point left and one of the sets of numbers is a mirror image of 9488.
So, firstly, why is this? Secondly how do we do mirror image letters and numbers in GIMP?
Sorry I'm jumping in late on this thread...
Always remember, you make the skin to fit the model. However the model is set to map to the skin position is how you have to setup the detail and additional artwork of the skin template. So there are many trips to the drome to take to test everything out that you add in.
OvS
The Black Baron of Boistrancourt returns!!
I'd rather die fighting, than live for nothing. - Gen. G.S. Patton
My first attempt is really basic. Not worth a new thread. I have simply extended 54 squadron's themes (Number and Initials) to my pilot, painted the rear part of the cowling and added a ring to the wheels for ease of identification.
There are scratches that I have painted in to the panels that really don't show. It's a really simple skin, but it is my first, so that's what you would expect. I hope anyway.
Help! I'm trying to complete my first skin and I've watched the skinning tutorial and when he gets to the part where he is saving his skin in GIMP to the extended bmp, he selects it from a drop-down menu that has a number of extension options. My problem is when I try to do that in GIMP I only have about 4 options and I definitely don't have the Windows bmp option. What do I do?
Member and provider of banjo music for the Illustrious BOC
You actually want to click "File" and then "Export", not save, then all those options will be available! Also, make sure you click "Advanced Options" and save it at 24 bit: Hope that helps! Show us a picture when you are done!
The older I get, the more I realize I don't need to be Han, Luke or Leia. I'm just happy to be rebel scum...
Ok, so once you saved it as a windows bitmap, you opened it in dxtbmp and saved as a.dds file in the correct folder following the naming convention? Talk me through what you've done a bit and we'll see if we can get you back on track...
The older I get, the more I realize I don't need to be Han, Luke or Leia. I'm just happy to be rebel scum...
That was the strangest thing, I was able to save it as a DDS file into the correct folder but when I would select it for my pilot it would assign a different skin. I had saved it with my pilot's name and so on a whim I changed it to my real name and that worked. I'm really puzzled by this one. Anyway, I've included a screenshot of my first skin. It's real simple, I just took the standard skin for Jasta 1 and added an emblem.
Member and provider of banjo music for the Illustrious BOC
In case I've forgotten, thanks for the tutorial. It really helped a lot and has gotten me excited about creating some original skins. When you save them, do you save them under your character's name or under a totally different naming convention?
Member and provider of banjo music for the Illustrious BOC
I'm glad it worked for you, that looks like a great start! Honestly, I don't really understand the naming convention, sometimes it works for me sometimes not. I just pick an ace's name with the same plane in the same squad and erase his name and put mine, even preserving the underscores. Maybe Olham or someone who has a better handle on what's important will chime in. Keep us posted on your progress!
The older I get, the more I realize I don't need to be Han, Luke or Leia. I'm just happy to be rebel scum...
Hey Rick, check out my new skin for my pilot flying for Jasta 4. He is from a minor noble family in Silesia and I thought it would be cool to include the lower Silesian coat of arms since he is from Gorlitz. Anyway, what do you think?
Member and provider of banjo music for the Illustrious BOC
Thanks, part of the role playing for me is to use the default skin for the Jasta and assume that my pilot would start with that. Anyway, I've definitely been bitten by the skinning bug.
Member and provider of banjo music for the Illustrious BOC
Lovely skin and at leas for awhile you will lose some flying time to your new hobby.....skinning!!
(System_Specs)
Case: Cooler Master Storm Trooper PSU: Ultra X3,1000-Watt MB: Asus Maximus VI Extreme Mem: Corsair Vengeance (2x 8GB), PC3-12800, DDR3-1600MHz, Unbuffered CPU: Intel i7-4770K, OC to 4.427Ghz CPU Cooler: Cooler Master Seidon 240M Liquid CPU Cooler Vid Card: ASUS GTX 980Ti STRIX 6GB OS and Games on separate: Samsung 840 Series 250GB SSD Monitor: Primary ASUS PG27AQ 4k; Secondary Samsung SyncMaster BX2450L Periphs: MS Sidewinder FFB2 Pro, TrackIR 4
It's been a long while since I've done any skinning, but last night I gave it another go. I modified a Jasta 5 Albatros. I opened it with DXT Bitmap & passed it on to Photoshop CS3, did the work, and saved it back to the OFF Skins folder as a .dds. But it won't show up in the skins list in Quick Combat. So I dragged it to the desktop and put it in the WOFF Skins. Still...no go. Here what I titled it. Any ideas on why it doesn't want to show?
off_Alb_DV_later_Ace_t_Jasta 5 1917_Hauksbee.dds
Once we get this sorted, is it possible to preface the Skin title with *, or _, so it appears at the top of the list? (t'would save search time since there's a lot of them.)
Last edited by Hauksbee; 03/17/1508:34 PM.
In theory, there is no difference between theory and practice. But in practice, there is.
Well, there's a couple of possibilities here. One is you may have modded a DVa (for example) skin but labeled it something different and then selected the wrong Albatros type in the QC menu... I have done that before. Try picking some of the other Albatros types and see if it shows up. I have also done everything correctly and it still didn't work. If you can't find it as one of the other Albatros types, delete it from both skins folders, restart your computer and run it through DXTBMP saving it in the campaign skins folder and run WOFF again. Let us know if either of those work and we can take it from there!
The older I get, the more I realize I don't need to be Han, Luke or Leia. I'm just happy to be rebel scum...
Well, there's a couple of possibilities here. One is you may have modded a DVa (for example) skin but labeled it something different and then selected the wrong Albatros type in the QC menu... I have done that before. Try picking some of the other Albatros types and see if it shows up. I have also done everything correctly and it still didn't work. If you can't find it as one of the other Albatros types, delete it from both skins folders, restart your computer and run it through DXTBMP saving it in the campaign skins folder and run WOFF again. Let us know if either of those work and we can take it from there!
Thanks, Rick. I've already checked every Alb. variant. It doesn't show up at all. I'll delete and run DXT Bitmap tomorrow.
In theory, there is no difference between theory and practice. But in practice, there is.
One thing I have noticed is that WOFF is very particular on how the skin is named. For example I put DIH in the name of the skin and it would not show in-game. Showed in the list, and was selectable but it would not appear in flightt - the default skin would. I had to change it to D I H (just as an example) to get it show actually in flight.
Well, there's a couple of possibilities here. One is you may have modded a DVa (for example) skin but labeled it something different and then selected the wrong Albatros type in the QC menu... I have done that before. Try picking some of the other Albatros types and see if it shows up. I have also done everything correctly and it still didn't work. If you can't find it as one of the other Albatros types, delete it from both skins folders, restart your computer and run it through DXTBMP saving it in the campaign skins folder and run WOFF again. Let us know if either of those work and we can take it from there!
Thanks, Rick. I've already checked every Alb. variant. It doesn't show up at all. I'll delete and run DXT Bitmap tomorrow.
It doesn't look like it wants to work. I dragged it from the OFF Skins, to the Desktop, launched DXT Bitmap, chose Adobe CS3 as the Editor, sent the .dds skin to Photoshop, then saved the Photoshop back to WOFF Skins as .dds. When I go to QC there are only four personal skins listed, plus a dozen or so which are just by Jasta and date.
Last edited by Hauksbee; 03/19/1505:09 AM.
In theory, there is no difference between theory and practice. But in practice, there is.
Good and bad news. Sometimes you have to add the file to the skin folder, run WOFF, take it out, run it again and put it back before it will work, I have no idea why...
Here's what I got to: Which gave me the default Albatros skin the first time but when I went through the above rigamarole, it worked! Now, you'll notice things don't quite line up... so I did some investigating and it looks like you used an Albatros DIII as your base skin, which does not line up with the DV series base skins, especially in the wheels... If you use something like Irfanview, you can cycle through the Albatros skins and you will see the components are not all in the same spot on the template... So, a quick rename later produced this:
which looks like this:
if you wanted to continue the texture onto the top of the fuselage (which I am suspecting you do) from looking at the bottom picture, I think you can see what you need to fix.
So, here's what you can do... Enjoy your Albatros DIII career by renaming your skin :
Off_Alb_DIII_OAW_t_Jasta 5 1917_Hauksbee
Or, through some clever cutting and pasting, you can transfer your skin to the DV skin you want, in which case I named it:
off_Alb_DV_later_Ace_t_Jasta 5 1917_Hauksbee_1
Remember, from Photoshop, you want to export it to a Windows Bitmap at 24 bits, run it in DXTBMP and save as a .dds to
Phew... let me know if that makes sense...or works!
Last edited by Rick_Rawlings; 03/20/1512:44 AM.
The older I get, the more I realize I don't need to be Han, Luke or Leia. I'm just happy to be rebel scum...
Remember, from Photoshop, you want to export it to a Windows Bitmap at 24 bits, run it in DXTBMP and save as a .dds to Skins. Phew... let me know if that makes sense...or works!
That was some fancy footwork, Rick. Thank you very, very much. This morning, I also noticed that I had forgotten to continue the stripping over the top deck. (asleep at the switch)
Your instructions seem pretty straightforward. I'll jump on this tomorrow and report back. Thanks again!
In theory, there is no difference between theory and practice. But in practice, there is.
Remember, from Photoshop, you want to export it to a Windows Bitmap at 24 bits, run it in DXTBMP and save as a .dds to Skins.
Forgot to ask if it is absolutely necessary to export from Photoshop at 24bit Bit Map, then run it thru DXTBitmap to a .dds, when it's possible to Save As .dds from Photoshop itself. This is what I was doing before, and might be part of my problem.
In theory, there is no difference between theory and practice. But in practice, there is.
'Near as I can see, you can't Export from Photoshop as a 24-bit Bitmap. The choices I get on Export are: Data Sets As Files... (grayed out) Paths to Illustrator... Render Video... Send Video Preview to Device... Video Preview... Zoomify...
If I settle for a simple 'Save As Bitmap" will that be 24 bit?
In theory, there is no difference between theory and practice. But in practice, there is.
Well...I finished the skin. I made two .dds files, one each with the naming suggestions you offered. Nothing shows in the lists. I tried taking one out, leaving the other. Then launching WOFF, closing out, re-starting and checking. No go. Did a re-start of the computer. Still nothing. Where to...?
In theory, there is no difference between theory and practice. But in practice, there is.
I'm coming late to this thread but you could try this to help narrow down the problem. Take one of your .dds files and rename it to exactly the same as an "HA" that already exists, but append the number 2 as the last character in the name.It should now show up in the list.
Also make sure that the squadron you are planning to use it in actually has this type of aircraft or it won't show up in the list.
If you have already tried this, then I suspect there is some problem with the rendering of the .dds file and that it is not the proper .dds type.
Hope this helps
(System_Specs)
Case: Cooler Master Storm Trooper PSU: Ultra X3,1000-Watt MB: Asus Maximus VI Extreme Mem: Corsair Vengeance (2x 8GB), PC3-12800, DDR3-1600MHz, Unbuffered CPU: Intel i7-4770K, OC to 4.427Ghz CPU Cooler: Cooler Master Seidon 240M Liquid CPU Cooler Vid Card: ASUS GTX 980Ti STRIX 6GB OS and Games on separate: Samsung 840 Series 250GB SSD Monitor: Primary ASUS PG27AQ 4k; Secondary Samsung SyncMaster BX2450L Periphs: MS Sidewinder FFB2 Pro, TrackIR 4
Take one of your .dds files and rename it to exactly the same as an "HA" that already exists, but append the number 2 as the last character in the name.It should now show up in the list. Also make sure that the squadron you are planning to use it in actually has this type of aircraft or it won't show up in the list.
Greetings, Robert. I am sad to report that I came a cropper on your suggestions too. First, this is a Jasta 5 skin. In QC I have the date set at 1917. I've got my area set to Flanders, the airfield Boistrancourt. (Jasta 5 flew out of Boistrancourt from March 11, 1917...for a year.)
I tried re-naming my skin with the text from a HA, Kurt Student. I appended the '_2'. No go. Tried doing a re-start. Nothing.
I find it odd that when I choose a D.V, and go to skin it, there are no Jasta 5's on the list. Here's all that shows: Jasta 12 Adolph von Tutschek Jasta 21 Eduard Ritter von Schleich Jasta 27 Hermann Goring Jasta 32 Rudolph Windisch Then a list of Jastas only: 10/12/13/17/17 19172/21/27/32/ & Default
I then decided to modify with a name that did show up in the lists. I named my skin with the text from Eduard Ritter von Schleich (_2) It too, did not appear among the WOFF skins. Playing a long-shot, I added it to the OFF skins. Still nothing. Did another re-start. All same-same.
Rick: I will be sending on my original Photoshop doc., plus the Eduard von Schleich_2 doc. Thanks, guys.
In theory, there is no difference between theory and practice. But in practice, there is.
Whew, OK, Hauksbee, don't feel too bad, I had a nightmare getting this to work, so it's not just you. One thing I noticed if you want to use this as a DV, you still have an Albatros DIII skin as your base, so when I loaded it as an Albatros DV skin, it looked like this: You can see where the arrows above point to, the textures don't match up. Here's why: As you can see, your wheel texture is located where the DIII wheel is on the right, not where the DV wheel is in the middle. When I loaded it up as a DIII, it looked great!
What I would do is to open up any DV skin in Photoshop and then (in new layers of course!) cut and paste your elements over where the DV elements are. Everything should be ok then.
Now, for a couple of thigs...
1) I used your .bmp, so the 24 bit thing shouldn't be a problem.
2) When you dxtbmp it, make sure you save it in this format:
3) With all of that, I still had a hell of a time getting it to register in game (no problem selecting it, it just wouldn't be that skin when I loaded) I've had this happen a lot with my own skins. I would put it in the folder, run the game, take it out, run the game again, put it back...blah. What I think finally worked was that I tried to select it, exited the mission when it wasn't the right skin, went back to the main menu, alt-tabbed out of the game, renamed it in the skins folder ( I just changed the squad number) and then ran it and it finally worked! So don't give up, the file is OK, it's almost like you have to fool the game into selecting the new skin and then everything is cool.
4. Also, working with Albatroses is difficult, because the name in the game is different from the skin name. So an uprated DV in the game is a DV 200 skin (or vice verse, can't remember). You're right, there aren't that many DV ace skins and none of them from Jasta 5. When you make the changes to the skin above, just name it in a squad that has aces in it (so off_Alb_DV_Ace_t_Jasta 10 1917_Hauksbee, for example) and it should work. After doing all the tricks I said above, of course!
I'm going to send you back the .dds as an Albatros DIII so you can at least enjoy your hard work. Put it in the campaigns/skins folder and let me know if it works!
RR
Last edited by Rick_Rawlings; 03/23/1501:36 PM.
The older I get, the more I realize I don't need to be Han, Luke or Leia. I'm just happy to be rebel scum...
Well, I'm back to it, and still no success. This time I decided to take a skin that was already in the list and modify it. I chose Werner Voss. I opened the Voss skin, then opened mine, and copied the top 4/5 and pasted it into Voss. Then saved it as DDS DXT1 (No Alpha) and went to QC. My "Voss" skin does not appear. Tried re-starting. No go. I continued to work at it and things got stranger. I found it difficult to find the skin I wanted in DXT Bitmap. The little bitty search window only displays three names at a time and it got tedious (quickly) paging through them. Plus, I couldn't be absolutely certain that I got them all. So I opened the C: drive so I could see the skins in a full page format, and dragged all the Voss skins to a folder on the desktop. I re-made the Voss/Hauksbee skin and re-inserted it into the skins folder. It is now the only one. 'Went to QC>Field and there's an Alb. with a Jasta 2 skin! Even though both Jasta 2's are on the desktop. I pulled my skin out. Now there are no Voss skins at all. Went to the Field and there it was again: Jasta 2. For some reason, my skin is invisible even though I did not alter the naming at all. In fact, that was why I chose Voss in the first place: just do a quick paste-in and save it back. How would the game know I had even been there?
Other oddities are; There's a Jasta 5 skin, and a Jasta 29 skin listed for Voss in QC, but those skins do not appear in the skins folder. Furthur, there are names that appear in the skins folder, like Bruno Loezer (always loved that skin) who do not appear in the QC queue, no matter which D.III variant you chose. Is Loezer chooseable at all?
So...that's the current state of my confusion. .
In theory, there is no difference between theory and practice. But in practice, there is.
Hey, Hauksbee, skin looks great! If you look under the aircraft folder you will see that each aircraft has some default skins, that is probably where the game is pulling them from. My recommendation at this point is to post some detailed screenshots of what you are naming things and where you are putting them. That might help us track down the problem. None of the files you have sent me have been bad, so I am guessing a naming or placing error
The older I get, the more I realize I don't need to be Han, Luke or Leia. I'm just happy to be rebel scum...
Rick: Not sure what you mean by "under the aircraft folder". Where is that? Recall that I pulled all the Voss skins out of "Skins" and stashed them in a desktop folder. Then I put one back and altered it. Did not change the file name in any way. Then I launched WOFF and tried to QC with each of the D.III variants. Instead of getting my skin, WOFF chose a Jasta 14 skin every time. Where is that coming from? It's in the desktop folder! My Voss skin is not being stored in the "Default" folder either. I launched each of the D.III's with Default skins. They're all different. That only leaves us with 'placement error'. How to unravel that? .
In theory, there is no difference between theory and practice. But in practice, there is.
Hey Hauksbee, this is where you are putting your skin and where you have pulled them from: Now, if you look at this path: you will notice that each aircraft has a "default" folder which I believe is where the game pulls the texture from if there is something "wrong" with the skin you call for. So I think that is where you are getting your textures from. Now in game, you should be seeing something like this in the QC: So if you can select the skin you want from the pulldown box, it means that the "naming" of it is correct. The reason it shows up as a different skin in game is...something I have never figured out. I suspect there is some log file that has to be overwritten that keeps your last skin memorized for speed...maybe? Perhaps a dev or someone more knowledgeable than me will chime in. If you are getting to this point, try the tip I outlined above:
Originally Posted By: Rick Rawlings
With all of that, I still had a hell of a time getting it to register in game (no problem selecting it, it just wouldn't be that skin when I loaded) I've had this happen a lot with my own skins. I would put it in the folder, run the game, take it out, run the game again, put it back...blah. What I think finally worked was that I tried to select it, exited the mission when it wasn't the right skin, went back to the main menu, alt-tabbed out of the game, renamed it in the skins folder ( I just changed the squad number) and then ran it and it finally worked! So don't give up, the file is OK, it's almost like you have to fool the game into selecting the new skin and then everything is cool.
It's a pain, but once it works once, you shouldn't have any further problems. Let me know if that works or if I am right on where you are in the process!
R
The older I get, the more I realize I don't need to be Han, Luke or Leia. I'm just happy to be rebel scum...
...if you can select the skin you want from the pulldown box, it means that the "naming" of it is correct. The reason it shows up as a different skin in game is...something I have never figured out. I suspect there is some log file that has to be overwritten that keeps your last skin memorized for speed...maybe? Perhaps a dev or someone more knowledgeable than me will chime in.
Back again. First, it's not a matter of selecting the skin I want, and then having a different one appear in the game. In your pulldown box, you have "Hauksbee" appearing. I can't get that far. Second, for the D.III skins, you have a significently different list of pilots. My list is: Lowenhardt Voss v. Richtofen Voss Sturm Strobel Nathanel Rumey
It's as though we're dealing from two different decks. And then there are the pilots that I know are in the Skins List, but never appear in the pulldown. Like Bruno Loezer. What's with that?
I thought I might be able to do an end-run around this jinx by simply doing another skin. I did a Dr.1 (Kempf's "kennst mi'noch") I went through the same process (1) Do the skin, changing only my name for his. No go. (2) Keep the name untouched, and paste my skin over his. Nothing there either.
I feel that somehow, my Skins Folder is not playing by the same set of rules as everyone else's. .
In theory, there is no difference between theory and practice. But in practice, there is.
Hmm, you should be putting them in the folder from my top screenshot... the blahblahblah/CampaignData/skins folder. If you are, it should appear in the pulldown box if you a) named it in an acceptable format (which I would guess you did if you just copied another ace name) and b) the name agrees with the type of skin you selected i.e. trying to select a DIII early when you named it as DIII updated. If all those things check out, you may want to try a fresh install? Sounds like a pain, but this seems unusually difficult...
The older I get, the more I realize I don't need to be Han, Luke or Leia. I'm just happy to be rebel scum...
It's looking like you're right: a re-install is the way to go. Just to be sure I've got this right (and perhaps belaboring the obvious into the bargain) you're not (are you?) suggesting me putting my skins in the "aircraft" folder? The Campaign>campaign data>skins is the right choice? Because that's where they've all gone...back to where I got them originally.
In theory, there is no difference between theory and practice. But in practice, there is.
As for Rick Rawlings request I post here my solution for Hauksbee skin problem.First error he made was the choice of texture file,he wanted to create an Alb DV "later" skin,but started out with an Alb D III "early" skin,and so incurred in wrong texture mapping over the 3D model,you can see it clearly from the screenshot:
you can see the mapping errors now a screen with the DIII "early" and the same texture,it's perfect!
then the main thing was to correct the file name he had this off_Alb_DV_later_Jasta 21 1917_Eduard Ritter von_Schleich_2.dds WOFF does not like anything after "name_surname" statement,so off_Alb_DV_later_Jasta 21 1917_Eduard Ritter von_Schleich2.dds that's it. EDIT: just a bit more advices,if you can, use Adobe Photoshop,and stick to version CS6 (64 bit for windows 7 64 bit users) that's because that way you can benefit from N'vidia Tools,for perfect conversion to .dds file type,you don't need an external format converter,you can open them directly from Photoshop and save them from there.Later versions (Creative Cloud or CC) are not supported anymore by N'Vidia Tools,so far so....another advice it's to grab Sagethumbs this simple software makes you visualize .dds files into Windows explorer as thumbnails,and right clicking it it displays a bigger image with all data about the texture file,very usefull,no need to external viewing softwares anymore.
It's as though we're dealing from two different decks. And then there are the pilots that I know are in the Skins List, but never appear in the pulldown. Like Bruno Loezer. What's with that?
...I feel that somehow, my Skins Folder is not playing by the same set of rules as everyone else's.
(Hauksbee here) Getting back to my skinning problem, I believe the above quote holds, and I need a re-install. It worked when (for reasons unknown) I lost all the Albatros skins. On that occasion, I simply bought another copy of WOFF. Fool that I was, I did not make a back-up copy. Now I need one. I find on the WOFF Home Page that a Duplicate copy can be got for a $5.00 charge. But I don't see anything clickable to make this happen. Could someone point me in the right direction?
(Hauksbee here) Getting back to my skinning problem, I believe the above quote holds, and I need a re-install. It worked when (for reasons unknown) I lost all the Albatros skins. On that occasion, I simply bought another copy of WOFF. Fool that I was, I did not make a back-up copy. Now I need one. I find on the WOFF Home Page that a Duplicate copy can be got for a $5.00 charge. But I don't see anything clickable to make this happen. Could someone point me in the right direction? [/quote]
"NOTE : If you lose the file and wish a new download link to be generated we will require an admin fee of $5 per item. So please back it up! to save us time and you money!"
That's from the WOFF website If you have the email they sent you for downloading,or a proof of your acquired copy of WOFF try to ask for a new download link it's that easy,and probably contacting Polowski will smooth things out ;-) Also You did not even replied to my mail where I showed you that your skins worked fine on my WOFF,and asked about your WOFF version to try to understand what your problem could be,sometimes I feel that helping people out it's a waste of time.
[/quote] Also You did not even replied to my mail where I showed you that your skins worked fine on my WOFF,and asked about your WOFF version to try to understand what your problem could be,sometimes I feel that helping people out it's a waste of time.
Cavaliere57: Please, accept my apologies. I did reply. First, you sent me five e-mails over a few days, some in response to my questions. The two most important were (1) you explained in detail that I had tried to put a D.V skin on a D.III, and that I had made serious mistakes in naming the file. Shortly after, you sent (2) an e-mail with 2.jpegs, one showing the skin on the wrong plane, and one on the right plane. Also you attached a copy (.dds) of my skin, properly named. I've had a lot on my plate in the last days here, and it took me a few days to get some quiet time to sit down with WOFF. First, I took the .dds copy you sent and dropped it in the Skins Folder. It does not show up in QC. I then re-opened the original file, made a few miniscule changes and saved out, being very careful to name properly according to your example. I did the same with a Dr.1 skin. Neither show up. At this point, I'm sure that my mistakes, bad as they might be, are not at the root of the problem. Both you and Rick Rawlings got the skins to work.
It was at this point that I e-mailed you back and attached the D.III and Dr.1 skins, asking you to test them for me. If you could drop them in your Skins Folder and have them work, that would be proof positive that I need a re-install. Somehow, regrettably, that e-mail has not gotten to you.
I understand you would be miffed at silence from my end, but it was accidental. Again, I apologize. I very much appreciate the help that you and Rick have given me.
Last edited by Hauksbee; 05/09/1504:22 PM.
In theory, there is no difference between theory and practice. But in practice, there is.
Yeah, sounds like a re-install is the best bet. That will give us a good clean slate to work with, if nothing else. I know it's a pain, but it will be good to see you get those lovely skins in the air!
The older I get, the more I realize I don't need to be Han, Luke or Leia. I'm just happy to be rebel scum...
It was at this point that I e-mailed you back and attached the D.III and Dr.1 skins, asking you to test them for me. If you could drop them in your Skins Folder and have them work, that would be proof positive that I need a re-install. Somehow, regrettably, that e-mail has not gotten to you.
I understand you would be miffed at silence from my end, but it was accidental. Again, I apologize. I very much appreciate the help that you and Rick have given me.
Robert I sent you back screenshots with the DIII and DR1 skins perfectly working on my WOFF,I suppose that mail got missed somewhere? Anyway here they are:
Thank you, Peter. The only thing I can think of is that it got sucked up in the SPAM filter. Since my ISP only saves 18-20 entries on a single page, there's no way to go back and look for it. Anyway, now I know that neither the skins nor the naming are at fault. I can get on with doing a re-install. Once again, I appreciate your help.
In theory, there is no difference between theory and practice. But in practice, there is.
Thank you, Peter. The only thing I can think of is that it got sucked up in the SPAM filter. Since my ISP only saves 18-20 entries on a single page, there's no way to go back and look for it. Anyway, now I know that neither the skins nor the naming are at fault. I can get on with doing a re-install. Once again, I appreciate your help.
Yes I suppose you will have to do a clean reinstall,I don't see any other way to overcome this problem of yours. Save your skins somewhere so you'll be able to reuse them later on.
Rick asked me to explain a couple of things after i published my Camel skin,in the screenshot thread,here we go. I use Photoshop CS6 64bit,but it applies with most all versions of Photoshop,except probably those prior to the CS series but only because something has changed in the Tools menu,basically they relocated something here and there. *Part One*
Here is the basic Camel skin from wich to start
starting from the background layer (the only one present at this point)select the upper wings and elevator surfaces
now with Ctrl-V copy the selection,and then Ctrl-C to paste it as a new layer,rename it as you wish,I use parts names
as you can see we have a new layer with only upper wings/elevator surfaces ( I have disabled the background layer to have a better view of it)
with the new layer active,from Selection menu,reselect again
from the Image menu,select the Substitute Color Tool
from the Substitute Color mask,clicking on the upper thumbnail,activate the color picker
point it to the brown on the wing
you now have a working color selection to work from,move the slider to the right to catch all the brown hues
now moving the lower sliders,get the color you aim for,desaturate always a bit and do not brighten too much,instead go for darker shades
now go again and select the lower wing/elevator surfaces,on a new layer, and chenge their color as well
we now have Green wings and light azure lower surfaces
*Part Two* From the Background layer,using the Lasso Tool instead of the previous Rectangular Selection Tool,select the lower fuselage section,as always Ctrl-C and Ctrl-V to paste as a new layer,name it and go changin' the color again,but this time keep active the lower wings layer,so to match colors
repeat the process with the rudders
we now have a Camel with green body/wings and azure lower surfaces,and five more layers
starting always from Background layer,select (wit Round Selection Tool) the wheel,and repeat all the process
Now select with Rectangul selection Tool,the engine cowling,copy and paste as new layer,rename it,and create stripes like these,with the Rectangular selection tool,and color them as the fuselage
Does anyone know how to get a skin to work for an aircraft that does not already have ace skins? I want to do one for my 'new' Aviatik BI.
Yes,it's in the naming of the file,this Camel for example was taken from the Squadron pool,no ace name,so the naming must be like this Off_Camel_ace_t_RNAS 8 1917_name_surname.dds of course plane type,squadron and pilot name,can be of your choice,but you have to specify name_surname otherwise it will not work.This is for WOFF,in OFF was simpler than this, you could put whatever you liked in pilot's name.
Okay, I've tried to make a Tutorial about Layers and Transparency for the Gimp. I hope, that I managed to make it understandable for those, who are relatively new to the Gimp as well (that was my focus)
Relieving It is somewhat complicated: You want to explain something to someone, whom you don't see, and have no Idea, if anyone exept yourself understands, what you are saying ...reminds me of this old Cartoonist-Joke:
How to draw an Owl: Step 1: Draw some Circles - Step 2: Draw the rest of the f...... Owl
Gents, I have not followed or even studied this thread, but I would like to contribute something here for all the new "skinners". I have researched the German Lozenge camouflage a bit (mostly at THE AERODROME website). I also saw Lozenge fabric on a Halberstadt tailplane in the BERLINER TECHNIKMUSEUM, and took a photo.
From what I have found, I have then made 5-colour and 4-colour Lozenge fabric for both, upper and lower surfaces. Lozenge camo was screen-printed on endless panels of canvas with a width of ca. 4.5 feet (if I remember that correct).
My 'panels' here are layed out horizontally, but on an aircaft wing they were used "vertically", or better: in flight-direction. Everyone can copy and use my Lozenge camo for their own skins - enjoy the skinning!
Vice-President of the BOC (Barmy OFFers Club) Member of the 'Albatros Aviators Club' - "We know how to die with Style!"
Complicated ? its clear as Mud to me. On the other hand, I did find a place on the web to copy from: Might not be original colors,but some do look nice.
Here's a link for a site with MarkMiller's research on Lozenge camouflage. He tried to get the colour "right", with several others. But from the few samples still around, I guess they couldn't nail it down. There were no industrialised standars for such productions in those days.
By working after colour photos, you can still get easily led wrong. Using flash light in a museum, the colours can wrong. Warm light also changes the colours.
Millers own works near the bottom don't look bad (compare with my photo), but I think he got the medium blue to "violettish".
Lou: "...Glad you like the looks of Hellshade's Pup. I used the graphics from a Tripehound I did for him back in OFF thinking it would be an easy migration across. It was not. But my kung fu is strong and we got 'er done. I like your devil layout as well, very nice. I had a hunch you had tried to swap from another Sopwith to the Pup thinking things would all line up. I tried the same thing myself and did not check the end results right away. Live and learn, eh?"
Yes, checking your Work in the Game is essential. Not only to see, if everything is aligned properly, one has to reajust the Colors, too, quite often. Some Skins look great on the Graphics Program, but are way too colorful for the actual Environment. I consider the Pup quite difficult to paint, especially the Engine-Cowl-Area.
(I took the Liberty to move our Discussion here... easier to find, later)
"It takes forever +/- 2 weeks for the A-10 to get anywhere significant..." Ice
"Ha! If it gets him on the deck its a start!" MigBuster
"What people like and what critics praise are rarely the same thing. 'Critic' is just another one of those unnecessary, overpaid, parasitic jobs that the human race has churned out so that clever slackers won't have to actually get a real job and possibly soil their hands." Sauron
Can be obtained at the Wings Over Flanders Fields website
1. All rights to the original artworks are retained by OBD software. 2. DO NOT contact OBD software with any questions or issues regarding this pack. This is user generated software and will not be supported by the creators of Wings Over Flanders Fields. 3. This pack may only be distributed with the included readme texts and only in a non-commercial manner.
Directions To utilize this pack, please unzip the skins to the following directory:
Computer >Local Disk (C:) >OBDSoftware> WOFF> OBDWW1 Over Flanders Fields > campaigns > CampaignData > skins
To remove them at any time, simply type �Joe Doe� in the search bar in the upper right hand of the Window you are in and delete all files that show up:
Viewing
You can view each paint submission using a .dds viewer like Irfan View found here: http://www.irfanview.com/
Renaming
You can see from the picture below that while the N17 and N23 are the same, the N24 is different and can�t be covered with a simple file name change.
Skins for the Albatros D.III (early) can also be used for the Albatros D.III or the Albatros D.III OAW, if the user changes the file name like this: from Off_Alb_DIII_early_t_Jasta 2 1917_Joe_Doe to Off_Alb_DIII_t_Jasta 2 1917_Joe_Doe or Off_Alb_DIII_OAW_t_Jasta 2 1917_Joe_Doe
Same goes for the Albatros D.V (early version with the hunchback), and the Albatros D.V (uprated)
from off_Alb_DV_later_Ace_t_Jasta 5 1917_Joe_Doe to off_Alb_DV_Ace_t_Jasta 5 1917_Joe_Doe
(Thanks to Olham for Albatros submissions!)
So find the name of the skin that you want to change to in the skins folder and use that naming convention.
This is the list of compatible planes that I know of:
Albatros D.III Early, DIII, DIII OAW Albatros DV, DV later, DVa Airco DH2, DH2 mid Fokker DVII, DVII OAW, DVIIF Fokker EI, EII, EIII � oddly, the EIV Rudder is moved, a little clever cut and pasting would make it work� Halberstadt DII, DIII � is the DIII in the game or is that a typo? Nieuport 11, 16 Nieuport 17, 17 Lewis, 23 Nieuport 17 bis, 24 look close enough to work, the rudder is a tiny bit different. 27 matches 24 SE5, SE5a, SE5a viper SPAD VII and XIII are close; you may be able to get away with it�
Troubleshooting
Sometimes the skin will not show the first time you try to load it (or the second or the third!) It seems WOFF can be a bit finicky about displaying new skins and needs some coaxing. Here are some tips:
1. Exit the QC screen back to WOFF shell, alt-tab out, rename the skin in the skins folder, go back into WOFF shell, re-enter the QC screen, re-select the skin and then launch. 2. Do the same above, but in the main WOFF screen, select a pilot from the �other side� of the conflict and start one QC, exit back to the shell, switch to your regular pilot and try running it again. 3. Pol suggests maybe deleting the .bdp for the QC1 aircraft before you start as a last resort.
Last edited by Rick_Rawlings; 11/09/1503:36 PM.
The older I get, the more I realize I don't need to be Han, Luke or Leia. I'm just happy to be rebel scum...
The Halberstadt D2 "Shark-Skin" was indeed intended for use with the Halberstadt D3. This Plane really exists in WOFF (it came with V2, I think). It is the Halb, that doesn't sound like a Fiat 500 One doesn't find any Skins for it in the Folder, because it is only using the Default one. I haven't tested the Shark on the D2, but it looks like it should fit...
Can be obtained at the Wings Over Flanders Fields website
1. All rights to the original artworks are retained by OBD software. 2. DO NOT contact OBD software with any questions or issues regarding this pack. This is user generated software and will not be supported by the creators of Wings Over Flanders Fields. 3. This pack may only be distributed with the included readme texts and only in a non-commercial manner.
Directions To utilize this pack, please unzip the skins to the following directory:
Computer >Local Disk (C:) >OBDSoftware> WOFF> OBDWW1 Over Flanders Fields > campaigns > CampaignData > skins
To remove them at any time, simply type �Joe Doe� in the search bar in the upper right hand of the Window you are in and delete all files that show up:
Viewing
You can view each paint submission using a .dds viewer like Irfan View found here: http://www.irfanview.com/
Renaming
You can see from the picture below that while the N17 and N23 are the same, the N24 is different and can�t be covered with a simple file name change.
Skins for the Albatros D.III (early) can also be used for the Albatros D.III or the Albatros D.III OAW, if the user changes the file name like this: from Off_Alb_DIII_early_t_Jasta 2 1917_Joe_Doe to Off_Alb_DIII_t_Jasta 2 1917_Joe_Doe or Off_Alb_DIII_OAW_t_Jasta 2 1917_Joe_Doe
Same goes for the Albatros D.V (early version with the hunchback), and the Albatros D.V (uprated)
from off_Alb_DV_later_Ace_t_Jasta 5 1917_Joe_Doe to off_Alb_DV_Ace_t_Jasta 5 1917_Joe_Doe
(Thanks to Olham for Albatros submissions!)
So find the name of the skin that you want to change to in the skins folder and use that naming convention.
This is the list of compatible planes that I know of:
Albatros D.III Early, DIII, DIII OAW Albatros DV, DV later, DVa Airco DH2, DH2 mid Fokker DVII, DVII OAW, DVIIF Fokker EI, EII, EIII � oddly, the EIV Rudder is moved, a little clever cut and pasting would make it work� Halberstadt DII, DIII � is the DIII in the game or is that a typo? Nieuport 11, 16 Nieuport 17, 17 Lewis, 23 Nieuport 17 bis, 24 look close enough to work, the rudder is a tiny bit different. 27 matches 24 SE5, SE5a, SE5a viper SPAD VII and XIII are close; you may be able to get away with it�
Troubleshooting
Sometimes the skin will not show the first time you try to load it (or the second or the third!) It seems WOFF can be a bit finicky about displaying new skins and needs some coaxing. Here are some tips:
1. Exit the QC screen back to WOFF shell, alt-tab out, rename the skin in the skins folder, go back into WOFF shell, re-enter the QC screen, re-select the skin and then launch. 2. Do the same above, but in the main WOFF screen, select a pilot from the �other side� of the conflict and start one QC, exit back to the shell, switch to your regular pilot and try running it again. 3. Pol suggests maybe deleting the .bdp for the QC1 aircraft before you start as a last resort.
First, thanks to Rick Rawlings and everyone else who contributed to this thread. It clarified a lot of issues for me. What I wanted to share is in reference to naming skins. I have been sim-flying with Jasta 13 for the past few months and have gotten rather fond of some of the AI that I fly with every day, particularly Ltn Heinrich Breidt. When the Jasta received upgraded aircraft, exchanging their old Alb DIII early for Alb DV upgraded (well into Sept 1917, were not exactly a top notch outfit in a hot area), some of my old AI Ace comrades had no skin for this aircraft. So I took the basic Jasta 13 skin, added their old logos and stipes or what have you to it with Gimp. When I put it back with DXTbmp as a DDS file I just put their name on it, in the proper format and when I went to the next mission, VOILA, there was Heinrich Breidt with his white band with two red stripes on a new machine. I guess because he has the Ace status as an AI the game latches onto it for the graphics. Just thought it might be of interest. JH
Nice! First off, welcome to the forums! Second off, I'm glad it worked out for you on the first try, naming conventions seem to be tricky at times...I bet you're right and it does search for an ace skin before pulling the default squadron one, good find! Third off, make sure you drop down to the regular forum and say "Hi!" so everyone else can give you a proper welcome!
The older I get, the more I realize I don't need to be Han, Luke or Leia. I'm just happy to be rebel scum...
Hi Rick! Thank so much for taking the time to do a tutorial on how to skin aircraft in WOFF. I think I will dip my toes into the world of skinning this summer and pick up the software you recommended. Looks fascinating!
Hi there. Don't know if you guys knew this looking through these pages, but you don't need to be messing around with DXTBMP at all, it's just an extra unnecessary step to your workflow.
Gimp can open, edit, save and generate mipmaps for .dds files on it's own by downloading the free plugin here and installing it :
Thanks 4L0M. Just downloaded and tested. Works just fine. Should we be loading the mipmaps when opening DDS to edit skins? Also, when saving DDS what settings should be used for compression, format, mipmaps etc to work with WOFF?
"Take the cylinder out of my kidneys, The connecting rod out of my brain, my brain, From out of my arse take the camshaft, And assemble the engine again."
if I paint I'm using the dot like in the video and if I do have an overlap from an early dot, I see whats on the attachment from the early posting. I did use two layers, one from the default fokker DII ( here is no painting on) and an layer for doing all the paintings.
Ok, make sure you are using the brush tool and not the airbrush tool. Also, make sure in the tool options, the brush has a hard round edge and not the fuzzy edge, this should make the color solid and not have earlier stroked bleed through. You can then use opacity or layer properties to make it more transparent. Is that what you are asking?
Cheers, Rick Rawlings
The older I get, the more I realize I don't need to be Han, Luke or Leia. I'm just happy to be rebel scum...
My first effort, as you can see first shot is without the white top, later is with the white top and bottom on the fuselage. Only the bottom was plain canvas so I have to remove these. Here is my source: https://www.hobbysta.eu/fokker-dii-p-50908.html
Wanting to change the TAC only after changing it sill does export as an cubic and not as the original circle. How to get rid of the cubic, see the red cross markings in the .jpg file and why does that shows up, I did not change that shape????
Hey, dutch, .jpegs won't do transparent textures apparently... where are you pulling that file from? rick
Yes Rick is correct. In brief explanation you need to separate the layers by extracting the circle as a ".bmp" and then create a transparent square as BMP for the alpha layer.
As Rick has said, where are you pulling the file from?
(System_Specs)
Case: Cooler Master Storm Trooper PSU: Ultra X3,1000-Watt MB: Asus Maximus VI Extreme Mem: Corsair Vengeance (2x 8GB), PC3-12800, DDR3-1600MHz, Unbuffered CPU: Intel i7-4770K, OC to 4.427Ghz CPU Cooler: Cooler Master Seidon 240M Liquid CPU Cooler Vid Card: ASUS GTX 980Ti STRIX 6GB OS and Games on separate: Samsung 840 Series 250GB SSD Monitor: Primary ASUS PG27AQ 4k; Secondary Samsung SyncMaster BX2450L Periphs: MS Sidewinder FFB2 Pro, TrackIR 4
I can not publish the .dds file as an visible file, this site only uses jpg as to be show. Now if I do correct the TAC file by removing the number and make it back to an .dds, the square appears from nowhere. This file can be found by using the search tactical_display and you will notice this file will showup and you can go to it folder. Not at my gamerig so I think this is the best way to trace this .dds file.
Are you working .bmp to .dds and back with nothing in between? Can you make a square transparent base layer in GIMP and then cut and paste the circle TAC on top of it? There are also plugins that let you work natively in GIMP with .dds files... check this post... http://SimHQ.com/forum/ubbthreads.php/topics/4360874/re-skinning-tutorial#Post4360874
The older I get, the more I realize I don't need to be Han, Luke or Leia. I'm just happy to be rebel scum...
Here another one question, in your video around 28:10 you do save the file at 24bit and not 32bit, is here some reason why not save it to the 32bit??? You are saying because not mixed up, while at the properties on the .dds file it is 32bit depth? Or is this something complete different.
Hi Rick: Have really profited from you vids and this thread.
The yellow tail on black fuselage is the Jasta 27 wing man plane Off_Fokker_DVII_OAW_Jasta 27 1918.
The middle one is a GIMP hue/brightness/Saturation change on two separate planes. The orange fuselage is from a yellow in-game and the green horizontal stabilizer was made from a red in-game skin then the two were joined by pasting the orange over the green and erasing the old orange stabilizer to get the green one I had on the layer beneath.
The blue tail is an in-game tail put on the same orange fuselage using the same erase to reveal technique.
I found later that there are a few in-game Fokker DVII types that have the same problems my erase conversions have here. I didn't make any note of them, having decided that this was just a limitation of the skin program/graphic whatever is the correct term.
Another thing I came across working with the Pfalz DIIIa is that if you have a white rudder and try to bring a color up the verticle stabilizer to cover over any portion of that white rudder, you get a line of that color on the outer edge of the rudder. This can be seen on in-game skins as well as my hack jobs. Example attached, but that's off subject, just an aside.
Just a heads up on skinning issues you may encounter. Not saying you will, but sometimes there is a model mapping issue which only comes to lifht when you are colorizing a model. It's difficult to explain as the mapping issue often varies between model types.
You may well have to experiment to see if you can find a workaround by not trying to have two different color areas come together on an area that has a mapping peoblem. I can't show you an example because I am not at my computer right now.
Just be aware of this possibility.
Best Regards
(System_Specs)
Case: Cooler Master Storm Trooper PSU: Ultra X3,1000-Watt MB: Asus Maximus VI Extreme Mem: Corsair Vengeance (2x 8GB), PC3-12800, DDR3-1600MHz, Unbuffered CPU: Intel i7-4770K, OC to 4.427Ghz CPU Cooler: Cooler Master Seidon 240M Liquid CPU Cooler Vid Card: ASUS GTX 980Ti STRIX 6GB OS and Games on separate: Samsung 840 Series 250GB SSD Monitor: Primary ASUS PG27AQ 4k; Secondary Samsung SyncMaster BX2450L Periphs: MS Sidewinder FFB2 Pro, TrackIR 4
After I did that post about the tail sections in May I started to figure out that there are just some things you can't do and what you say confirms it. Looking at the in-game skins I can see certain things that just aren't done, especially to the nose and tail sections so I just make a more difficult skin as close to the photo or profile I'm trying to copy and make do. Not that much has to be sacrificed to make the more complicated ones work well enough and most of the time non at all. I'm grateful the skins were designed to be so easy to work with and post into the games skin file. Sort of like being able to make all those model airplanes you planned to make someday and fly them, or watch them fly too.
Hey, jerbear, I went through a few DrI skins this morning and didn't see any stock ones that had the band. I apologize for not being more help so far, I haven't been home much the last few days. I should be able to give it some attention tomorrow. If you can get the name of one of the ones that shows the band, it might help us compare. Also, if you could post the section of your graphics file that corresponds to that area, it might be useful as well.
*edit: if you have any time play around with it, you will notice that in the first post of this thread there was a graph-paper skin example. If you could create one of those and take some in-game pictures from different angles, that might show if there are any geography issues.
** edit again: also, just to be clear, you want the tail color to creep up on the fuselage so that it is one solid line across, correct?
*** edit yet again: I may have found something to help you. Check out Hans Muller's 1917 Jasta 15 skin.
Here's how it looks in the game: And here's the relevant part of the skin: Use that as a model to put your stripe in and see if it works...
Last edited by Rick_Rawlings; 08/01/1903:00 AM.
The older I get, the more I realize I don't need to be Han, Luke or Leia. I'm just happy to be rebel scum...
Hello Rick - Same here, I don't get to spend that much time home, seem to always be at work.
The problems I'm looking at is on the Fokker DVII tail. Here are four aircraft with the same problem. The orange one with the graph is mine. Looks like the graph is a little big, sorry. Then there is Karl Plauth, Jasta 20; Erich Budes, Justa 26 and Adolf Auer Jasta 40, all with the same problems.
Nice, I wasn't even looking at the right tail! I'll take a look at it tomorrow and see if I come up with any bright ideas, although I am not instilling myself with a lot of confidence...
The older I get, the more I realize I don't need to be Han, Luke or Leia. I'm just happy to be rebel scum...
OK, so I figured out what is happening, although it probably wont help you much... So here's a Lowenhardt reference: That little piece isn't even on the skin. I used this reference August Raben Jasta 18: So to see where it was being pulled from, I tried this:
OK, so it is being copied from somewhere above, but where? So you can fill in the gap, but you have to live with a band of the same color above it. I tried painting in the area under the fuselage where there was nothing to see if it would take, but it didn't... (though I screenshot it, but didn't, it just looked like the original skin...)
Stumped at the moment. Maybe a developer or skinner will pop in with some advice...
Last edited by Rick_Rawlings; 08/03/1907:14 PM.
The older I get, the more I realize I don't need to be Han, Luke or Leia. I'm just happy to be rebel scum...
Thanks for having a look and all the hard work Rick, I appreciate it.
At least I know I'm not completely inept.
There seems to be some little thing like that on every 3d model, nothin's perfect. What we have is awfully dern good though. A few compromises here and there have to be made and there's no sense driving yourself crazy over it.
The reminder about the grid thing was helpful. I have been working with stripes and Bavarian checks. I think that trick will help with some of the projects I can't complete. I need to go back and review some of these things every now and then. The old brain doesn't retain things like a steel trap anymore.
Mr Wiggins: Just did a quick survey of a few examples on Quick Combat. It seems that the problem does not affect the DVII OAW. Just the DVII and DVIIF. Ernst Udet is a good example since he flies all three models and has things going on with his horizontal stabilizer on all three.
If you just do the whole tail section in one color the problem doesn't occur. Only when you try to make only that stabilizer a different color.
Gents this is a modeling issue and cannot be resolved by adjusting the skin. Sorry.
At this point, it would be up to OBD to resolve. Best to simply work around it as we did originally, unless the original designer is will to change this... which might snowball all of the original skins. I'm not really interested in seeing anyone buried by a minor flaw as this.. so it's up to that person to decide if it's worth going through the trouble of adjusting it.
I can certainly go back and adjust whatever skins it effects from whatever Jastas I did if that is the case, but it won't be a quick fix for sure.
OvS
The Black Baron of Boistrancourt returns!!
I'd rather die fighting, than live for nothing. - Gen. G.S. Patton
Thanks for looking into it. Definitely not an issue worth upsetting the apple cart over. I just thought it was something I was or wasn't doing. Issue resolved and thank you again.
I have worked the first time with GIMP (2.10.14, dds-format included) and have made my first skin for woff-PE. Positiv: lt has functioned, I can use the skin with quick combat and in the campaign! Nice!
Question: I have recogniced, that my own skin-file is much bigger (12MB) than the original file from the skin folder (ca. 3MB). Even if I export the original file only with an other name -without any changes- I have 12MB in the new skin-file. So I asked myself: What is the best mode to save / export the new skin-file in dds for WOFF-PE after changes? Which steps in the settings (1., 2., 3. step etc.) should be used when I save it as dds-file?
Hi Becker - 1- go upper left on Gimp to File > On drop down choose "Save as" > put in your file name and leave it as .xcf file > Save it in your documents file. This is only a backup and has nothing to do with export or converting to DDS. 2- go back to File > choose "Export as" on dropdown > enter you file name but change it to a bmp file. Example: Fokker DVII.bmp. > There is a dropdown list on the bottom of your export window that will say " "All export images" choose the dropdown that says "Windows BMP image (bmp) make sure you have bmp in your file name not xcf. > choose desktop as you file destination on the left side of the window.
3 - Hit the "EXPORT" button and another window will appear that asks is you want compatability options or advanced options > choose advanced options > you will be given three options 16, 24 or 32 bits > choose 24 bits and then click on "EXPORT" this will send the bmp file to your desktop.
4 - now open your DXTbmp app. in the upper left clock file then open, this will show you all the images on your desk top. > click on the bmp image you sent to desktop, then open, it will appear on DXTbmp.
5- again go to file and choose "save as" this will give you a drop down that will have DDS Texture along with some other options > click DDS texture > the file name will be on this new window but you will not see your image > change the image name so you will not confuse your new DDS image it with the bmp that is alerady on your desktop. > click on "save" and it will send the DDS image to your desktop. 6 - from the desktop you can cut the DDS image and paste it into you picture file or wherever else you want it. > you must now name the image in the correct WOFF code such as off_Fokker_DVII_ace_t_Jasta 13 1918_Hans_Butthead. 7- I usually make a copy before cutting the DDS and pasteing it in the WOFF skin folder. You can, of course put the image directly into the skin folder from desktop but I like the extra step.
This procedure should give you a DDS file of the correct size. I know it looks like a lot of step but it is very easy and becomes second nature and intuitive after a few times.
Holler if you have trouble and I or someone smarter will get back to you.
Right off your tutorial Rick. That's something I stupidly omitted Becker. Go to YOUtube and see Rick Rawlings "circus Skinning tutorial" You can see all this in action and explained very well. Could'a saved myself a lot of typing. Jerbear
Omg! Thanks! You reminded me of that stupid broken link to the video in the first post. I have fixed it now so the video should show. Also, having the steps written out is useful so you don't have to keep rewinding, so I've added your steps into the first post as well!
The older I get, the more I realize I don't need to be Han, Luke or Leia. I'm just happy to be rebel scum...
now I have a little bit time to follow your steps for making the own skin-files smaller after GIMP.
I have 2 questions: a) step 4: I must download DXTbmp, right? b) after work with GIMP (see my text above page 8): Is the bigger skin-file (ca. 12MB) a problem for WOFF or is it even for the sim?
all is clear! I did read a little bit more in the skinning-threads and now I have the answers (fortunately there were other members with the same questions before).
I hope to not get the people's wrath for necroposting here, but I'd need some help. I'm trying to make a skin, for the Pfalz DIIIa, the struggle is that neither side of the fuselage is alligned (they're actually disaligned when applied to the plane too), same for the top and the bottom which are at completely different positions when working on the skin. So the stripe I'm trying to make, which is a ring that goes around all the fuselage, keeps appearing disaligned, like this:
Does anybody have a tip on how to manage to get em aligned, or do I just have to be lucky in getting the right position? Thanks a bunch.
Last edited by trustworthykebab; 04/10/2104:03 PM.
Hi Trustie: I'm afraid there is no completely perfect fix here. This is a warpage area on the model.
To see these warped areas, make a grid layer on your skin, then look at it in QC. The grid squares in the warped area will be...well...warped.
Look at one of the Pfalz skins in the WOFF skins pack in QC that has a band in this area. You'll see that, although they were able to make it a little better, it is still warped in the worst areas.
Here is a shot of Rudolf Stark's Jasta 34 Pfalz. It's mostly fixed but has some bad areas on both sides a the top. If that's good enough for you, (and you really can't see that from a distance) then use Stark's existing skin as a template. I can give you some tips on how to do that if you need.
If you want it not to have this warpage, you will have to move your band further back. If you still want it in front of the national markings you will have to move them as well and possibly shrink them.
That's looking great, by the way, trustworthykebab! As jerbear said, using a graph paper grid can help, there is some additional info on it in the first post on page one as submitted by Olham. You can also look at my attempt to get the N 17 cowl lined up in the same post. Keep us posted on how it is going!
The older I get, the more I realize I don't need to be Han, Luke or Leia. I'm just happy to be rebel scum...
NP, also keep in mind that sometimes constraints can lead to inspiration. What if you made the band go under the cross, almost like a cigar band? That might look cool!
The older I get, the more I realize I don't need to be Han, Luke or Leia. I'm just happy to be rebel scum...
It indeed inspired me, as I decided to abandon the band idea, while keeping the ailerons coloured, adding a blue rotor nose and wheel coverings. Seems like it's better to keep it clear when skinning Pfalzen, they can come really handy when hiding from faster enemy scouts!
Aalright. I'm back from the ashes after I bought a new laptop. This means...Another question about skins! I made a custom skin for my DiD pilot in J27, and one thing I noticed (on other custom skins too) is that the skin tends to be glitchy, flickering and becoming invisible when looking at it from certain angles. Any idea on how to fix this or is it standard?
Second of all, is this in the new WOFF or an older version? I have noticed some wonkiness with the damage model with the wings where it flickers in and out kind of like that.
Other questions: Are you up to date with the latest patch? Does it always happen from certain angles or is it random? How are you modifying the base skin? What programs and formats?
Let's see if we can figure this out!
The older I get, the more I realize I don't need to be Han, Luke or Leia. I'm just happy to be rebel scum...
FIrst of all thanks! Secondly, I use GIMP (just normal work, work layer then fuse it with the base one). It's BHaHII, patch 1.06. The glitch happens mostly only on ground, before taking off, at angles on both sides at around 45 degrees like in the picture. If I zoom in max from outside I do not see it, and in first person it happens only if I zoom in/out. It's not really a problem, I'm just curious
Trustie: I had the same problem a few weeks back. Try this:
Choose another skin to use for your bottom layer > cut and paste the details you want to use onto that, even if you have to cut up a copy of the skin you are using as a base layer now.
I don't know why this happens and it has, so far, only happened once. I suspect it had something to do with the fact that I used that skin several times as a base layer, but don't know for sure. Also lots and lots of saving can cause problems.
As I was capturing video for my latest challenge intro, I noticed this Albatros, which from certain angles flickers between the damaged and undamaged wing state. So I am wondering if your plane is pulling from the default skin at certain angles? If so, it may have nothing to do with anything you did wrong. Maybe Pol will see this and chime in...
The older I get, the more I realize I don't need to be Han, Luke or Leia. I'm just happy to be rebel scum...
Could be. But this thing happens to me only on custom made skins and it doesn't have anything to do with damaged/non damaged graphics, just the skin becoming invisible/deformed when close to ground. In air everything goes as fine as it can be.


![[Linked Image]](http://SimHQ.com/forum/files/usergals/2014/10/full-24719-88496-color_test.jpg)
![[Linked Image]](http://SimHQ.com/forum/files/usergals/2014/10/full-24719-88497-cowl.jpg)
![[Linked Image]](http://SimHQ.com/forum/files/usergals/2014/10/full-24719-88503-front_cowl.jpg)
![[Linked Image]](http://SimHQ.com/forum/files/usergals/2014/10/full-24719-88498-normal.jpg)
![[Linked Image]](http://SimHQ.com/forum/files/usergals/2014/10/full-24719-88499-multiply.jpg)
![[Linked Image]](http://SimHQ.com/forum/files/usergals/2014/10/full-24719-88500-subtract.jpg)
![[Linked Image]](http://SimHQ.com/forum/files/usergals/2014/10/full-24719-88501-rick_1.jpg)
![[Linked Image]](http://SimHQ.com/forum/files/usergals/2014/10/full-24719-88502-rick_2.jpg)
![[Linked Image]](http://SimHQ.com/forum/files/usergals/2014/10/full-24719-88490-full_31324_85775_woff_gerhard_thomsen_alb_dv_late_001.jpg)
![[Linked Image]](http://SimHQ.com/forum/files/usergals/2014/10/full-24719-88491-upper_wing.jpg)
![[Linked Image]](http://SimHQ.com/forum/files/usergals/2014/10/full-24719-88493-1422_8x8.jpg)
![[Linked Image]](http://SimHQ.com/forum/files/usergals/2014/10/full-24719-88492-grid.jpg)
![[Linked Image]](http://SimHQ.com/forum/files/usergals/2014/10/full-24719-88494-grid_over_skin_1.jpg)
![[Linked Image]](http://SimHQ.com/forum/files/usergals/2014/10/full-24719-88495-grid_over_skin_2.jpg)
![[Linked Image]](http://SimHQ.com/forum/files/usergals/2015/05/full-33736-103021-1.jpg)
![[Linked Image]](http://SimHQ.com/forum/files/usergals/2015/05/full-33736-103022-2.jpg)
![[Linked Image]](http://SimHQ.com/forum/files/usergals/2015/05/full-33736-103023-3.jpg)
![[Linked Image]](http://SimHQ.com/forum/files/usergals/2015/05/full-33736-103024-4.jpg)
![[Linked Image]](http://SimHQ.com/forum/files/usergals/2015/05/full-33736-103025-5.jpg)
![[Linked Image]](http://SimHQ.com/forum/files/usergals/2015/05/full-33736-103026-6.jpg)
![[Linked Image]](http://SimHQ.com/forum/files/usergals/2015/05/full-33736-103027-7.jpg)
![[Linked Image]](http://SimHQ.com/forum/files/usergals/2015/05/full-33736-103028-8.jpg)
![[Linked Image]](http://SimHQ.com/forum/files/usergals/2015/05/full-33736-103029-9.jpg)
![[Linked Image]](http://SimHQ.com/forum/files/usergals/2015/05/full-33736-103030-10.jpg)
![[Linked Image]](http://SimHQ.com/forum/files/usergals/2015/05/full-33736-103031-11.jpg)
![[Linked Image]](http://SimHQ.com/forum/files/usergals/2015/05/full-33736-103032-12.jpg)
![[Linked Image]](http://SimHQ.com/forum/files/usergals/2015/05/full-33736-103033-13.jpg)
![[Linked Image]](http://SimHQ.com/forum/files/usergals/2015/05/full-33736-103034-14.jpg)
![[Linked Image]](http://SimHQ.com/forum/files/usergals/2015/05/full-33736-103035-15.jpg)
![[Linked Image]](http://SimHQ.com/forum/files/usergals/2015/05/full-33736-103036-16.jpg)
![[Linked Image]](http://SimHQ.com/forum/files/usergals/2015/05/full-33736-103037-17.jpg)
![[Linked Image]](http://SimHQ.com/forum/files/usergals/2015/05/full-33736-103038-18.jpg)
![[Linked Image]](http://SimHQ.com/forum/files/usergals/2015/05/full-33736-103045-19.jpg)
![[Linked Image]](http://SimHQ.com/forum/files/usergals/2015/05/full-33736-103046-20.jpg)
![[Linked Image]](http://SimHQ.com/forum/files/usergals/2015/05/full-33736-103047-21.jpg)
![[Linked Image]](http://SimHQ.com/forum/files/usergals/2015/05/full-33736-103048-22.jpg)
![[Linked Image]](http://SimHQ.com/forum/files/usergals/2015/05/full-33736-103049-23.jpg)
![[Linked Image]](http://SimHQ.com/forum/files/usergals/2015/05/full-33736-103050-shot05_26_15_14_06_25.jpg)
![[Linked Image]](http://SimHQ.com/forum/files/usergals/2015/05/full-33736-103051-shot05_26_15_14_07_18.jpg)
![[Linked Image]](http://SimHQ.com/forum/files/usergals/2015/05/full-33736-103052-shot05_26_15_14_07_44.jpg)
![[Linked Image]](http://SimHQ.com/forum/files/usergals/2014/10/full-24719-89061-bright.jpg)
![[Linked Image]](http://SimHQ.com/forum/files/usergals/2014/10/full-24719-89062-too_much_2.jpg)
![[Linked Image]](http://SimHQ.com/forum/files/usergals/2014/10/full-24719-89063-dull.jpg)
![[Linked Image]](http://SimHQ.com/forum/files/usergals/2014/10/full-24719-89064-medium.jpg)
![[Linked Image]](http://SimHQ.com/forum/files/usergals/2014/10/full-24719-89065-amerispad.jpg)
![[Linked Image]](http://SimHQ.com/forum/files/usergals/2015/04/full-38109-101483-camel_camo.jpg)
![[Linked Image]](http://SimHQ.com/forum/files/usergals/2015/09/full-38109-109382-tutorial_1.jpg)
![[Linked Image]](http://SimHQ.com/forum/files/usergals/2015/09/full-38109-109383-tutorial_2.jpg)
![[Linked Image]](http://SimHQ.com/forum/files/usergals/2015/09/full-38109-109384-tutorial_3.jpg)
![[Linked Image]](http://SimHQ.com/forum/files/usergals/2015/09/full-38109-109385-tutorial_4.jpg)
![[Linked Image]](http://SimHQ.com/forum/files/usergals/2015/09/full-38109-109027-hagen_d3_b.jpg)
![[Linked Image]](http://SimHQ.com/forum/files/usergals/2015/10/full-27170-109814-olhams_lozenge_page_1.jpg)
![[Linked Image]](http://SimHQ.com/forum/files/usergals/2015/10/full-27170-109828-olhams_lozenge_5_c.jpg)
![[Linked Image]](http://SimHQ.com/forum/files/usergals/2015/10/full-27170-109829-olhams_lozenge_4_colour.jpg)
![[Linked Image]](http://SimHQ.com/forum/files/usergals/2015/10/full-27170-109817-halberstadt_cl_iv.jpg)


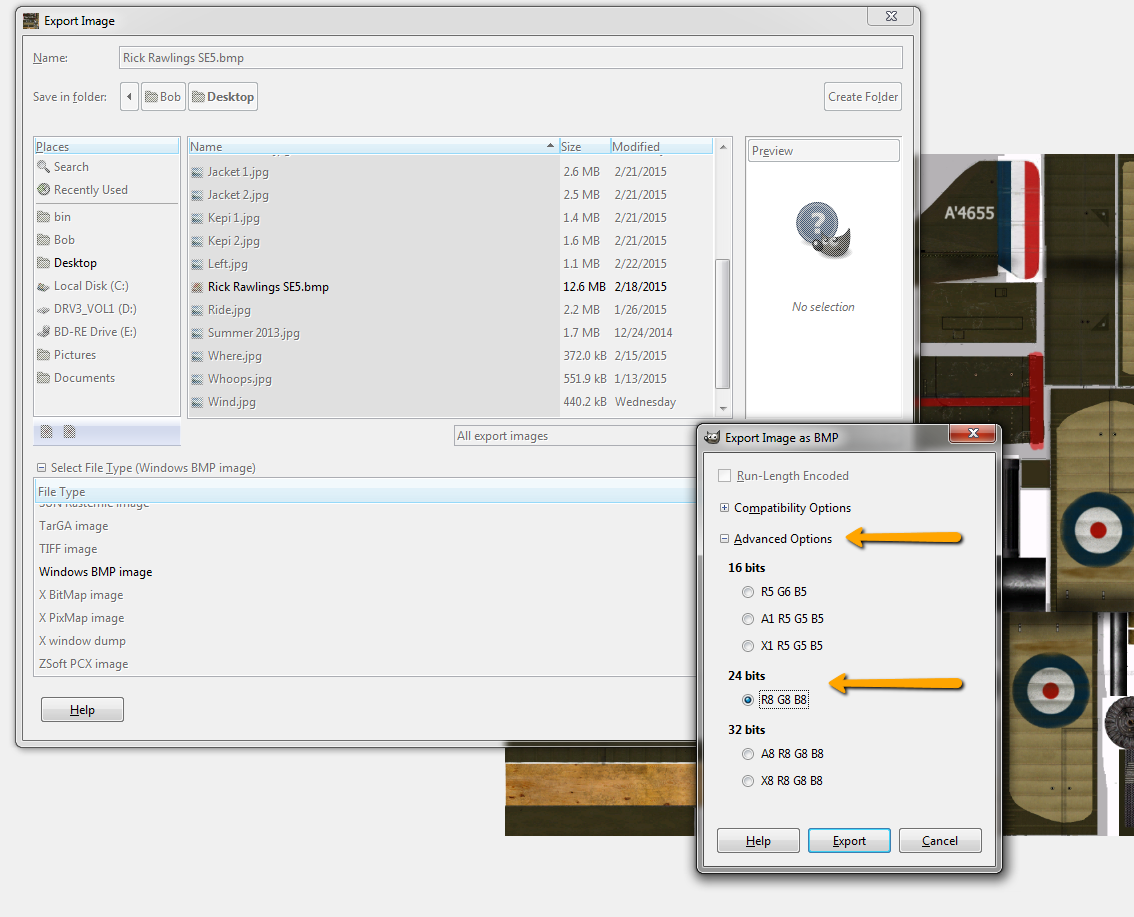

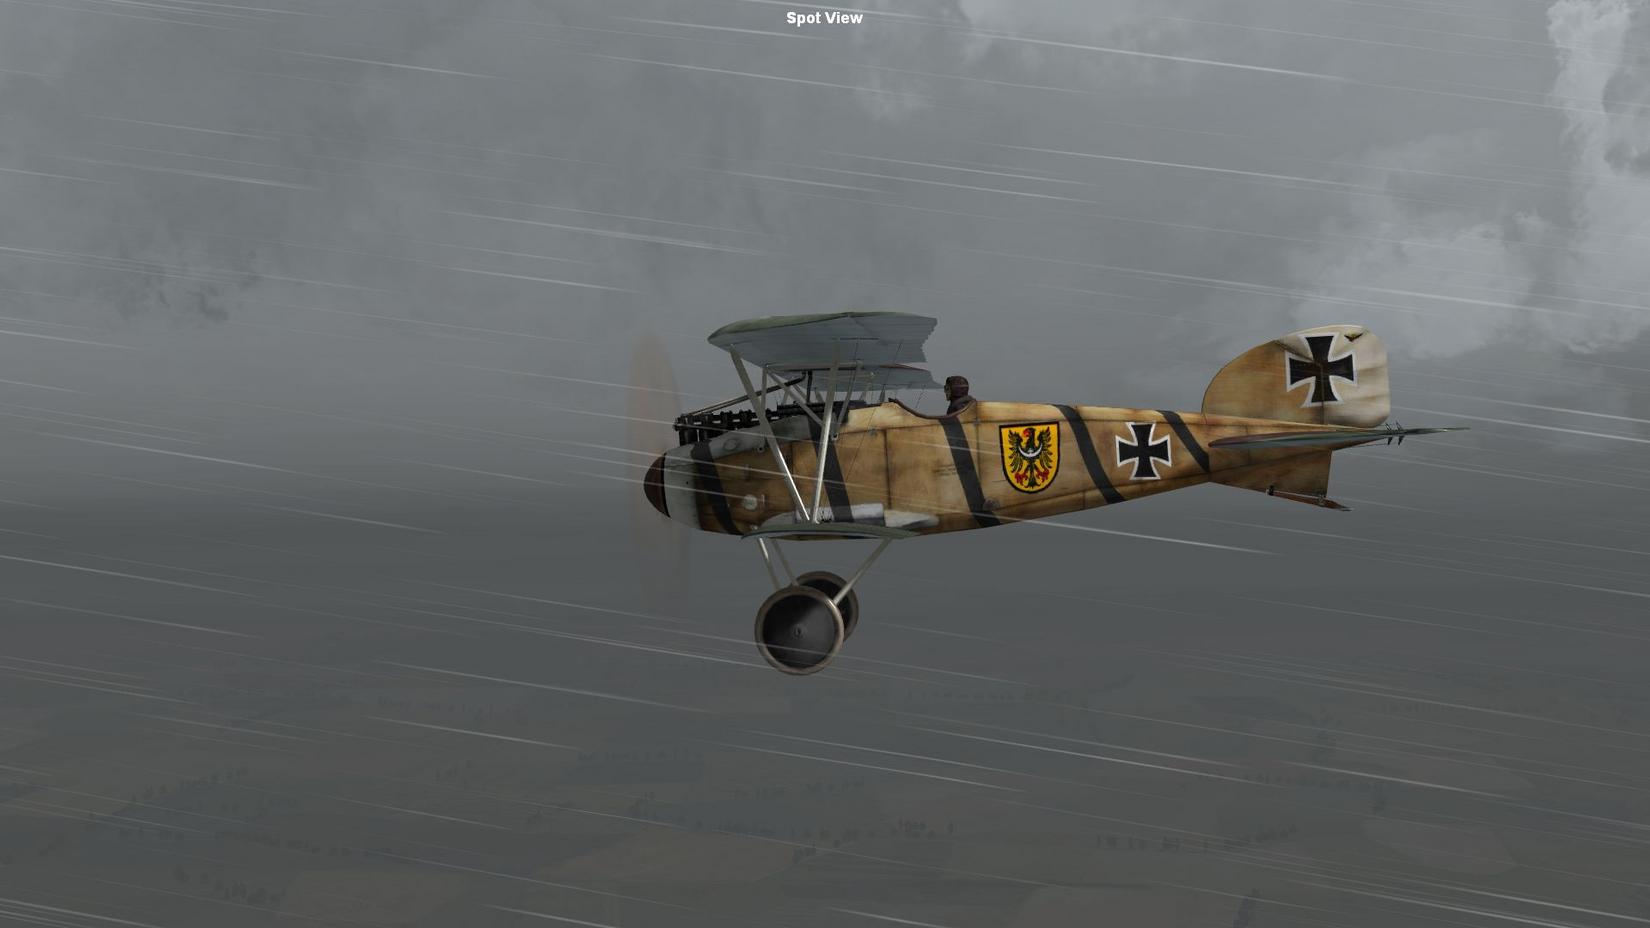

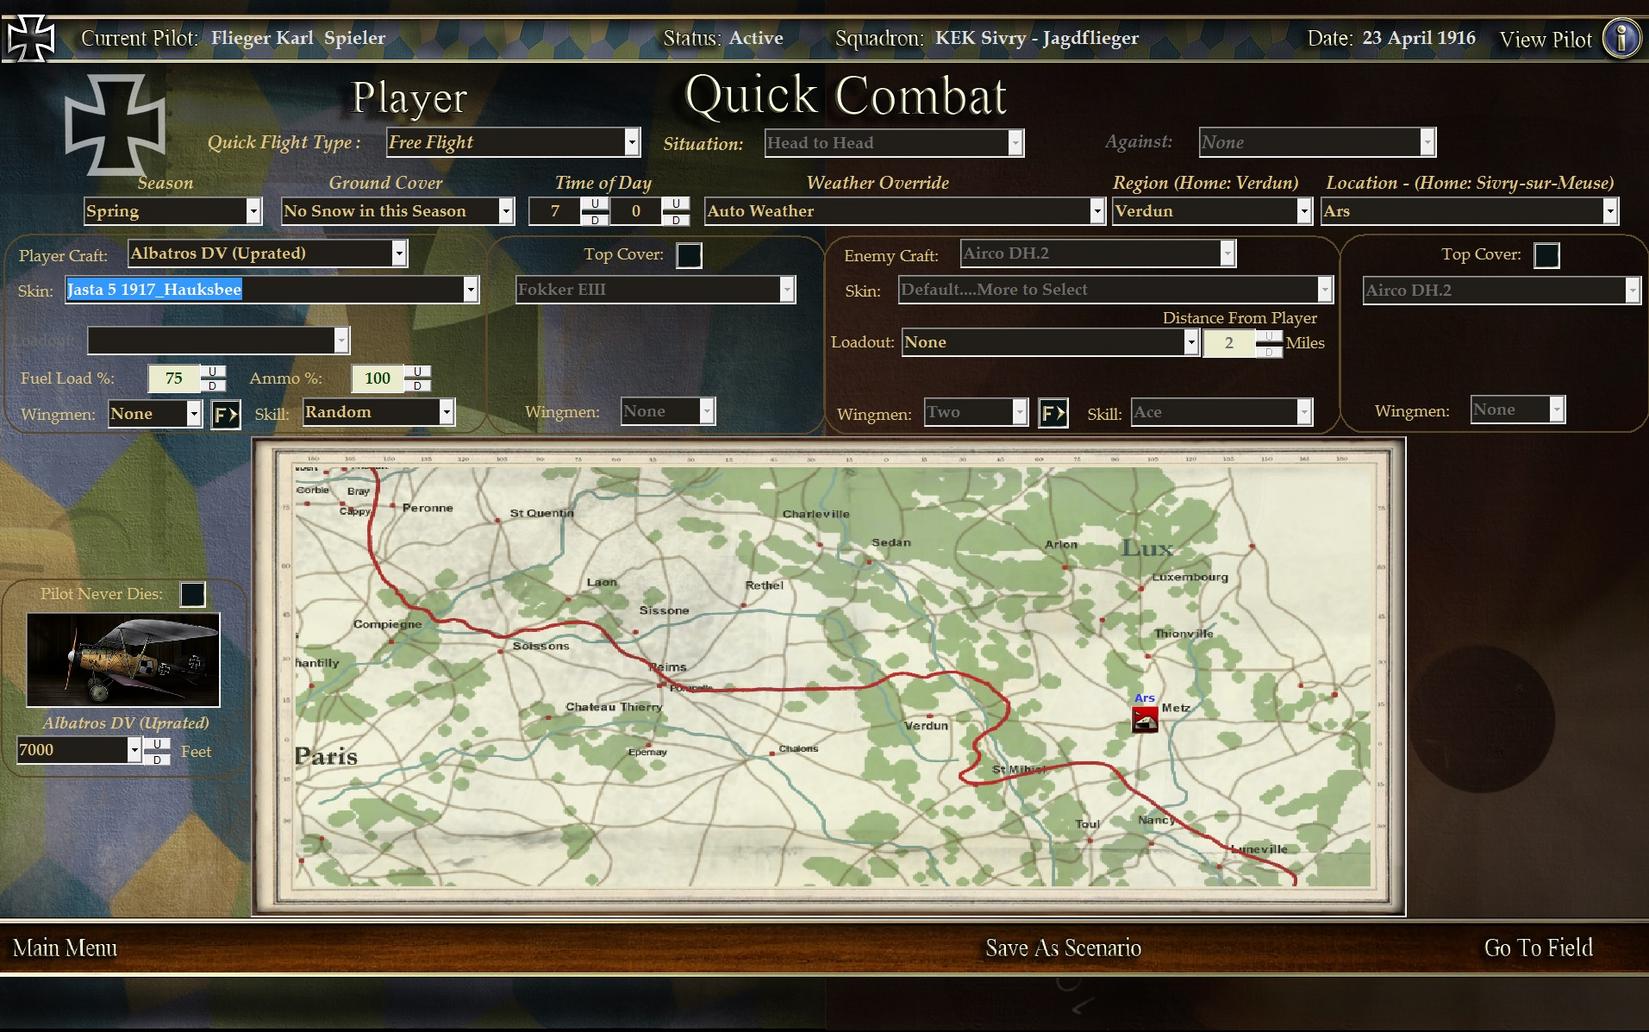


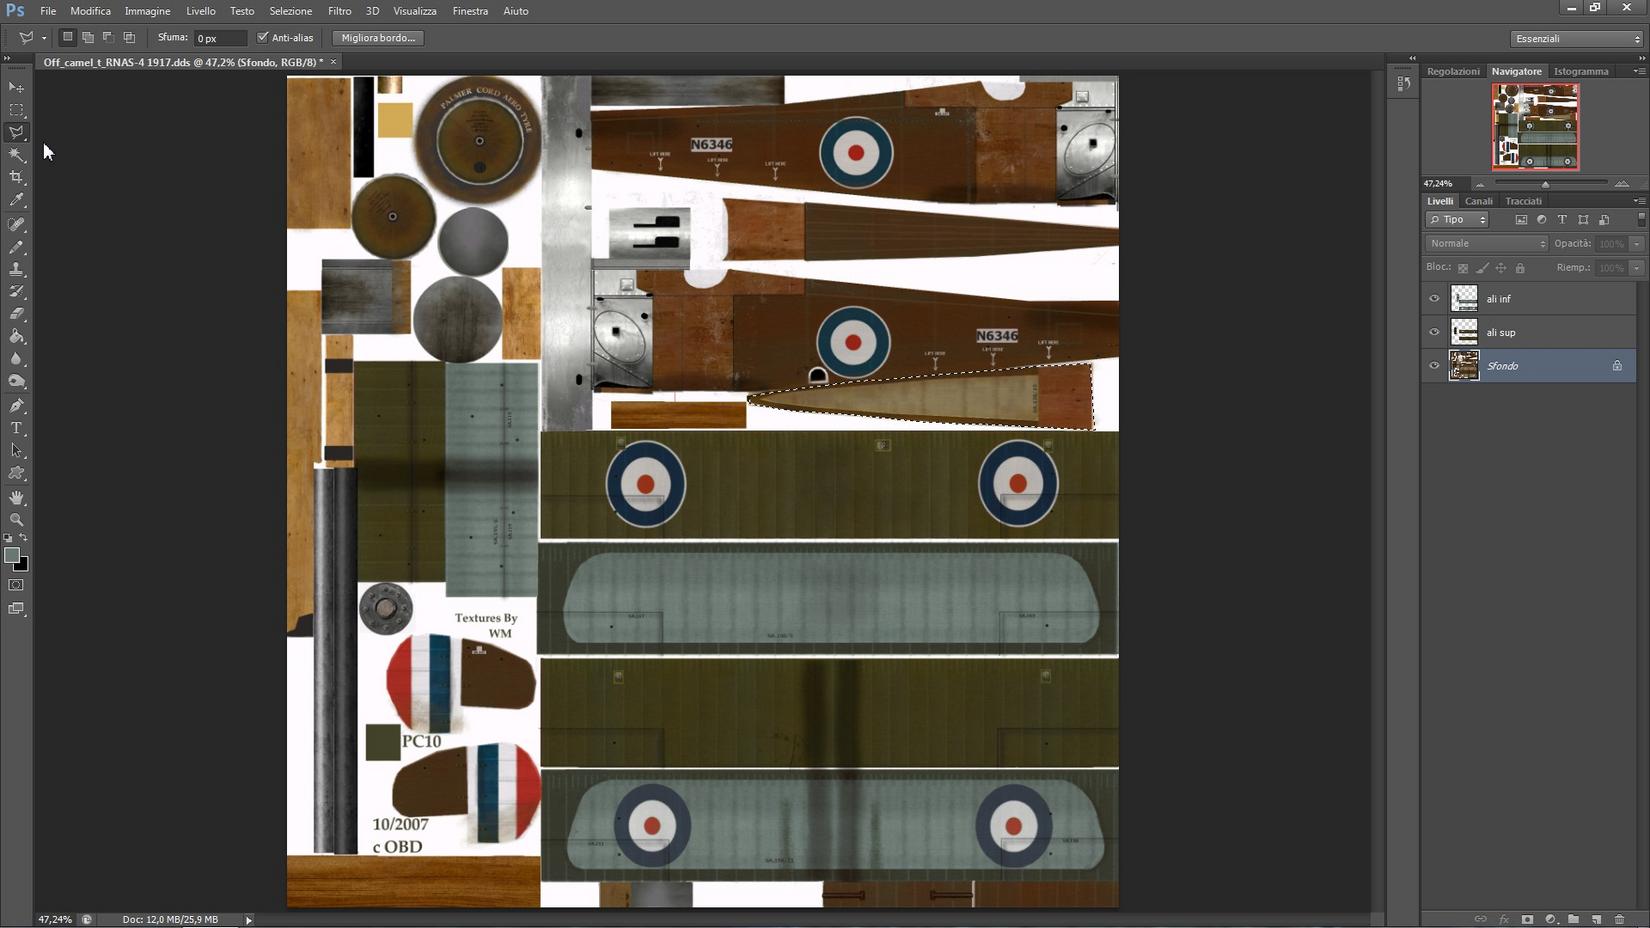


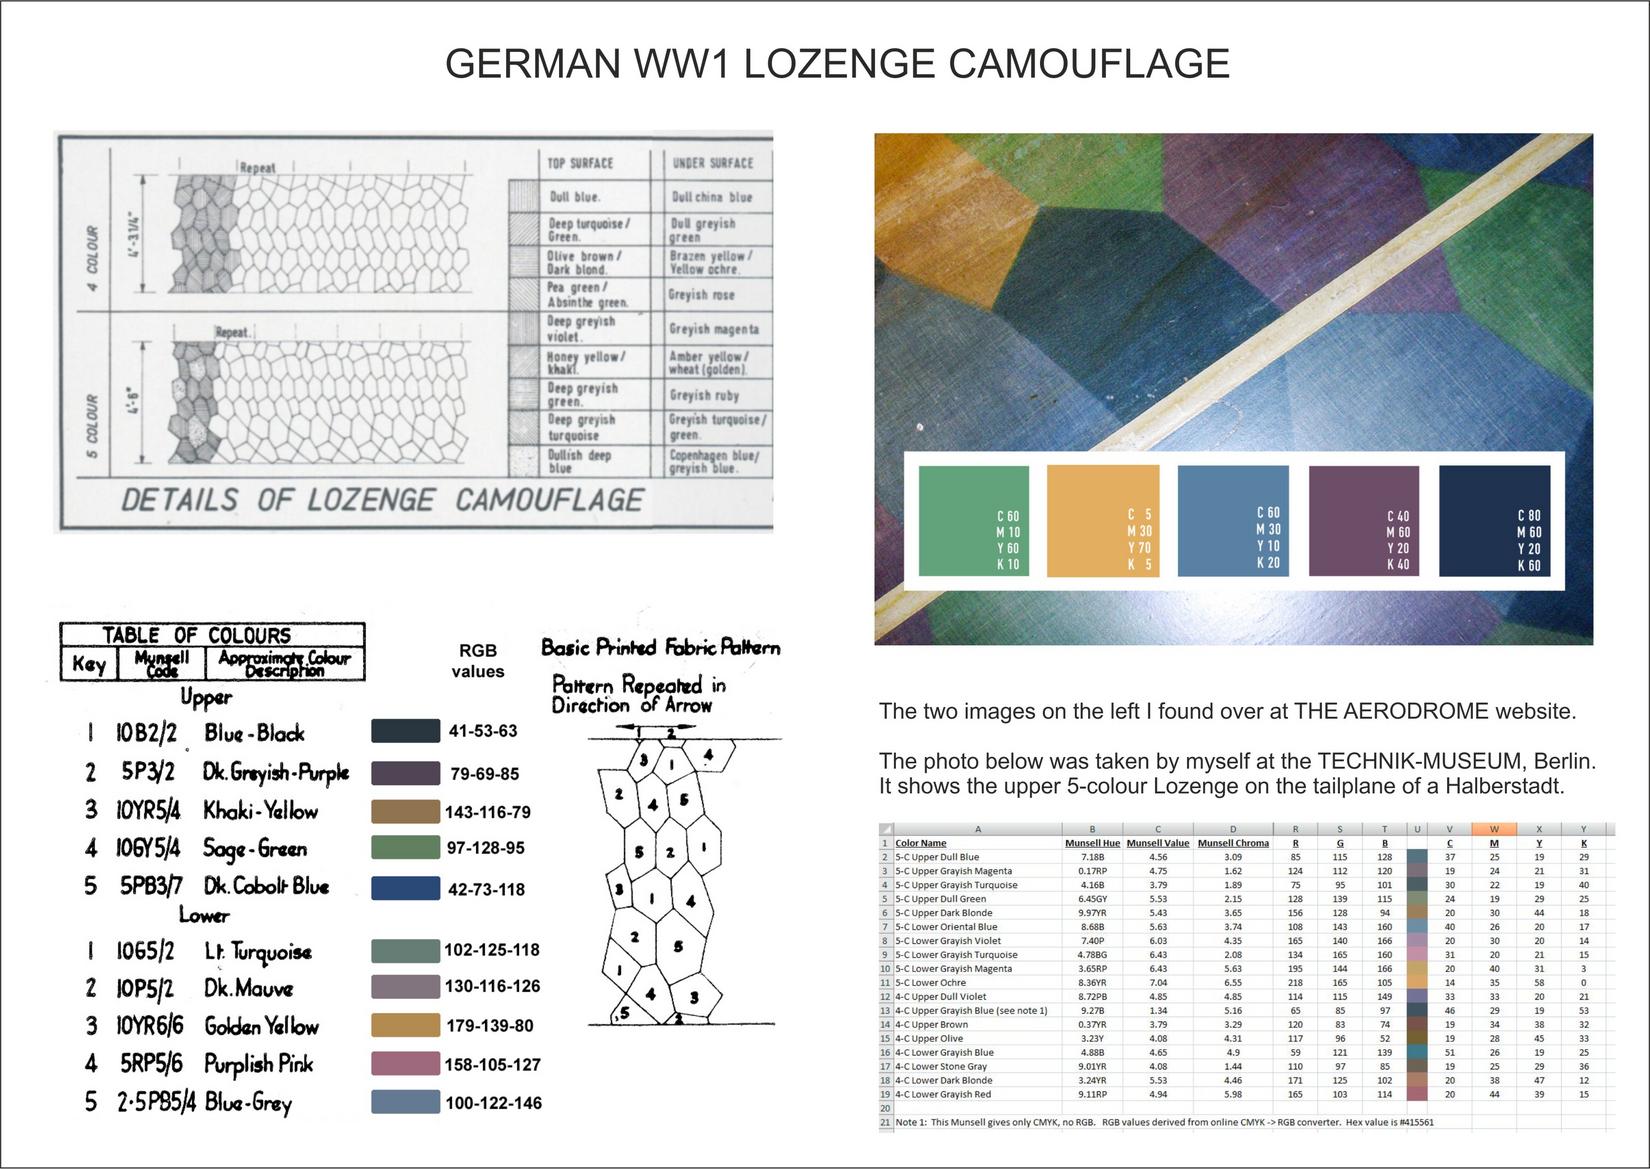


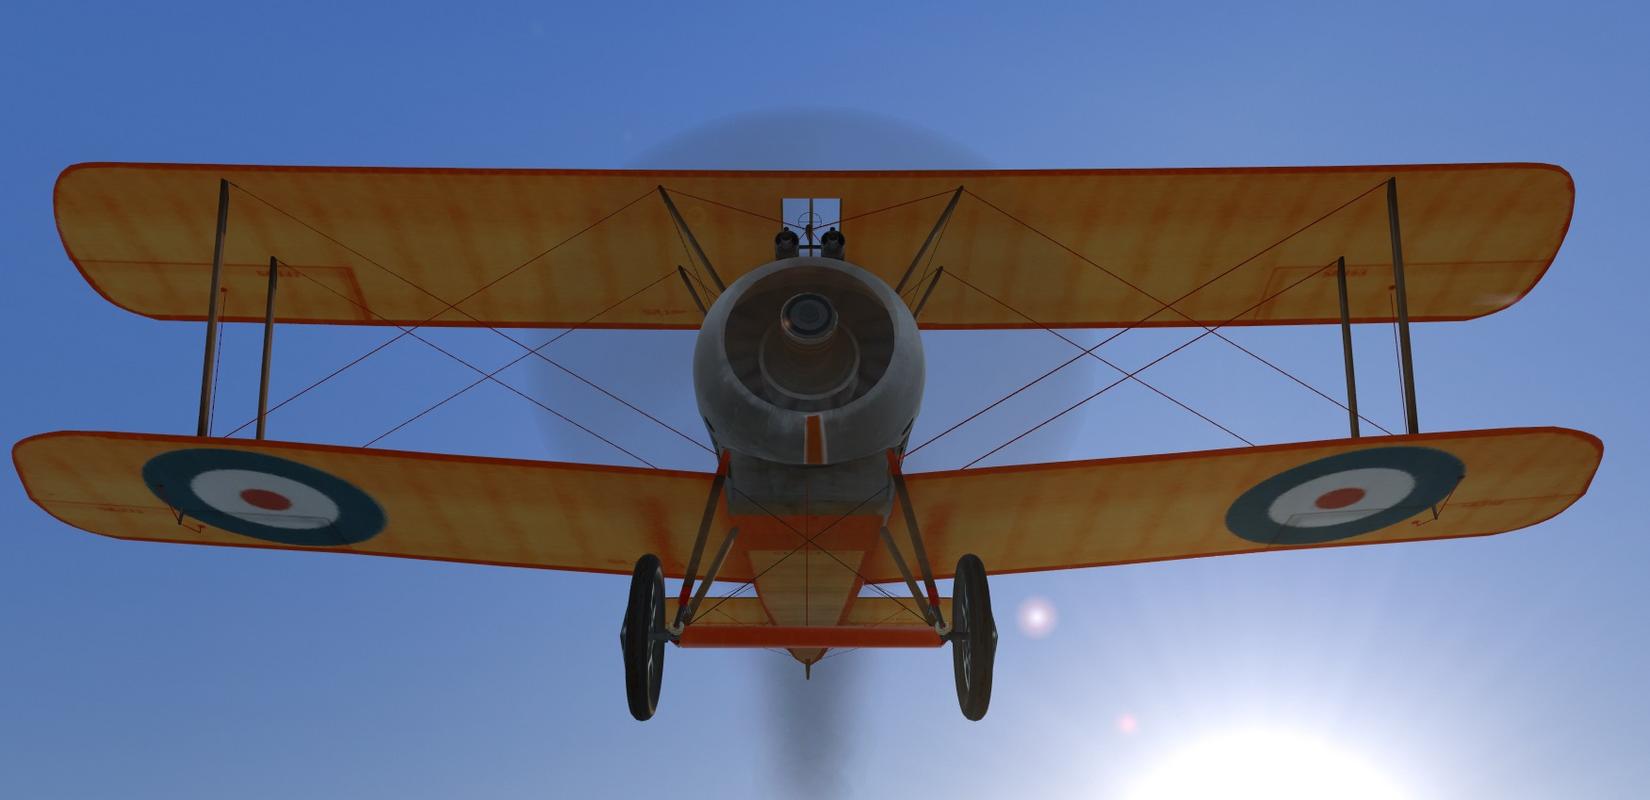


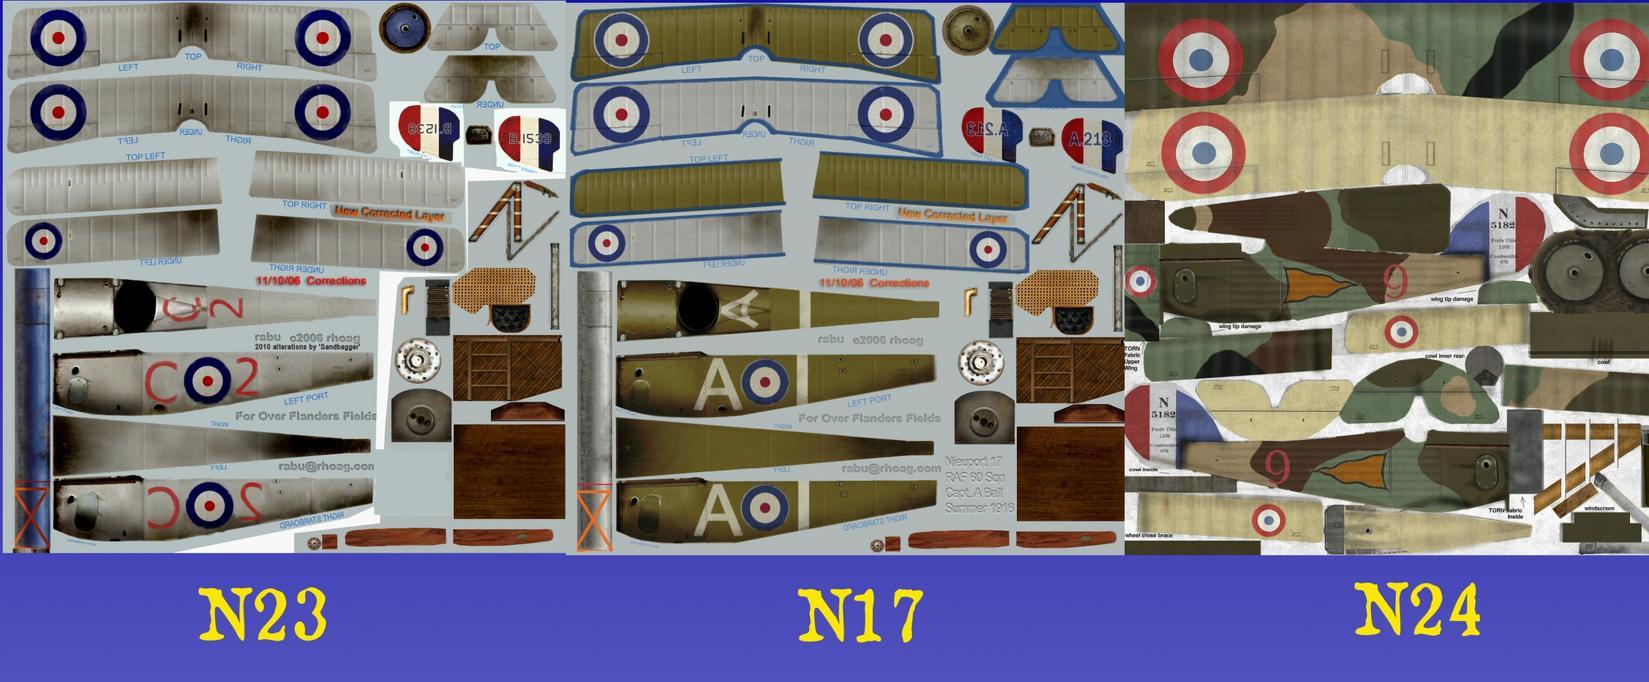

![[Linked Image]](https://mikesww1aircraftmodels.com/HEADER/header.jpg)


![[Linked Image]](http://SimHQ.com/forum/files/16478.png)
![[Linked Image]](http://SimHQ.com/forum/files/16480.png)
![[Linked Image]](http://SimHQ.com/forum/files/16481.png)
![[Linked Image]](http://SimHQ.com/forum/files/16479.png)
![[Linked Image]](http://SimHQ.com/forum/tmp/17623.jpg)
![[Linked Image]](http://SimHQ.com/forum/files/17637.jpg)
![[Linked Image]](http://SimHQ.com/forum/files/17638.jpg)
![[Linked Image]](http://SimHQ.com/forum/tmp/17650.jpg)
![[Linked Image]](http://SimHQ.com/forum/tmp/17657.jpg)
![[Linked Image]](http://SimHQ.com/forum/files/17669.jpg)
![[Linked Image]](http://SimHQ.com/forum/files/17670.jpg)
![[Linked Image]](http://SimHQ.com/forum/files/17671.jpg)
![[Linked Image]](http://SimHQ.com/forum/files/17672.jpg)
![[Linked Image]](http://SimHQ.com/forum/files/17673.jpg)
![[Linked Image]](http://SimHQ.com/forum/files/17674.jpg)
![[Linked Image]](http://SimHQ.com/forum/files/17675.jpg)
 (though I screenshot it, but didn't, it just looked like the original skin...)
![[Linked Image]](https://SimHQ.com/forum/ubbthreads.php/ubb/download/Number/30655/filename/Shot04-10-21-17-55-31.jpg)
![[Linked Image]](https://SimHQ.com/forum/tmp/30671.jpg)
![[Linked Image]](https://SimHQ.com/forum/tmp/30672.jpg)