|
#3928222 - 03/21/14 10:26 PM
 Re: AMT Shelby GT350 build
[Re: adlabs6]
Re: AMT Shelby GT350 build
[Re: adlabs6]
|
Joined: Nov 2004
Posts: 19,794
adlabs6

Veteran
|
Veteran
Joined: Nov 2004
Posts: 19,794
Tracy Island
|
A nice extra couple of hours today to do some airbrushing on the chassis. First though, some pics catching up on other earlier progress. The 90 degree angle ignition wire boots that will (hopefully) plug into the distributor:  I already posted the pic showing my trimming out the fronts of the mag wheels. Here, the solid rears are going to get cleaned out to match. I initially was going to hand drill all those tiny holes then clear the material with by hobby knife. But to save time, I borrowed the use of a Dremel, which only resulted in melting the plastic on it's lowest speed setting. So I borrowed the use of a drill press and a 1/2 inch bit at 750 rpm... Easy. You can see one test fitted to the front rim still on the tree.   And here are the airbrushed tires. Treads were sanded by putting each tire on a shank on an electric drill, and running them on sandpaper. Black airbrushed on the sidewalls, dark gray treads. White letters were done with a tiny wood dowel.  Finally, the chassis! The engine is getting too delicate to handle, and I still have more work to do on it. It looks like I can mount it in the chassis and complete my work from there with only minimal direct handling. I started by joining the firewall to the chassis pan. The firewall was missing some details. Namely, the heater hose holes and blower motor, as well as the steering column hole. The steering column isn't even included in the kit, I'll have to build one later. So I drilled the missing holes:  And a test fit. Note the blower motor (made from scrap sprue and wire) installed in the hole left of the engine. Placeholder sprue steering column sits in on the test. Also, notice there are now two tiny metal ignition wire guides sitting atop the manifold. These should help tame my wiring runs, and will be painted black with the wiring. These wire guides have a long tail, which were pushed down into holes in the manifold. Holes were created with a piece of the same wire heated in a candle and pushed through the plastic.  While I was at it, I noticed that the steering has all the pieces to allow the wheels to be posed left or right, but that they are just glued together. So I drilled out where necessary and will pin them together later (again, hopefully) allowing them to pose.  And now the chassis pan after airbrushing and some drybrushing. This went well. I've had a bit more practice and didn't have any issues with the paint "pooling" or running. I kept the air pressure as low as 6 or 7 PSI during the first "mist" coats, then up to maybe 10 PSI while putting down a more solid color.   
WARNING: This post contains opinions produced in a facility which also occasionally processes fact products.
|
|
|
#3928725 - 03/23/14 04:19 AM
Re: AMT Shelby GT350 build
[Re: adlabs6]
|
Joined: Nov 2004
Posts: 19,794
adlabs6
Veteran
|
Veteran
Joined: Nov 2004
Posts: 19,794
Tracy Island
|
This evening I spent trying to model the fuel line and parking brake linkage. The fuel lines are wire that I bent to shape, and then tacked in place with CA glue. Note near the front of the chassis, where the fuel line begins its extension along the black painted frame member, there is a short black thickness along the line. This represents the rubber hose that joins the two piece steel lines on the 1967 car photos I based this on. Some apparently were solid lines, and it could be that some late 1967 (and apparently 1968 models), the fuel line didn't run along the outside of the underbody, but instead along inside the drive shaft tunnel. The white parts along side the end of the transmission are the parking brake linkage, based on what my pics are showing. New hole in the firewall, and the cable comes down to the angled arm. Then fine wires will reach back from this linkage, on through the two small drilled holes in the brackets on the frame near the rear axle. Brackets are sheet styrene. Engine is glued in place, but the exhaust system is only test fitted (and is still in need of some putty and sanding).   
WARNING: This post contains opinions produced in a facility which also occasionally processes fact products.
|
|
|
#3932267 - 03/30/14 10:46 PM
Re: AMT Shelby GT350 build
[Re: adlabs6]
|
Joined: Nov 2004
Posts: 19,794
adlabs6
Veteran
|
Veteran
Joined: Nov 2004
Posts: 19,794
Tracy Island
|
Weekend update. Some little bits here and there, plus some preparation and planning for future work. Up first, work on the exhaust system. Default kit had no hanger hardware modeled. I crafted these from sheet styrene for those shown in the pics below. The hangers for the tailpipes were crafted from wire.   Next up, after test fitting the body to check a few clearance areas, I found the front fender wells being molded to the body was a huge pain. Having to "stretch" and manipulate this very tight fit in near the delicate engine details just didn't sit well with me. So I decided to cut the wells off the body molding. This will let me detail them better, too.  Test fitted wells on chassis, along with the separate radiator part.  Also cut the trunk opening out, so I can display it open if I wish. 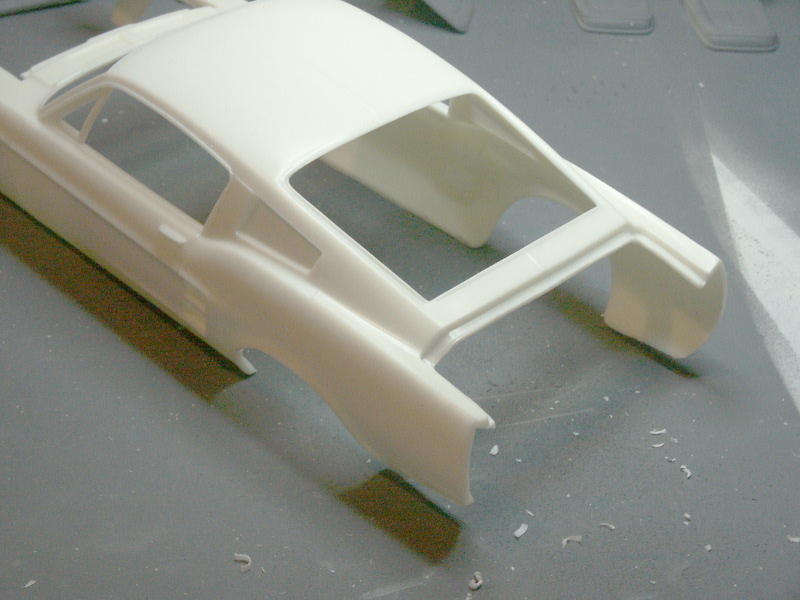 And now after bits of airbrushing, drybrushing, some washes, and brush work. Note the late addition of the rear brake line coming down the drive shaft tunnel. You can see the completed parking brake linkages and cabling, too.   My prior plan to put the ignition wires into Milliput in the little distributor cup I made. This might have worked, but the scale effect was obviously wrong before I was half done. Scrapped the idea, and filled in the distributor solid with Milliput.  Ignition wires were glued direct to the distributor, and are inserted into each of the spark plug boots. Fuel line is installed, and the air filter sits in place for the photo.  Here is the scratch built steering column. After the fender wells are mounted, plus the power brake cylinder, this part will barely be visible.  Some primer and test fitting on the next parts of assembly. 
WARNING: This post contains opinions produced in a facility which also occasionally processes fact products.
|
|
|
#3935470 - 04/07/14 04:03 AM
Re: AMT Shelby GT350 build
[Re: adlabs6]
|
Joined: Nov 2004
Posts: 19,794
adlabs6
Veteran
|
Veteran
Joined: Nov 2004
Posts: 19,794
Tracy Island
|
I've been getting a bit adventuresome this last week. First up, why not make the doors open? Both interior and one exterior done:  Next, the radiator cap area. It's molded as only half a cap, and a bit small/low. As well, this kit includes no shroud.  Cut down to receive the new scratch built parts:  Final product, all sheet styrene buildup.  After some base color airbrushed on, brake system detailing, adding the throttle linkages, and adding a Monte Carlo bar made from some steel wire, it's about done:  Or is it... I became a bit interested in the optional factory Paxton supercharger. Very few were ordered this way, but still adding a 40%+ Horsepower boost is so fun! But it will require ripping out some of the details completed thus far. A test with a piece of paper modeling the general parts requirement.  After cutting up an old ballpoint pen, and gluing some sheet styrene the form is there. Intake box, compressor, and the tube back to the (missing) airbox. The white ring laying on the left side is the accessory drive pully for the supercharger. Will glue on the front of the crankshaft pully.  A quickie carved wooden guestimate of the airbox. Easy to see how to adjust from here while building the plastic part. Also note the tensioner pully and arm reaching above and across the fan pully.  And a full test fit. The airbox will be trimmed with a knife, and then used as an armature for Milliput to get the final smooth shaping. Note the heater hoses have been removed from their original "clean" straight back installation, and routed outboard of the engine, to allow the airbox to seat more tightly against the intake manifold. Probably more correct than the straight run was, too. I also had to remove the metal fuel line, and route it along the same path as the heater hoses, and it makes a change from metal tubing to rubber hose for the final seal into the airbox. Brake boost vacuum line was also re-routed above the now lowered throttle linkages.   Everything seems to have decent clearance beneath when test fitted under hood, too. Monte Carlo bar was reshaped as shown.  Up next, Milliput the airbox! Then wait for a nice (not cold and rainy) day to prime, paint, and fine detail the new parts. In the mean time I will try some detailing on the battery, starter solenoid, and basic electrical detailing. And maybe cut out that other door.
WARNING: This post contains opinions produced in a facility which also occasionally processes fact products.
|
|
|
#3938883 - 04/14/14 03:52 AM
Re: AMT Shelby GT350 build
[Re: adlabs6]
|
Joined: Nov 2004
Posts: 19,794
adlabs6
Veteran
|
Veteran
Joined: Nov 2004
Posts: 19,794
Tracy Island
|
Progress this week was mostly sculpting the supercharger airbox from Milliput, detailing it, plus some work on the fenderwells and bracing. NOTE: The interior of the engine compartment has been drybrushed for some variety and detail. Due to the stretched contrast of some of my photos (so details aren't lost in black/white) the effect may appear excessive. It's actually quite subtle in person. Plus, my fluorescent ring lamp makes everything look flat and crummy compared to reality, IMO. I will have to attempt some better lit shots later. First, the Milliput airbox, ready for sanding.  And after sanding, priming, and painting. Accessory belt was created same as the previous, from masking tape soaked in superglue. Also test fitted in this photo are the braces included in the kit. They are the split braces, as found on US Mustangs (or so I read). The Shelby units appear to have been fitted with the "export brace" which is both one piece, and has two folded creases for strength.  The stock parts are flat and also super thick! See those holes for the useless hood "hinge" pins, those are filled in later photos with sheet styrene, flush with the rest of the fender wells.  My attempt at a scratch re-build of this part. Details are shaped wire of two sizes to recreate the metal pressing, glued on plastic. Also new modeled shock mounts.  And all together, test fitted and detailed. I'm not fully satisfied, but it will work. Note that there is also some painted red metal work from the (still unpainted) fender reaching over under the hood, with it's fasteners. Also you can see the power cable leaving the starter solenoid, and connecting (out of sight in this photo) to the starter.  Rear aspect shot.  So... the new brace will be glued after the body and chassis are permanently joined. It sits atop both for stability, and I didn't want to cut the rear most hood support away from the body, to ensure easy body/chassis alignment later on. Easy enough. Next week, I'm hoping to model a few bits of the ignition wiring harness leading to the starter solenoid, blower motor, and alternator.
WARNING: This post contains opinions produced in a facility which also occasionally processes fact products.
|
|
|
#3938995 - 04/14/14 02:06 PM
Re: AMT Shelby GT350 build
[Re: Arthonon]
|
Joined: Nov 2004
Posts: 19,794
adlabs6
Veteran
|
Veteran
Joined: Nov 2004
Posts: 19,794
Tracy Island
|
Again, impressive work. My model building skills are rudimentary in comparison  I'm starting a Mustang kit of my own, and it will not come close to what you're doing with this one. Ah, which Mustang kit? And as to what I may do... I am just looking to have fun trying new stuff and exploring the "how-to" side of it. This build is like a huge practice session.
WARNING: This post contains opinions produced in a facility which also occasionally processes fact products.
|
|
|
#3939227 - 04/14/14 08:10 PM
Re: AMT Shelby GT350 build
[Re: adlabs6]
|
Joined: Sep 2004
Posts: 10,571
Arthonon
Veteran
|
Veteran
Joined: Sep 2004
Posts: 10,571
California
|
Again, an amazing set of photos - such detailed work.
The kit I'm working on is the 2013 Boss 302 that was just released by Revell. It's the closest thing to my 2014 GT that's available, so I'm going to try to make it look like mine.
Externally, they're almost identical with the differences being different rims, different logos (different pony on the grill, no "5.0" on the side), a slightly larger front splitter, and no grill driving lights (although there are some cutouts where they would be). Inside the main difference is that the Boss doesn't have the navigation screen, and mine does. The engines look very different when looking under the hood.
I bought three copies, and am using the first one as a test mule. Like I said, my building skills are pretty rudimentary, so it will be a while before I get them up to speed, but I thought I'd do the best I could in the meantime.
|
|
|
#3942092 - 04/20/14 06:24 PM
Re: AMT Shelby GT350 build
[Re: adlabs6]
|
Joined: Nov 2004
Posts: 19,794
adlabs6
Veteran
|
Veteran
Joined: Nov 2004
Posts: 19,794
Tracy Island
|
This past week I've been working on finishing up a few smaller things, and thinking ahead to some problems like making the hinges and such. I've also made a list of things I want to try, and bought the parts/materials to do them. Items purchased include: 1/16th inch K&S Brass rod (for hinges) 1/8th inch Evergreen styrene tubing (for hinges, brass rod will pass through this tubing) K&S .030 clear plastic sheet (for scratch building new thinner windows) Testors Contour Putty (lots of body work to get a clean fit) Scenes Unlimited white resin Torque Thrust wheels (my favorite mag wheel, see pics below) Bare Metal Foil (instead of silver paint on the chrome trim) Detail Master rectangular photo etch grille (see cutaway pics below) Detail Master white velour flocking (interior carpeting, to be airbrushed to desired color) Vallejo satin varnish (to get an even surfacing here and there) So including the kit and the Vallejo paints I bought to start, I'm right at $100 spent on this one. Not what I had in mind when I started, ouch.  So now some pics of the last week. Drivers side fender well details, windshield washer pump and plumbing, plus electrical to the front. All but invisible once installed, but hey...  Here are the unpainted white resin wheels. I was really pleased with the detail on these!  I was not too happy to see how poorly the nose cowl fits to the body molding. Some huge holes (too big to even be called gaps!), hence the filler putty. No idea how the rear cowl will fit yet.  Some final details under the hood. Here you can see the blower motor wiring (and maybe the main electrical leads coming down to the starter solenoid). Also the air filter can and it's flexible hose are in place. Radiator cap and overflow line. Radiator hose and clamps.  From the other side. Just a few paint touch ups left. Yes... I will use the anti-static brush to get rid of the plastic shavings!  Stock grille molded into the cowling. I cut it out (preserving the Shelby badge) and will replace it with the Detail Master rectangular grille.  Coming next I must pay attention to the hinges. They play into the engine compartment and the interior, so I need to get them in the right place and finalized, along with door jambs. Here, the stock molding for the interior sidewalls.  I chose to drill out the courtesy lights, drilled a through hole for the roll bar. I've decided to model the "mandatory optional" fold down seat in it's folded position. So I scraped off the molded in supports for the seat back, and crafted the latch mechanism using some styrene and copper wire.  Here is the body with the painted resin wheels in place. I have always liked the Torque Thrusts, I think they'll look great on this car. Also see driver's door is cut out now.  A shot of the coil springs and shocks I made to replace the stock "all in once piece" molded part. Spring is from a junk ballpoint pen. 
WARNING: This post contains opinions produced in a facility which also occasionally processes fact products.
|
|
#3942120 - 04/20/14 08:17 PM
 Re: AMT Shelby GT350 build
[Re: adlabs6]
Re: AMT Shelby GT350 build
[Re: adlabs6]
|
Joined: Jun 2012
Posts: 946
tempusmurphy
Member
|
Member
Joined: Jun 2012
Posts: 946
outside London
|
using the spring from a ballpoint pen is inspired ...fantastic build Adlabs looking forward to seeing the completed kit
Dont think of it as being vastly outnumbered ... but just having a large target selection.
The only thing more accurate than incoming fire, is incoming friendly fire
Tracers work BOTH ways...
" I have a cunning plan my lord "
|
|
|
#3945439 - 04/27/14 10:13 PM
Re: AMT Shelby GT350 build
[Re: adlabs6]
|
Joined: Nov 2004
Posts: 19,794
adlabs6
Veteran
|
Veteran
Joined: Nov 2004
Posts: 19,794
Tracy Island
|
I was working on little bits all over the model the past week. Most of these were done in little half-hour stints. Sorry for this huge post, it was longer than I expected. This is a comparison of the stock kit drum brake positioning (as best I could determine) and my modifications to get the drum inside the wheels.  The parts... Left two are stock, right three are mod.  Finished product, also visible through the mag wheels.  The disc brakes also sat a bit inside, but worse had the caliper detail on just the inside. So I removed the calipers and recreated them. Drilled out the discs to fit them within the wheel a bit better, too.  Final unsanded disc brakes.  Rear suspension, showing brake lines and the scratch built "snubber" mount on the differential. Modified drum brakes are ready for the mags/tires to be superglued in place.  And the underbody with all the brake and suspension parts resting in place.  The same assembly flipped over (carefully, lol) and sitting up on bottle caps. The wheels are positioned as close to correct as I can get it for this test. I had to raise the rear suspension by .040" to get a good looking height, rear track was fine without a touch. Front track had to be narrowed by about 1/8th of an inch to get the wheels under the body!  Preparing a bit for the interior flocking. Stock floorboard was way forward compared to photos.  Also it had the squarish effect (actually the rear of the firewall molding) around the tunnel, also not apparent in photos.  So I made a new sheet styrene floorboard. Photos below show it in place, but without the putty to blend the seam.    Reading suggests that those "GT350" floormats so often in photos didn't come along until the 1970s, and in fact the car didn't ship with any mats. Buyers could apparently option some stock Mustang mats if desired. I will simply model the basic mud guard which is part of the forward carpet section.  Working to drill out the body side air scoops.  Today I spent about 3 hours working on the hinging. Everything worked, but I am tired. The trunk was easy, just half an hour. But the hood... getting it integrated into the engine compartment section was incredibly slow and tedious. Not to mention risky with all those little parts jammed in there. If there is a moral to this post, or indeed this entire thread... it should be: HINGE BODY PANELS BEFORE DOING ANYTHING ELSE! So here are the results. Trunk is fitted, but needs some minor tweaks. Hood is not done, I'm beat so I'll work on that later.       And a few other shots not included above. First, the finished air scoops, plus the door jambs made from sheet styrene. Seat sitting in place for reference.  The front cowl had a poor fit as you may recall, but I did some scraping and it glued up pretty nicely and is ready for putty. Rear panel glued up very clean as shown above. Also opened up the hood scoops. 
WARNING: This post contains opinions produced in a facility which also occasionally processes fact products.
|
|
|
#3949085 - 05/05/14 01:00 AM
Re: AMT Shelby GT350 build
[Re: adlabs6]
|
Joined: Nov 2004
Posts: 19,794
adlabs6
Veteran
|
Veteran
Joined: Nov 2004
Posts: 19,794
Tracy Island
|
This past week, I have continued to work on hinging, and preparing the interior for near future assembly steps. First, the flocking. I tried four (4) times to flock the interior, and each failed. I will spare you all the photos of disaster. Just imagine a clumpy, uneven mess, and you will get the pics. First 2 attempts were following the several internet tutorials on flocking. 1) Apply a white glue/water mix with a brush. 2) Sprinkle flocking using a sifter. 3) Gently press the flocking into the glue. 4) Allow to dry a few minutes, tap away excess, or use a soft brush. 5) Gentle blast from a hair dryer to clear away final loose parts. Then you are supposed to repeat to either fill in empty areas, or to gain thickness. I never attempted a second coat, as the first applications were such horrible results. Each time after about 30 minutes of drying, I simply peeled off the white glue film and it was un-done. Attempt 3, I switched to the tutorials out there which recommend paint as the adhesive. I used some orange acrylic, of which I had a bunch with no plans to use it. (Remember, the colors don't matter as I intend to airbrush it to the correct color.) Same steps as above attempts. This time, I never even got to the hair dryer. The results were so clump and lumpy after tapping away the excess, it was obvious to pull the EJECT handle ASAP. This was a big mess. Wet a cotton swap on a wooden stick and scrub. Repeat. Repeat. Complete waste of time. Attempt 4 it was back to glue. What could be going wrong? Was I not pressing the flocking down gently enough? So I go through the steps again, with ever so light pressure to seat the flocking into the glue. And on the new forward floorboard, I just didn't press at all! And when I tapped away, and later used the hair dryer, I could see it. Where I had NOT pressed, I had good, even coverage! Otherwise, the results were near the same as before. The quality result where I had not pressed was the answer, so again I stripped off all the flocking/glue. So attempt 5... Zero pressing. Zero touching of the flocking at all, not even with the soft brush. Sift, and tap away the excess within 30 seconds or so. Success! It was thin, but clean and even. After it was dry several hours, I repeated again with zero touch and got a nice, even, and fuller coverage. Again, dry thoroughly, and then airbrush. You can still see a bit of the orange remaining. It'll never show. I'm pleased with the result, but ouch on the time invested to get it. At least I learned how to do it!  Also spent a bit of time doing some prep coats and washes on the "parchment" color interior parts.  Next was another problem from last week. My hinging on the trunk impacted the body work on first open, and then was resting on the bodywork/rear window at full open. You can imagine the disaster for the paint later on. So I worked on the geometry problem a good while. The solution was in moving the pivot axis farther forward, to attain more lift during the opening arc. This presented a new problem, however, as the hinge was as far forward as possible without clipping into the interior (and being visible through the rear window). So I had to use two separate hinges, each reaching outboard to the fenders, rather than a single piece hinge across the middle. New hinge results:  Trunk lid doesn't impact the body, and lifts nicely at full open.  The hood pivot axis was OK, and when I got my styrene hood hinge details modeled, they worked fine.  These are made from styrene tubing and strip stock, to better model the real hinges. They are in the wrong place (rather than opening from within the engine compartment, they stow within the fender well area), but they look better IMO. The brass rod never is visible from under the hood, and retracts neatly behind the dashboard in the interior, out of sight.  Here you can see the new trunk hinge placement.  And I did a bit with my gloss and satin varnishes. Some under the hood (no good pic), and some on the wheels. 
WARNING: This post contains opinions produced in a facility which also occasionally processes fact products.
|
|
|
#3949095 - 05/05/14 01:35 AM
Re: AMT Shelby GT350 build
[Re: adlabs6]
|
Joined: Dec 2008
Posts: 2,939
Scoobe
Senior Member
|
Senior Member
Joined: Dec 2008
Posts: 2,939
|
Great detail on those tires and seats! Can't wait to see it finished.
How do you do the white lettering on the tires? Looks very time consuming but the result is great.
Rob
Intel Core i7-3770K
GB (4 x 4GB) 240-Pin DDR3 SDRAM DDR3 2000 (PC3 16000)
MSI GTX 960 GTX 4GB
|
|
|
#3949109 - 05/05/14 02:48 AM
Re: AMT Shelby GT350 build
[Re: adlabs6]
|
Joined: Nov 2004
Posts: 19,794
adlabs6
Veteran
|
Veteran
Joined: Nov 2004
Posts: 19,794
Tracy Island
|
Hi Scoobe, thanks!
For the letters I used a little scrap of telephone wire, stripped to the bare copper. I lock the wire in a pair of forceps for easy handling. I dip in white paint, wipe off the "blob" on the tip of the wire, and use the remnant of paint to build up the color on the raised details.
Wiping off most of the blob of paint on the end of wire helps prevent a flow from filling in the details.
WARNING: This post contains opinions produced in a facility which also occasionally processes fact products.
|
|
|
|


