Previous Thread
Next Thread
Print Thread
Rate This Thread
Hop To
Page 1 of 112 1 2 3 111 112
#3899105 - 01/21/14 03:55 PM MMJoy/MMjoy2 - Set your own USB controller with a cheap Arduino *****  
Joined: Nov 2001
Posts: 3,955
Sokol1 Offline
Senior Member
Sokol1  Offline
Senior Member

Joined: Nov 2001
Posts: 3,955
Internet
Update: MMjoy2 USB 2.0

What is MMjoy2?

A free firmware developed by Mega_Mozg13 for make USB joystick controller using specific versions of Arduino/Teensy prototype boards, without need to assembly circuit boards or write computer code or deal with Arduino "sketches".

Solder tools and skill is need to assembly pins in some Arduino boards, as well to attach potentiometer, sensor, buttons as in any joystick.

Hardware needed: ~5$ Arduino PRO Micro (ATMEGA32U4) clone (or ~20$ Sparkfun/Teensy versions). Other supported boards linked bellow. Sample:

[Linked Image]

IMPORTANT - Arduino PRO MICRO with ATMEGA43u4, 16 MHZ, 5V.

Firmware : MMjoy2 - is loaded in Arduino board through a USB cable with MMJoy2 JoySetup software:

[Linked Image]
https://s31.postimg.cc/j2e3t3v5z/Teensy2.jpg

Firmware and MMJoySetup download: https://sites.google.com/site/mmjoyproject/fajly-dla-skacivania <<< Always check if MJoySetup and firmware are with same date (or redundance error will occur).

Firmware MMjoy2 Download.

Tutorial for firmware upload - by Geneb(F15SIM): http://www.geneb.org/mmjoy2/pro-micro-instructions.pdf

Sample of firmware upload, using Teensy 2.0+: http://forum.il2sturmovik.com/topic/18379-teensy-20-mmjoy2-firmware-joystick-controller

Features (latest firmware):

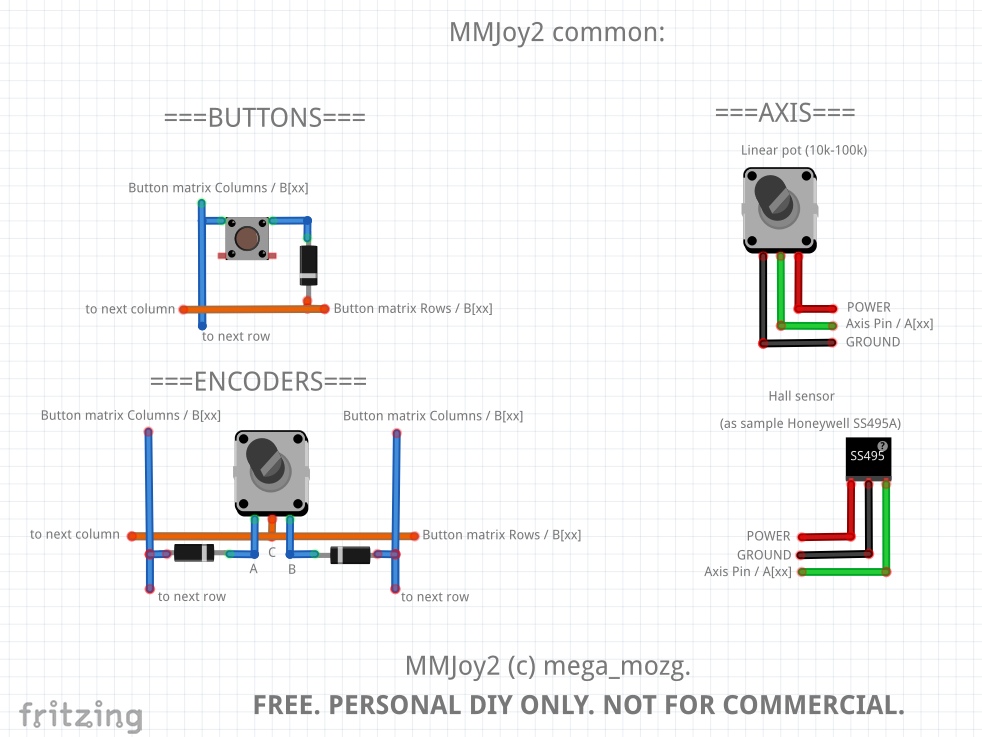
Buttons: Up to 128 - Notice that 128 buttons was possible in some boards only due pinout limitations, see in links bellow.
Buttons connection require use of Diode Matrix or Shift Register circuits. Sample o DIY Shift Register board, by Debolesis (ED forum).

Encoder - up to 6, adjustable "click" times

Axis: Up to 8 axis using the internal 10 bits (1024 points) ADC or up to 8 axis using 12 bits (4096 position) using external ADC MCP3201, 3202, 3204, 3208 (the last digit indicates supported axis number)

Inputs (axis) in analog mode:

Conventional potentiometer, Linear type (B code), 1k to 100k, ideally use 10k.

HALL sensor: Radiometric linear, example Honeywell SS495A1, Allegro A1324

Inputs in digital mode:

TLE5010/5011, KMA200, KMZ60 + MCP3202 magnetic resistence sensors.

* TLE5010/11 has internal ADC 14 bits.

8 way PoV HAT.

Special functions:

- "Shift" (mode) function, allow a physical button press a virtual button if "shift" are ON.
- Compatibility with shift registers used in F-22 PRO, Cougar, Warthog and Cobra M-5 grips, making use this grips "plug-and-play".
- "Joystick" name, VID, PID defined be user as desired, allowing use several MMjoy2 in the same computer.

If you want configure MMJoy as "2 axis and 1(or 0) button joystick" you can.

Update December 2015:

Quote
Firmware has support for up to 128 buttons + 10 axis inputs (2 axis reserved for mouse emulation, Windows Game Controllers see up to 8 axis), number of buttons use depend on Arduino board number of pins available.
Possibility to use for joystick: 128 buttons + 2 HAT's (8 buttons) + 8 axis
Possibility to use for mouse emulation: 3 buttons + 2 axis
Possibility to use for keyboard emulation: 12 buttons (or 15 without "mouse")

To maximize the MCU (Arduino board) pins use:

For axis - MCP3208 external ADC, what allow use 8 channel 12 bit (4096 poins of resolution), and free 4 pins on Arduino and allow 8 analog axis inputs.
For buttons - shift register IC 74HC165 or CD 4021B (this free 3 pins on Arduino and allow UNLIMITED button sources chaining one Shift Register IC in another, each manage 8 buttons)


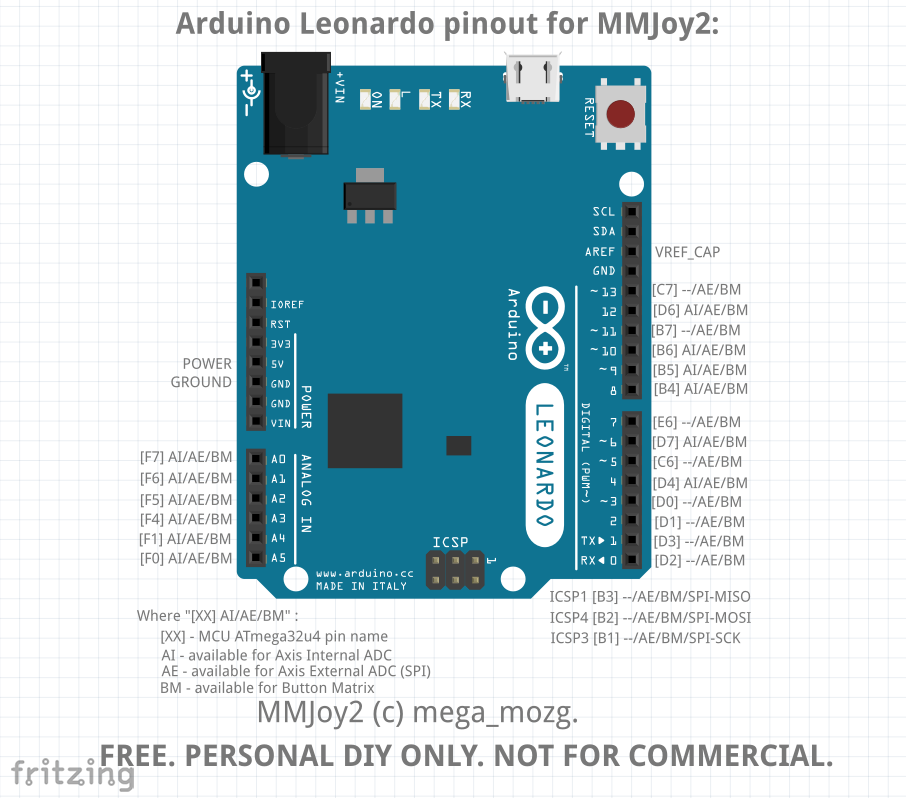
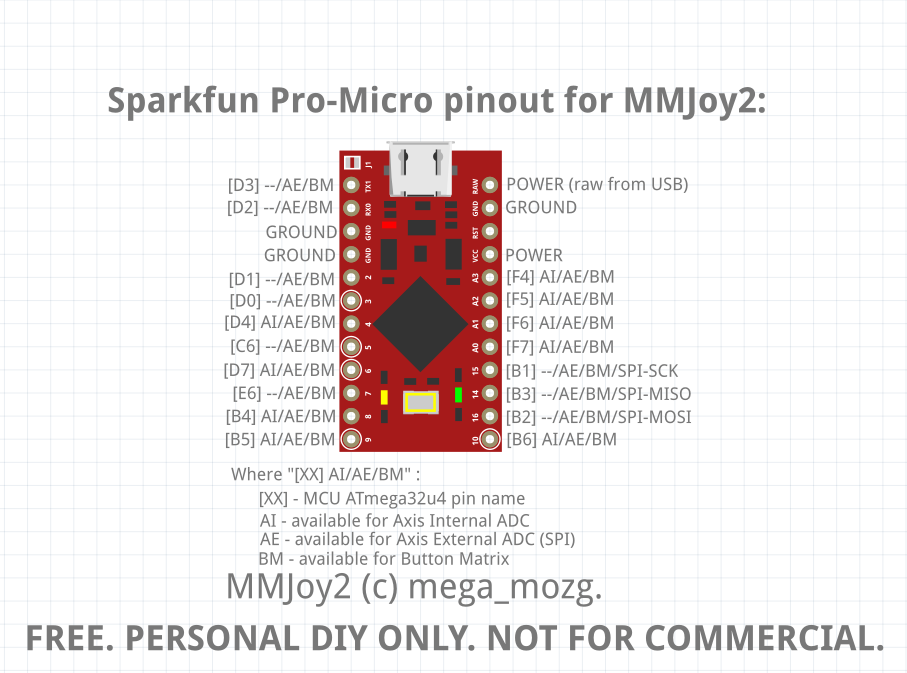
Compatible Arduino boards - should use ATMEGA32u4, ST90USB646, ST90USB1286 m/c (16 MHZ, 5V):

1

2

3

For MMJoy firmware/Configurator download see the more recently Mega_Mozg links (end of topic), or there:

https://sites.google.com/site/mmjoyproject/fajly-dla-skacivania

https://github.com/MMjoy/mmjoy_en/wiki

Related topics in Russian language forums:
https://forum.warthunder.ru/index.php?/topic/64234-mjoy-mjoy8-mjoy16-mmjoy/

Skip the DIY build boards part (first posts - like here) with today available and cheap Arduino boards the DIY ones became obsolete.

http://forum.il2sturmovik.ru/topic/...a-i-soft-dlya-samodelnogo-k/#entry435954

In English:

http://forums.eagle.ru/showthread.php?t=120049

=============================================================================================================

Debolestis PCB Layout for make DIY Shift Register boards (Cougar/Warthog compatible):

[Linked Image]
http://i.imgur.com/Kx6YvcD.jpg

http://forums.eagle.ru/showpost.php?p=2780923&postcount=89

Sample of Diode Matrix connections (using BU0836 as example):

[Linked Image]

Sample of layout for TLE5010-11 sensor PCB - included in MMjoy2 package, folder PCB.

[Linked Image]

Others:

https://oshpark.com/profiles/Debolestis
https://oshpark.com/profiles/rel4y

====================================================================================================================

IMPORTANT:

Flash the firmware in the Arduino don't create a ready to use josytick controller, but a blank template with 0 axis, 0 buttons:

[Linked Image]

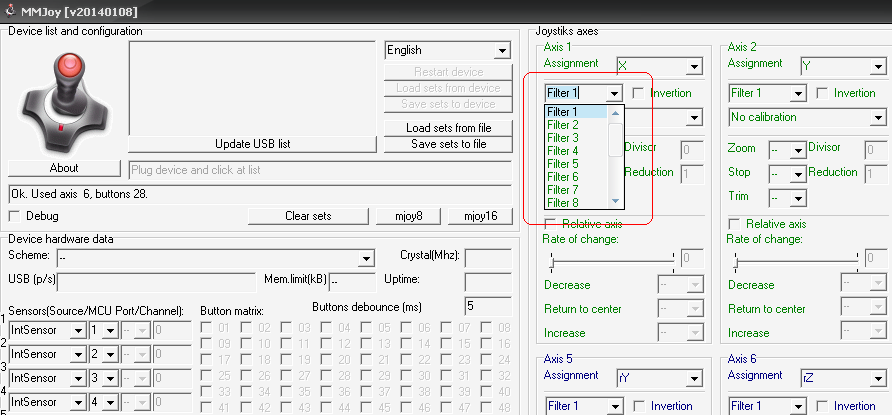
For you customize like your needs defining number of axes: 0 to 8 axes, number of buttons: 0 do 128 buttons, joystick name, VID/PID... use MMJoySetup program, filing the options and after "Save sets to Device".

===============================================================================================================

WARNING (02/20/2017): Is know that MMJoySetup - the firmware flash, configuration utility - don't run in Windows in Chinese language, and virtual machine running English Windows don't help - the COM port is not seem.
In that cases is need a computer/laptop running a Windows in English, German or Russian for run MMjoySetup.


Original topic about MMjoy -now obsolete:


What is MMJoy?

A new firmware developed by MEGA_Mozg, for the old (2004) Mindaugas/Meandog project MJoy (DIY USB Controller based on ATMEL mc), that besides original Mjoy8 or Mjoy16 board works on "developer� METABOARD, AVR_USB_MEGA16 and Arduino based Teensy 2.0 and Leonardo PRO Micro (Chinese clones cost ~5$ in eBay).

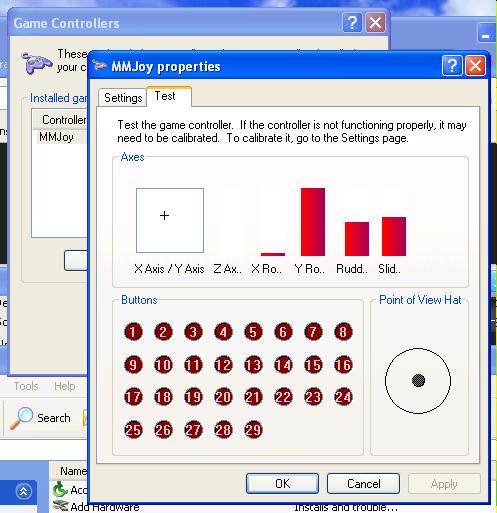
Is a configurable joystick firmware, after write MMJoy firmware on your board (require USB ISP programmer cable), this is recognized by Windows as USB HID device, but not as �joystick�, because since the firmware is configurable, are you that define the �joystick" parameters, to this use the program &#147;Configurator�, via standart USB cable:

[Linked Image]

MMJoy main features:
Quote


2 to 8 axis (10 bits= 1024 points of resolution with ATMEGA32u4 ADCand 12 bits= 4.096 points of resolution with external ADC)
- Support for axis in digital mode with external ADC converter (MCP3201/MCP3202/MCP3204/MCP3208 and KMA200)
- Axis inversion in firmware
- Axis auto-calibration (optional)
- Axis ZOOM mode (momentary � by button press - reduce axis response to improve precision)
- Axis STOP mode (momentary � by button press � �freeze� axis response)

0 to 48 buttons in momentary or toggle mode (in Windows buttons after 32 need keymapper)

4 encoders (each encoder take 2 button position).

POV HAT (8 angles)

User defined �joystick� name with up to 10 characters.
User defined VID and PID number � this allow use more than one MMjoy on same computer without conflict, set the MMjoy joystick to be seem by Windows first or after �COTS� joystick.


Code Google project page (In Russian, but easy readable with Google Translator).

https://code.google.com/p/mmjoy/

Actually the cost of Teensy 2.0 or Leonardo PRO Micro assembled boards make almost senseless DIY cards, but since different world regions have restrictions to import (here import fees double prices) is easy to do.

EDIT - What "hardware" is need to start?

A Teensy 2.0 (Teensy 2.0++ firmware WiP, see bellow) or Leonardo Pro Micro board.
PCI pins for connection (optional).
A USBASP USBISP AVR Programmer cable to transfer the firmware from PC/Laptop.


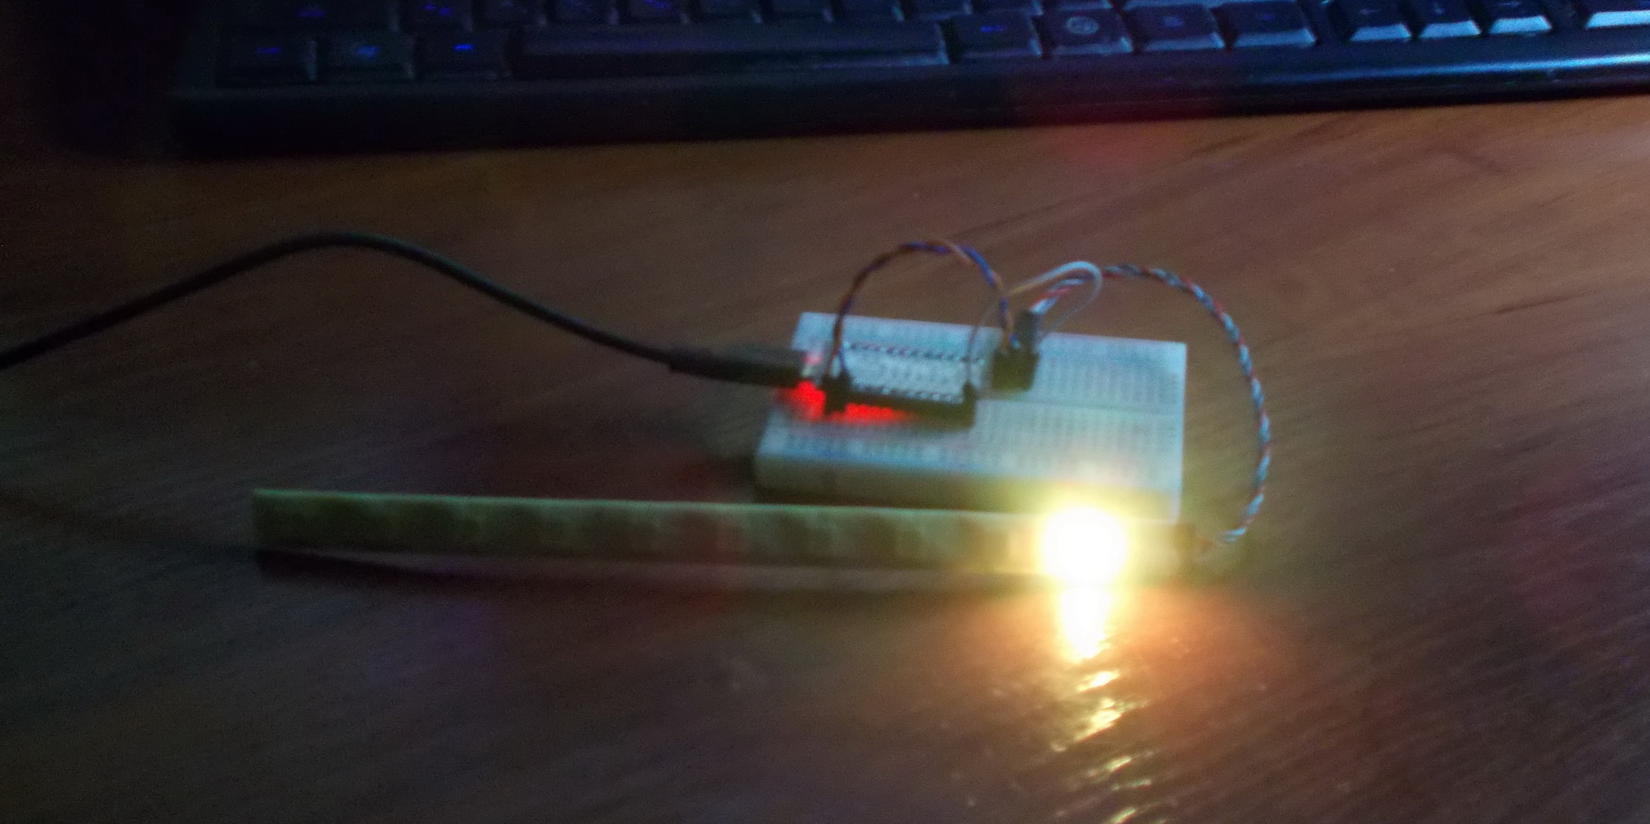
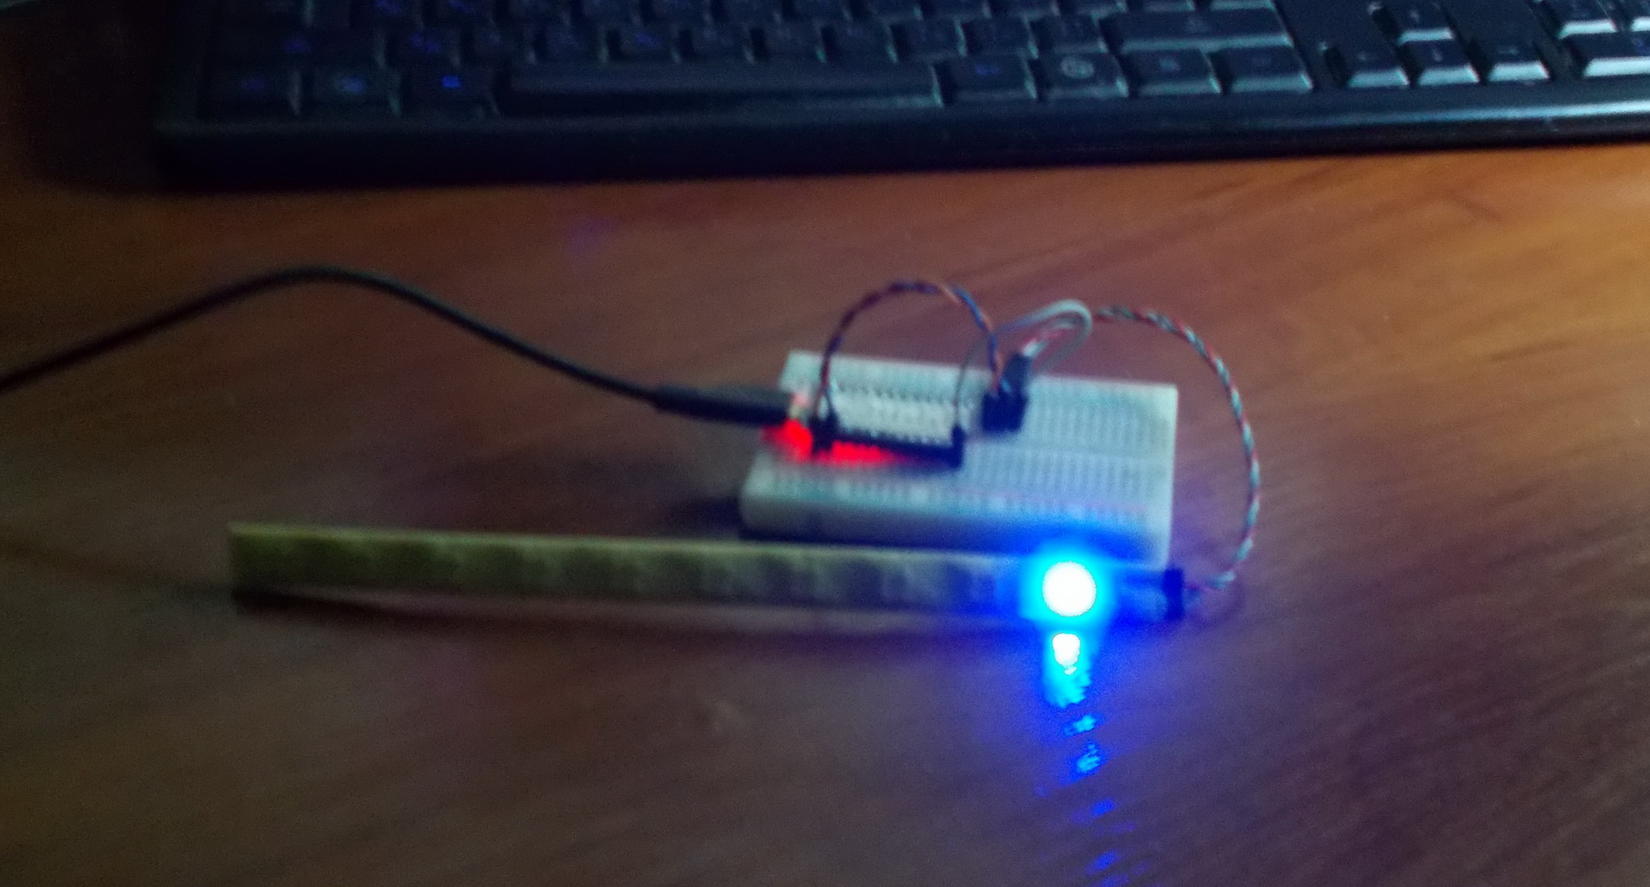
Sample: DIY Mjoy16 (ATMEGA16-16PU) that I build in 2008 and now re-write with MMJoy firmware.

[Linked Image]

My LPT1 DIY programmer cable (now obsolete):

Other Mjoy, used to "USB'erized" a gameport CH PRO pedal - "Bic" HALL sensor on rudder axis (notice some RC linkage wink ).

http://img97.imageshack.us/img97/1040/mjoy83x.jpg

When I start with this, the only thing I know is how do "acceptable solders", and that in electricity "+" and "-" dont can be mixed - but my first Mjoy make some smoke (and survive). smile


Sokol1

Last edited by Sokol1; 08/20/22 12:26 AM. Reason: Tipo
Inline advert (2nd and 3rd post)

#3899138 - 01/21/14 05:20 PM Re: MMJoy - Build your own USB controller [Re: Sokol1]  
Joined: Jan 2004
Posts: 1,221
f15sim Offline
More projects than sense!
f15sim  Offline
More projects than sense!
Member

Joined: Jan 2004
Posts: 1,221
Graham, WA
If you want to use the Teensy++ 2.0 board, you can use GenericHID: http://generichid.sourceforge.net/

g.


Proud owner of 80-0007
http://www.f15sim.com - The only one of its kind.
http://geneb.simpits.org - the Me-109F/X Project
#3899342 - 01/21/14 10:56 PM Re: MMJoy - Build your own USB controller [Re: Sokol1]  
Joined: Nov 2001
Posts: 3,955
Sokol1 Offline
Senior Member
Sokol1  Offline
Senior Member

Joined: Nov 2001
Posts: 3,955
Internet
Gene,

I know some other firmware for use Arduino (like Teensy) boards as joystick controller.
But since MMjoy do the same and more, is configurable, and develop by simmers is (my)
natural choince.. smile

Sokol1

#3900104 - 01/23/14 03:10 AM Re: MMJoy - Build your own USB controller [Re: Sokol1]  
Joined: Apr 2011
Posts: 106
recoilfx Offline
Member
recoilfx  Offline
Member

Joined: Apr 2011
Posts: 106
Sokol, what do you do to keep the noise down? I had my Teensy3/Arudino Uno hooked up my supposedly high quality pots, but the outputs jitter... They don't show any jitters with BU0836x or UHID.

Does MMJoy use some special filters? Better, if there is a way to port it over to Teensy/Arduino...

#3900313 - 01/23/14 03:19 PM Re: MMJoy - Build your own USB controller [Re: Sokol1]  
Joined: Nov 2001
Posts: 3,955
Sokol1 Offline
Senior Member
Sokol1  Offline
Senior Member

Joined: Nov 2001
Posts: 3,955
Internet
I dont have experience with Teensy, only with Mjoy DIY boards (~8), with pots have no jitter, and some with HALL sensor, is need use shielded cables.

AFAIK - MMjoy firmware are ported for Teensy 2.0 - is just matter or write via USB ISP cable - but not for 3.0

Sokol1

Last edited by Sokol1; 01/23/14 06:17 PM.
#3902291 - 01/27/14 06:20 AM Re: MMJoy - Build your own USB controller [Re: recoilfx]  
Joined: Jan 2014
Posts: 274
mega_mozg_13 Offline
Member
mega_mozg_13  Offline
Member

Joined: Jan 2014
Posts: 274
BELARUS, Minsk
Hi to all. I'm author of software/firmware MMJOY.

Originally Posted By: recoilfx
Does MMJoy use some special filters?

Firmware have software filtration algorithms. Have 15 steps of filtration settings.
"Filter #1" - no filtration, clear signal from sensor;
"Filter #15" - maximum filtration;


Any questions and(or) ideas are welcome!

#3902377 - 01/27/14 01:30 PM Re: MMJoy - Build your own USB controller [Re: Sokol1]  
Joined: Apr 2011
Posts: 106
recoilfx Offline
Member
recoilfx  Offline
Member

Joined: Apr 2011
Posts: 106
Hi Mega, thanks for the reply! Is the filter function an average of multiple analog reads? Can the algorithm looked up somewhere? I'd like to implement my filter code for my Teensy3...

#3902564 - 01/27/14 06:13 PM Re: MMJoy - Build your own USB controller [Re: recoilfx]  
Joined: Jan 2014
Posts: 274
mega_mozg_13 Offline
Member
mega_mozg_13  Offline
Member

Joined: Jan 2014
Posts: 274
BELARUS, Minsk
Originally Posted By: recoilfx
Is the filter function an average of multiple analog reads? Can the algorithm looked up somewhere?


Look here: https://code.google.com/p/mmjoy/source/browse/
Folder: common_libs
File: MMJoy.c
Function: Axis_Filter()

PS: All project materials are open source.

#3902643 - 01/27/14 08:01 PM Re: MMJoy - Build your own USB controller [Re: Sokol1]  
Joined: Apr 2011
Posts: 106
recoilfx Offline
Member
recoilfx  Offline
Member

Joined: Apr 2011
Posts: 106
Yep got it! Thanks! Will look through it tonight!

#3903870 - 01/29/14 05:21 PM Re: MMJoy - Build your own USB controller [Re: Sokol1]  
Joined: Jan 2004
Posts: 1,221
f15sim Offline
More projects than sense!
f15sim  Offline
More projects than sense!
Member

Joined: Jan 2004
Posts: 1,221
Graham, WA
Does the firmware work with the Teensy++ 2.0?

g.


Proud owner of 80-0007
http://www.f15sim.com - The only one of its kind.
http://geneb.simpits.org - the Me-109F/X Project
#3904189 - 01/30/14 05:32 AM Re: MMJoy - Build your own USB controller [Re: f15sim]  
Joined: Jan 2014
Posts: 274
mega_mozg_13 Offline
Member
mega_mozg_13  Offline
Member

Joined: Jan 2014
Posts: 274
BELARUS, Minsk
Originally Posted By: Gene Buckle
Does the firmware work with the Teensy++ 2.0?

Not now.
But possible in future, need only a sample "Teensy++ 2.0".

#3907631 - 02/05/14 05:44 PM Re: MMJoy - Build your own USB controller [Re: Sokol1]  
Joined: Jan 2004
Posts: 1,221
f15sim Offline
More projects than sense!
f15sim  Offline
More projects than sense!
Member

Joined: Jan 2004
Posts: 1,221
Graham, WA
I asked about the Teensy++2.0 because of the work this guy has done:
http://generichid.sourceforge.net/

The extra pins on the ++ would benefit MMJoy I think.

g.


Proud owner of 80-0007
http://www.f15sim.com - The only one of its kind.
http://geneb.simpits.org - the Me-109F/X Project
#3909720 - 02/10/14 07:27 AM Re: MMJoy - Build your own USB controller [Re: f15sim]  
Joined: Jan 2014
Posts: 274
mega_mozg_13 Offline
Member
mega_mozg_13  Offline
Member

Joined: Jan 2014
Posts: 274
BELARUS, Minsk
Originally Posted By: Gene Buckle
The extra pins on the ++ would benefit MMJoy I think.

MMJoy main idea is a simple controller for a simple joystick.
I don't want make 'fat cockpit controller' with hundreds buttons/axis/indicators.

About 'Teensy++ 2.0' I asked developers for sample/discount items, and was refused.

#3914011 - 02/19/14 04:53 PM Re: MMJoy - Build your own USB controller [Re: Sokol1]  
Joined: Jan 2011
Posts: 6
Eogund Offline
Junior Member
Eogund  Offline
Junior Member

Joined: Jan 2011
Posts: 6
Hi, I have bought a Leonardo Pro Micro clone because I want to build a collective for DCS-UH1. It is detected in Windows as Arduino Leonardo and HID device, however in MMJoy-Loader it doesn´t show in the device list. I installed the driver from the JoyLoader_arduino folder, do I have to do something else before using the loader?

#3914282 - 02/20/14 08:19 AM Re: MMJoy - Build your own USB controller [Re: Eogund]  
Joined: Jan 2014
Posts: 274
mega_mozg_13 Offline
Member
mega_mozg_13  Offline
Member

Joined: Jan 2014
Posts: 274
BELARUS, Minsk
Originally Posted By: Eogund
Hi, I have bought a Leonardo Pro Micro clone because I want to build a collective for DCS-UH1. It is detected in Windows as Arduino Leonardo and HID device, however in MMJoy-Loader it doesn´t show in the device list. I installed the driver from the JoyLoader_arduino folder, do I have to do something else before using the loader?


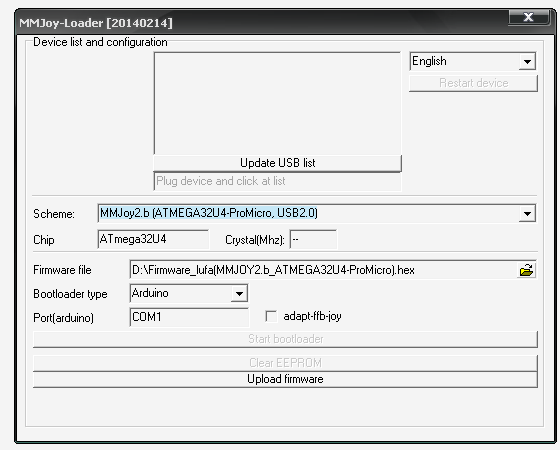
1) for first time - manual select from the list 'Scheme'
2) select firmware(hex) file
3) manual input COM port of Arduino.
4) click 'upload...'

#3914519 - 02/20/14 08:26 PM Re: MMJoy - Build your own USB controller [Re: mega_mozg_13]  
Joined: Jan 2011
Posts: 6
Eogund Offline
Junior Member
Eogund  Offline
Junior Member

Joined: Jan 2011
Posts: 6
Ok, thanks for your help. Now I receive a message about missing libusb0.dll. Where can I download it?

#3914698 - 02/21/14 04:32 AM Re: MMJoy - Build your own USB controller [Re: Eogund]  
Joined: Jan 2014
Posts: 274
mega_mozg_13 Offline
Member
mega_mozg_13  Offline
Member

Joined: Jan 2014
Posts: 274
BELARUS, Minsk
Originally Posted By: Eogund
message about missing libusb0.dll

It is a part of Atmel FLIP:
FLIP 3.4.7 for Windows (Java Runtime Environement included)
After install look in Flip\usb\...

#3914734 - 02/21/14 09:00 AM Re: MMJoy - Build your own USB controller [Re: mega_mozg_13]  
Joined: Jan 2011
Posts: 6
Eogund Offline
Junior Member
Eogund  Offline
Junior Member

Joined: Jan 2011
Posts: 6
Well, still having no luck with my board. I get this message:

Connecting to programmer: .
Found programmer: Id = "¤ ""; type = &#9786;
Software Version = . ; Hardware Version = .
avrdude.exe: error: buffered memory access not supported. Maybe it isn't
a butterfly/AVR109 but a AVR910 device?
Presione una tecla para continuar . . .

Any idea?

#3914740 - 02/21/14 10:09 AM Re: MMJoy - Build your own USB controller [Re: Sokol1]  
Joined: Jan 2014
Posts: 274
mega_mozg_13 Offline
Member
mega_mozg_13  Offline
Member

Joined: Jan 2014
Posts: 274
BELARUS, Minsk
let me know one thing.
When device start bootloader on console "device management" you see "COMx port" (where 'x' maybe variable) or "ATMEGA32U4" device?(make screenshots please)

#3914899 - 02/21/14 04:42 PM Re: MMJoy - Build your own USB controller [Re: mega_mozg_13]  
Joined: Jan 2011
Posts: 6
Eogund Offline
Junior Member
Eogund  Offline
Junior Member

Joined: Jan 2011
Posts: 6
Ok, I see my mistake, I did not tried to launch Joyloader while in bootloader mode (a little difficult, you only have a few seconds after manually restarting the device). Working OK now.
I have one more question: How does the buttons matrix work ? Is it similar to Leo Bodnar's BU0836?
Thanks for your help.

Last edited by Eogund; 02/21/14 04:45 PM. Reason: Very bad english
#3914925 - 02/21/14 05:45 PM Re: MMJoy - Build your own USB controller [Re: Eogund]  
Joined: Jan 2014
Posts: 274
mega_mozg_13 Offline
Member
mega_mozg_13  Offline
Member

Joined: Jan 2014
Posts: 274
BELARUS, Minsk
Originally Posted By: Eogund
Ok, I see my mistake, I did not tried to launch Joyloader while in bootloader mode (a little difficult, you only have a few seconds after manually restarting the device). Working OK now.

8 seconds bootloader mode.

Originally Posted By: Eogund

I have one more question: How does the buttons matrix work ? Is it similar to Leo Bodnar's BU0836?

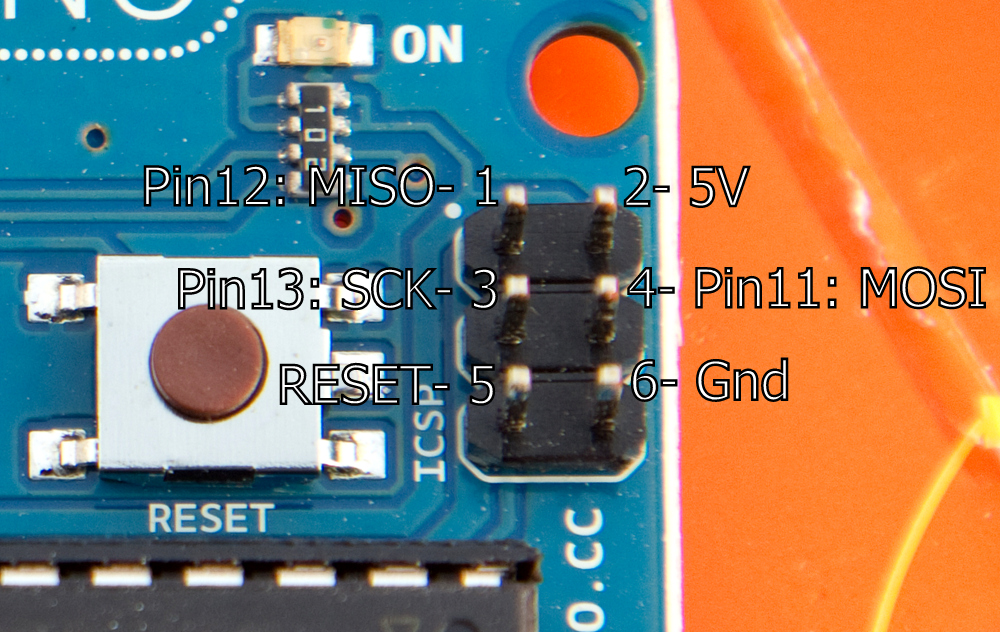
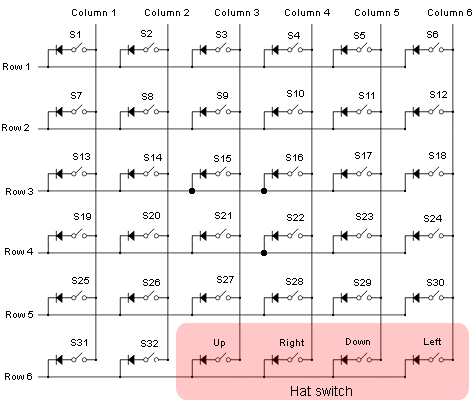
Yes.
Leo Bodnar's BU0836:

Mjoy original:

#3914928 - 02/21/14 05:54 PM Re: MMJoy - Build your own USB controller [Re: Sokol1]  
Joined: Nov 2001
Posts: 3,955
Sokol1 Offline
Senior Member
Sokol1  Offline
Senior Member

Joined: Nov 2001
Posts: 3,955
Internet
PRO Micro (clone) pinnout:

[Linked Image]
EDIT- For serial connections check Arduino PRO Micro pinout in MMjoy2 Wiki.

6 rows (BR pins) x 6 columns (BC pins) = 36 buttons and 6 analog axis input - number of axis could be increased for 8 using pins from matrix at cost of buttons number. Teensy, Arduino Micro boards has more pints for inputs.

ADC pins is axis input.

Sokol1


Last edited by Sokol1; 07/13/18 08:12 PM. Reason: image link replace
#3914943 - 02/21/14 06:22 PM Re: MMJoy - Build your own USB controller [Re: Sokol1]  
Joined: Jan 2011
Posts: 6
Eogund Offline
Junior Member
Eogund  Offline
Junior Member

Joined: Jan 2011
Posts: 6
Wow, thank you Sokol, that's exactly what I was looking for. I am a nerd in electronics, what kind of diodes are you using in the matrix?

#3914947 - 02/21/14 06:39 PM Re: MMJoy - Build your own USB controller [Re: Sokol1]  
Joined: Nov 2001
Posts: 3,955
Sokol1 Offline
Senior Member
Sokol1  Offline
Senior Member

Joined: Nov 2001
Posts: 3,955
Internet
1N4148 or 1N4004 is fine.

Sokol1

#3914952 - 02/21/14 06:44 PM Re: MMJoy - Build your own USB controller [Re: Sokol1]  
Joined: Jan 2004
Posts: 1,221
f15sim Offline
More projects than sense!
f15sim  Offline
More projects than sense!
Member

Joined: Jan 2004
Posts: 1,221
Graham, WA
A 1N4001 diode should work just fine.

g.


Proud owner of 80-0007
http://www.f15sim.com - The only one of its kind.
http://geneb.simpits.org - the Me-109F/X Project
#3919297 - 03/03/14 01:51 AM Re: MMJoy - Build your own USB controller [Re: Sokol1]  
Joined: Jul 2012
Posts: 8
skygunner58203 Offline
Junior Member
skygunner58203  Offline
Junior Member

Joined: Jul 2012
Posts: 8
ND
Will this work on my Arduino Micro? It runs on the ATMega32u4, but look different from the Leonardo pro micro. Also, could I use my Uno R3 to program it?

#3919965 - 03/04/14 06:27 AM Re: MMJoy - Build your own USB controller [Re: skygunner58203]  
Joined: Jan 2014
Posts: 274
mega_mozg_13 Offline
Member
mega_mozg_13  Offline
Member

Joined: Jan 2014
Posts: 274
BELARUS, Minsk
Originally Posted By: skygunner58203
Will this work on my Arduino Micro? It runs on the ATMega32u4, but look different from the Leonardo pro micro.


Arduino Micro
Microcontroller ATmega32u4
Operating Voltage 5V
Clock Speed 16 MHz

it is same as 'promicro', you can try.

Originally Posted By: skygunner58203
Also, could I use my Uno R3 to program it?

Only if "Uno R3" support upload 'hex' files.
My "JoyLoader" software to load firmware via bootloader(Atmel FLIP/Arduino and Teensy2).

Downloads/Updates here: https://drive.google.com/folderview?id=0B2zIeYwbAIHOMFlzSkNPZ1NXV1k&usp=sharing

#3926027 - 03/17/14 04:03 PM Re: MMJoy - Build your own USB controller [Re: Sokol1]  
Joined: Jan 2012
Posts: 20
E69_Jack_Aubrey Offline
Junior Member
E69_Jack_Aubrey  Offline
Junior Member

Joined: Jan 2012
Posts: 20
Spain
Mega_mozg do you mean that it would be possible to use the Uno R3 with your work....

So let me guess you upload part to the atmega 328p and then the usb comunication to the atmega16u2???? If that's true would you mean to explain for dumbs as i'm a complete begginer and also english it isn't my mother language.

If it's true I'm gonna love you!!!!!

#3926047 - 03/17/14 05:56 PM Re: MMJoy - Build your own USB controller [Re: mega_mozg_13]  
Joined: Nov 2001
Posts: 3,955
Sokol1 Offline
Senior Member
Sokol1  Offline
Senior Member

Joined: Nov 2001
Posts: 3,955
Internet
JA, the precondition to test is:

Originally Posted By: mega_mozg_13

Only if "Uno R3" support upload 'hex' files.


And the answer is yes:

http://rlangoy.github.io/Arduino-Uno-Uploader-Tool/

Entonces lo prueba, hombre
. wink

Use Mega_Mozg "JoyLoader".

Sokol1


Last edited by Sokol1; 03/17/14 06:22 PM.
#3926157 - 03/17/14 09:37 PM Re: MMJoy - Build your own USB controller [Re: Sokol1]  
Joined: Jan 2012
Posts: 20
E69_Jack_Aubrey Offline
Junior Member
E69_Jack_Aubrey  Offline
Junior Member

Joined: Jan 2012
Posts: 20
Spain
...... jawdrop kneeldown then i begging to test it tomorrow... Because right now i have to much Guinness beercheers

#3926838 - 03/19/14 09:01 AM Re: MMJoy - Build your own USB controller [Re: Sokol1]  
Joined: Jan 2014
Posts: 274
mega_mozg_13 Offline
Member
mega_mozg_13  Offline
Member

Joined: Jan 2014
Posts: 274
BELARUS, Minsk
sorry, guys.
No support to "UNO_R3" here crazy hardware "atmega16u2" + "atmega328p".
Only possible with single chip "ATmega32u4" = "Arduino Leonardo" / "Arduino Micro" and clone "Sparkfun ProMicro" .

#3927725 - 03/21/14 12:47 AM Re: MMJoy - Build your own USB controller [Re: Sokol1]  
Joined: Nov 2001
Posts: 3,955
Sokol1 Offline
Senior Member
Sokol1  Offline
Senior Member

Joined: Nov 2001
Posts: 3,955
Internet
Small test with DIY board, 1 encoder (incremental/quadrature) from mouse scroll , 1 pot 50k (CH) 1 pot 100k - no brand.


Set as trim in CloD - Fiat Br.20 - Encoder on Elevator (Profunditá)


Buttons:

On "normal" mode = act like keyboard (ON until pressed)

On "S" mode = turn ON in first press and turn OFF on second press (similar to OF-OFF toggle switch).

On "P" and R" mode = Dont get a conclusive result, some random blinks only...

Sokol1

Last edited by Sokol1; 03/21/14 12:50 AM.
#3927953 - 03/21/14 01:45 PM Re: MMJoy - Build your own USB controller [Re: Sokol1]  
Joined: Jan 2014
Posts: 274
mega_mozg_13 Offline
Member
mega_mozg_13  Offline
Member

Joined: Jan 2014
Posts: 274
BELARUS, Minsk
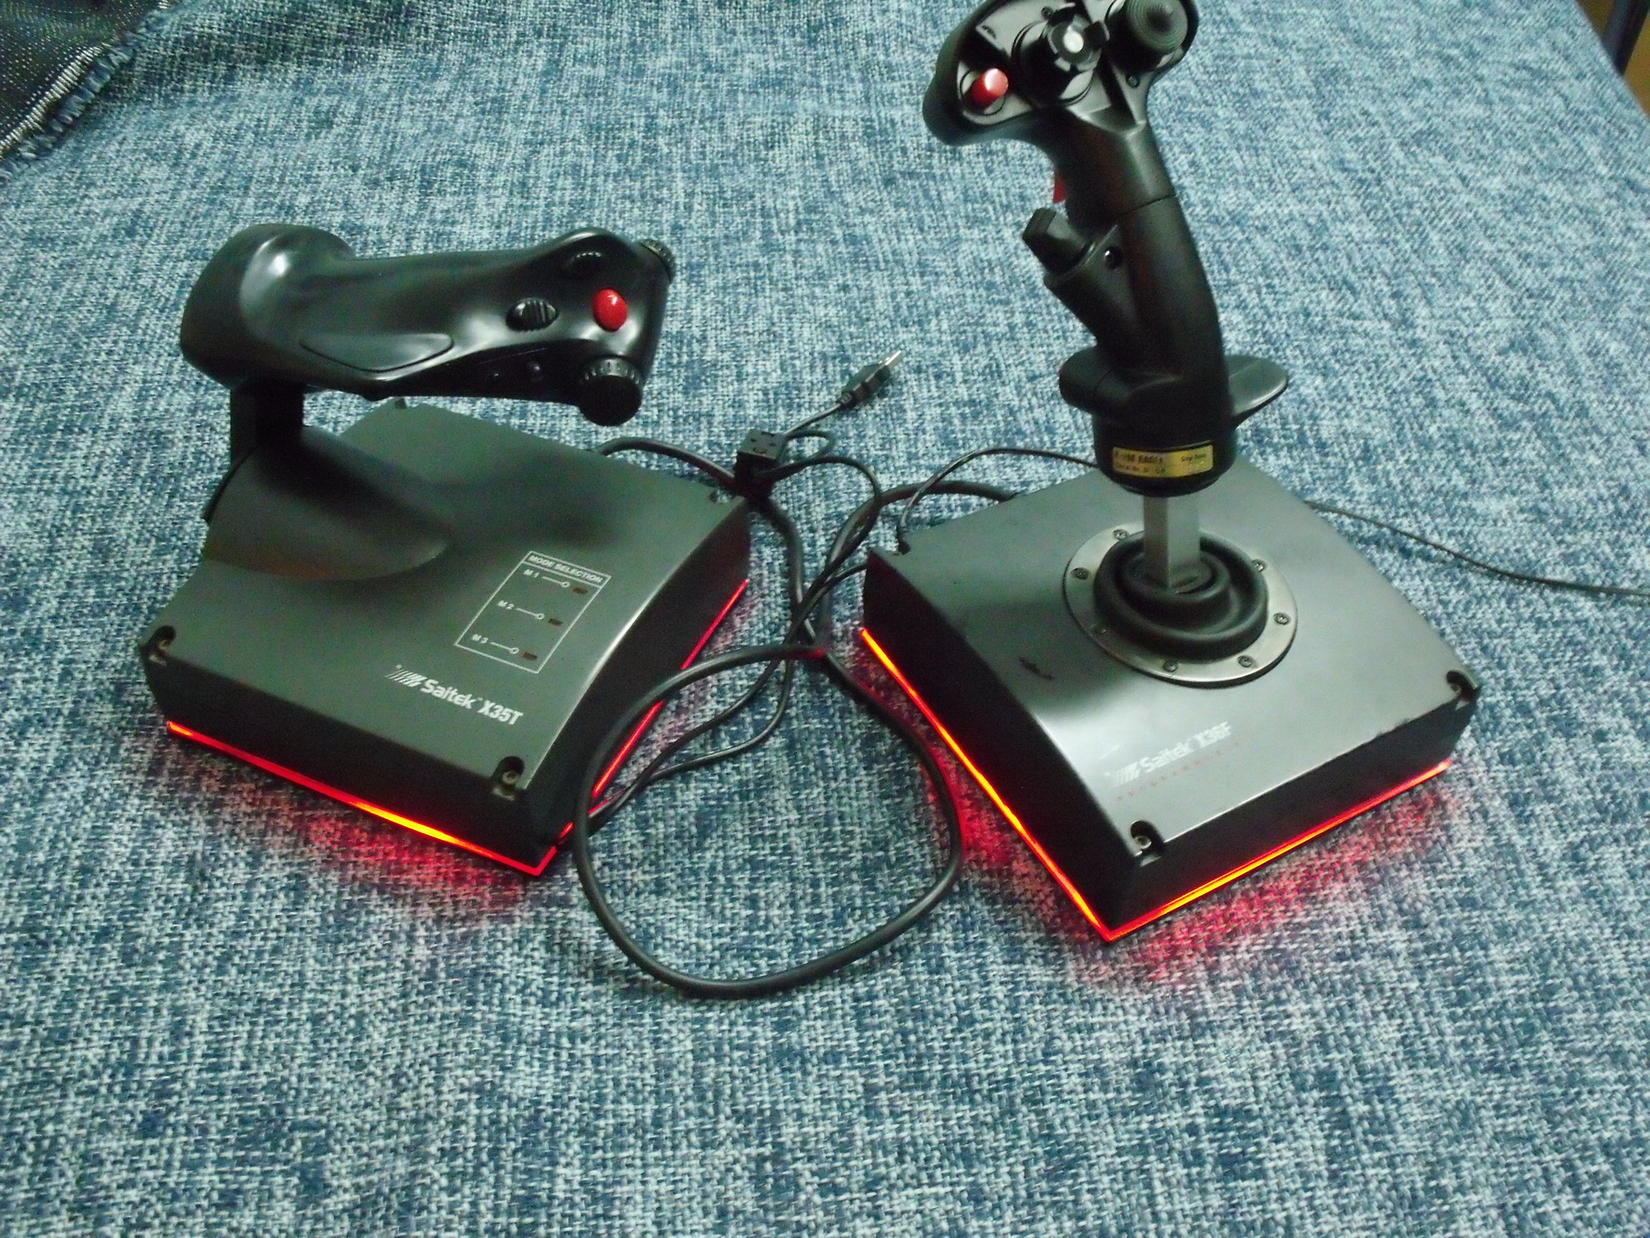
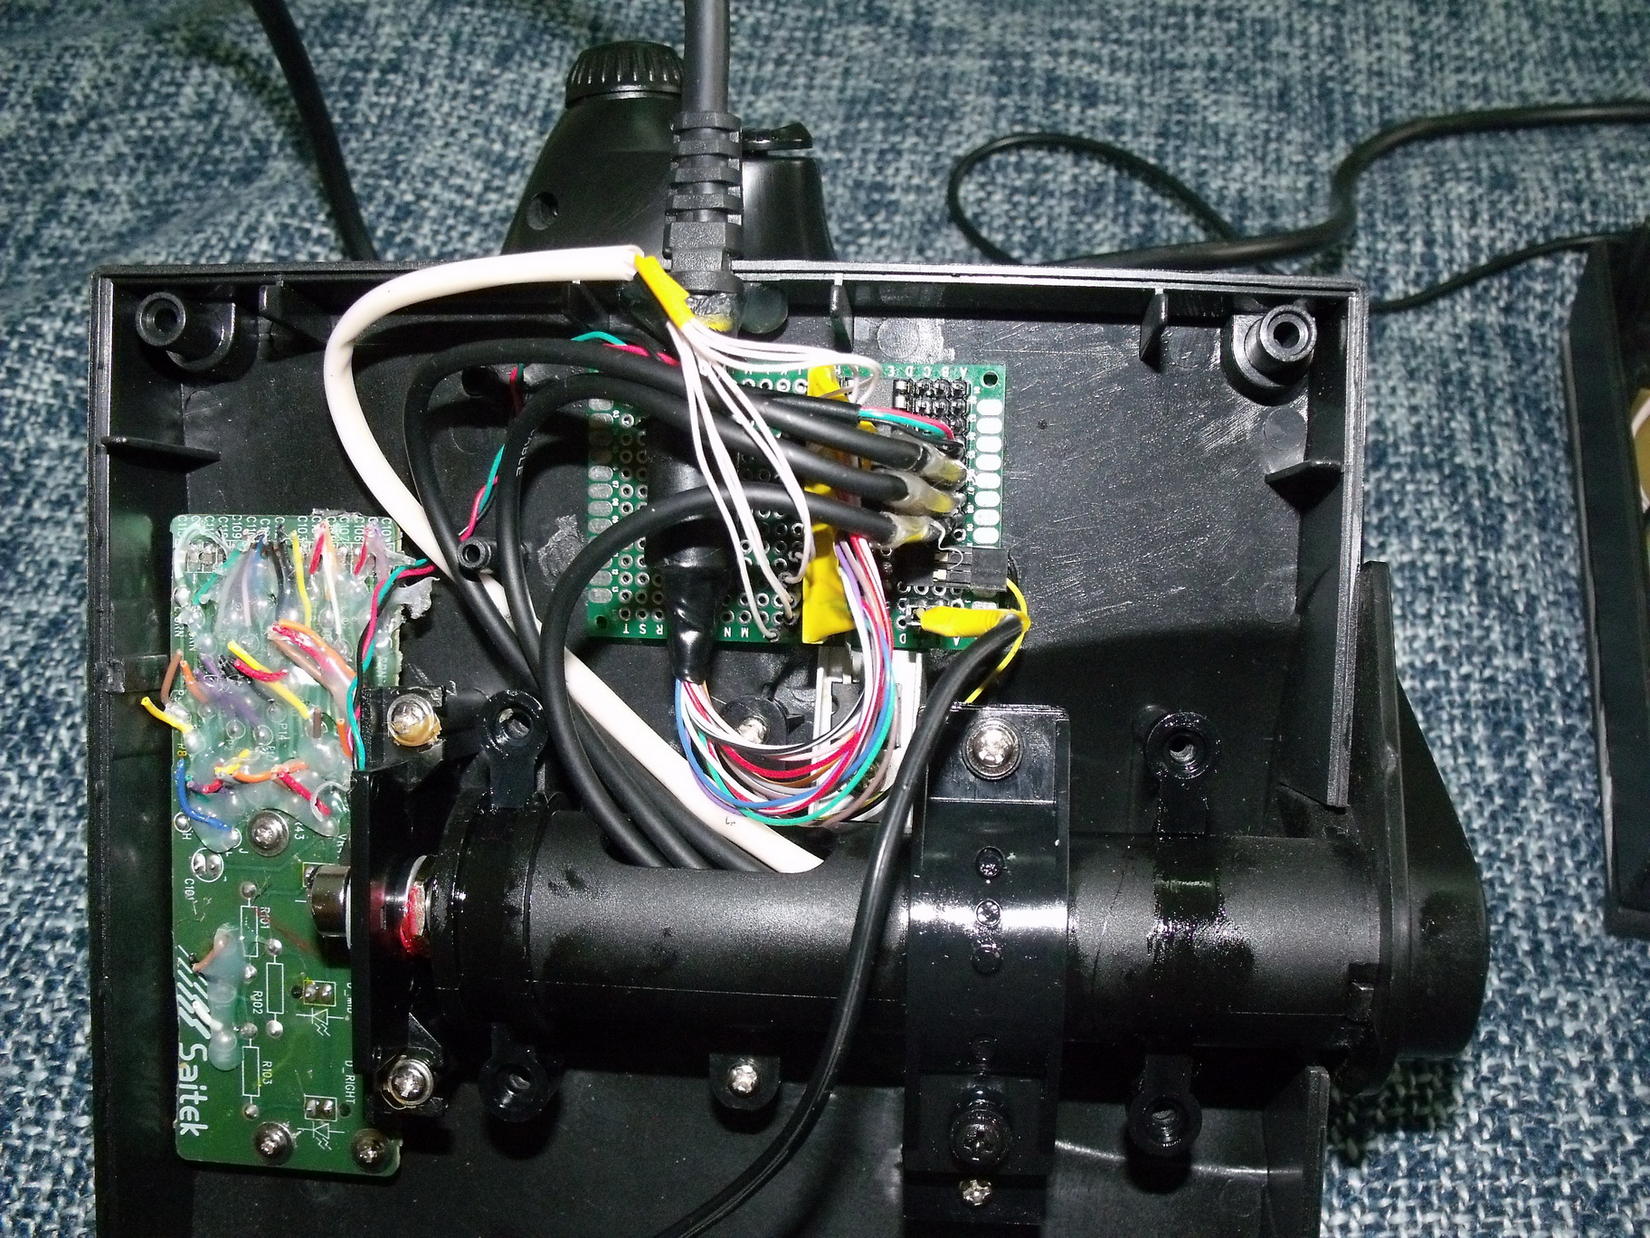
and some pictures from me.
base joystick: Saitek X35-X36/Suncom F15.
electronics: MMjoy2 ProMicro, simple extension boards, Hall's Allegro A1324 (X/Y/Throttle).

handmade aluminum bearings mechanics:


ring magnets + Halls:


base for stick:


base for throttle:


stick assemble:


stick 'Saitek':


stick 'Suncom':


rubber pads:


extension board scheme:


firmware configuration:


Last edited by mega_mozg_13; 03/21/14 01:48 PM.
#3929256 - 03/24/14 03:40 PM Re: MMJoy - Build your own USB controller [Re: Sokol1]  
Joined: Jan 2012
Posts: 20
E69_Jack_Aubrey Offline
Junior Member
E69_Jack_Aubrey  Offline
Junior Member

Joined: Jan 2012
Posts: 20
Spain
Thanks for that reply mega_mozg... i was thinking about that "two chip" setup from arduino UNO

Also, which one u recommend for MMjoy 2???

Last edited by E69_Jack_Aubrey; 03/24/14 03:42 PM.
#3929342 - 03/24/14 05:36 PM Re: MMJoy - Build your own USB controller [Re: Sokol1]  
Joined: Jan 2014
Posts: 274
mega_mozg_13 Offline
Member
mega_mozg_13  Offline
Member

Joined: Jan 2014
Posts: 274
BELARUS, Minsk
E69_Jack_Aubrey,
if you want "ready for use":
"Sparkfun Arduino ProMicro" - 36 buttons + 6 axis, or "Teensy 2.0" - 64 buttons + 8 axis.

PS: now testing "Arduino Leonardo(ATmega32u4)" and results later.

#3929410 - 03/24/14 07:23 PM Re: MMJoy - Build your own USB controller [Re: Sokol1]  
Joined: Jan 2012
Posts: 20
E69_Jack_Aubrey Offline
Junior Member
E69_Jack_Aubrey  Offline
Junior Member

Joined: Jan 2012
Posts: 20
Spain
There's any diference between Arduino Micro and the one you said the Sparkfun Arduino ProMicro ... the thing is that for me the less expensive one is the Arduino's one and the Sparkfun it's quite expensive (shipment mainly).

I have seen your post telling Arduino micro or sparkfun clone ....

Also i understand that it's posible to build a shield to increment the inputs????

Last edited by E69_Jack_Aubrey; 03/24/14 07:24 PM.
#3929768 - 03/25/14 04:12 PM Re: MMJoy - Build your own USB controller [Re: Sokol1]  
Joined: Jan 2011
Posts: 6
Eogund Offline
Junior Member
Eogund  Offline
Junior Member

Joined: Jan 2011
Posts: 6
Hi, I'm having bad response when connecting 10k and 100k pots directly to the axis pins of the Promicro. Buttons work OK. Will I have better results using the MCP3208 chip instead?

Last edited by Eogund; 03/25/14 04:14 PM.
#3929915 - 03/25/14 09:20 PM Re: MMJoy - Build your own USB controller [Re: Sokol1]  
Joined: Nov 2001
Posts: 3,955
Sokol1 Offline
Senior Member
Sokol1  Offline
Senior Member

Joined: Nov 2001
Posts: 3,955
Internet
Eogund,

You did Windows > C.Panel > Game Controllers calibration process?
With ATMEGA axis stabilize only after do this 1st time.
Or use DXTweake2.

Use only pots 10 ~50k, 100k pick much noise.

Sokol1

#3930145 - 03/26/14 07:19 AM Re: MMJoy - Build your own USB controller [Re: E69_Jack_Aubrey]  
Joined: Jan 2014
Posts: 274
mega_mozg_13 Offline
Member
mega_mozg_13  Offline
Member

Joined: Jan 2014
Posts: 274
BELARUS, Minsk
Originally Posted By: E69_Jack_Aubrey
Also i understand that it's posible to build a shield to increment the inputs????

only axis possible to increase (with MCP3202/MCP3204/MCP3208), but total no more 8.

if you want more 36 buttons, at plans make a firmware for promicro(train sim) "8*8 = 64 buttons + 2 axis (and possible add axis with MCP320x)"


Last edited by mega_mozg_13; 03/26/14 07:26 AM.
#3930146 - 03/26/14 07:23 AM Re: MMJoy - Build your own USB controller [Re: Eogund]  
Joined: Jan 2014
Posts: 274
mega_mozg_13 Offline
Member
mega_mozg_13  Offline
Member

Joined: Jan 2014
Posts: 274
BELARUS, Minsk
Originally Posted By: Eogund
Hi, I'm having bad response when connecting 10k and 100k pots directly to the axis pins of the Promicro.


make fotos, it help to find problem. picture of "JoySetup".

and today updated information of connecting axis to promicro:

#3951729 - 05/10/14 08:00 AM Re: MMJoy - Build your own USB controller [Re: Sokol1]  
Joined: May 2014
Posts: 16
Red_Yeti Offline
Junior Member
Red_Yeti  Offline
Junior Member

Joined: May 2014
Posts: 16
Germany
Hi
any news regarding the Teensy2++ compatibility?

#3952489 - 05/12/14 09:21 AM Re: MMJoy - Build your own USB controller [Re: Red_Yeti]  
Joined: Jan 2014
Posts: 274
mega_mozg_13 Offline
Member
mega_mozg_13  Offline
Member

Joined: Jan 2014
Posts: 274
BELARUS, Minsk
Originally Posted By: Red_Yeti
Hi any news regarding the Teensy2++ compatibility?


Hi.

I do not have "Teensy2++".
If community helps with donate (to buy it) or somebody send "Teensy2++" to me I will start work.

sorry for this position, but project non commercial and I waste a lot of money (and time too)...

#3952507 - 05/12/14 11:07 AM Re: MMJoy - Build your own USB controller [Re: mega_mozg_13]  
Joined: May 2014
Posts: 16
Red_Yeti Offline
Junior Member
Red_Yeti  Offline
Junior Member

Joined: May 2014
Posts: 16
Germany
Hi thx for the answer.
Where in Europe do you live? I could send you a board. Otherwise, I would also be willing to donate money.

#3952547 - 05/12/14 01:20 PM Re: MMJoy - Build your own USB controller [Re: Sokol1]  
Joined: Jan 2014
Posts: 274
mega_mozg_13 Offline
Member
mega_mozg_13  Offline
Member

Joined: Jan 2014
Posts: 274
BELARUS, Minsk
Red_Yeti check PM.

#3954366 - 05/16/14 06:28 AM Re: MMJoy - Build your own USB controller [Re: Sokol1]  
Joined: Jan 2014
Posts: 274
mega_mozg_13 Offline
Member
mega_mozg_13  Offline
Member

Joined: Jan 2014
Posts: 274
BELARUS, Minsk
Hi community.
What about this solution (as start) for Teensy ++ 2.0
64 buttons (8*8 matrix), and 8 Axis:


PS: my respect to Red_Yeti

#3954434 - 05/16/14 01:19 PM Re: MMJoy - Build your own USB controller [Re: Sokol1]  
Joined: Jan 2004
Posts: 1,221
f15sim Offline
More projects than sense!
f15sim  Offline
More projects than sense!
Member

Joined: Jan 2004
Posts: 1,221
Graham, WA
That would be cool. It would work nicely with the 8 row, 4 column diode-isolated input boards I had made recently. You could daisy-chain two of them to get the 64 switch inputs.

g.


Proud owner of 80-0007
http://www.f15sim.com - The only one of its kind.
http://geneb.simpits.org - the Me-109F/X Project
#3959059 - 05/28/14 12:38 PM Re: MMJoy - Build your own USB controller [Re: Sokol1]  
Joined: Jan 2014
Posts: 274
mega_mozg_13 Offline
Member
mega_mozg_13  Offline
Member

Joined: Jan 2014
Posts: 274
BELARUS, Minsk
release [v20140528] support "MMJoy2.f (AT90USB1286-Teensy++2.0, USB2.0)"
not yet tested on hardware, you can try to be first tester!!!

#3959422 - 05/29/14 09:33 AM Re: MMJoy - Build your own USB controller [Re: Sokol1]  
Joined: May 2014
Posts: 16
Red_Yeti Offline
Junior Member
Red_Yeti  Offline
Junior Member

Joined: May 2014
Posts: 16
Germany
Hi, made a short test with a 5x5 keymatrix. Works for me so far.
I'll do some other tests with encoders and axes this weekend.

#3973653 - 06/27/14 10:08 AM Re: MMJoy - Build your own USB controller [Re: Sokol1]  
Joined: May 2014
Posts: 16
Red_Yeti Offline
Junior Member
Red_Yeti  Offline
Junior Member

Joined: May 2014
Posts: 16
Germany
Hi, could you replicate the issue with the 7 row?

#3973998 - 06/28/14 03:23 AM Re: MMJoy - Build your own USB controller [Re: Sokol1]  
Joined: Dec 2010
Posts: 4
arnsk98 Offline
Junior Member
arnsk98  Offline
Junior Member

Joined: Dec 2010
Posts: 4
Hello all

First post ever after lurking for long. I have wanted to make a cockpit/panels using Mjoy/Mjoy16 for years, just now I have both time and money.

Thank you, mega_mozg_13, for making this project and saving me from having to make a PCB.

I'm having some issues, though.

I'm using a Pro Micro clone off Ebay, Windows 7 x64, mmjoy_software[20140528_update2] and mmjoy_firmware_lufa[v20140528_update1]. In JoySetup, I'm using the values loaded after clicking on the "mjoy8" button (6 axis, 28 buttons)

First: at random intervals, anywhere from 1 to 120 minutes, the board restarts itself. Also, JoySetup doesn't update the uptime value in real time, rather it's slower.

Second: I can't make the first 4 axis change value. Axis 5 and 6 work well. I see values for all 6 axis in Sensors(Source/MCU Port/Channel) with a lot of jitter when they're not connected. But only axis 5 and 6 seem to work. In the board itself, pins A3 and A2 work well, pins A1, A0, 10 and 9 don't seem to work. Nothing happens when connected to a pot (100K) or ground.

This happens with 2 different Pro Micro boards in both my desktop and laptop PCs.

Thank you to whoever can help.

Regards

Al


Last edited by arnsk98; 06/28/14 03:28 AM.
#3975891 - 07/02/14 12:32 PM Re: MMJoy - Build your own USB controller [Re: Sokol1]  
Joined: Jan 2014
Posts: 274
mega_mozg_13 Offline
Member
mega_mozg_13  Offline
Member

Joined: Jan 2014
Posts: 274
BELARUS, Minsk
arnsk98

about axis - check this picture, for "promicro" source "IntSensor" can be only 5/6/7/8/13/14:


about random restarts - try to check USB connection (maybe connect active USB HUB with self power source).

#3985269 - 07/24/14 09:40 AM Re: MMJoy - Build your own USB controller [Re: Sokol1]  
Joined: Jul 2014
Posts: 15
Crosswind Offline
Junior Member
Crosswind  Offline
Junior Member

Joined: Jul 2014
Posts: 15
great works! make things a lot of easy for somebody not knowing electronics

Thank you, mega_mozg_13

#3985427 - 07/24/14 03:24 PM Re: MMJoy - Build your own USB controller [Re: mega_mozg_13]  
Joined: Jul 2014
Posts: 15
Crosswind Offline
Junior Member
Crosswind  Offline
Junior Member

Joined: Jul 2014
Posts: 15
How about this testing "Arduino Leonardo(ATmega32u4)"? working as well?

#3987220 - 07/28/14 04:04 PM Re: MMJoy - Build your own USB controller [Re: Sokol1]  
Joined: Jan 2014
Posts: 274
mega_mozg_13 Offline
Member
mega_mozg_13  Offline
Member

Joined: Jan 2014
Posts: 274
BELARUS, Minsk

work in progress.
new idea "open hardware", you can assign MCU pins to ADC/Buttons as you like.

#3989365 - 08/01/14 03:54 PM Re: MMJoy - Build your own USB controller [Re: mega_mozg_13]  
Joined: Jul 2014
Posts: 15
Crosswind Offline
Junior Member
Crosswind  Offline
Junior Member

Joined: Jul 2014
Posts: 15
Great! in Leonardo board, I had to try each pin out for the Axis.

Do you have plan to add the deadzone setting in the tool?

#3990627 - 08/04/14 05:16 PM Re: MMJoy - Build your own USB controller [Re: Sokol1]  
Joined: Jan 2014
Posts: 274
mega_mozg_13 Offline
Member
mega_mozg_13  Offline
Member

Joined: Jan 2014
Posts: 274
BELARUS, Minsk
Crosswind, not each!!

for axis use only with "ADCxx" pins (green marker).
and current version supports no more 8 axis.

#3991533 - 08/06/14 05:53 AM Re: MMJoy - Build your own USB controller [Re: mega_mozg_13]  
Joined: Jul 2014
Posts: 15
Crosswind Offline
Junior Member
Crosswind  Offline
Junior Member

Joined: Jul 2014
Posts: 15
Yes, yes, of cause I meant the ADC pins....

This is the result for the Channel vs Pins I got from my Leonardo board:

Axis Channel Arduino Leonardo Pin
1 ----> 5
6 ----> A2
7 ----> A1
8 ----> A0
9 ----> 4
10 ----> 12

#3994326 - 08/12/14 11:44 AM Re: MMJoy - Build your own USB controller [Re: Sokol1]  
Joined: Jan 2014
Posts: 274
mega_mozg_13 Offline
Member
mega_mozg_13  Offline
Member

Joined: Jan 2014
Posts: 274
BELARUS, Minsk
hi boys!

here some pictures. is it easy to understand how to connect pins to pot's / buttons:


Last edited by mega_mozg_13; 08/19/14 05:15 AM.
#3996191 - 08/15/14 07:33 PM Re: MMJoy - Build your own USB controller [Re: Sokol1]  
Joined: Jan 2004
Posts: 1,221
f15sim Offline
More projects than sense!
f15sim  Offline
More projects than sense!
Member

Joined: Jan 2004
Posts: 1,221
Graham, WA
Excellent work, thanks for posting that!

g.


Proud owner of 80-0007
http://www.f15sim.com - The only one of its kind.
http://geneb.simpits.org - the Me-109F/X Project
#3996425 - 08/16/14 02:42 AM Re: MMJoy - Build your own USB controller [Re: Sokol1]  
Joined: Nov 2001
Posts: 3,955
Sokol1 Offline
Senior Member
Sokol1  Offline
Senior Member

Joined: Nov 2001
Posts: 3,955
Internet
Very well, Thank you.

This button scheme is for connect Encoder?


Sokol1

#3996669 - 08/16/14 03:39 PM Re: MMJoy - Build your own USB controller [Re: Sokol1]  
Joined: Aug 2014
Posts: 1
Rog99 Offline
Junior Member
Rog99  Offline
Junior Member

Joined: Aug 2014
Posts: 1
Hi, new guy here...

Have lurked on this and other forums for quite a while, but thought I'd register just to say thanks for the MMjoy firmware - it's great and allowed me to resurrect an old CH Pro throttle with an ADB interface.


Additional buttons and rotaries, maybe a mini-stick will be added when I can work out how to add them nicely.

The only real problem I had was getting the firmware on to the Arduino, but got there first time with a USBASP programmer.

Any chance of increasing the device name to more than 10 characters?

Thanks again.

#3997088 - 08/17/14 05:35 PM Re: MMJoy - Build your own USB controller [Re: Sokol1]  
Joined: Nov 2001
Posts: 3,955
Sokol1 Offline
Senior Member
Sokol1  Offline
Senior Member

Joined: Nov 2001
Posts: 3,955
Internet
Rog99

Well done!

These gameport CH Throttles is very friendly to "update", all wires are very accessible.

Sokol1

#3997597 - 08/18/14 07:12 PM Re: MMJoy - Build your own USB controller [Re: Sokol1]  
Joined: Aug 2014
Posts: 17
Lorphos Offline
VR guy
Lorphos  Offline
VR guy
Junior Member

Joined: Aug 2014
Posts: 17
Germany
Hi Rog99,

I want to do the same exact mod (once I get a cheap CH Pro Throttle). Well done.

For everyone else: Could someone explain why I need an extra USBasp to program the Arduino Pro Micro? According to Sparkfun, one of its features is the "On-Board micro-USB connector for programming".

#3997654 - 08/18/14 08:54 PM Re: MMJoy - Build your own USB controller [Re: Sokol1]  
Joined: May 2014
Posts: 16
Red_Yeti Offline
Junior Member
Red_Yeti  Offline
Junior Member

Joined: May 2014
Posts: 16
Germany
If I'm right, you no longer need it.
Just the firmware, the loader an FLIP installed, i think.

But did not tested it yet.

#3997660 - 08/18/14 09:09 PM Re: MMJoy - Build your own USB controller [Re: Sokol1]  
Joined: Nov 2001
Posts: 3,955
Sokol1 Offline
Senior Member
Sokol1  Offline
Senior Member

Joined: Nov 2001
Posts: 3,955
Internet
Seems that use USB cable is a bit tricky, due restrict time to type the commands...

and since USBasp is cheap, most prefer the "easy" way. smile

https://code.google.com/p/mmjoy/wiki/UpdateFirmware_eng

Instructions for use USB cable and Flip (Google translated from Russian):

Quote:

Notes on using the native firmware bootloader and program Flip.
(Information for users who assembly the controller from scratch)
Microcontrollers "AT90USB646" and "ATMEGA32U4" from the factory have built bootloader - built-in loader flasher.
Therefore properly assembled one when connected to the computer immediately recognized by the operating system.
For firmware update you should download and install the free software from the site FLIP ATMEL.
Link to the site download http://www.atmel.com/tools/flip.aspx

To activate the loader, follow these steps.
On the boards with buttons:
- Connect the board via USB
- Press button RST
- Holding the RST, press the button HWB
- Hold down the HWB, release the button RST
- Release the HWB

On the boards without the button, with a jumper HWB:
- Set jumper HWB
- Connect the board via USB
- Remove the jumper HWB

If done correctly the OS will detect the new device. The name used by the microcontroller, respectively. If the operating unit is determined with an error in Device Manager, you must find the device and update the driver by specifying the source directory with installed Flip.


https://code.google.com/p/mmjoy/wiki/MMJOY2

Sokol1

Last edited by Sokol1; 08/18/14 09:17 PM.
#3997770 - 08/19/14 03:26 AM Re: MMJoy - Build your own USB controller [Re: Sokol1]  
Joined: Jan 2014
Posts: 274
mega_mozg_13 Offline
Member
mega_mozg_13  Offline
Member

Joined: Jan 2014
Posts: 274
BELARUS, Minsk
Hi!
Rog99 WOW. Very good!
Lorphos NO NO NO "USBasp"!!! Use "JoyLoader" software for firmware updates.
Sokol1 Yes it encoders.

#3997801 - 08/19/14 05:14 AM Re: MMJoy - Build your own USB controller [Re: Sokol1]  
Joined: Jan 2014
Posts: 274
mega_mozg_13 Offline
Member
mega_mozg_13  Offline
Member

Joined: Jan 2014
Posts: 274
BELARUS, Minsk
update:

thanks to Red_Yeti

#3997979 - 08/19/14 03:49 PM Re: MMJoy - Build your own USB controller [Re: mega_mozg_13]  
Joined: Aug 2014
Posts: 17
Lorphos Offline
VR guy
Lorphos  Offline
VR guy
Junior Member

Joined: Aug 2014
Posts: 17
Germany
Hi mega_mozg_13, you're the man!
Originally Posted By: mega_mozg_13

Lorphos NO NO NO "USBasp"!!! Use "JoyLoader" software for firmware updates.

OK, no need to buy the USBasp, instead I use JoyLoader during the 8 seconds that is it in bootloader mode, got it!

#3998511 - 08/20/14 05:40 PM Re: MMJoy - Build your own USB controller [Re: Sokol1]  
Joined: May 2014
Posts: 16
Red_Yeti Offline
Junior Member
Red_Yeti  Offline
Junior Member

Joined: May 2014
Posts: 16
Germany
Originally Posted By: Lorphos

OK, no need to buy the USBasp, instead I use JoyLoader during the 8 seconds that is it in bootloader mode, got it!


Tested today and it works as described. But had to use arduino IDE to get the right COM-Port.

Last edited by Red_Yeti; 08/20/14 05:41 PM.
#4005743 - 09/05/14 10:39 PM Re: MMJoy - Build your own USB controller [Re: Sokol1]  
Joined: Sep 2014
Posts: 1
deee Offline
Junior Member
deee  Offline
Junior Member

Joined: Sep 2014
Posts: 1
First of, very, very nice job mega_mozg_13.

I'm in need of advise. I have a Leonardo, but i do not understand what the schemes are in mmjoy loader and which hex file to load to be able to support 8 axis etc. I have not found any explanation for scheme/hex void 6/36 nor YoZHeg 888. So which scheme/hex to use?

Just some more info: I downloaded the mmjoy_software[20140528_update2] and also 20140702_u1 from beta directory, but there's no leonardo option. The screenshot seems to indicate, that you used the pro micro FW for the Leonardo, is that correct? I hope there'll be a leonardo scheme/hex, if others can't be used.

Ok, i uploaded the pro micro FW to it for now. Had a little difficulties getting it programmed. So here's a little explanation for others:
1. Start MMjoy loader
2. Select scheme, crystal, and hex.
3. Go to device manager (from the device management or devmgmt-button), open ports (COM & LPT).
4. Press reset on the board, the device manager might refresh and show the com port.
5. After the 8 seconds of boot time, the com port might change, device manager refresh, as it did with me(which caused the difficulties), but you need to use the com port when in boot loader mode.
6. Type the port to port input (like COM5 for example)
7. Select bootloader type arduino
8. Press reset on the board and within the bootloader time (light doing the "heartbeat"-thing), press "upload firmware"

Also, found what the void 6/36-type is, in the wiki, MMjoy2 page, but don't know what YoZHeg 888 is.

Last edited by deee; 09/06/14 12:29 PM.
#4006252 - 09/07/14 12:16 PM Re: MMJoy - Build your own USB controller [Re: Sokol1]  
Joined: Aug 2014
Posts: 17
Lorphos Offline
VR guy
Lorphos  Offline
VR guy
Junior Member

Joined: Aug 2014
Posts: 17
Germany
I have a quick question, I got a digital joystick here (4 micro switches) with 4 buttons. Do I need to use the button matrix or can I just connect one button per pin directly without anything else?

#4006493 - 09/07/14 10:37 PM Re: MMJoy - Build your own USB controller [Re: Sokol1]  
Joined: Nov 2001
Posts: 3,955
Sokol1 Offline
Senior Member
Sokol1  Offline
Senior Member

Joined: Nov 2001
Posts: 3,955
Internet
No HAT?

The diode matrix is used to avoid "ghost" button press when you press three or more buttons simultaneous,
what probable you will not do.

Try using one pin from Row and one pin from Column.

Sokol1

#4007137 - 09/09/14 09:25 AM Re: MMJoy - Build your own USB controller [Re: Sokol1]  
Joined: Jan 2014
Posts: 274
mega_mozg_13 Offline
Member
mega_mozg_13  Offline
Member

Joined: Jan 2014
Posts: 274
BELARUS, Minsk
hi to all.
mmjoy[20140909] "open hardware" release.
more inromation (russian)

#4013294 - 09/23/14 09:04 AM Re: MMJoy - Build your own USB controller [Re: Sokol1]  
Joined: Jan 2014
Posts: 274
mega_mozg_13 Offline
Member
mega_mozg_13  Offline
Member

Joined: Jan 2014
Posts: 274
BELARUS, Minsk
hi. a have some news:


soon to release. two joysticks per one board. 8 axis/32 buttons/2 HATs per each joystick.

#4020589 - 10/10/14 04:11 AM Re: MMJoy - Build your own USB controller [Re: Sokol1]  
Joined: Oct 2014
Posts: 1
0052 Offline
Junior Member
0052  Offline
Junior Member

Joined: Oct 2014
Posts: 1
Hi guys, this is awesome, just what I've been looking for for a long time. Quick question. I have built a stick with 6 buttons and 5 pots, the pots are no problem, have them working on the device no problem. But the buttons are not. This is how I have them wired:


And this is the setup:


But when I press the buttons in the windows device settings nothing happens, they are not recognized. What am I doing wrong? Thanks!

#4020734 - 10/10/14 03:11 PM Re: MMJoy - Build your own USB controller [Re: Sokol1]  
Joined: Nov 2001
Posts: 3,955
Sokol1 Offline
Senior Member
Sokol1  Offline
Senior Member

Joined: Nov 2001
Posts: 3,955
Internet
Check diode orientation, on above example they are placed with strip toward ROW.

#4020904 - 10/10/14 08:46 PM Re: MMJoy - Build your own USB controller [Re: Sokol1]  
Joined: May 2014
Posts: 16
Red_Yeti Offline
Junior Member
Red_Yeti  Offline
Junior Member

Joined: May 2014
Posts: 16
Germany
Sokol1 has right. Just swap the rows and columns in MMJoy.

#4022061 - 10/14/14 09:10 AM Re: MMJoy - Build your own USB controller [Re: Sokol1]  
Joined: Jan 2014
Posts: 274
mega_mozg_13 Offline
Member
mega_mozg_13  Offline
Member

Joined: Jan 2014
Posts: 274
BELARUS, Minsk
Hi, new beta MMJOY2_beta_2014.10.14.rar
two joysticks for all USB 2.0 hardware (ProMicro, Arduino Leonardo/Micro, Teensy 2.0/2.0++)
more information (russian)

#4023723 - 10/17/14 04:44 PM Re: MMJoy - Build your own USB controller [Re: Sokol1]  
Joined: Jan 2010
Posts: 464
tirta Offline
Member
tirta  Offline
Member

Joined: Jan 2010
Posts: 464
hi mega_mozg,
hi sokol1,

it is very nice to see you guys here. biggrin

I am excited about the new mmjoy2_beta,
so it has total 16 axis and 64 buttons?
and it only use one arduino pro micro?
is this correct?

how fast is the speed?

#4023800 - 10/17/14 06:28 PM Re: MMJoy - Build your own USB controller [Re: Sokol1]  
Joined: Nov 2001
Posts: 3,955
Sokol1 Offline
Senior Member
Sokol1  Offline
Senior Member

Joined: Nov 2001
Posts: 3,955
Internet
Tirta,

Yes, this last firmware create two "virtual" joysticks with one physical board, with 8 axis, 32 buttons each, this allows all buttons to be seen by Windows without use of keymapper's, simplifying map in games.

To be USB 2.0 the board need use ATmega32U4 like these Arduino, but you can build your own board (maybe not cost/effective if compared to Chinese ones):

https://code.google.com/p/mmjoy/wiki/MMJOY2

Sokol1

#4024039 - 10/18/14 08:43 AM Re: MMJoy - Build your own USB controller [Re: Sokol1]  
Joined: Jan 2010
Posts: 464
tirta Offline
Member
tirta  Offline
Member

Joined: Jan 2010
Posts: 464
Thanks Sokol1,

However, from this picture:


at this site:
https://code.google.com/p/mmjoy/wiki/MMJOY2

I find only the old one:
6 axis (6 ADCx)
36 buttons (6 BC x 6 BR)

The new one is at mega_mozg link:
https://groups.google.com/forum/?hl=ru#!topic/mmjoy_update/Lnvn-Utj3D4

[img]https://08526453900738904547.googlegroups.com/attach/7a1aac23283b6a29/Pins_Sparkfun%5Bpromicro%5D.PNG?part=0.6&view=1&vt=ANaJVrGlPYB1P4y9ZAJK7OG5XYqHoDpTh270LugTAHUFoRiUequ-b3CLqXrlzzqgghydu3M_UCX_ApPtSUhC3ktP1LdwPT6BVRnAz518Yq9VsTKwOxONUm4[/img]

However, the connection is still not clear.
It seems that one pin is used for 2 connections?
I hope mega_mozg can clarify this.

#4024053 - 10/18/14 10:02 AM Re: MMJoy - Build your own USB controller [Re: tirta]  
Joined: Jan 2014
Posts: 274
mega_mozg_13 Offline
Member
mega_mozg_13  Offline
Member

Joined: Jan 2014
Posts: 274
BELARUS, Minsk
hi to all.

Originally Posted By: tirta

However, the connection is still not clear.
It seems that one pin is used for 2 connections?


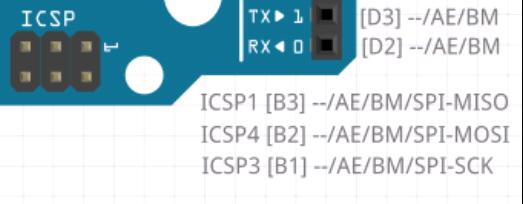
for a sample see pin "A3" = [F4] AI/AE/BM it can be used as internal port ADC, OR as external SPI-ChipSelect for ADC mcp320x, OR as button matrix.
another sample see pin "TX1" = [D3] ../AE/BM there is no internal port ADC, so use as external SPI-ChipSelect for ADC mcp320x, OR as button matrix.

one pin can be used only for one function.

#4024058 - 10/18/14 10:37 AM Re: MMJoy - Build your own USB controller [Re: Sokol1]  
Joined: Jan 2014
Posts: 274
mega_mozg_13 Offline
Member
mega_mozg_13  Offline
Member

Joined: Jan 2014
Posts: 274
BELARUS, Minsk
now only one difference between any board - is a available pins count.
Sparkfun[promicro] - total 18 pins, and 9 can be used for internal(onboard ADC) axis.
Arduino[leonardo] - total 23 pins, 11 internal axis.
Arduino[micro] - total 24 pins, 12 internal axis.
PJRC[Teensy 2.0] - total 25 pins, 12 internal axis.
JRC[Teensy 2.0 ++] - total 46 pins, 8 internal axis.

so if you want more axis, you can use SPI connected external ADC:
a) "kma200" magnetic field angle sensor + 13 bit ADC;
b) "MCP3201" 1 channel 12 bit ADC;
c) "MCP3202" 2 channels 12 bit ADC;
d) "MCP3204" 4 channels 12 bit ADC;
e) "MCP3208" 8 channels 12 bit ADC;
f) "MMSENS(MCP3202+KMZ60)" magnetic field angle sensor KMZ60 + MCP3202 12 bit ADC + trigonometric math at controller, my new project digital sensor;
SPI is a very easy to use, just connect power and ground from controller to ADC and connect SPI lines MISO/MOSI/SCK and CS(chip select). pin "CS" are individual for ADC, other pins is common for all ADC's connected.

PS: here some pictures of "MMSENS" working.

#4024113 - 10/18/14 02:52 PM Re: MMJoy - Build your own USB controller [Re: Sokol1]  
Joined: Jan 2010
Posts: 464
tirta Offline
Member
tirta  Offline
Member

Joined: Jan 2010
Posts: 464
Hi mega_mozg,

Thanks for the reply.
so for pro micro, there are 18 pins.

If I use 6 for axis,
there are only 12 pins left for buttons?

so 16 axis with 64 buttons are not possible for pro micro?

Are these correct?

#4024213 - 10/18/14 08:04 PM Re: MMJoy - Build your own USB controller [Re: tirta]  
Joined: Jan 2014
Posts: 274
mega_mozg_13 Offline
Member
mega_mozg_13  Offline
Member

Joined: Jan 2014
Posts: 274
BELARUS, Minsk
Originally Posted By: tirta

so for pro micro, there are 18 pins.
If I use 6 for axis, there are only 12 pins left for buttons?
so 16 axis with 64 buttons are not possible for pro micro?
Are these correct?

it is correct only if you want to use internal ADC.

but with two "mcp3208" connected to "pro micro" you can access to 16 axis(used 2 pins to "SPI-CS"), and you have 16 pins to buttons 8*8 = 64.

#4024331 - 10/19/14 04:24 AM Re: MMJoy - Build your own USB controller [Re: Sokol1]  
Joined: Jan 2010
Posts: 464
tirta Offline
Member
tirta  Offline
Member

Joined: Jan 2010
Posts: 464

Hi mega_mozg,

thanks for the explanation.

do you have picture for connecting pro micro to mcp3208 to hall sensors?

#4024341 - 10/19/14 06:33 AM Re: MMJoy - Build your own USB controller [Re: tirta]  
Joined: Jan 2014
Posts: 274
mega_mozg_13 Offline
Member
mega_mozg_13  Offline
Member

Joined: Jan 2014
Posts: 274
BELARUS, Minsk
Originally Posted By: tirta

do you have picture for connecting pro micro to mcp3208 to hall sensors?


look at my "ProMicro_ExtensionBoard". I use it for "Saitek x35/36". Here two mcp3208.


and special for you only promicro + mcp3208.


pins:
mcp3208.VDD = promicro.VCC
mcp3208.VREF = promicro.VCC
mcp3208.AGND = promicro.GND
mcp3208.DGND = promicro.GND
mcp3208.CLK = promicro.SCK (also "SCK" possible to share with button matrix, you can use this pin for SPI and for buttons)
mcp3208.Dout = promicro.MISO (also "MISO" possible to share with button matrix, you can use this pin for SPI and for buttons)
mcp3208.Din = promicro.MOSI (also "MOSI" possible to share with button matrix, you can use this pin for SPI and for buttons)
mcp3208.CS = any pin of promicro (this pin must used only for SPI, and it pin must be assigned at JoySetup)

and last note, if you like to use SPI and button matrix together all 3 SPI pins(MOSI/MISO/SCK) must be at one side raws or colunms. At my sample "ProMicro_ExtensionBoard" SPI shared with raws.

and connecting pot or hall to mcp3208 pins CH0-CH7, as regular ADC Pow(vcc) Gnd and out.

#4024342 - 10/19/14 06:42 AM Re: MMJoy - Build your own USB controller [Re: Sokol1]  
Joined: Jan 2014
Posts: 274
mega_mozg_13 Offline
Member
mega_mozg_13  Offline
Member

Joined: Jan 2014
Posts: 274
BELARUS, Minsk
and guys, this SPI external ADC's you can use with any board Arduino or Teensy.

#4024353 - 10/19/14 08:33 AM Re: MMJoy - Build your own USB controller [Re: Sokol1]  
Joined: Jan 2010
Posts: 464
tirta Offline
Member
tirta  Offline
Member

Joined: Jan 2010
Posts: 464
thanks mega_mozg.
I really appreciate it very much.
pictures make it very clear.

if I need only 7 axis and 42 buttons,
is 1 mcp3208 and 1 pro micro enough?

how fast is this setup compared to the first mmjoy?

#4024388 - 10/19/14 01:24 PM Re: MMJoy - Build your own USB controller [Re: Sokol1]  
Joined: Nov 2001
Posts: 3,955
Sokol1 Offline
Senior Member
Sokol1  Offline
Senior Member

Joined: Nov 2001
Posts: 3,955
Internet
Mega_mozg

I think by "how fast" Tirta mean board operations frequency, if 100, 150 MHZ, etc, relative to old ATMEGA8/16 versions.

Sokol1


#4024411 - 10/19/14 02:51 PM Re: MMJoy - Build your own USB controller [Re: Sokol1]  
Joined: Jan 2010
Posts: 464
tirta Offline
Member
tirta  Offline
Member

Joined: Jan 2010
Posts: 464
hi mega_mozg,

I have looked for mcp3208 at ebay,
it seems that there are lots of versions,
here are two of them:

MCP3208-CI/P 12-bit A/D Converter IC New Microchip DIP 16
http://www.ebay.com/itm/1-PCS-MCP3208-CI...=item3a8769a5a3

MCP3208-CI/SL 12-bit A/D Converter IC New Microchip SOP-16 SMD SOP16
http://www.ebay.com/itm/1-PCS-MCP3208-CI...=item3cd878b302

which one should I use?

#4024721 - 10/20/14 05:26 AM Re: MMJoy - Build your own USB controller [Re: Sokol1]  
Joined: Jan 2014
Posts: 274
mega_mozg_13 Offline
Member
mega_mozg_13  Offline
Member

Joined: Jan 2014
Posts: 274
BELARUS, Minsk
Originally Posted By: Sokol1

I think by "how fast" Tirta mean board operations frequency, if 100, 150 MHZ, etc, relative to old ATMEGA8/16 versions.

starting release "20140909" no more support for classic Mjoy8(atmega8) and Mjoy16(atmega16).

#4024724 - 10/20/14 05:55 AM Re: MMJoy - Build your own USB controller [Re: tirta]  
Joined: Jan 2014
Posts: 274
mega_mozg_13 Offline
Member
mega_mozg_13  Offline
Member

Joined: Jan 2014
Posts: 274
BELARUS, Minsk
Originally Posted By: tirta
how fast is this setup compared to the first mmjoy?

set "USB Poll" to "1" = 1000 Hz
2=500
4=250
and 8=125 (OS Windows limit for old mjoy8 / mjoy16).

#4024725 - 10/20/14 05:58 AM Re: MMJoy - Build your own USB controller [Re: tirta]  
Joined: Jan 2014
Posts: 274
mega_mozg_13 Offline
Member
mega_mozg_13  Offline
Member

Joined: Jan 2014
Posts: 274
BELARUS, Minsk
Originally Posted By: tirta

MCP3208-CI/P 12-bit A/D Converter IC New Microchip DIP 16
MCP3208-CI/SL 12-bit A/D Converter IC New Microchip SOP-16 SMD SOP16

it has many package versions:


#4024726 - 10/20/14 06:13 AM Re: MMJoy - Build your own USB controller [Re: Sokol1]  
Joined: Jan 2010
Posts: 464
tirta Offline
Member
tirta  Offline
Member

Joined: Jan 2010
Posts: 464
so any of them is good to use?

#4024730 - 10/20/14 06:26 AM Re: MMJoy - Build your own USB controller [Re: tirta]  
Joined: Jan 2014
Posts: 274
mega_mozg_13 Offline
Member
mega_mozg_13  Offline
Member

Joined: Jan 2014
Posts: 274
BELARUS, Minsk
Originally Posted By: tirta
so any of them is good to use?

"DIP" easy to solder.

#4024736 - 10/20/14 07:05 AM Re: MMJoy - Build your own USB controller [Re: Sokol1]  
Joined: Jan 2010
Posts: 464
tirta Offline
Member
tirta  Offline
Member

Joined: Jan 2010
Posts: 464
thanks mega_mozg.

about the button matrix, in the new mmjoy2,
you do not specify which one is column and which one is row.

so how do you connect the buttons?

#4024740 - 10/20/14 07:14 AM Re: MMJoy - Build your own USB controller [Re: Sokol1]  
Joined: Jan 2014
Posts: 274
mega_mozg_13 Offline
Member
mega_mozg_13  Offline
Member

Joined: Jan 2014
Posts: 274
BELARUS, Minsk
tirta
button matrix, setup as you like.

#4024748 - 10/20/14 08:09 AM Re: MMJoy - Build your own USB controller [Re: Sokol1]  
Joined: Jan 2010
Posts: 464
tirta Offline
Member
tirta  Offline
Member

Joined: Jan 2010
Posts: 464
so you define which one is row and which one is column with joysetup.exe?

#4024749 - 10/20/14 08:19 AM Re: MMJoy - Build your own USB controller [Re: Sokol1]  
Joined: Jan 2010
Posts: 464
tirta Offline
Member
tirta  Offline
Member

Joined: Jan 2010
Posts: 464
is there any difference between sparkfun pro micro and arduino pro micro?

http://www.ebay.com/itm/New-Pro-Micro-AT...=item20d2a4f795

or they are the same?

#4024750 - 10/20/14 08:19 AM Re: MMJoy - Build your own USB controller [Re: Sokol1]  
Joined: Jan 2014
Posts: 274
mega_mozg_13 Offline
Member
mega_mozg_13  Offline
Member

Joined: Jan 2014
Posts: 274
BELARUS, Minsk
tirta
you eat my brain.

"mmjoy2" by default no axis and no buttons, no any fixed presets.
just setup as you like as you need.
1) open "Pins_Sparkfun[promicro].PNG" and you see a pins names(F4/D3/B6) and possible pins fuctions(AI/AE/BM).
2) think what you want, make decision, set X pins to axis, Y pins to button raw and Z pins to button column.
3) solder / setup and enjoy.

#4024754 - 10/20/14 08:48 AM Re: MMJoy - Build your own USB controller [Re: Sokol1]  
Joined: Jan 2014
Posts: 274
mega_mozg_13 Offline
Member
mega_mozg_13  Offline
Member

Joined: Jan 2014
Posts: 274
BELARUS, Minsk


#4024755 - 10/20/14 08:51 AM Re: MMJoy - Build your own USB controller [Re: Sokol1]  
Joined: Jan 2010
Posts: 464
tirta Offline
Member
tirta  Offline
Member

Joined: Jan 2010
Posts: 464
hi mega_mozg,

thanks for the explanation. biggrin

sorry I do not understand what you mean by "you eat my brain".

Quote:
set "USB Poll" to "1" = 1000 Hz
2=500
4=250
and 8=125 (OS Windows limit for old mjoy8 / mjoy16).


so if i use 8 axis with 42 buttons,
do I get faster response using mmjoy2 compared to the old mjoy16?

#4024756 - 10/20/14 08:55 AM Re: MMJoy - Build your own USB controller [Re: Sokol1]  
Joined: Jan 2014
Posts: 274
mega_mozg_13 Offline
Member
mega_mozg_13  Offline
Member

Joined: Jan 2014
Posts: 274
BELARUS, Minsk
Tirta, x4 faster at minimum.

#4024760 - 10/20/14 09:07 AM Re: MMJoy - Build your own USB controller [Re: Sokol1]  
Joined: Jan 2010
Posts: 464
tirta Offline
Member
tirta  Offline
Member

Joined: Jan 2010
Posts: 464
thanks mega_mozg,

the reason I ask for the sparkfun pro micro is the one I get from ebay:
http://www.ebay.com/itm/New-Pro-Micro-AT...i-/140972980117

does not have "sparkfun" in it.

so since I know almost nothing about electronics,
I wonder if it is the same product or not.

I have googled this, and find out that sparkfun is a brand name.
And the one from ebay is a chinese clone.

so I guess it is the same, but I am not very sure about it.

#4024762 - 10/20/14 09:23 AM Re: MMJoy - Build your own USB controller [Re: mega_mozg_13]  
Joined: Oct 2014
Posts: 15
triggahappy Offline
Junior Member
triggahappy  Offline
Junior Member

Joined: Oct 2014
Posts: 15
Hello.

@Mega mozg

I know its possible to use pro micros 5v to power up mcp 3208 however in your original pro micro and extension board you have used external 12v power supply converted to 5v to power up both mcp 3208.

My knowledge of electronics is limited and i can only guess why did you do that way.
Am i correct guessing that the only reason to use external power supply (stable 5v) to mcp3208 is to get highest sampling rate from the chip.

Thanks

@tirta

i am using 'ebay' pro micro and it works just fine, just make sure its pro micro and not any 'other'micro

Last edited by triggahappy; 10/20/14 09:26 AM.
#4024898 - 10/20/14 05:02 PM Re: MMJoy - Build your own USB controller [Re: tirta]  
Joined: Nov 2001
Posts: 3,955
Sokol1 Offline
Senior Member
Sokol1  Offline
Senior Member

Joined: Nov 2001
Posts: 3,955
Internet
Quote:

is there any difference between sparkfun pro micro and arduino pro micro?


Originally Posted By: tirta
thanks mega_mozg,

the reason I ask for the sparkfun pro micro is the one I get from ebay:
http://www.ebay.com/itm/New-Pro-Micro-AT...i-/140972980117

does not have "sparkfun" in it.

so since I know almost nothing about electronics,
I wonder if it is the same product or not.

I have googled this, and find out that sparkfun is a brand name.
And the one from ebay is a chinese clone.

so I guess it is the same, but I am not very sure about it.


Tirta,

This one you buy in Ebay is Chinese no brand clone of PRO-Micro (Sparkfun is only manufacturer) - work in the same way (if work... like all cheap China goods smile ).

Is advisable buy the in pairs... just in case. hahaha

Sokol1


Last edited by Sokol1; 10/20/14 05:35 PM.
#4025123 - 10/21/14 04:42 AM Re: MMJoy - Build your own USB controller [Re: Sokol1]  
Joined: Jan 2010
Posts: 464
tirta Offline
Member
tirta  Offline
Member

Joined: Jan 2010
Posts: 464
hi triggahappy & sokol1,

thanks for clarifying about pro micro.
now I am going to order it biggrin

#4025127 - 10/21/14 05:27 AM Re: MMJoy - Build your own USB controller [Re: triggahappy]  
Joined: Jan 2014
Posts: 274
mega_mozg_13 Offline
Member
mega_mozg_13  Offline
Member

Joined: Jan 2014
Posts: 274
BELARUS, Minsk
Originally Posted By: triggahappy

Am i correct guessing that the only reason to use external power supply (stable 5v) to mcp3208 is to get highest sampling rate from the chip.

Yes it is for stable 5v.

#4025158 - 10/21/14 09:43 AM Re: MMJoy - Build your own USB controller [Re: Sokol1]  
Joined: Jan 2010
Posts: 464
tirta Offline
Member
tirta  Offline
Member

Joined: Jan 2010
Posts: 464
Hi mega_mozg,

after studying and looking at your pictures and explanations, then comparing the prices at ebay:
http://www.ebay.com/itm/Leonardo-R3-Pro-...=item2ececa28e3

it seems that using arduino leonardo is better for only 6 axis & 42 buttons.

it has total 23 pins, 11 internal axis.
if I use only 6 axis, there are 17 pins left for button matrix.
so 17 is more than enough, for 42 buttons I only need 13 pins.
13 = 6+7
6 colums x 7 rows = 42 buttons.

so there is no need to add mcp3208.

is this correct?

#4025166 - 10/21/14 10:51 AM Re: MMJoy - Build your own USB controller [Re: tirta]  
Joined: Oct 2014
Posts: 15
triggahappy Offline
Junior Member
triggahappy  Offline
Junior Member

Joined: Oct 2014
Posts: 15
Thanks mega_mozg

@tirta

As long as you have enough pins that long one device will do the job and you wont have to use mcp3208

I think the reason to use mcp3208 in general is not only to extend the number of axis but also to use 12bit adc instead of built in 10 bit adc.

As far as i am aware pro micro offers 10 bit internal adc (axis sensor) which offers resolution of 1024 and mcp3208 is a 12 bit adc with resolution of 4095.

#4025182 - 10/21/14 12:15 PM Re: MMJoy - Build your own USB controller [Re: Sokol1]  
Joined: Jan 2010
Posts: 464
tirta Offline
Member
tirta  Offline
Member

Joined: Jan 2010
Posts: 464
thanks triggahappy.

what is the advantage using 12bit?
is it more accurate?
can you feel it when playing the game?

#4025216 - 10/21/14 01:32 PM Re: MMJoy - Build your own USB controller [Re: Sokol1]  
Joined: Oct 2014
Posts: 15
triggahappy Offline
Junior Member
triggahappy  Offline
Junior Member

Joined: Oct 2014
Posts: 15
@tirta

That's the thing.... i don't know:P
It's only my assumption that with higher resolution you should get more precise response.
And i expect to see results while playing game.

I am rebuilding Logitech extreme 3d pro with hall sensors and belkin n52te as a throttle control with additional second pov and 2 additional axis. i need around 40 buttons and 6 axis. one way or another i need mcp3208.

I was hoping mega_mozg would shed some light on how 12bit compares to 10bit.

Since we are on the subject it would be good to know if there is significant difference in mcp3208 performance while using 4.5v instead of full 5v

Cheers

#4025292 - 10/21/14 06:57 PM Re: MMJoy - Build your own USB controller [Re: Sokol1]  
Joined: Nov 2001
Posts: 3,955
Sokol1 Offline
Senior Member
Sokol1  Offline
Senior Member

Joined: Nov 2001
Posts: 3,955
Internet
Other (theoretical) advantage is that communication between MCP3208 and the controller board is in Digital mode (binary code) instead Analog (voltage variation), what means axis less subject to external interferences (electrical/magnetic noise).

https://code.google.com/p/mmjoy/wiki/ExtenralADC

Sokol1

#4025510 - 10/22/14 06:44 AM Re: MMJoy - Build your own USB controller [Re: Sokol1]  
Joined: Jan 2014
Posts: 274
mega_mozg_13 Offline
Member
mega_mozg_13  Offline
Member

Joined: Jan 2014
Posts: 274
BELARUS, Minsk
MMJOY2 [v20141021]
'Shift registers' now posible connecting "Defender Comba m5" and "Thrustmaster Warthog/Cougar" grips using native 5 wire connector.

#4025697 - 10/22/14 05:10 PM Re: MMJoy - Build your own USB controller [Re: Sokol1]  
Joined: Nov 2001
Posts: 3,955
Sokol1 Offline
Senior Member
Sokol1  Offline
Senior Member

Joined: Nov 2001
Posts: 3,955
Internet
Quote:
and "Thrustmaster Warthog/Cougar" grips using native 5 wire connector.


That's reminder-me that I have a old Tm F22PRO somewhere ... smile

#4026030 - 10/23/14 10:22 AM Re: MMJoy - Build your own USB controller [Re: Sokol1]  
Joined: Jan 2010
Posts: 464
tirta Offline
Member
tirta  Offline
Member

Joined: Jan 2010
Posts: 464
hi mega_mozg,

what is the advantage using 12bit (mcp3208)?
is it more accurate compared to 10bit?
can you feel it when playing the game?

#4026216 - 10/23/14 06:44 PM Re: MMJoy - Build your own USB controller [Re: Sokol1]  
Joined: Nov 2001
Posts: 3,955
Sokol1 Offline
Senior Member
Sokol1  Offline
Senior Member

Joined: Nov 2001
Posts: 3,955
Internet
Tirta,

My 0,02$

Probable you don't feel difference in practice, because this will be masked by joystick gimbal imperfections.

A good read about this matter (sensors) is what Milan and Slaw post in the "Battle of pedals".

http://simhq.com/forum/ubbthreads.php/topics/3977757/Slaw_VS._Milan_the_battle_of_t#Post3977757

Sokol1


Last edited by Sokol1; 10/23/14 07:13 PM.
#4026636 - 10/24/14 03:01 PM Re: MMJoy - Build your own USB controller [Re: Sokol1]  
Joined: Jan 2010
Posts: 464
tirta Offline
Member
tirta  Offline
Member

Joined: Jan 2010
Posts: 464
Hi Sokol1,

Thanks for the link.

it seems what those guys say is mostly true,
so there is no need to use 12bit or adding mcp3208 for my purpose.

Last edited by tirta; 10/24/14 03:03 PM.
#4027805 - 10/27/14 08:59 AM Re: MMJoy - Build your own USB controller [Re: Sokol1]  
Joined: Jan 2014
Posts: 274
mega_mozg_13 Offline
Member
mega_mozg_13  Offline
Member

Joined: Jan 2014
Posts: 274
BELARUS, Minsk
driving 10 Pcs WS2811/WS2812 RGB LED(on strip).


for indicating any data from any games (gears/flaps/overheating).
more information later...

#4027949 - 10/27/14 06:51 PM Re: MMJoy - Build your own USB controller [Re: Sokol1]  
Joined: Nov 2001
Posts: 3,955
Sokol1 Offline
Senior Member
Sokol1  Offline
Senior Member

Joined: Nov 2001
Posts: 3,955
Internet
WoW! Nice news. thumbsup

Sokol1

#4027968 - 10/27/14 08:17 PM Re: MMJoy - Build your own USB controller [Re: Sokol1]  
Joined: Jan 2014
Posts: 274
mega_mozg_13 Offline
Member
mega_mozg_13  Offline
Member

Joined: Jan 2014
Posts: 274
BELARUS, Minsk


RGB LED strip "ws2811", each LED have individual digital address to set any color.
3 wire connection power/ground and digital control.

#4028164 - 10/28/14 08:56 AM Re: MMJoy - Build your own USB controller [Re: Sokol1]  
Joined: Jan 2014
Posts: 274
mega_mozg_13 Offline
Member
mega_mozg_13  Offline
Member

Joined: Jan 2014
Posts: 274
BELARUS, Minsk

Last edited by mega_mozg_13; 10/28/14 08:56 AM.
#4033546 - 11/08/14 04:54 PM Re: MMJoy - Build your own USB controller [Re: Sokol1]  
Joined: Oct 2014
Posts: 16
Euphoria Offline
Junior Member
Euphoria  Offline
Junior Member

Joined: Oct 2014
Posts: 16
United States
Mega_mozg, I signed up for this forum with the sole purpose of thanking you for your hard work on the mmjoy platform. I also wanted to ask you about your hall sensor and magnet arrangement. What is your usable range with the sensor/magnet orientation you use (how many steps?). I have a similar arrangement and can only get about 3000 steps

#4034028 - 11/10/14 07:08 AM Re: MMJoy - Build your own USB controller [Re: Sokol1]  
Joined: Jan 2014
Posts: 274
mega_mozg_13 Offline
Member
mega_mozg_13  Offline
Member

Joined: Jan 2014
Posts: 274
BELARUS, Minsk
Hi, Euphoria.
Quote:
I have a similar arrangement and can only get about 3000 steps

What type of hall sensor you use?
By my think, 3000 steps it is very good achievement.

#4034175 - 11/10/14 05:08 PM Re: MMJoy - Build your own USB controller [Re: Sokol1]  
Joined: Oct 2014
Posts: 16
Euphoria Offline
Junior Member
Euphoria  Offline
Junior Member

Joined: Oct 2014
Posts: 16
United States
I purchased allegro a1324 sensors from Mouser, and my magnets are removed from tiny motors used in micro helicopter toys. They are about 5mm diameter and 15mm long, and are polarized diametrically. The hall sensor is placed at one end of the magnet with it's top facing it. I am just trying to figure out a way to get the extra ~1000 steps to get closer to full range of the MCP3208. I want to thank you again for your work. I am a stay-at-home dad and have plenty of time to tinker with projects like this.

#4034480 - 11/11/14 05:26 AM Re: MMJoy - Build your own USB controller [Re: Sokol1]  
Joined: Jan 2014
Posts: 274
mega_mozg_13 Offline
Member
mega_mozg_13  Offline
Member

Joined: Jan 2014
Posts: 274
BELARUS, Minsk
Euphoria, I understand now.
I have test many times positions hall and magnet, and best is:

with one magnet cube(or ring);


with two flat magnets;

rotate over central pin, and minimum as possible distance between hall and magnet.


Last edited by mega_mozg_13; 11/11/14 05:37 AM.
#4034722 - 11/11/14 06:47 PM Re: MMJoy - Build your own USB controller [Re: Sokol1]  
Joined: Oct 2014
Posts: 16
Euphoria Offline
Junior Member
Euphoria  Offline
Junior Member

Joined: Oct 2014
Posts: 16
United States
Thank you for the information, mega_mozg. Your findings are the same as my own experiments with magnet and sensor orientation. I have another question regarding rotary encoders. I have configured my encoders in mmjoy (three encoders on my throttle) and when I view the outputs thru the program "DIView", I can see the button presses registering for all three encoders. My issue is that when I turn my encoders in a game, sometimes the button presses do not register within the game. It takes sometimes 3 or 4 clicks before one button press is detected. Again, this is only while in game environment, whereas DIView sees every single click as a button press. Can you shed any light on this?

Last edited by Euphoria; 11/11/14 06:50 PM.
#4034933 - 11/12/14 04:26 AM Re: MMJoy - Build your own USB controller [Re: Sokol1]  
Joined: Jan 2014
Posts: 274
mega_mozg_13 Offline
Member
mega_mozg_13  Offline
Member

Joined: Jan 2014
Posts: 274
BELARUS, Minsk
Euphoria, try to set debounce interval to minimum.

#4034951 - 11/12/14 06:07 AM Re: MMJoy - Build your own USB controller [Re: Sokol1]  
Joined: Oct 2014
Posts: 16
Euphoria Offline
Junior Member
Euphoria  Offline
Junior Member

Joined: Oct 2014
Posts: 16
United States
Mega_mozg,

Thank you for the reply. I have set my debounce to 1ms and still the same issue. I have done some research today that leads me to believe the issue is because of the short pulse width of the rotary encoders. Looking at the data from DIview, most of the pulses from any of my encoders last less than 20ms, more around 10-15ms. The pulses that do make it thru as a button press in game are over 40ms. I wonder if there is a way to adjust rotary encoder pulse width in the code? I will look into it some more, just wanted to share my findings with you.

#4035144 - 11/12/14 07:38 PM Re: MMJoy - Build your own USB controller [Re: Sokol1]  
Joined: Sep 2014
Posts: 33
SolderMonkey Offline
Junior Member
SolderMonkey  Offline
Junior Member

Joined: Sep 2014
Posts: 33
Ari-freakin-zona
Mega_Mozg - First - thanks for putting together such an incredible set of code. I've got a working Thrustmaster FCS and WCS now - for $38 total. I'm 1990s cool again, thanks to your software.

Question though - I have never been able to get the firmware loader in Joyloader to work. I've tried literally dozens of times. I have ended up flashing using the USBASP method. Would you be willing to post a YouTube Video or a walkthrough for those of us lacking the competence to make that part work?

Many thanks for all of your work!


#4035334 - 11/13/14 06:20 AM Re: MMJoy - Build your own USB controller [Re: Sokol1]  
Joined: Jan 2014
Posts: 274
mega_mozg_13 Offline
Member
mega_mozg_13  Offline
Member

Joined: Jan 2014
Posts: 274
BELARUS, Minsk
SolderMonkey,
yes it is very very big trouble to load firmware at first time... Im searching idea to fix this.
please make more photos "Thrustmaster FCS" =)

#4035759 - 11/14/14 05:49 AM Re: MMJoy - Build your own USB controller [Re: Sokol1]  
Joined: Sep 2014
Posts: 33
SolderMonkey Offline
Junior Member
SolderMonkey  Offline
Junior Member

Joined: Sep 2014
Posts: 33
Ari-freakin-zona
Ok, photos. I don't have "before" shots, so some steps are missing.

I started with a $10 Thrustmaster FCS mark 1 off ebay. I think it was a Macintosh model, it had a PS2 passthrough connector on the end of it. model was KP3MACFCS.


Taking the bottom off, I removed the original circuit board. There are two ribbon cables that connect the stick to the board. I desoldered them, but I'm sure there is enough leftover to cut them at the board. There was also a 5 pin connector that would have run out to the PS2 connector and the computer, it just pulled off the board.

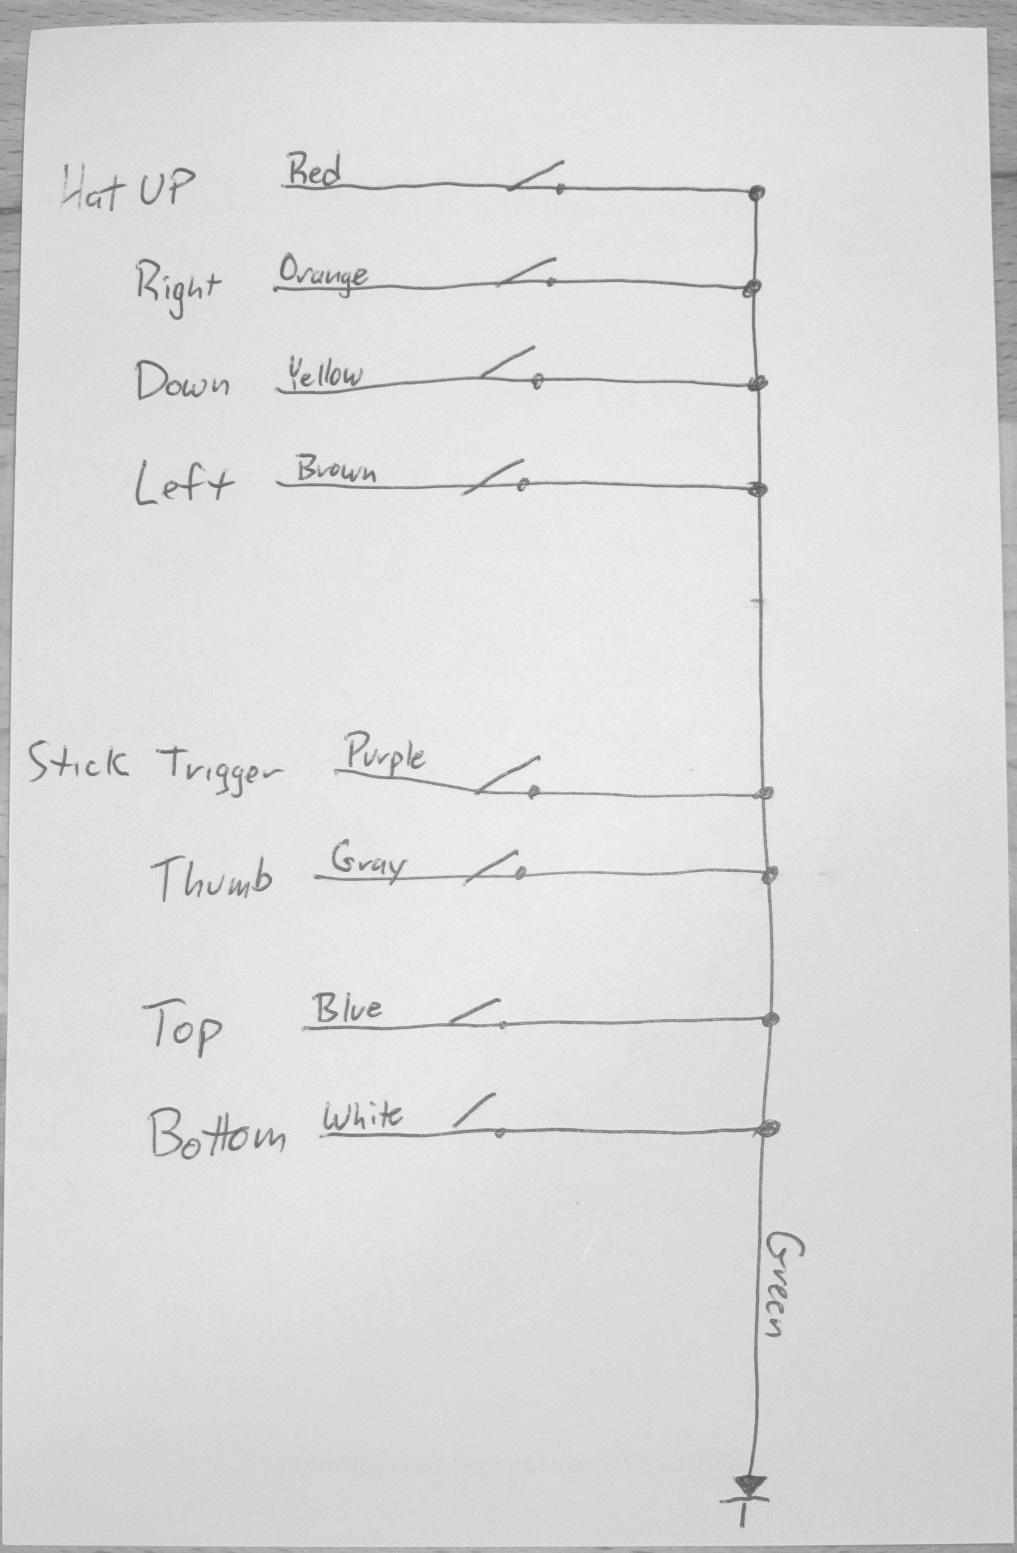
Remember, you're looking at the bottom of the stick. You can see the two original ribbon cables - one for the stick, one for the pots. The stick has 9 conductors and comes out of the bottom of the stick support tube in the center. The pots get 4 conductors and come in from the bottom left in this view. To connect to the PC, I just hacked a usb phone cord in two and spliced it in to the original keyboard cable, so I could keep the original stress relief. The splice is ugly, but it works.


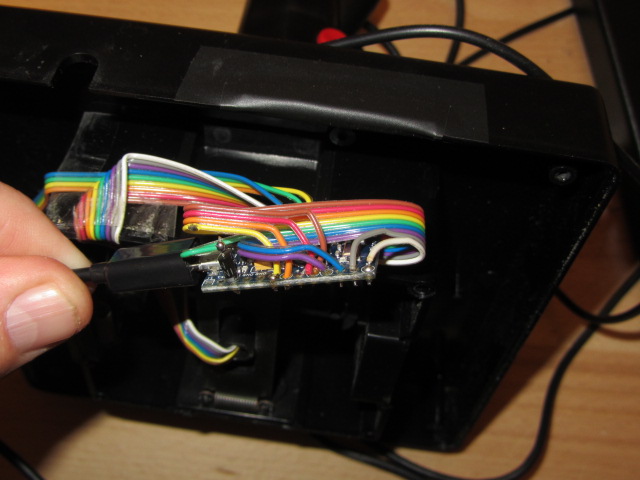
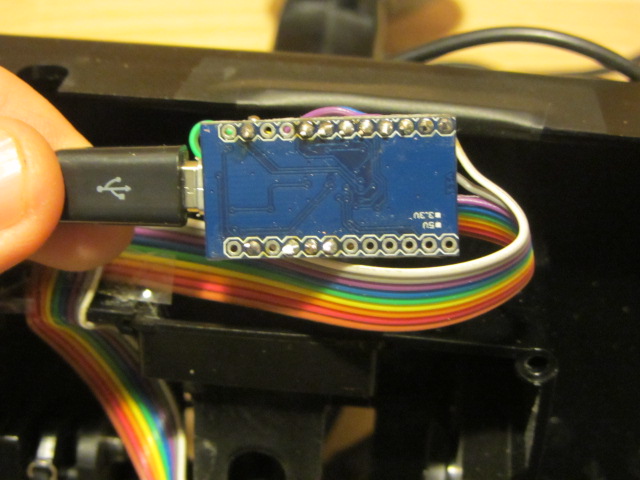
Board views. I added one diode on the common ground and soldered the original cables straight in. The pots are just too easy, wired exactly like the common samples images earlier in this thread.


This is what the stick buttons and hat switch looked like on mine - colors all fed into the green common wire.

This is how I hooked to the pro micro.


Once again, three cheers for Mega_Mozg!

#4036363 - 11/15/14 07:08 PM Re: MMJoy - Build your own USB controller [Re: Sokol1]  
Joined: Jan 2014
Posts: 274
mega_mozg_13 Offline
Member
mega_mozg_13  Offline
Member

Joined: Jan 2014
Posts: 274
BELARUS, Minsk
SolderMonkey, good work!!!

I save "promicro_labels.pdf" at "MMJoy/downloads" it helps with pins/ports for promicro...

#4037064 - 11/17/14 03:55 PM Re: MMJoy - Build your own USB controller [Re: Sokol1]  
Joined: Jan 2011
Posts: 658
Bluedeath Offline
BS 62 "Pegasus" CAG
Bluedeath  Offline
BS 62 "Pegasus" CAG
Member

Joined: Jan 2011
Posts: 658
i bought this on ebay
New Pro Micro ATmega32U4 5V 16MHz Replace ATmega328 Ardu.
what kind of programmer should i use?

Thanks in advance


"When you plan revenge best dig two graves" Confucius
"They who can give up essential liberty to obtain a little temporary safety, deserve neither liberty nor safety" Benjamin Franklin
#4037108 - 11/17/14 05:19 PM Re: MMJoy - Build your own USB controller [Re: Sokol1]  
Joined: Nov 2001
Posts: 3,955
Sokol1 Offline
Senior Member
Sokol1  Offline
Senior Member

Joined: Nov 2001
Posts: 3,955
Internet
The last firmware (Atemega32U4) is http://SimHQ.com/forum/ubbthreads.php/topics/4028164/Re:_MMJoy_-_Build_your_own_USB#Post4028164

You can load the firmware with USB cable (a bit tricky) or use USBASP cable (V 2.0).

https://code.google.com/p/mmjoy/wiki/UpdateFirmware_eng

#4037425 - 11/18/14 05:30 AM Re: MMJoy - Build your own USB controller [Re: Sokol1]  
Joined: Jan 2014
Posts: 274
mega_mozg_13 Offline
Member
mega_mozg_13  Offline
Member

Joined: Jan 2014
Posts: 274
BELARUS, Minsk
guys, you are killing me by USBASP...

use bootloader, it easy!!!

0) connect leonardo to USB, windows ask for drivers. Use it from subfolder 'JoySetup' -> 'drivers'.
1) open "device manager" -> "LPT/COM ports". somevere will be "Arduino leonardo COMxx". warning "COMxx"!!!
2) click "reset"+"gnd" pins twice, "Arduino leonardo COMxx" - remove and windows ask for new device and drivers.
3) on "device manager" -> "LPT/COM ports". will be NEW "Arduino leonardo bootloader COMyy". warning "COMyy"!!!
!!!remember bootloader mode active only 8 sec, after leonardo automaticly reset to "Arduino leonardo"!!!
so for update firmware you need a active state "Arduino leonardo bootloader COMyy".
4) start JoySetup, manual select: chip "atmega32u4", file firmware "Firmware_lufa_[MMJOY2.ATMEGA32U4].hex", boot type "Arduino", and COM port. where "COMyy" - bootloader port number "YY".
5) again goto bootloader mode "click "reset"+"gnd" twice".
6) when field port are green it is ready to update just click "upload firmware".

Last edited by mega_mozg_13; 11/18/14 05:34 AM.
#4037440 - 11/18/14 07:10 AM Re: MMJoy - Build your own USB controller [Re: Sokol1]  
Joined: Jan 2011
Posts: 658
Bluedeath Offline
BS 62 "Pegasus" CAG
Bluedeath  Offline
BS 62 "Pegasus" CAG
Member

Joined: Jan 2011
Posts: 658
Thanks to both of you.


"When you plan revenge best dig two graves" Confucius
"They who can give up essential liberty to obtain a little temporary safety, deserve neither liberty nor safety" Benjamin Franklin
#4037451 - 11/18/14 08:05 AM Re: MMJoy - Build your own USB controller [Re: Sokol1]  
Joined: Jan 2011
Posts: 658
Bluedeath Offline
BS 62 "Pegasus" CAG
Bluedeath  Offline
BS 62 "Pegasus" CAG
Member

Joined: Jan 2011
Posts: 658
Can the MMjoy2 work with FCC3 FSSB or other force modsof the cougar?


"When you plan revenge best dig two graves" Confucius
"They who can give up essential liberty to obtain a little temporary safety, deserve neither liberty nor safety" Benjamin Franklin
#4037453 - 11/18/14 08:30 AM Re: MMJoy - Build your own USB controller [Re: Sokol1]  
Joined: Jan 2014
Posts: 274
mega_mozg_13 Offline
Member
mega_mozg_13  Offline
Member

Joined: Jan 2014
Posts: 274
BELARUS, Minsk
Bluedeath, no force feedback.

#4037483 - 11/18/14 12:06 PM Re: MMJoy - Build your own USB controller [Re: mega_mozg_13]  
Joined: Jul 2009
Posts: 9,711
CyBerkut Offline
Administrator
CyBerkut  Offline
Administrator
Hotshot

Joined: Jul 2009
Posts: 9,711
Florida
Originally Posted By: mega_mozg_13
Bluedeath, no force feedback.


He was talking about Force Sensing, not Force Feedback.

#4037484 - 11/18/14 12:08 PM Re: MMJoy - Build your own USB controller [Re: Sokol1]  
Joined: Jan 2011
Posts: 658
Bluedeath Offline
BS 62 "Pegasus" CAG
Bluedeath  Offline
BS 62 "Pegasus" CAG
Member

Joined: Jan 2011
Posts: 658
By force mod i mean load cells / strain gauges (like FCC or FFSB or the real f16 handle) not FF.
They are direct retrofit of the cougar i was wondering if the work in the MMjoy2 too (I'm triying to ditch the origina Cougar pcb)


"When you plan revenge best dig two graves" Confucius
"They who can give up essential liberty to obtain a little temporary safety, deserve neither liberty nor safety" Benjamin Franklin
#4037801 - 11/19/14 04:18 AM Re: MMJoy - Build your own USB controller [Re: Sokol1]  
Joined: Jan 2014
Posts: 274
mega_mozg_13 Offline
Member
mega_mozg_13  Offline
Member

Joined: Jan 2014
Posts: 274
BELARUS, Minsk
tensor gauge, now I understand. I do not have sensors. where to buy?

#4037820 - 11/19/14 09:05 AM Re: MMJoy - Build your own USB controller [Re: Sokol1]  
Joined: Jan 2011
Posts: 658
Bluedeath Offline
BS 62 "Pegasus" CAG
Bluedeath  Offline
BS 62 "Pegasus" CAG
Member

Joined: Jan 2011
Posts: 658
Here
Look at page 3 for the links

Thanks in advance

Last edited by Bluedeath; 11/19/14 09:08 AM.

"When you plan revenge best dig two graves" Confucius
"They who can give up essential liberty to obtain a little temporary safety, deserve neither liberty nor safety" Benjamin Franklin
#4038062 - 11/19/14 09:03 PM Re: MMJoy - Build your own USB controller [Re: Sokol1]  
Joined: Jan 2014
Posts: 274
mega_mozg_13 Offline
Member
mega_mozg_13  Offline
Member

Joined: Jan 2014
Posts: 274
BELARUS, Minsk
Bluedeath,
this is simple system like regular pot, use it as is.
or you want special features(curves) at JoySetup/Firmware?

#4038081 - 11/19/14 09:46 PM Re: MMJoy - Build your own USB controller [Re: Sokol1]  
Joined: Jan 2011
Posts: 658
Bluedeath Offline
BS 62 "Pegasus" CAG
Bluedeath  Offline
BS 62 "Pegasus" CAG
Member

Joined: Jan 2011
Posts: 658
I do not need to setup curves just ti know if the mmjoy2 works with a strain gauge modded cougar (normally i tweak curves in the simulator so is no big deal)


"When you plan revenge best dig two graves" Confucius
"They who can give up essential liberty to obtain a little temporary safety, deserve neither liberty nor safety" Benjamin Franklin
#4038084 - 11/19/14 09:51 PM Re: MMJoy - Build your own USB controller [Re: Sokol1]  
Joined: Jan 2004
Posts: 1,221
f15sim Offline
More projects than sense!
f15sim  Offline
More projects than sense!
Member

Joined: Jan 2004
Posts: 1,221
Graham, WA
Is the source code for the Windows client software available somewhere?

tnx.

g.


Proud owner of 80-0007
http://www.f15sim.com - The only one of its kind.
http://geneb.simpits.org - the Me-109F/X Project
#4038220 - 11/20/14 04:19 AM Re: MMJoy - Build your own USB controller [Re: f15sim]  
Joined: Jan 2014
Posts: 274
mega_mozg_13 Offline
Member
mega_mozg_13  Offline
Member

Joined: Jan 2014
Posts: 274
BELARUS, Minsk
Originally Posted By: f15sim
Is the source code for the Windows client software available somewhere?

it written at Delphi2010 + JEDI Code Library(HID driver). what do you want to know from sources?

#4038476 - 11/20/14 04:31 PM Re: MMJoy - Build your own USB controller [Re: Sokol1]  
Joined: Jan 2004
Posts: 1,221
f15sim Offline
More projects than sense!
f15sim  Offline
More projects than sense!
Member

Joined: Jan 2004
Posts: 1,221
Graham, WA
I think it would be interesting to port to either C# or Lazarus. I like looking to see how things are done, too. smile

I've got every version of Delphi from v1 to XE. It's a shame Embarcadero insists on charging so much for it. They're doing more damage to the language via their pricing model than Microsoft could ever hope to do. frown

g.


Proud owner of 80-0007
http://www.f15sim.com - The only one of its kind.
http://geneb.simpits.org - the Me-109F/X Project
#4042576 - 11/28/14 10:35 AM Re: MMJoy - Build your own USB controller [Re: Sokol1]  
Joined: Jan 2010
Posts: 464
tirta Offline
Member
tirta  Offline
Member

Joined: Jan 2010
Posts: 464
Hi Guys,

After waiting for about a month, finally my arduino leonardo is arrived.
Then I try to program it with the latest mmjoy2 20141119.

First, I start "joyloader.exe",
then choose "firmware" section.
Then after plugging the arduino leonardo to my system,
I press "start bootloader" or press reset button on the board.
Then I press "upload firmware".

Then, a little cmd window pops up,
it says: connecting to proggrammer etc etc.

However, before the window dissappear,
I notice there is an error:

avrdude: error: buffered memory access not supported. Maybe it isn't
a butterfly/AVR109 but a AVR910 device?

what is wrong here?
please advise.

#4042811 - 11/28/14 08:25 PM Re: MMJoy - Build your own USB controller [Re: Sokol1]  
Joined: Jan 2014
Posts: 274
mega_mozg_13 Offline
Member
mega_mozg_13  Offline
Member

Joined: Jan 2014
Posts: 274
BELARUS, Minsk
Tirta!
did you read this?
do you understand difference "Arduino Leonardo - COMx" and "Arduino Leonardo Bootloader - COMy" modes?

#4043002 - 11/29/14 07:22 AM Re: MMJoy - Build your own USB controller [Re: Sokol1]  
Joined: Jan 2010
Posts: 464
tirta Offline
Member
tirta  Offline
Member

Joined: Jan 2010
Posts: 464
Hi mega_mozg

Success!! yeah
I can program it successfully now. thumbsup

It takes me a while to discern what you wrote,
but finally I understand what you mean.

However, your "start bootloader" button does not work.
I use reset button on the board.

Thanks for all the help. cheers


Last edited by tirta; 11/29/14 07:23 AM.
#4043005 - 11/29/14 07:34 AM Re: MMJoy - Build your own USB controller [Re: Sokol1]  
Joined: Jan 2010
Posts: 464
tirta Offline
Member
tirta  Offline
Member

Joined: Jan 2010
Posts: 464
sorry if this is another noob question:

about ICSP pin,


there is 2 pin for each number,

so which one should I use for button matrix:
the upper pin or the lower one?

#4043243 - 11/29/14 07:09 PM Re: MMJoy - Build your own USB controller [Re: Sokol1]  
Joined: Jan 2014
Posts: 274
mega_mozg_13 Offline
Member
mega_mozg_13  Offline
Member

Joined: Jan 2014
Posts: 274
BELARUS, Minsk

#4043268 - 11/29/14 08:24 PM Re: MMJoy - Build your own USB controller [Re: Sokol1]  
Joined: Jan 2010
Posts: 464
tirta Offline
Member
tirta  Offline
Member

Joined: Jan 2010
Posts: 464
thanks mega_mozg for the picture.

can you explain about "shift register" ?
what does it do?

#4043310 - 11/29/14 10:27 PM Re: MMJoy - Build your own USB controller [Re: Sokol1]  
Joined: Nov 2001
Posts: 3,955
Sokol1 Offline
Senior Member
Sokol1  Offline
Senior Member

Joined: Nov 2001
Posts: 3,955
Internet
Tirta,

"Shift register" is the way that joysticks like Thrustmaster F22/PRO, Cougar, Warthog and Defender Cobra M5 use to send buttons/HATS press to controller main board via 5 wires cable, due use of multiplexer chips inside joystick grip. If you are not using one of this grips, this functions will dont have use.

Sokol1

#4043509 - 11/30/14 01:32 PM Re: MMJoy - Build your own USB controller [Re: Sokol1]  
Joined: Jan 2010
Posts: 464
tirta Offline
Member
tirta  Offline
Member

Joined: Jan 2010
Posts: 464
thanks Sokol1 for the explanation.

how about encoder?
what do you use it for?

#4043704 - 12/01/14 12:57 AM Re: MMJoy - Build your own USB controller [Re: Sokol1]  
Joined: Nov 2001
Posts: 3,955
Sokol1 Offline
Senior Member
Sokol1  Offline
Senior Member

Joined: Nov 2001
Posts: 3,955
Internet
Encoder is physically similar to potentiometer, but instead read voltage variation (or resistance) send binary code, what the USB controller interprets as key press.

Turned clockwise send one press (e.g A) turn anti-clockwise send other press (e.g. B).

In Flight Simulator is useful for things like set COMM radios, select weapons, set bombsights, autopilots...
or for example in il-2 BoS adjust trim (in this not assignable to analog axis) be wheels controls.
In racing sim is used for adjust brakes bias, etc.
Any control that use + and - inputs can be benefited by the use of encoder.

Sokol1

#4045270 - 12/04/14 10:05 AM Re: MMJoy - Build your own USB controller [Re: Sokol1]  
Joined: Jan 2010
Posts: 464
tirta Offline
Member
tirta  Offline
Member

Joined: Jan 2010
Posts: 464
thanks Sokol1.

is encoder similar to using svmapper - continuous key press?

#4045356 - 12/04/14 02:34 PM Re: MMJoy - Build your own USB controller [Re: Sokol1]  
Joined: Nov 2001
Posts: 3,955
Sokol1 Offline
Senior Member
Sokol1  Offline
Senior Member

Joined: Nov 2001
Posts: 3,955
Internet
Encoder send a momentary key press in each direction of rotation.

SVMapper translate a continuous key press from a ON/OFF switch in ON position in momentary key press (what the games are designed to handle, with few exceptions in some DCS controls).

See the Encoder (from SIM point of view) like a rotary device that instead send voltage or resistance variation (like a potentiometer) send momentary key press.

The encoder code can be translate in proportional movement (like a axis) be appropriated controller, example mouse scroll wheel, or Saitek Trim Wheel, that use encoder instead potentiometer.

Sokol1

#4045943 - 12/05/14 02:11 PM Re: MMJoy - Build your own USB controller [Re: Sokol1]  
Joined: Jan 2010
Posts: 464
tirta Offline
Member
tirta  Offline
Member

Joined: Jan 2010
Posts: 464
thanks Sokol1 for the explanation.

I notice there is also "filter " for axis.
what does it do?

#4046161 - 12/05/14 08:13 PM Re: MMJoy - Build your own USB controller [Re: Sokol1]  
Joined: Jan 2014
Posts: 274
mega_mozg_13 Offline
Member
mega_mozg_13  Offline
Member

Joined: Jan 2014
Posts: 274
BELARUS, Minsk
tirta, filter is smoothing (cut signal noise).

#4046522 - 12/06/14 09:11 AM Re: MMJoy - Build your own USB controller [Re: Sokol1]  
Joined: Jan 2010
Posts: 464
tirta Offline
Member
tirta  Offline
Member

Joined: Jan 2010
Posts: 464
thanks mega_mozg,

I am using hall effect sensor, do I need to use it?

#4046619 - 12/06/14 03:08 PM Re: MMJoy - Build your own USB controller [Re: Sokol1]  
Joined: Nov 2001
Posts: 3,955
Sokol1 Offline
Senior Member
Sokol1  Offline
Senior Member

Joined: Nov 2001
Posts: 3,955
Internet
Tirta,

Test your "joystick" with JoyTester2, VKB joystester (or Tm Joy Analyzer), if without move the axis the response line became "serrated" apply the filter, if not is no need.

The two first programs here, in Mercury13 page (Analyzer from Thrustmaster page):

http://mercury13.tut.su/?q=soft_other
Or
http://ftp.vkb-sim.pro/Programms/

Sokol1

Last edited by Sokol1; 12/06/14 03:10 PM.
#4046759 - 12/06/14 09:03 PM Re: MMJoy - Build your own USB controller [Re: Sokol1]  
Joined: Jan 2014
Posts: 274
mega_mozg_13 Offline
Member
mega_mozg_13  Offline
Member

Joined: Jan 2014
Posts: 274
BELARUS, Minsk
my collection of tools for joysticks "all in one" [MMJOY downloads] -> [tools_joy.rar]

#4047109 - 12/07/14 04:30 PM Re: MMJoy - Build your own USB controller [Re: Sokol1]  
Joined: Jan 2010
Posts: 464
tirta Offline
Member
tirta  Offline
Member

Joined: Jan 2010
Posts: 464
thanks Sokol1 for the reply.

thanks mega_mozg for the files.

I am going to do some testing now.

#4049511 - 12/12/14 10:19 AM Re: MMJoy - Build your own USB controller [Re: Sokol1]  
Joined: Jan 2010
Posts: 464
tirta Offline
Member
tirta  Offline
Member

Joined: Jan 2010
Posts: 464
Hi mega_mozg,
Hi Sokol1,

I have another problem when connecting the cables for button matrix from the throttle unit to the joystick unit.
My old version, I connect the cables directly from the throttle button to mmjoy.
There is no problem, everything work fine this way.

Now, since I want to make the joystick interchangeable.
I use db15 connector in between throttle and joystick unit (mmjoy is inside joystick unit),
so that I can use another joystick with the same throttle.

However with these connectors (male and female). it seems that connections are never good,
Testing with joysetup.exe, when I press the one button, always 2 or 3 numbers are checked.
Bad connector? may be,
but I have changed both male and female parts 2 times with new parts,
the result is still the same.
I have double check all cables connection, with multimeter there seems nothing wrong.

However, if I do not use the connector at all,
all the buttons are good, always one number for one button pressed.
Why is that?
Do you know what is the culprit?

And what is button debounce?
what does it do?

Last edited by tirta; 12/12/14 11:01 AM.
#4049575 - 12/12/14 02:18 PM Re: MMJoy - Build your own USB controller [Re: Sokol1]  
Joined: Aug 2014
Posts: 17
Lorphos Offline
VR guy
Lorphos  Offline
VR guy
Junior Member

Joined: Aug 2014
Posts: 17
Germany
Hi mega_mozg_13,

I saw your conversion of the Saitek X36/X35. Do you think it's also possible to do a less invasive conversion leaving the wiring of the stick and throttle unchanged and only add an Arduino with MMJoy in the base of the joystick?

Also thanks for the detailed flashing instructions in your posting

Btw, have you seen the new dirt cheap "Nano 3.0 CH340" boards on AliExpress? You can get them for around $3.20 with shipping, or $2.60 if you buy ten.

Last edited by Lorphos; 12/12/14 02:31 PM.
#4049620 - 12/12/14 04:27 PM Re: MMJoy - Build your own USB controller [Re: tirta]  
Joined: Nov 2001
Posts: 3,955
Sokol1 Offline
Senior Member
Sokol1  Offline
Senior Member

Joined: Nov 2001
Posts: 3,955
Internet
Originally Posted By: tirta
, when I press the one button, always 2 or 3 numbers are checked.


You are using diodes on buttons?

When using many inputs from matrix they are need to avoid "ghost" buttons press.

1N4148 diode is fine.

Sokol1

#4049693 - 12/12/14 06:56 PM Re: MMJoy - Build your own USB controller [Re: Sokol1]  
Joined: Jan 2010
Posts: 464
tirta Offline
Member
tirta  Offline
Member

Joined: Jan 2010
Posts: 464
yes I use 1N4148 diode.

I am thinking of buying another pair of db15 connector [male and female], might be a better quality ones.
It seems that all 2 pairs that I have are bad.

it seems unlikely,
but that is the most logical explanation so far.

#4050295 - 12/14/14 05:55 AM Re: MMJoy - Build your own USB controller [Re: Lorphos]  
Joined: Jan 2014
Posts: 274
mega_mozg_13 Offline
Member
mega_mozg_13  Offline
Member

Joined: Jan 2014
Posts: 274
BELARUS, Minsk
Originally Posted By: Lorphos

I saw your conversion of the Saitek X36/X35. Do you think it's also possible to do a less invasive conversion leaving the wiring of the stick and throttle unchanged and only add an Arduino with MMJoy in the base of the joystick?

it was a more then year ago... I don't remember.

Originally Posted By: Lorphos
Btw, have you seen the new dirt cheap "Nano 3.0 CH340" boards on AliExpress?

"Nano 3.0 CH340" not supported (MCU "ATmega328P" without USB interface).

Last edited by mega_mozg_13; 12/14/14 05:55 AM.
#4051381 - 12/16/14 10:53 AM Re: MMJoy - Build your own USB controller [Re: Sokol1]  
Joined: Jan 2010
Posts: 464
tirta Offline
Member
tirta  Offline
Member

Joined: Jan 2010
Posts: 464
Hi mega_mozg,
Hi sokol1,

Finally I manage to get rid of the "ghost button presses" by adding the pull up resistor 10k to each column.
Thanks for letting me know.

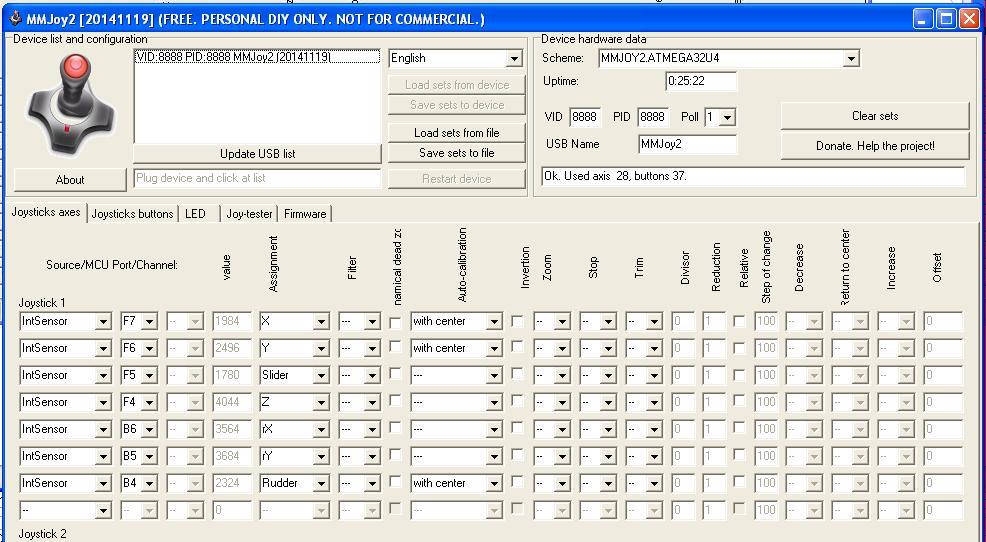
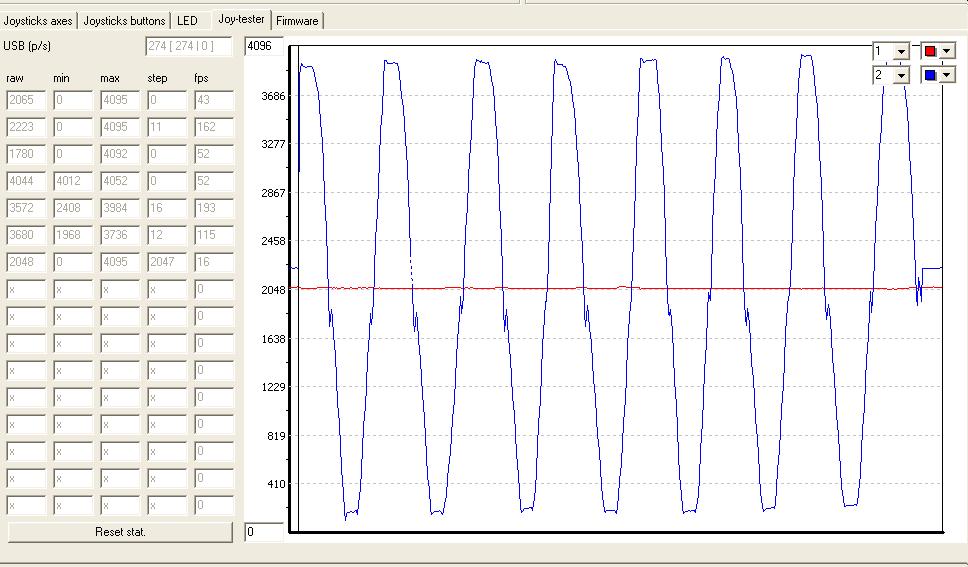
Now with firmware v20141119,
I find out that the axis value on the "Joystick axes" page is different than "Joy-tester" page.
So which one is the correct one?


min center max
X 122 2059 3975 these values from Joy-tester > raw
X 676 1984 3308 these values from Joystick axes > value

Y 161 2168 3866 these values from Joy-tester > raw
Y 1724 2496 3180 these values from Joystick axes > value


I use hall sensor for both x and y.
Are these values good enough?
or do I need to better align the magnet - hall sensor?

Also I have enabled the auto calibration w/center for both axis,
but when I look at control panel > game controller,
I find the axis is not centered.


Then I calibrate it from setting > calibrate,
but it seem the result is not optimal,
the axis is still not centered.


Please let me know what is wrong and how to fix it.

#4051524 - 12/16/14 03:04 PM Re: MMJoy - Build your own USB controller [Re: Sokol1]  
Joined: Nov 2001
Posts: 3,955
Sokol1 Offline
Senior Member
Sokol1  Offline
Senior Member

Joined: Nov 2001
Posts: 3,955
Internet
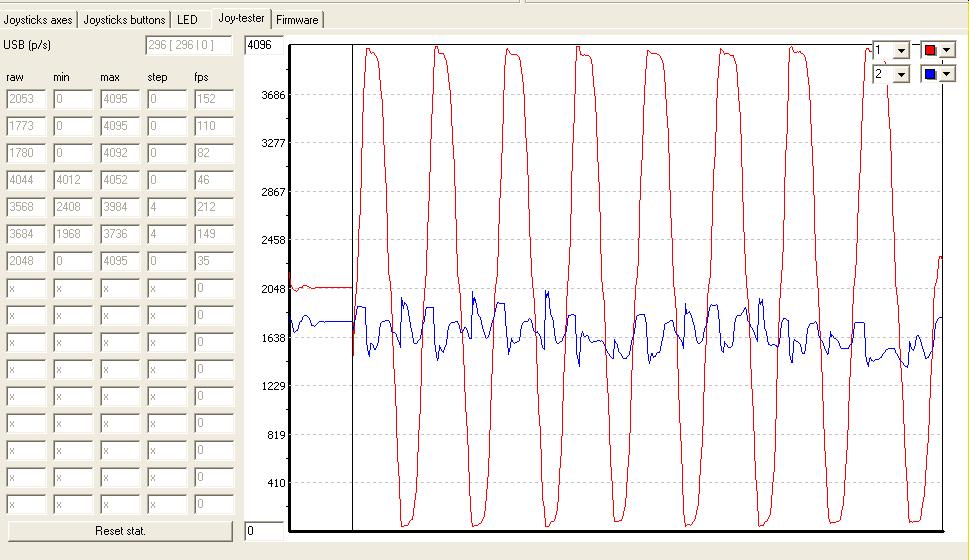
The reading values - above 3000 are very good, don't worry with this.

Try this: open the device (joystick ?) plug into computer USB port and careful move the magnets until the axis are centered (more approximately possible).

Instead monitor on Windows applet use one these joy test software, like this one in your above pictures, more detailed.
The center is in 2048. The blue axis -static on second picture - is clearly off center.

The "Achilles hell" of DIY HALL sensor assembly is this alignment, a 0.1 mm off make difference in centering.

Sokol1

#4051886 - 12/17/14 04:35 AM Re: MMJoy - Build your own USB controller [Re: Sokol1]  
Joined: Jan 2014
Posts: 274
mega_mozg_13 Offline
Member
mega_mozg_13  Offline
Member

Joined: Jan 2014
Posts: 274
BELARUS, Minsk
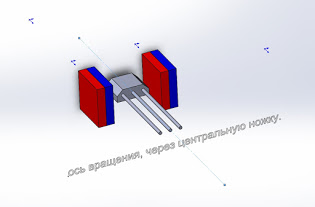
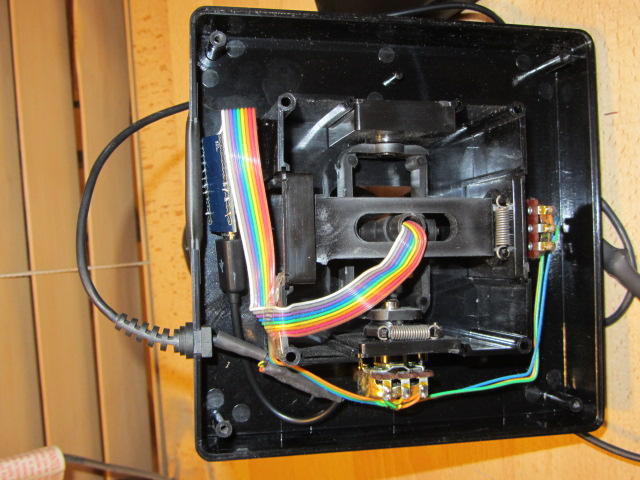
tirta, your hall+magnet system works ery well.
if want more, and perfect:
1) decrease distance between hall and magnet as less as possible. axis raw must be: min 0-100 point, and max 4000-4096.
2) check your mechanic


it is no good!!!

see my bearings mechanic:

#4052184 - 12/17/14 06:02 PM Re: MMJoy - Build your own USB controller [Re: Sokol1]  
Joined: Jan 2010
Posts: 464
tirta Offline
Member
tirta  Offline
Member

Joined: Jan 2010
Posts: 464
thanks Sokol1 & mega_mozg for sharing your knowledge.
I learn a lot from reading your posts.

mega_mozg,
your joystick motion looks very smooth.
can I know what kind of joystick do you use?

#4052483 - 12/18/14 04:19 AM Re: MMJoy - Build your own USB controller [Re: tirta]  
Joined: Jan 2014
Posts: 274
mega_mozg_13 Offline
Member
mega_mozg_13  Offline
Member

Joined: Jan 2014
Posts: 274
BELARUS, Minsk
Originally Posted By: tirta
mega_mozg, your joystick motion looks very smooth. can I know what kind of joystick do you use?

worklog

#4052818 - 12/18/14 07:04 PM Re: MMJoy - Build your own USB controller [Re: Sokol1]  
Joined: Jun 2007
Posts: 630
Ltfransky Offline
Sith Lord
Ltfransky  Offline
Sith Lord
Member

Joined: Jun 2007
Posts: 630
Peterborough, ON, Canada
Ok, I'm gonna take another shot at this even though my last mjoy attempt was an utter failure.

Will this board work with MMJoy?

http://www.ebay.ca/itm/Leonardo-Pro-Micr...=item4853468c6a


Please Heatware Me!

Ours is not to reason why. Ours is to do or die.
Tennyson

I have slipped the surly bonds of earth
And danced the skies on laughter-silvered wings..
Gillespie Magee, RCAF
#4052833 - 12/18/14 07:40 PM Re: MMJoy - Build your own USB controller [Re: mega_mozg_13]  
Joined: Jun 2007
Posts: 630
Ltfransky Offline
Sith Lord
Ltfransky  Offline
Sith Lord
Member

Joined: Jun 2007
Posts: 630
Peterborough, ON, Canada
Originally Posted By: mega_mozg_13
guys, you are killing me by USBASP...

use bootloader, it easy!!!

0) connect leonardo to USB, windows ask for drivers. Use it from subfolder 'JoySetup' -> 'drivers'.
1) open "device manager" -> "LPT/COM ports". somevere will be "Arduino leonardo COMxx". warning "COMxx"!!!
2) click "reset"+"gnd" pins twice, "Arduino leonardo COMxx" - remove and windows ask for new device and drivers.
3) on "device manager" -> "LPT/COM ports". will be NEW "Arduino leonardo bootloader COMyy". warning "COMyy"!!!
!!!remember bootloader mode active only 8 sec, after leonardo automaticly reset to "Arduino leonardo"!!!
so for update firmware you need a active state "Arduino leonardo bootloader COMyy".
4) start JoySetup, manual select: chip "atmega32u4", file firmware "Firmware_lufa_[MMJOY2.ATMEGA32U4].hex", boot type "Arduino", and COM port. where "COMyy" - bootloader port number "YY".
5) again goto bootloader mode "click "reset"+"gnd" twice".
6) when field port are green it is ready to update just click "upload firmware".


Holy #%&*$#. So with any pro micro you DON"T need a progammer (I have an avrisp - no idea how to use it)? All I have to do is follow the above steps to get it to work? Also, in order for this to work, do steps 4-6 have to be done within 8 seconds or can you start Joysetup and get everything ready, then plug in the promicro and click "upload"?

Last edited by Ltfransky; 12/18/14 07:46 PM.

Please Heatware Me!

Ours is not to reason why. Ours is to do or die.
Tennyson

I have slipped the surly bonds of earth
And danced the skies on laughter-silvered wings..
Gillespie Magee, RCAF
#4052859 - 12/18/14 08:28 PM Re: MMJoy - Build your own USB controller [Re: mega_mozg_13]  
Joined: Jan 2010
Posts: 464
tirta Offline
Member
tirta  Offline
Member

Joined: Jan 2010
Posts: 464
Originally Posted By: mega_mozg_13
Originally Posted By: tirta
mega_mozg, your joystick motion looks very smooth. can I know what kind of joystick do you use?

worklog


hi mega_mozg,

wow, I am speechless.
you make your own gimbal mechanism.
that is very impressive. thumbsup

how long does it takes to make it?

#4053066 - 12/19/14 04:22 AM Re: MMJoy - Build your own USB controller [Re: Ltfransky]  
Joined: Jan 2014
Posts: 274
mega_mozg_13 Offline
Member
mega_mozg_13  Offline
Member

Joined: Jan 2014
Posts: 274
BELARUS, Minsk
Originally Posted By: Ltfransky

yes!!!

#4053069 - 12/19/14 04:27 AM Re: MMJoy - Build your own USB controller [Re: Ltfransky]  
Joined: Jan 2014
Posts: 274
mega_mozg_13 Offline
Member
mega_mozg_13  Offline
Member

Joined: Jan 2014
Posts: 274
BELARUS, Minsk
Originally Posted By: Ltfransky

Holy #%&*$#. So with any pro micro you DON"T need a progammer (I have an avrisp - no idea how to use it)?

also with Arduino Leonardo / Arduino Micro / Teensy2.0 and Teensy2.0++ - NO NEED EXTERNAL PROGRAMMER.
if you want to update firmware no need to disassemble your joystick.

Originally Posted By: Ltfransky

All I have to do is follow the above steps to get it to work? Also, in order for this to work, do steps 4-6 have to be done within 8 seconds or can you start Joysetup and get everything ready, then plug in the promicro and click "upload"?

as you like, main think you understand. when you click "upload firmware" device mode "bootloader" and joysetup correct data fields(chip/file hex/com port/type boot).

#4053072 - 12/19/14 04:34 AM Re: MMJoy - Build your own USB controller [Re: tirta]  
Joined: Jan 2014
Posts: 274
mega_mozg_13 Offline
Member
mega_mozg_13  Offline
Member

Joined: Jan 2014
Posts: 274
BELARUS, Minsk
Originally Posted By: tirta

you make your own gimbal mechanism.
that is very impressive. thumbsup
how long does it takes to make it?

from first idea to first hardware - half year. and another half year to make 3 or 4 hardware versions...

#4053146 - 12/19/14 12:30 PM Re: MMJoy - Build your own USB controller [Re: Sokol1]  
Joined: Jul 2014
Posts: 15
Crosswind Offline
Junior Member
Crosswind  Offline
Junior Member

Joined: Jul 2014
Posts: 15
Hi mega_mozg_13,

I am planning to build my own magrez MCP601+kmz41 sensor, but in the joysetup the source has many option except IntSensor, which one should I choose if a magrez sensor is connect.

Many thanks

#4053556 - 12/20/14 05:57 AM Re: MMJoy - Build your own USB controller [Re: Crosswind]  
Joined: Jan 2014
Posts: 274
mega_mozg_13 Offline
Member
mega_mozg_13  Offline
Member

Joined: Jan 2014
Posts: 274
BELARUS, Minsk
Originally Posted By: Crosswind

I am planning to build my own magrez MCP601+kmz41 sensor, but in the joysetup the source has many option except IntSensor, which one should I choose if a magrez sensor is connect.


Hi.
Select "IntSensor" / "Port" (where it connected) and "Assigment". It is minimum to works with any analog sensor (pot/hall/magrez).

#4053562 - 12/20/14 07:00 AM Re: MMJoy - Build your own USB controller [Re: mega_mozg_13]  
Joined: Jul 2014
Posts: 15
Crosswind Offline
Junior Member
Crosswind  Offline
Junior Member

Joined: Jul 2014
Posts: 15
Originally Posted By: mega_mozg_13
Originally Posted By: Crosswind

I am planning to build my own magrez MCP601+kmz41 sensor, but in the joysetup the source has many option except IntSensor, which one should I choose if a magrez sensor is connect.


Hi.
Select "IntSensor" / "Port" (where it connected) and "Assigment". It is minimum to works with any analog sensor (pot/hall/magrez).


thank your explanation, I know this part. My mistake. I thought magrez is a digital sensor.....

Do you have any MCP320x + KMZxx shematic to share? I'd like to try something else other than analog.

#4053568 - 12/20/14 07:46 AM Re: MMJoy - Build your own USB controller [Re: Sokol1]  
Joined: Jan 2014
Posts: 274
mega_mozg_13 Offline
Member
mega_mozg_13  Offline
Member

Joined: Jan 2014
Posts: 274
BELARUS, Minsk
Crosswind,

MCP3202_KMZ60.lay6 (Sprint-Layout6) at "downloads" folder.

shematic:
for MCP3202-SOIC
for MCP3202-DIP

MCP3202-DIP real fotos


Last edited by mega_mozg_13; 12/20/14 07:54 AM.
#4053657 - 12/20/14 02:25 PM Re: MMJoy - Build your own USB controller [Re: Sokol1]  
Joined: Jul 2014
Posts: 15
Crosswind Offline
Junior Member
Crosswind  Offline
Junior Member

Joined: Jul 2014
Posts: 15
very nice of you, thank again cheers

BTW, what's the R0?

Last edited by Crosswind; 12/20/14 02:30 PM.
#4053698 - 12/20/14 04:28 PM Re: MMJoy - Build your own USB controller [Re: Sokol1]  
Joined: Jun 2007
Posts: 630
Ltfransky Offline
Sith Lord
Ltfransky  Offline
Sith Lord
Member

Joined: Jun 2007
Posts: 630
Peterborough, ON, Canada
Where is everyone getting the KMZ60s? I usually try for ebay because of free shipping, but i can't find any on there. I'd be interested in trying this out on some of my home sticks.

Also, I believe the MaRS sensor was the MCP601+kmz41, is there a schematic for that setup?

Last edited by Ltfransky; 12/20/14 04:32 PM.

Please Heatware Me!

Ours is not to reason why. Ours is to do or die.
Tennyson

I have slipped the surly bonds of earth
And danced the skies on laughter-silvered wings..
Gillespie Magee, RCAF
#4053707 - 12/20/14 04:51 PM Re: MMJoy - Build your own USB controller [Re: Crosswind]  
Joined: Jan 2014
Posts: 274
mega_mozg_13 Offline
Member
mega_mozg_13  Offline
Member

Joined: Jan 2014
Posts: 274
BELARUS, Minsk
Originally Posted By: Crosswind
very nice of you, thank again cheers
BTW, what's the R0?

this is Resistor = 0 Om (jumper).

#4053709 - 12/20/14 04:56 PM Re: MMJoy - Build your own USB controller [Re: Sokol1]  
Joined: Nov 2001
Posts: 3,955
Sokol1 Offline
Senior Member
Sokol1  Offline
Senior Member

Joined: Nov 2001
Posts: 3,955
Internet
KMZ60 are available in Mouser, Digikey and Chip1stop.

MCP3202+KMZ60 has a advantage to use less components than the old MCP601+KMZ41

Sokol1


Last edited by Sokol1; 12/20/14 05:09 PM.
#4053710 - 12/20/14 04:57 PM Re: MMJoy - Build your own USB controller [Re: Ltfransky]  
Joined: Jan 2014
Posts: 274
mega_mozg_13 Offline
Member
mega_mozg_13  Offline
Member

Joined: Jan 2014
Posts: 274
BELARUS, Minsk
Originally Posted By: Ltfransky
Also, I believe the MaRS sensor was the MCP601+kmz41, is there a schematic for that setup?

Wrong!
"Mars" - this is VKB digital(kmz41+attiny85) sensor, works only with Defender Cobra M5/ VKB Njoy32 controller.
"Magrez" - analog kmz41+mcp601, works everywhere.

https://mmjoy.googlecode.com/svn/wiki/MagRez_GVL_MM_44-22.lay6
("Magrez" PCB, Sprint Layout6)
https://mmjoy.googlecode.com/svn/wiki/MagRez_GVL_Setup.doc
("Magrez" Russian manual "how to", author GVL)

#4053713 - 12/20/14 05:02 PM Re: MMJoy - Build your own USB controller [Re: Sokol1]  
Joined: Jan 2014
Posts: 274
mega_mozg_13 Offline
Member
mega_mozg_13  Offline
Member

Joined: Jan 2014
Posts: 274
BELARUS, Minsk
about KMZ60 / KMZ41. my english is no good, try to translate this from russian:
http://forum.warthunder.ru/index.php?/topic/64234-mjoy-mjoy8-mjoy16-mmjoy/?p=3814221

#4053805 - 12/20/14 08:41 PM Re: MMJoy - Build your own USB controller [Re: Sokol1]  
Joined: Nov 2001
Posts: 3,955
Sokol1 Offline
Senior Member
Sokol1  Offline
Senior Member

Joined: Nov 2001
Posts: 3,955
Internet
What I understand from WT topic:

Quote:


KMZ41 - use one bridge of sensor

Advantage - Can be connect to any (USB) controller

Disadvantage - sensor gain value needs to be adjusted under work (joystick) mechanics, e.g. need solder components (resistor???)
Disadvantage - magnet central position needs to be set manually

KMZ60- use both bridge of sensor

Advantage - the central position of magnet (centering) is defined in Configurator
Advantage - adjusting for a (joystick) mechanics is done by Auto Calibration in Configurator

Disadvantage - this sensor only work if plugged into a controller that perform trigonometry calculations, or ones with MMJoy firmware
Disadvantage - is not easy to find and buy "KMZ60" and "MCP3202", therefore is provides possibility of replacing the ADC "MCP3202" by "MCP3204" or "MCP3208"


BTW - Nice Logitech upgrade: ball bearings on gimbal, MagRez sensors, MMjoy. smile

http://forum.warthunder.ru/uploads/monthly_12_2014/post-1103554-0-24545400-1418930208.jpg

Sokol1


Last edited by Sokol1; 12/20/14 08:47 PM.
#4054096 - 12/21/14 04:47 PM Re: MMJoy - Build your own USB controller [Re: Sokol1]  
Joined: Jul 2014
Posts: 15
Crosswind Offline
Junior Member
Crosswind  Offline
Junior Member

Joined: Jul 2014
Posts: 15
Russian flight sim community is another world! You guys did a great job

#4054168 - 12/21/14 08:39 PM Re: MMJoy - Build your own USB controller [Re: Sokol1]  
Joined: Jan 2004
Posts: 1,221
f15sim Offline
More projects than sense!
f15sim  Offline
More projects than sense!
Member

Joined: Jan 2004
Posts: 1,221
Graham, WA
Now if they'd just write in English... biggrin

g.


Proud owner of 80-0007
http://www.f15sim.com - The only one of its kind.
http://geneb.simpits.org - the Me-109F/X Project
#4054344 - 12/22/14 04:16 AM Re: MMJoy - Build your own USB controller [Re: Sokol1]  
Joined: Jan 2014
Posts: 274
mega_mozg_13 Offline
Member
mega_mozg_13  Offline
Member

Joined: Jan 2014
Posts: 274
BELARUS, Minsk
Originally Posted By: Sokol1

BTW - Nice Logitech upgrade: ball bearings on gimbal, MagRez sensors, MMjoy. smile


more fotos

#4054540 - 12/22/14 03:26 PM Re: MMJoy - Build your own USB controller [Re: Sokol1]  
Joined: Jan 2010
Posts: 464
tirta Offline
Member
tirta  Offline
Member

Joined: Jan 2010
Posts: 464
Hi mega_mozg,

Since your latest mmjoy firmware can use LED,
can you give me some ideas what the LED is used for?

#4054660 - 12/22/14 08:25 PM Re: MMJoy - Build your own USB controller [Re: Sokol1]  
Joined: Nov 2001
Posts: 3,955
Sokol1 Offline
Senior Member
Sokol1  Offline
Senior Member

Joined: Nov 2001
Posts: 3,955
Internet
Tirta

You can use LED to monitor switch's state. Sample from above WT link.

http://forum.warthunder.ru/uploads/monthly_12_2014/post-59452-0-29246800-1418105755.jpg

Sokol1

#4055320 - 12/24/14 08:21 AM Re: MMJoy - Build your own USB controller [Re: Sokol1]  
Joined: Jan 2010
Posts: 464
tirta Offline
Member
tirta  Offline
Member

Joined: Jan 2010
Posts: 464
Originally Posted By: Sokol1
Tirta

You can use LED to monitor switch's state. Sample from above WT link.

http://forum.warthunder.ru/uploads/monthly_12_2014/post-59452-0-29246800-1418105755.jpg

Sokol1


thanks Sokol1,

that's a lot of LEDs.
so it is possible to assign one LED to each button?
How do you do it?

#4056246 - 12/26/14 05:13 PM Re: MMJoy - Build your own USB controller [Re: Sokol1]  
Joined: Sep 2014
Posts: 33
SolderMonkey Offline
Junior Member
SolderMonkey  Offline
Junior Member

Joined: Sep 2014
Posts: 33
Ari-freakin-zona
Ok, I've now completed a thrustmaster FCS, WCS, X fighter, attack throttle, rudder pedals and a CH Pro yoke. All the buttons, hats and axis work. I think I'm getting the hang of this.

But, I have some questions:

What do Zoom, Stop, Trim and Divisor do in Axis Programming?

Is there a way to set one of the thrustmaster 3 way switches to actually work without putting in gate logic chips?

Can someone explain to me like I'm 5 - what are shift registers, how they work and why I would program them?

What are the differences between the October and the November firmware releases?

Page 1 of 112 1 2 3 111 112

Moderated by  RacerGT 

Quick Search
Recent Articles
Support SimHQ

If you shop on Amazon use this Amazon link to support SimHQ
.
Social


Recent Topics
Headphones
by RossUK. 04/24/24 03:48 PM
Skymaster down.
by Mr_Blastman. 04/24/24 03:28 PM
The Old Breed and the Costs of War
by wormfood. 04/24/24 01:39 PM
Actors portraying British Prime Ministers
by Tarnsman. 04/24/24 01:11 AM
Roy Cross is 100 Years Old
by F4UDash4. 04/23/24 11:22 AM
Actors portraying US Presidents
by PanzerMeyer. 04/19/24 12:19 PM
Dickey Betts was 80
by Rick_Rawlings. 04/19/24 01:11 AM
Exodus
by RedOneAlpha. 04/18/24 05:46 PM
Copyright 1997-2016, SimHQ Inc. All Rights Reserved.

Powered by UBB.threads™ PHP Forum Software 7.6.0