|
#4282543 - 07/28/16 02:24 AM
 Re: MMJoy - Build your own USB controller
 [Re: Sokol1]
|
Joined: Nov 2001
Posts: 3,955
Sokol1

Senior Member
|
Senior Member
Joined: Nov 2001
Posts: 3,955
Internet
|
Your idea make sense, I think in something similar, but not with their trim but a way to turn the BIC section externally. CH bases are a bit "flimsy", what I think help their pot's last long, but for fit HALL is PITA, even the weight of your hand over the base flex then and then the magnets off center. Other detail is that CH pot axis is part of gimbal, if remove then the gimbal fall apart.  Did this in one Combastick.  img imgThe pot axis has the tip diameter reduced a bit in lathe to allow Bic tube fit tight, so for "tuning" the Bic section can be turned slight. Ideally is if this can be done externally. Plan eventually replace this with TLE501x. Interesting your POV HAT solution in Logitech grip. Bi-Tech 6127 HALL - nice sensor but bloody expensive Yes, but one cost less than two CH pot sold as replacement. In HOTAS Cougar "King of the Hill" times people used pay more than 100$ in similar Midori HALL Sensor - even today some continue to pay.
Last edited by Sokol1; 07/28/16 03:41 PM.
|
|
|
#4282608 - 07/28/16 12:09 PM
Re: MMJoy - Build your own USB controller
[Re: Sokol1]
|
Joined: Oct 2014
Posts: 15
triggahappy
Junior Member
|
Junior Member
Joined: Oct 2014
Posts: 15
|
CH bases are a bit "flimsy", what I think help their pot's last long, but for fit HALL is PITA, even the weight of your hand over the base flex then and then the magnets off center. Plastick gimbals they are all flimsy and have some loose movement. Compared to Logitech 3D and others similar CH gimbal feels great. Additionally I am using 0.15mm teflon tape and a bit of capton tape to eliminate loose movement.  Your hall is much better idea of what I was thinking, I simply overcomplicated it:). After openig the pot I think it's just not worth the effort to keep the trim. I dont have a lathe so will have to use something else than bic pen or diametrically magnetised magnets What is that? A LEGO piece?:) 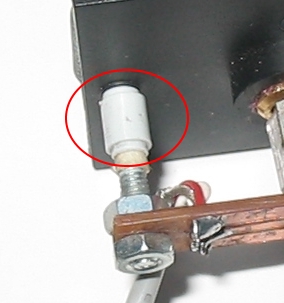 As for POV. 2 5-way will fit for sure, with a bit of luck 3rd one will fit as well 
Last edited by triggahappy; 07/28/16 12:10 PM.
|
|
#4282648 - 07/28/16 01:41 PM
 Re: MMJoy - Build your own USB controller
[Re: triggahappy]
Re: MMJoy - Build your own USB controller
[Re: triggahappy]
|
Joined: Nov 2001
Posts: 3,955
Sokol1
Senior Member
|
Senior Member
Joined: Nov 2001
Posts: 3,955
Internet
|
Don't remember from where this plastic "tube" come, but he fit over the pin that are in this place in gimbal and allow the 1/8 screw fit inside. Was fit only for test, after the pin place was bored and the screw bolted in the wall. If you have a powered hand drill can reduce the pot axis tip with sand paper for metal, the pot axis is brass, relatively soft (will take some time) for fit the Bic tube. Bic tube easy the things due the ~parallel sides. A guy fit bearings in this CH gimbal, to reduce their play:  The metal tube is for upper part, a twist rudder mechanism from some Logitech stick.
|
|
|
#4282670 - 07/28/16 02:21 PM
Re: MMJoy - Build your own USB controller
[Re: Sokol1]
|
Joined: Oct 2014
Posts: 15
triggahappy
Junior Member
|
Junior Member
Joined: Oct 2014
Posts: 15
|
Don't remember from where this plastic "tube" come, but he fit over the pin that are in this place in gimbal and allow the 1/8 screw fit inside. Was fit only for test, after the pin place was bored and the screw bolted in the wall. I was wondering why you did not drill the wall :P If you have a powered hand drill can reduce the pot axis tip with sand paper for metal, the pot axis is brass, relatively soft (will take some time) for fit the Bic tube. Bic tube easy the things due the ~parallel sides. Thanks for letting me know that it is brass Power drill and a file here I come Just had a quick look at bic and pot shaft, there is not that much material to remove aprox 0.4mm. Other option is to use acrylic tube OD 10mm ID 6mm. With 2mm wall thikness there is enough material to file a grove for magnets. If done properly hall sensor (4mm wide) would be sitting between 2 magnets with 1mm room on each side. Bearings fited into gimbal that's lovely but without proper tools like stand press drill with vice I am not going to even think of doing it. Thanks for the ideas
Last edited by triggahappy; 07/28/16 02:22 PM.
|
|
|
#4283132 - 07/30/16 08:04 AM
Re: MMJoy/MMjoy2 - Build your own USB controller
[Re: mega_mozg_13]
|
Joined: Jul 2016
Posts: 25
Snagov
Junior Member
|
Junior Member
Joined: Jul 2016
Posts: 25
|
In MMJoy2, there are any posibility to use one interruptor (on/off) to work like a push button?
Magnetos:
1 position: off
2 position: magneto 1
3 position: magneto 2
possible. set "MODE:SwitchON"+"TimerON" for each button(position), it is give only one short click when you switch position.  This is my button box, working as i wanted!   Thanks again!
|
|
|
#4283784 - 08/01/16 02:56 PM
Re: MMJoy/MMjoy2 - Build your own USB controller
[Re: Sokol1]
|
Joined: Nov 2001
Posts: 3,955
Sokol1
Senior Member
|
Senior Member
Joined: Nov 2001
Posts: 3,955
Internet
|
Forsaken, Only early versions of MMjoy is compatible with Mjoy8/16 due the different mc - the slow and obsolete ATMEGA8 & 16 used in this versions. Think the last firmware with support for this mc is v20140528. For Arduino you don't need serial or parallel port or programmer cable/board - but this is need for MJoy8/16. Then you need buy a USB AVR Programming Cable, better leave this old boards as is.
|
|
|
#4283922 - 08/01/16 11:04 PM
Re: MMJoy/MMjoy2 - Build your own USB controller
[Re: Sokol1]
|
Joined: Nov 2001
Posts: 3,955
Sokol1
Senior Member
|
Senior Member
Joined: Nov 2001
Posts: 3,955
Internet
|
Some motherboards although dont have connector for LPT on back panel, have pins for this connector inside, check in manual. If are, is just matter to plug some cables there to use the old DIY LPT programmer for Mjoy. BTW - Mjoy16 based "device".  https://www.youtube.com/watch?v=8f7LryGqqrU https://www.youtube.com/watch?v=8f7LryGqqrU
|
|
|
#4284249 - 08/03/16 10:07 AM
Re: MMJoy/MMjoy2 - Build your own USB controller
[Re: Sokol1]
|
Joined: Jul 2016
Posts: 25
Snagov
Junior Member
|
Junior Member
Joined: Jul 2016
Posts: 25
|
Hi again..... which is the value of potentiometers can be used? 500k is posible? This board can be used? Deal Extreme Pro Micro 32U4
Last edited by Snagov; 08/03/16 10:09 AM.
|
|
|
#4284252 - 08/03/16 10:37 AM
Re: MMJoy/MMjoy2 - Build your own USB controller
[Re: Sokol1]
|
Joined: Oct 2014
Posts: 15
triggahappy
Junior Member
|
Junior Member
Joined: Oct 2014
Posts: 15
|
@Sokol1 No press drill option for bearings. wink I think you guys have been building/rebuilding sim gear for years and no matter what I ask you will just come up with a solution to a problem Just wish I had enough time to do it all. At the moment bloody job is preventing me from doing any moding at all. Cheers
|
|
|
#4284322 - 08/03/16 02:31 PM
Re: MMJoy/MMjoy2 - Build your own USB controller
[Re: Snagov]
|
Joined: Nov 2001
Posts: 3,955
Sokol1
Senior Member
|
Senior Member
Joined: Nov 2001
Posts: 3,955
Internet
|
Looks Ok, what you should pay attention: ATMEGA32u4 mc 5V - 16mhz Some guys are buying 3,5V versions what seems no firmware compatible and prevents use HALL sensor, as most require 5V. I advise this PRO Micro - because their USB connector is Mini (and not Micro) with 4 solder points on PCB instead 2, so more strong. http://www.ebay.com/itm/Pro-Micro-ATmega32U4-5V-16MHz-Replace-ATmega328-Arduino-Pro-Mini-/400988209614?hash=item5d5cc281ce:g:TJkAAOSwu4BV5Xso
|
|
|
|
|
|
|
|
|
|
|
|
|
|
|
|
|
|
|
|
|
Exodus
by RedOneAlpha. 04/18/24 05:46 PM
|
|


