Previous Thread
Next Thread
Print Thread
Rate This Thread
Hop To
#3353196 - 07/28/11 02:52 AM Hoping for a little help with a Saitek Aviator and the BU0836A...  
Joined: Jan 2010
Posts: 26
TheGrunch Offline
Junior Member
TheGrunch  Offline
Junior Member

Joined: Jan 2010
Posts: 26
Hey guys,
I recently bought a BU0836A to replace the controller board in my Saitek Aviator and hopefully eliminate the weird axis issues that plague this stick. I'm quite happy wiring up the buttons and switches on the base of the stick to rows and columns on the button matrix on the controller board, however upon opening the handle of the stick I was faced with this:


Just hoping some of you can give me some pointers as to what goes where when I'm wiring these three buttons and the hat up to the matrix? Thanks! smile

Last edited by TheGrunch; 07/28/11 02:54 AM.
Inline advert (2nd and 3rd post)

#3353361 - 07/28/11 08:48 AM Re: Hoping for a little help with a Saitek Aviator and the BU0836A... [Re: TheGrunch]  
Joined: May 2010
Posts: 108
julian265 Offline
Member
julian265  Offline
Member

Joined: May 2010
Posts: 108
I can't give you any "connect X to Y" style instructions (maybe someone here who has an aviator can), but you always have the option of disconnecting the existing wires, and running your own wires to each of the button terminals. There might be a need to break the PCB connections also.

#3353420 - 07/28/11 11:45 AM Re: Hoping for a little help with a Saitek Aviator and the BU0836A... [Re: TheGrunch]  
Joined: Jan 2010
Posts: 26
TheGrunch Offline
Junior Member
TheGrunch  Offline
Junior Member

Joined: Jan 2010
Posts: 26
Thanks Julian, have to admit I was considering the option of just desoldering everything and taking it off and then breaking out the sander and sanding the board clear.

#3353512 - 07/28/11 01:27 PM Re: Hoping for a little help with a Saitek Aviator and the BU0836A... [Re: TheGrunch]  
Joined: Jul 2009
Posts: 9,711
CyBerkut Offline
Administrator
CyBerkut  Offline
Administrator
Hotshot

Joined: Jul 2009
Posts: 9,711
Florida
Judicious use of an exacto knife should be sufficient for cutting the traces that need it. However, it *looks* like most (maybe even all) of them could be left intact, and just use the edge terminals to make your connections. The diodes shouldn't interfere.

#3353536 - 07/28/11 01:58 PM Re: Hoping for a little help with a Saitek Aviator and the BU0836A... [Re: TheGrunch]  
Joined: Jun 2009
Posts: 792
PropNut Offline
Member
PropNut  Offline
Member

Joined: Jun 2009
Posts: 792
Greenville, Michigan
I hacked an Aviator for my early simpit build and used the parts that you have shown for some of my buttons, etc. All you need to do is cut the wires leading out of the bottom (at the base of the stick, not up by the PCB/swtiches) and connect them to the Bodnar board (I used the BU0836X). They use a common ground and all of the other leads are per switch. To find out which is which I used a multimeter and tested conductivity. Connect the black lead on the multimeter to the common ground (look at the pcb traces to see which one goes to all buttons and that one will be the common ground) and the red lead on the multimeter to any other wire...press buttons until you get a resistence reading on the multimeter (showing connectivity). You will want to connect the four leads from the hat switch to the corresponding inputs on the Bodnar board to get all eight hat type outputs.

Edit: From looking at the pictures the red wire clearly shows that it is ground so that takes most of the work away. It is a simple matter from there to find out which button goes to which wire.

Last edited by PropNut; 07/28/11 02:03 PM. Reason: added information

F/A-18C Hornet cockpit build project:

http://hornetpits.org/index.php?topic=15.0
#3353800 - 07/28/11 05:22 PM Re: Hoping for a little help with a Saitek Aviator and the BU0836A... [Re: TheGrunch]  
Joined: Nov 2001
Posts: 3,955
Sokol1 Offline
Senior Member
Sokol1  Offline
Senior Member

Joined: Nov 2001
Posts: 3,955
Internet
To hook HAT:

BU0836 Row 6 => PD1
BU0836 Coll 3 => HU
Bu0836 Coll 4 => HR
Bu0836 Coll 5 => HD
Bu0836 Coll 6 => HL

But, for any of four HAT button you need place 1N4148 diode toward to Row6. Actual diodes in PCB are in inverse position, toward to Collumns.

IMO - More ease just cut all PCB trais and sold wires directly in buttons pins under PCB.
Put 1N4148 diode in every swtich pin e put wires accord BU0836A matrix.

Notice that PCB have a LED (with associated resitor in +5V LED). To maintain this LED working probable need a
separated toggle circuit. BU0836 work with momentary contacts.

Sokol1

#3353983 - 07/28/11 09:08 PM Re: Hoping for a little help with a Saitek Aviator and the BU0836A... [Re: TheGrunch]  
Joined: Jan 2010
Posts: 26
TheGrunch Offline
Junior Member
TheGrunch  Offline
Junior Member

Joined: Jan 2010
Posts: 26
Thanks guys for all the help, but I think I probably asked too vague a question (sorry, I'm not very good with electronics so I don't often know how to explain what I mean), what I meant was more: Can I connect the buttons in a matrix arrangement when I only have the one common ground wire? Can I still do it the way that means I get more than 12 buttons to use or do I have to use the aforementioned exacto-knife and direct connections method to do that, unless I'm willing to give up adding more and use the alternative method where you connect each output wire to a row/column pin and the common ground to an analogue axis ground pin?
My instincts tell me to try connecting GND to row 6 and VCC, P14, etc. to the column pins on the board, so that the hat switches make up the last four inputs on row 6, and hopefully I should then be fine since the board already has diodes along each output, but my instincts don't know anything about electronics! biggrin And also then I don't know what'll happen to the LED or suchlike. Will it interfere? Will it still light up? (Don't really care so much about that last part).

EDIT: Thanks Sokol, sorry, I just missed your post before I made mine!

AND AGAIN: Not sure how I missed the fact that the diodes were in the wrong direction. That sounds like a good plan though to wire up the hat separately. I've already made some small stripboards with column connectors and a single row connector with 1N4148 diodes in between each column connector and the row connector after Ian Sissons' from 737NG's instructions, but do you think it also work to desolder the diodes and reverse them, remove the LED and resistor entirely and put wires through where they were, and then proceed as normal with GND to row6 and then each button's signal wire to a column?

Last edited by TheGrunch; 07/28/11 09:23 PM.
#3354058 - 07/28/11 10:39 PM Re: Hoping for a little help with a Saitek Aviator and the BU0836A... [Re: TheGrunch]  
Joined: Sep 2006
Posts: 4,353
HitchHikingFlatlander Offline
Senior Member
HitchHikingFlatlander  Offline
Senior Member

Joined: Sep 2006
Posts: 4,353
California
I'm not trying to sound like an ass here but I bought my Saitek Aviator for less than a Leo Bodnar board costs. Why didn't you just buy a new stick?


I've got a bad feeling about this.....
#3354096 - 07/28/11 11:34 PM Re: Hoping for a little help with a Saitek Aviator and the BU0836A... [Re: TheGrunch]  
Joined: Nov 2001
Posts: 3,955
Sokol1 Offline
Senior Member
Sokol1  Offline
Senior Member

Joined: Nov 2001
Posts: 3,955
Internet
Originally Posted By: TheGrunch
Thanks guys for all the help, but I think I probably asked too vague a question (sorry, I'm not very good with electronics so I don't often know how to explain what I mean), what I meant was more: Can I connect the buttons in a matrix arrangement when I only have the one common ground wire?
My instincts tell me to try connecting GND to row 6 and VCC, P14


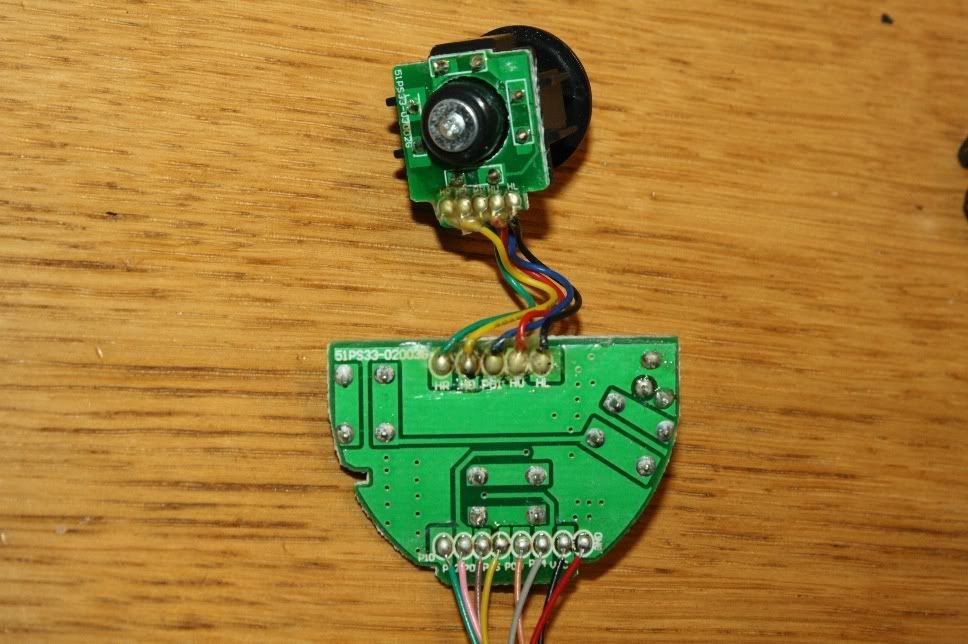
In Bu0836/A matrix - the common wire is related at individual ROW and not at all buttons/HAT possibles.
So you have a "common wires" for each ROW of matrix, in BU0836 mean six.

Ie. BU0836 ROW 6 is "common wire" to buttons 30, 32, HU, HR, HD, HL.

Notice that BU0836X is a different figure, since his matrix is integrated to circuit e this allow you
use one common wire to all buttons.


In this 
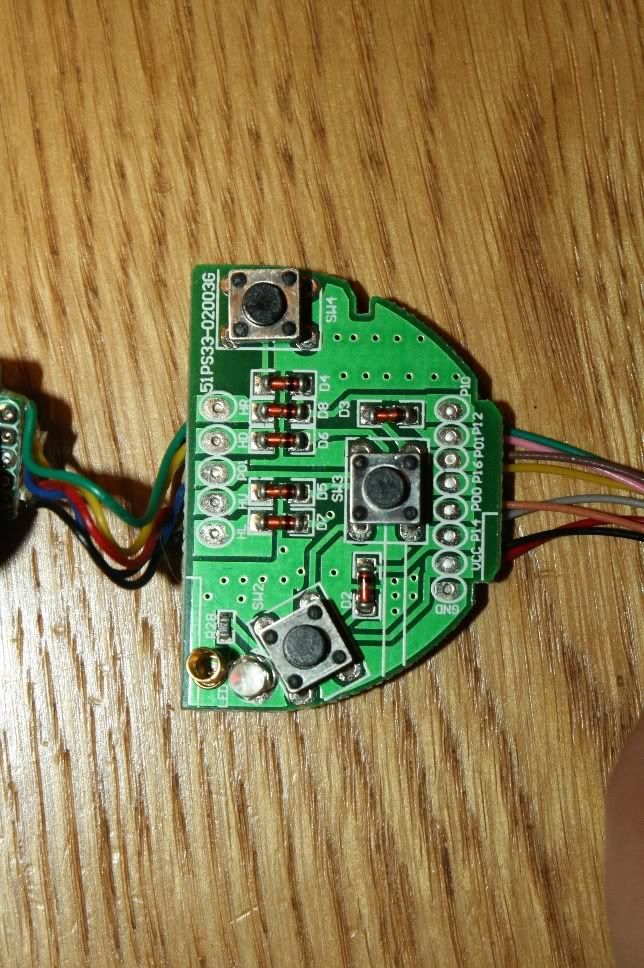
Saitek PCB the common wire (for buttons and HAT) is the pins PD0 and PD1

GND and VCC is only for LED. Not related to buttons or matrix.

I dont figure how light this LED - since you need VCC and GND to this, and mix this with rows and columns wires in SW2 probable is not good for BU0836 health... smile

If you can test with multimeter you see that VCC and GND is not connected to SW2. Only to LED and resistor (R28).

In Saitek AV8R when you press SW2 (button 2) probable some relay or optocoupler in main circuit is closed and light (or blink?) the LED.

[/quote]but do you think it also work to desolder the diodes and reverse them,[/quote]

I remember that someone say that you can use diodes toward columns instead to rows - is case to make a test, so no desolder is need. Reverse then probable make HAT to stop to work.

[quote]remove the LED and resistor entirely and put wires through where they were,[/quote

In case just ignore the LED, VCC and GND wires (remove these wires - Red and Black - from PCB).
Buttons and HAT dont make use of these two wires.

To hook SW2, SW3 and SW4 use:

BU0836 Columns 2, 3, 4 and ROW 1 - diodes 1N4148 toward ROW 1.

You save one wire if instead columns 2, 3, 4 use columns 3, 4, 5 since these already are use by HAT. wink

Sokol1

#3354285 - 07/29/11 07:17 AM Re: Hoping for a little help with a Saitek Aviator and the BU0836A... [Re: HitchHikingFlatlander]  
Joined: Jan 2010
Posts: 26
TheGrunch Offline
Junior Member
TheGrunch  Offline
Junior Member

Joined: Jan 2010
Posts: 26
Thanks for the detailed reply Sokol! I'll let you know how I get on, and whether the diodes being the other way works. If the VCC and GND wires are entirely separate to the buttons, could I maybe connect up VCC and GND to the spare +5V and -5V pins on the BU0836 board?

Originally Posted By: HitchHikingFlatlander
I'm not trying to sound like an ass here but I bought my Saitek Aviator for less than a Leo Bodnar board costs. Why didn't you just buy a new stick?

That's not ALL I'm doing with it. wink There's only the handle and gimbal left from the Aviator at the moment.

Last edited by TheGrunch; 07/29/11 07:18 AM.
#3354554 - 07/29/11 04:44 PM Re: Hoping for a little help with a Saitek Aviator and the BU0836A... [Re: TheGrunch]  
Joined: Sep 2006
Posts: 4,353
HitchHikingFlatlander Offline
Senior Member
HitchHikingFlatlander  Offline
Senior Member

Joined: Sep 2006
Posts: 4,353
California
LOL NVM, I just thought you were trying to repair it! I was thinking you can get one on amazon for $20 these days. I bought mine to turn it into a collective controller for Black Shark! Good luck with your project.


I've got a bad feeling about this.....
#3354905 - 07/29/11 11:46 PM Re: Hoping for a little help with a Saitek Aviator and the BU0836A... [Re: TheGrunch]  
Joined: Nov 2001
Posts: 3,955
Sokol1 Offline
Senior Member
Sokol1  Offline
Senior Member

Joined: Nov 2001
Posts: 3,955
Internet
Quote:
could I maybe connect up VCC and GND to the spare +5V and -5V pins on the BU0836 board?


Yes, but you get a LED always ON. How this LED work in original Saitek circuit - blink when you press button 2 (SW2)?

Quote:
I'm not trying to sound like an ass here but I bought my Saitek Aviator for less than a Leo Bodnar board costs. Why didn't you just buy a new stick?


IMO - A new 35 U$ stick dont surpass a MODed one with BU0836. wink

Sokol1

#3355132 - 07/30/11 09:24 AM Re: Hoping for a little help with a Saitek Aviator and the BU0836A... [Re: Sokol1]  
Joined: Jan 2010
Posts: 26
TheGrunch Offline
Junior Member
TheGrunch  Offline
Junior Member

Joined: Jan 2010
Posts: 26
Originally Posted By: HitchHikingFlatlander
LOL NVM, I just thought you were trying to repair it! I was thinking you can get one on amazon for $20 these days. I bought mine to turn it into a collective controller for Black Shark! Good luck with your project.
Thanks. smile Also, what Sokol says below...especially where the Aviator and its dodgy calibration issues are concerned. wink I'm a little bit sick of the second throttle intermittently restricting itself to half an axis in range mid-flight and getting wandering +-10% all the time on both throttles...thankfully for me it's only been the throttles that have been dodgy, I understand some people have had problems with the X and Y axes.

Originally Posted By: Sokol1
Quote:
could I maybe connect up VCC and GND to the spare +5V and -5V pins on the BU0836 board?


Yes, but you get a LED always ON. How this LED work in original Saitek circuit - blink when you press button 2 (SW2)?

Quote:
I'm not trying to sound like an ass here but I bought my Saitek Aviator for less than a Leo Bodnar board costs. Why didn't you just buy a new stick?


IMO - A new 35 U$ stick dont surpass a MODed one with BU0836. wink

Sokol1

The LED is on all the time, Sokol. smile You wouldn't be able to see it blink when it was under your thumb anyway. wink

#3356181 - 07/31/11 11:03 PM Re: Hoping for a little help with a Saitek Aviator and the BU0836A... [Re: TheGrunch]  
Joined: Jan 2010
Posts: 26
TheGrunch Offline
Junior Member
TheGrunch  Offline
Junior Member

Joined: Jan 2010
Posts: 26
Well, using a multimeter I established that:
SW2: PD0->P14
SW3: PD0->P12
SW4: PD0->P10
HU: PD1->P16
HR: PD1->P10
HD: PD1->P14
HL: PD1->P12

So I connected:

Trigger blue wire->Column 1
Trigger white wire->Row 1, with 1N4148 diode toward row
P16->Column 3
P10->Column 4
P14->Column 5
P12->Column 6
PD0->Row 1
PD1->Row 6
VCC->+5V
GND->-5V

No luck! Only the trigger switch worked, and the LED was unlit. I tried reversing the connector for VCC and GND, but still no LED. Checked all of my connections with the multimeter and they're all sound from the PCB to the connector end. So, it looks like using diodes along the columns doesn't work. I'm really not sure why the LED isn't working. Oh well! On the plus side everything else apart from the buttons and the LED is now ready and working.


Moderated by  RacerGT 

Quick Search
Recent Articles
Support SimHQ

If you shop on Amazon use this Amazon link to support SimHQ
.
Social


Recent Topics
Headphones
by RossUK. 04/24/24 03:48 PM
Skymaster down.
by Mr_Blastman. 04/24/24 03:28 PM
The Old Breed and the Costs of War
by wormfood. 04/24/24 01:39 PM
Actors portraying British Prime Ministers
by Tarnsman. 04/24/24 01:11 AM
Roy Cross is 100 Years Old
by F4UDash4. 04/23/24 11:22 AM
Actors portraying US Presidents
by PanzerMeyer. 04/19/24 12:19 PM
Dickey Betts was 80
by Rick_Rawlings. 04/19/24 01:11 AM
Exodus
by RedOneAlpha. 04/18/24 05:46 PM
Copyright 1997-2016, SimHQ Inc. All Rights Reserved.

Powered by UBB.threads™ PHP Forum Software 7.6.0