Until recently personal cockpits have been considered something of a niche product, reserved generally for those that were rich enough to afford such a device. The other option was to try to build your own, a tedious and often ultimately more expensive idea. Luckily, over the last few years the cost of gaming cockpits had dropped down to the point where they are becoming more affordable for the average simulation junkie.
Several different companies make several different types of configurations, each with a certain market in mind. Guod reviewed the original Obutto oZone cockpit a few years ago, and Panther reviewed the Obutto R3Volution cockpit last year. Bart Waclawik, the founder of Volair Sim contacted me about taking a look at their setup. While other companies, like Playseat and rSeat make products as well these appear to be more for the console gaming market. Obutto and Volair Sim concentrate on the PC simulation market.
Volair Sim sent me their latest version of their cockpit setup to look over. This review will cover the Volair Sim flight simulation cockpit as well as general gaming desktop use. The driving review can be found on SimHQ Motorsports.
Construction and Setup

Volair Sim shipping box
The box the cockpit came in weighed somewhere around 120 pounds, about what I expected. Keep this in mind when ordering because the shipping costs can add up to enormous depending on where you live. The company is based in Indiana and to ship the Volair Sim cockpit to Olympia, WA would cost approximately $165 USD. Yes, that is an insanely stupid amount but these days it is the going rate I’m afraid. Left coasters beware. I have to give Bart at Volair Sim some credit here; he ate a pretty big shipping cost to send this to me.
The contents were well packaged and protected. All the metal components were bubble wrapped and the power coating job done on them was top notch. In fact, everything looked significantly better than I expected. The seat is a very nicely done “Recaro style” with the ability to recline and carbon fiber accents where most people will place their hands during entrance and exit. All the bolts and fasteners were separated and marked and the tools needed to construct the cockpit were included. For faster construction I suggest a set of (metric) wrenches and a screwdriver with interchangeable allen head attachments but this isn’t necessary.
The only thing that didn’t strike me top notch was the assembly manual that came with the Volair Sim cockpit. While helpful to a degree it was many times too vague and could easily confuse the not so mechanically inclined. It also came loose and the moment I opened the wrapper holding it I dropped all the papers on the floor. Luckily it was numbered but a staple might be in order.
There is a video at Volair Sim’s web site that goes into detail on the building of the cockpit and I highly recommend watching it before building the Volair Sim cockpit. Unfortunately for me, I didn’t realize this until after I had taken down my router and wireless network to begin the construction. A suggestion for the Volair Sim team, maybe include a DVD with the video as well as any other info that someone may need for building the cockpit.
The cockpit, in and of itself is fairly easy to build with only the seat setup being slightly complicated. A normal person, one that actually watched the video and didn’t have to contend with a pair of Yorkshire Terriers thinking that my lying on the floor was an invitation to slobber ‘kisses’ all over daddy should be able to construct the entire setup in about an hour and a half to two hours. The prep to construct the cockpit took longer than the actual build itself.

There are a couple of things to note with the Volair Sim cockpit. First off, it is not a computer desk. I suppose you can do some work on it but there isn’t a true writing surface anywhere on the cockpit. Since most of the surfaces are pre-drilled for the mounts of various flight and driving devices there isn’t a place there to actually do work. Likewise there is no real place to put a computer tower so you will either have to set it on the ground, put it in on a separate desk/holder or do what I did, put up a wall mount.
In addition, owners of hardwood floors need to be warned that there are no “feet” on the Volair Sim cockpit and there is a risk of damage to floors. The cockpit rests, almost completely, on a standard size protector for desk chairs and luckily you can find those at just about any office supply store.
Volair Sim comes with the option to mount a 42-inch single monitor or up to three 30-inch monitors. I opted to place three 24-inch monitors for the review. The cockpit comes standard with the triple monitor setup. Again, realize that this setup takes up a fair amount of space although in all honesty the size footprint of the entire setup is slightly less than my old RoccaForte desk that I have had for five years. Surprisingly, I actually freed up some space in my family room with the Volair Sim cockpit, a pleasant surprise to my wife.
What I really like about the cockpit is the ability to actually mount your hardware to the ‘hardpoints’. Volair Sim claims pre drilled support for everything Saitek makes plus support for the Thrustmaster HOTAS Warthog. CH equipment, which I use, is a little different but that is because mounting holes aren’t available on things like the CH Fighterstick or Pro Throttle.
Overall the cockpit is sturdy, looks good, and isn’t as obtrusive as I thought it would be. While solid and fairly heavy (like it should be!) it still is pretty easy to maneuver around to get into the right spot. Granted, as you add components (like monitors) this changes but it still is easy to get into place. The next portion of the review will deal with strengths and weaknesses of driving vs. flying simulations but my first opinion of the cockpit, so far, have been very positive.

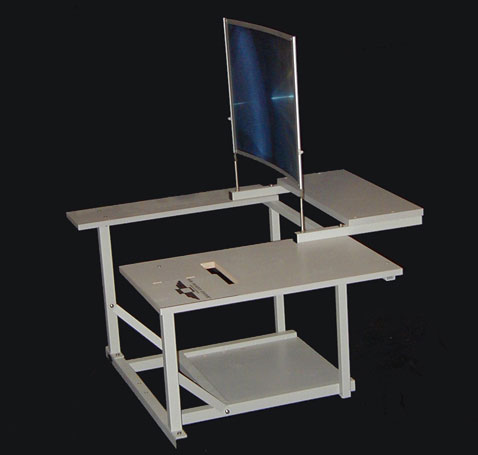
The Volair Sim cockpit before additions were added
Flight Simulations
I had the opportunity to test the Volair Sim cockpit with several different simulations, including Rise of Flight, Cliffs of Dover, Microsoft Flight Simulator X, and Aces High. This variety of flight simulations gave me the opportunity to test both the CH Flight Sim Yoke / Throttle Quadrant as well as the CH Fighterstick and Throttle (with the Frankenpotato mod) to go along with the Simped F16 Rudder Pedals that I usually fly with.
Volair’s cockpit setups are pre-drilled for Saitek, Thrustmaster and Logitech controllers. I have no reason to believe that any of the other mountable flight sim devices shouldn’t work well.
The only devices that don’t instantly mount-up are in the CH product line. Unfortunately, there is no real mount available for any of the CH products. This isn’t the fault of the Volair Sim cockpit; there is no mounting setup for any CH product. Luckily, some Velcro solves this problem in a hurry. For “clamping” devices like the CH Yoke and Throttle Quadrant, I used a small piece of wood to anchor under the side mount and working tray.

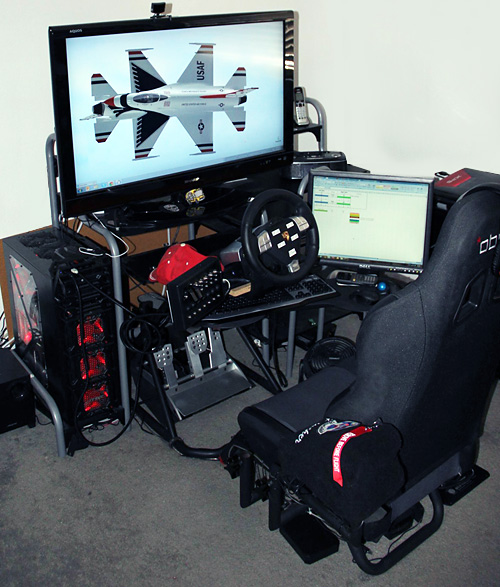
Volair Sim Cockpit 3-wide monitors sure adds to the immersive feel!
Unlike an earlier complaint that I had with the G27 wheel feeling too far away in the driving review the CH Flight Sim Yoke was very comfortable and worked well. The only problem I have had is with the Simped F16 pedals. They work with the Volair Sim cockpit, but barely. In fact, there is a slight rub against the sides of the base. Something that doesn’t affect game play but is unnerving, especially when you consider the cost of the pedals. I suspect that any “wide” pedals may have this issue. With the Simped pedals, this could be fixed by a slight tube bend of about ¼ inch on both sides. I probably will be able to do the same thing with a hammer, but wouldn’t recommend anything like that unless you want to void your warranty.
Part of the reason this review is several weeks behind the driving review is due to the inclusion of a new product that goes with the Volair Sim cockpit – a center mount that allows a virtual fighter pilot the opportunity to mount a stick in the proper place for a fighter aircraft. A center mount adds about $60 USD to the cost of the cockpit. It isn’t mandatory for a flight simmer but if you are considering the upgrade you might want to go ahead and pull the trigger. Installing the mounting hardware for the center stick mount means removing the seat and replacing the center piece under the seat; it takes about 45 minutes to complete. Not a big deal, but something to consider.

Me and the flight navigator
The center mount works pretty well. Personally, I would like the ability to raise it a little bit higher than it does in its default setting but that is more of a personal preference than something particularly wrong with the stick mount. The other issue is the difficulty entering and exiting the cockpit with the center stick in place. Let’s just say scraping your leg on the thing during your dismount is real easy. My wife absolutely hated the center mount.
Getting in and out of the Volair Sim isn’t the easiest to begin with, especially for a 45 year old guy. Adding the center stick makes it more of a challenge. Thankfully the mount is easily removed and can be stored away, then returned into place with just a turn of a mounting screw. I suspect that most users will keep the mount itself detached and off to the side when not flying.
Final Opinions and Recommendations
I really liked my RoccaForte desk. I’ve had it for five years and it has been reliable, easy to work with and it had done a good job holding the wide variety of junk that I have bought and put on it.
The Volair Sim cockpit flat out blows it away. It isn’t even close. This is one of those “why didn’t I get this earlier?” items, one that you know you wanted but could never justify. Then after you get it you realize that you will never get rid of it.
At $549.00 USD plus shipping the Volair Sim Cockpit System is not cheap, especially if you live far away from Volair Sim in Indiana. There is absolutely no denying that for many this will cause a moment of pause when considering a cockpit setup.
Likewise it takes up some space, and in reality it is nothing more than a great big frivolous toy. Getting a spouse to sign off on something like this in the house may take some doing. Hell, I had to talk my wife into the thing and I didn’t pay anything for it.
But if you have the cash and the space, then by all means look closely at the Volair Sim cockpit for flying simulations. It won’t disappoint.
Good
- Very well made
- High quality components
- Fairly easy to assemble
- Comfortable, component mounts in the right place
- Absolutely adds to the immersion of a game
- Almost everything is placed well for flight simulator hardware
Could be Better
- Expensive, especially with shipping
- Instructions for assembly could be a little better
- Takes up a fair amount of space
- Center mount stick is cool, but can make entering and exiting the cockpit somewhat complicated
- Tends to make you look even dorkier to your wife than you already did
- Attracts Yorkshire Terriers
Discuss this article on the forums…
Related posts:
 Obutto oZone Gaming Cockpit Page 3
Obutto oZone Gaming Cockpit Page 6
Obutto oZone Gaming Cockpit Page 3
Obutto oZone Gaming Cockpit Page 6
 Obutto R3Volution Gaming Cockpit
 Page 3
Obutto R3Volution Gaming Cockpit
Obutto R3Volution Gaming Cockpit Page 3
 Sim Cockpit System FX and Cockpit Seat
 Page 3
Sim Cockpit System FX and Cockpit Seat Page 4
Sim Cockpit System FX and Cockpit Seat
Sim Cockpit System FX and Cockpit Seat Page 3
Sim Cockpit System FX and Cockpit Seat Page 4
 Sim Cockpit System SCS-F3 Page 2