
Switch Panel, Multi Panel, Radio Panel, and Backlit Information Panel (BIP)
Introduction
![]() One key to a quality flight sim experience is immersion: high quality graphics, believable physics, and smooth controls usually come with a decent flight sim product, but additional monitors for greater field of view and realistic input devices for representative controls go a long way towards significantly increasing the immersion factor. A full-up sim cockpit is as close as we’ll ever get to the real thing in our own home, but few of us have the skill, time, patience, or money to cobble the switches, dials, buttons and levers together into a working cockpit.
One key to a quality flight sim experience is immersion: high quality graphics, believable physics, and smooth controls usually come with a decent flight sim product, but additional monitors for greater field of view and realistic input devices for representative controls go a long way towards significantly increasing the immersion factor. A full-up sim cockpit is as close as we’ll ever get to the real thing in our own home, but few of us have the skill, time, patience, or money to cobble the switches, dials, buttons and levers together into a working cockpit.
Thankfully, Saitek offers a solution to this problem with their Pro Flight Panels series of products.
 |
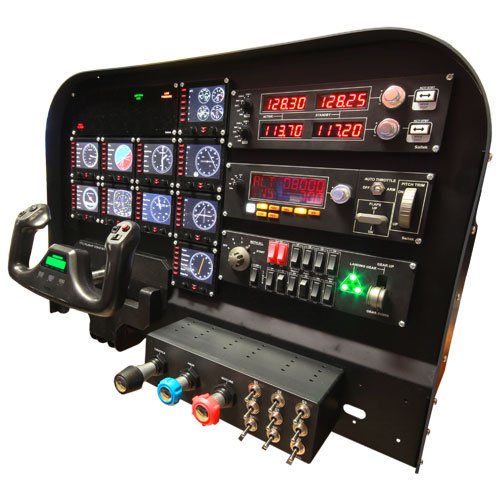
Switch Panel – Engine magneto / ignition – Battery / alternator master – Avionics master – Fuel pump, de-ice, and pitot-heat – Cowl flaps open / close – Lighting systems on / off – Landing gear handle – Gear up / down LED indicator |
|---|---|
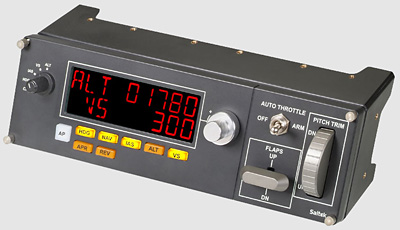 |
Multi Panel – Autopilot settings selector and function buttons – Auto throttle arming – Flaps extend / retract – Pitch trim |
 |
Backlit Information Panel – 24 individually-controlled segments – Real-time in-game feedback – Each segment has 3 user defined colors: red, orange, or green – 51 optical lenses with individual legends included |
 |
Radio Panel – Radio mode selector – Active and standby frequency switch – Outer rotary adjusts standby frequency by increments of 1, inner rotary adjusts decimals – Communications channels 1 and 2 – Navigation channels 1 and 2 – Automatic direction frequency receiver – Distance measuring equipment – Transponder frequency code |
Installation
The Pro Flight Switch Panel, Multi Panel, Backlit Information Panel, and Radio Panel each come with a mounting bracket and knurled knob bolts. What I found odd was for each component there was also an allen head wrench, I’m guessing for the knurled knob bolts that have no allen head? Saitek could probably save themselves a couple bucks and leave the allen wrench out of the packaging.
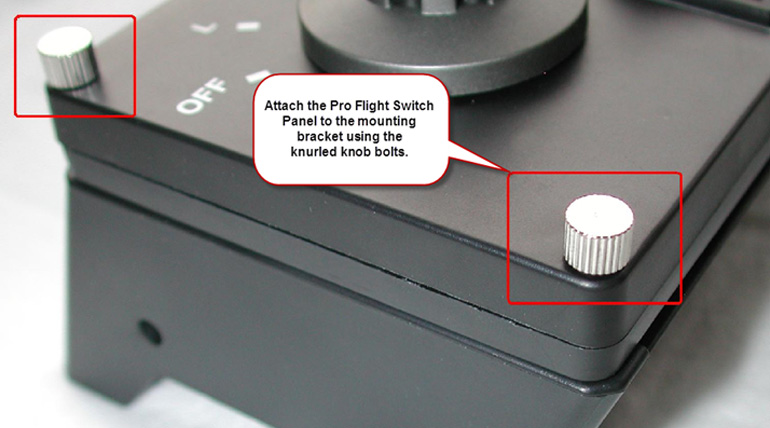
Installing the Pro Flight Switch Panel to the supplied mounting bracket.
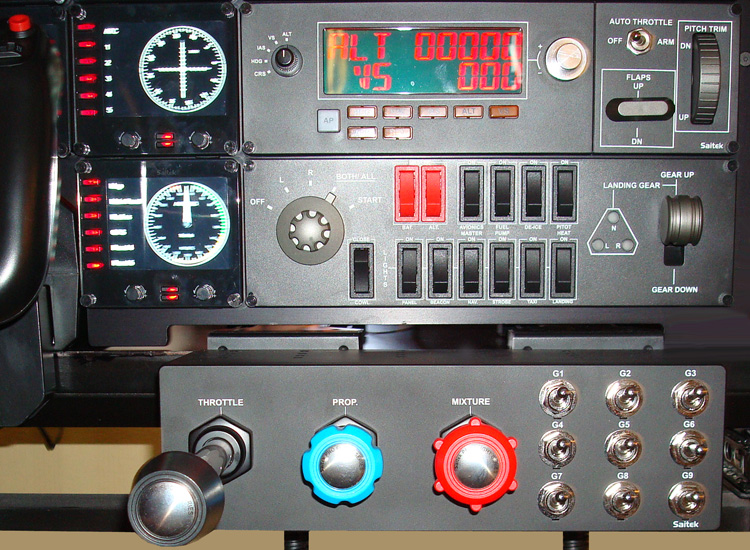
You can stack the panels in a multitude of configurations. I assembled them with the Multi Panel on top of the Pro Flight Switch Panel, the Radio Panel to its left, and the Backlit Information Panels to their right. They fit right in my Obutto oZonejust below my 32” monitor beautifully in this configuration.

Driver installation for each component is pretty straight forward and simple using the enclosed documentation, if you happen to be using Windows XP or Vista. Installing onto a Windows 7 operating system is, well, not so much. However, you can find the drivers and software at the Saitek Drivers and Software web page for each of the aforementioned operating systems. Drivers are available at their site for Windows 8 as well, but, for me, the jury is still out on Windows 8, and I’m only using Windows 7.
Pay close to attention to the web site directions when downloading your drivers, i.e., “When you have clicked your driver link, make sure you select the ‘Save’ option when prompted. Do not select ‘Run’ as this may impact on the installation of the driver.”
Now that we’ve downloaded the drivers and applicable software, let’s install it. I’ll just go into my Downloads folder and click on the appropriate installation executable. This will bring up the Saitek Software Setup Wizard.
The installation process itself had a couple of minor surprises: the first splash screen has a “Setup will” quote but with no information on what Setup will (or won’t!) do and the Register Now checkbox just brings up an HTML 404 “page not found” error. Even with these slight hiccups, the installation completed successfully. Saitek has a Product Registration web page, but note that the Pro Flight Panels don’t have serial numbers so proof of purchase is needed to get the 2-year warranty.
Heads up: The Saitek Switch Panel will not register automatically if you have installed the unit before installing FSX. If you’re in this situation, to register the unit with FSX, click the provided shortcut “Launch the Flight Sim X Plug-in manually”.
Programming
Once the drivers are installed, there’s nothing more to do since FSX, as it should, automatically detects the unit and further adjustments are really not needed. This is really “plug and play”.

The Backlit Information Panel display (above) can be customized via the provided tools with a simple point-and-click interface to place indications on the panel. There are indications for the following groups: Engine, Cockpit, Navigation, and Miscellaneous.
There is also a Test Page function for the input panels that let you check out the functionality of your installed devices. The interactive display responds to the selections you make on the real switch panel. You will note the switch, handle or selector moving on your display. Below is a sample of the Radio Panel test page in action.

Below is the test page for the Switch Panel.

Conclusion
Overall I found the Saitek Pro Flight Panels simple to set up, and easy to use. Truly plug and play. The Backlit Information Panels were simple enough to install and program. If you don’t already have a flight sim cockpit and don’t have the time, energy, and money to devote to building your own from scratch, the Pro Flight Panels could be just be the right components you need.
Reviewer’s System Specs
- Processor: AMD AM3 Phenom II
- Motherboard: AM3
- RAM: 8GB DDR3
- Graphics Card(s): ATI Radeon 5750
- Storage: 500GB SATA Hard Drive
- Power Supply: 400W
- Case: Asus Essentio CG1330
- Controllers: CH Products: FighterStick, ProThrottle, MFPs (Xs2), Throttle Quadrant, ProPedals DT225, XKeys Pro USB, Logitech MOMO
- Operating System: Windows 7 Home Premium 64-bit
We want your Feedback. Please let us know what you thought of this article here.
Related posts:
 CES 2011 for Simmers Page 4
 EFIS Panel Builder for Microsoft Flight Simulator
 Flight Training Cockpit Advanced Panel
 Saitek X-55 RHINO HOTAS Review
 Saitek X-65F Pro Flight Combat Control System Page 2
Saitek X-65F Pro Flight Combat Control System Page 3
Saitek X-65F Pro Flight Combat Control System Review
Saitek X-65F Pro Flight Combat Control System Page 2
Saitek X-65F Pro Flight Combat Control System Page 3
Saitek X-65F Pro Flight Combat Control System Review
 Saitek X52 HOTAS


