by Guest Writer Erik “EinsteinEP” Pierce
Autopilot á la Modes
The Ka-50 autopilot is organized into four channels: Bank, Pitch, Heading, and Altitude. Each channel controls autopilot responses in a specific control axis:
- Bank = cyclic left / right
- Pitch = cyclic up / down
- Heading = rudder left / right
- Altitude = collective up / down
Each channel can be activated independently of the others via the big blue buttons on the right cockpit panel, just below the PVI.

Ka-50 Autopilot Channel Buttons
As discussed in Part 1, activating a channel engages stability augmentation for that channel, which filters the pilot’s inputs to the control system, resulting in smoother control inputs. Stability augmentation is always applied in activated channels, regardless of autopilot modes or overrides. In addition to stability augmentation, the autopilot provides control feedback based on the autopilot mode and assigned attitude/airspeed/altitude settings in the active autopilot channels.

Autopilot Related Functions on Cyclic and Default Key Bindings

Autopilot Related Functions on Collective and Default Key Bindings
Setting Autopilot Assignments
The autopilot’s whole goal in life is to achieve the assigned attitude, turn rate, airspeed, altitude, or position, depending on which mode it’s in. We’ll talk more about the modes a little later. There are four different ways to set or change these assigned conditions:
1) Activating an autopilot channel – When an autopilot channel is activated, the helicopter’s current state in the relevant axis (bank, pitch, turn rate, altitude) is used as the assigned condition.
2) Activating an autopilot mode – When an autopilot mode (like Route Mode) is activated, the autopilot takes any of the current conditions (e.g., airspeed or reference point) that were not set in the previous autopilot mode and sets them as the assigned condition. For example, when the pilot engages Route Mode from Attitude Hold, there is no airspeed assignment, so the autopilot uses the airspeed of the helicopter when Route Mode was engaged.
3) Releasing the Trimmer button – On release of the Trimmer button, the autopilot uses the current conditions as the assigned conditions. Note that the Trimmer does not change the altitude assignment.
4) Releasing the collective brake – Releasing the collective brake sets the current altitude as the assigned altitude.
Blinking Autopilot Buttons
The autopilot uses data from the navigation system as well as from other sensors to determine the control feedback response needed to achieve the assigned conditions. If the information coming from these systems is corrupt or incorrect, such as if the navigation system goes down (e.g., because the generators have stopped producing power due to low rotor RPM, or the unauthorized installation of a 20mm hole), This situation is indicated by a blinking autopilot channel button, which informs the pilot that although the autopilot channel is commanded on, the data it needs isn’t available.
The autopilot’s Auto Hover mode (described more in detail later) requires information from the Doppler navigation system to determine control feedback responses (actually, the PVK-800 navigation system uses a combination of sensors, including the Doppler system, to generate the navigation solution that’s used by the autopilot, but for Auto Hover, the Doppler system is a key component). This system takes a few minutes to warm up before it can provide data. Entering the Auto Hover mode before the Doppler system has initialized will cause the autopilot to automatically disengage the Bank and Pitch channels, indicated by these channel buttons going dark and the helicopter flopping on its side. Prior to engaging the Auto Hover, pilots should ensure that the Doppler system is up and running by looking for a groundspeed indication in the upper left corner of the HUD. This is especially critical if engaging the Auto Hover immediately after takeoff, as the Doppler system may still be warming up.
Autopilot Modes
Now, about those autopilot modes…There are three autopilot modes: Attitude Hold, Auto Hover, and Route Mode.
Attitude Hold
Attitude Hold is the default autopilot mode. With the Route Mode switch in the “off” position, Auto Hover disengaged, and Auto Turn to Target off, the autopilot provides feedback to maintain the assigned attitude (pitch, roll, and heading) in the active channels. For example, if the Bank channel is active, the assigned roll command is 0 degrees, and the aircraft is banked to the right 10 degrees, the autopilot will apply left cyclic until the helicopter achieves 0 degrees. If the Attitude channel is active, the autopilot will also attempt to maintain the assigned altitude via the collective. The autopilot will hold to either the radar or the barometric altimeter reading, depending on the position of the altitude selection switch, which is just to the right of the Altitude channel button on the right panel.
In Attitude Hold, a diamond marker on the HUD heading tape indicates the currently assigned heading, so long as a navigation point (waypoint, airfield, or target point) is not selected on the PVI. With a navigation point selected, the diamond marker indicates the bearing to the selected point.
Auto Hover
When Auto Hover is engaged, the autopilot references the helicopter’s current position over the ground, called the hover point. The relative position of the hover point with respect to the helicopter is shown graphically on the HUD by a square box, called the hover point deviation marker and on the HSI by the intersection of a horizontal and vertical bar. If the Bank and Pitch channels are active, the autopilot will provide control feedback to move and keep the helicopter over the hover point. If the Altitude channel is active, the autopilot will provide control feedback to maintain the assigned altitude. The Heading channel functions the same as in Attitude Hold.
The hover point can be reset to the position directly underneath the helicopter’s current position by pressing then releasing the Trimmer button. Similarly, the assigned altitude is updated each time the collective brake is released.
If the helicopter has significant ground speed when the Auto Hover is activated, it will rapidly move away from the hover point, which is stuck to the ground. The autopilot will attempt to correct within its control authority, but at speeds greater than even a few km/hr, the autopilot’s responses can get downright ugly. The best way to use Auto Hover is for the pilot to enter a trimmed hover with a very low ground speed (try for 5 km/hr or less as indicated in upper left corner of HUD) over the desired hover point, then activate Auto Hover.
Once in Auto Hover, the pilot can enter the Descent Mode by holding the Route Mode selector switch on the collective to Descent. In Descent Mode, if the Altitude channel is active, the autopilot will attempt to achieve a 2m/s descent rate (within the control authority it has in the collective channel) down to a radar altitude of 4 meters.
As mentioned earlier, if Auto Hover is engaged before the Doppler navigation system has initialized, the autopilot will automatically disengage the Pitch and Bank channels, indicated by the channel buttons going dark, removing autopilot feedback and disabling stability augmentation as well! Check that ground speed indication before entering Auto Hover.
Auto Turn to Target functions the same in Auto Hover as in Attitude Hold.
Route Mode
In Route Mode, the autopilot attempts to maintain the assigned heading (Heading Channel), airspeed (Pitch Channel), and altitude (Altitude Channel). Just like the other autopilot modes, pressing and releasing the Trimmer button updates the assignments to the current helicopter conditions, enabling the pilot to adjust the assigned airspeed en route. Furthermore, if a navigation point (waypoint, airfield, or target point) is selected on the PVI-800, the autopilot will attempt to fly a course towards that point. If the selected point is a waypoint in a pre-planned route, the PVI will automatically select the next waypoint in the route once the helicopter reaches that point.
Overrides
There are two overrides: Flight Director and Auto Turn to Target. Autopilot overrides can be enabled in any autopilot mode.

Auto Turn to Target
Auto Turn to Target. If the Auto Turn to Target override is enabled (by pressing the Auto Turn to Target button on weapon control panel), the assigned heading is overridden by the look angle of the Shkval. Laser designation or Target Lock is not required to use Auto Turn to Target and Auto Turn to Target will not attempt to follow the Shkval in scan mode. Although the Auto Turn to Target override can be engaged with the Flight Director override, it will have no function: Flight Director disables control feedback from the autopilot and activation of the Shkval removes Flight Director symbology from the HUD.

Flight Director
Flight Director. Flight Director is activated by the big blue button to left of the four autopilot channel buttons. With the Flight Director override enabled, all autopilot control feedback is disabled and the autopilot only adds stability augmentation to the pilot’s inputs. Instead, the HUD and HSI display steering cues that indicate the conditions required to achieve the assigned command states.
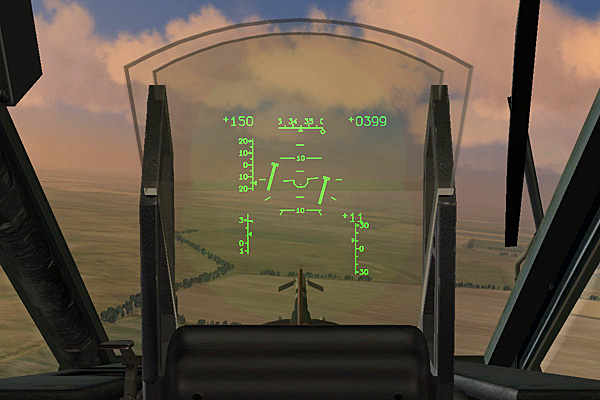
Flight Director HUD Cues
Flight Director HUD Cues. These cues vary depending on the channels that are active and the autopilot mode engaged and basically tell the pilot what the autopilot would be doing if it had control of the helicopter. For example, in Figure 22 above, the cues indicate that the pilot should be banking to the right, pitching up, and lowering the collective. Refer to the manual for additional information on Flight Director steering cues.
Autopilot Disengage. The Autopilot Disengage function turns off all autopilot channels, removing all input from the autopilot to the controls, including stability augmentation. Since this disables stability augmentation as well, this function should only be used as an emergency response.
Recommendations
Prior to taxi, activate the Bank, Pitch, and Heading channels (default via the LWin+Home start cheat) and make sure they’re lit steady blue before you take off. Always fly with at least these three channels activated, if not all four.
If you’re still uncomfortable with the autopilot control feedback responses, fly with the Flight Director override. This removes all autopilot feedback control, but still gives you stability augmentation. The autopilot can’t exert any control over the inputs, so you’ll need to get familiar with the autopilot responses to use nifty features like Auto Hover or Route Mode.
Love the Trimmer. Use it frequently to remove extra control inputs needed to hold the desired conditions, especially before engaging Route Mode or Auto Hover. Remember that the autopilot only has 20% control authority!
To change the assigned altitude, such as in Route Mode or Auto Hover, press and hold down the collective brake before moving the collective and release it once the helicopter has settled at the desired altitude. Watch your descent rate and the blade pitch indicator gauge on the front left panel to ensure the autopilot is operating to the desired altitude setting.
As the helicopter accelerates/slows or climbs/descends, the control input needed will change, but the autopilot can only add or subtract up to 20%. Trim often during these changing conditions to ensure that the autopilot has the control authority margin needed to maintain controlled flight throughout these maneuvers.
Use the virtual control display (rctrl+Enter) to see what control inputs you have trimmed in. As soon as the helicopter starts acting wonky, check this display. About 90% of the time you’ll find you’ve got different controls trimmed in than you thought you did.
Practice, practice, practice! These concepts are not intuitive and are pilots are not expected to be experts the first time they step into the cockpit. Start with the Flight Director on and learn the autopilot. Then fly with Flight Director off, but without using any modes. Then work with one mode at a time. Master each step before moving on to the next.
There are many different ways to use the Autopilot and, as long as it helps you accomplish your mission and come back home alive, there’s no wrong way. Experiment and find a method that works well for you.
Other articles in the Series:
Introduction and Author’s Biography
We want your Feedback. Please let us know what you thought of this article here.
Related posts:
 A Stick and Rudder Man’s Guide to DCS: Black Shark
 Page 2
A Stick and Rudder Man’s Guide to DCS: Black Shark
A Stick and Rudder Man’s Guide to DCS: Black Shark Page 2
 DCS: Black Shark and Coaxial Rotor Aerodynamics
 DCS: Black Shark – Autopilot: Part 1
 DCS: Black Shark and the Trimmer
 DCS: Black Shark English Version – Part 1 Page 6
DCS: Black Shark English Version – Part 1 Page 7
DCS: Black Shark English Version – Part 1 Page 6
DCS: Black Shark English Version – Part 1 Page 7
 DCS: Black Shark… Technical, Simplified