
by Ed “Skater” Lynch
For those of you that are “old salts” when it comes to flight sims, and for those of you that are new to flight sims, this article should be of some value to you. This is largely a reprint from the manual of one of the best combat flight sims ever released. Spectrum Holobyte’s Falcon 3.0 was indeed the father of all modern, “realistic” combat flight sims. The F3 manual was one hell of a paper weight. Weighing in at something like seven pounds, the F3 manual was jam packed with information on flying the sim, and the usage of tactics, and the deployment of weapons and the employment of the aircraft. Here is a little jewel from the tactics section. Enjoy!
Credit goes to Microprose / Hasbro Interactive, Spectrum Holobyte, and the Falcon 3.0 team.
Introduction to Head-On BFM
A head-on BFM fight requires more maneuvering than any other fight we have discussed so far. As you approach an enemy fighter head-on, you have two options: you can separate or you can stay and fight. The biggest decision you must make when passing a bandit head-on is whether you should get anchored in a turning fight. If you enter a fight with a bandit from head-on, you will use up both energy and time. Energy is needed to maneuver, and time can be used against you by yet another bandit who may find your fight and get in on you for a shot. If you take too much time, you may be winning the fight you started with one bandit, but losing a fight with a second bandit you don’t see.
There are many good reasons to blow past the bandit and separate. There are also plenty of times when you will have to turn and fight. This chapter will provide the academic background to help you construct a game plan for fighting a bandit from head-on. Before plunging into head-on BFM, you need to understand the concept of the “escape window.”
The Escape Window
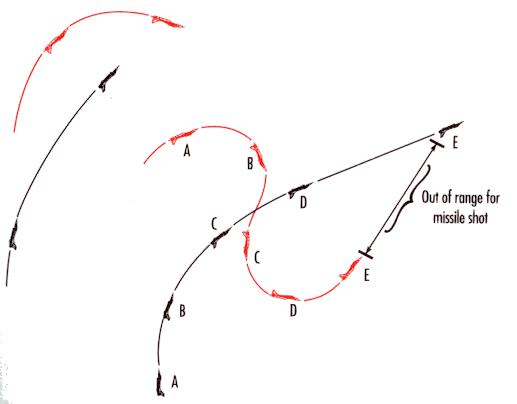
A fighter pilot enters a fight to shoot down the enemy and survive to fight another day. As you enter a fight, you must be aware of your position in regard to your escape window. The escape window represents your safe path out of the fight. Said another way, the window represents your chances of separating from the fight. The window expands and contracts based on both the geometry of fight and your energy. If you jump a single bandit that doesn’t have a tally, your escape window is huge. You can leave the fight at anytime. However, if the bandit picks up a tally and starts a defensive turn, your escape window starts to shrink. As the window shrinks, the probability of getting out of the fight goes down. At some point in a maneuvering fight, your escape window closes completely. The engagement on the left shows an offensive BFM setup with the attacking fighter inside the bandit’s turn circle at low angle-off. Is the escape window open or closed?

In this engagement, the escape window is dosed. The engagement on the right shows why. At low angle-off, inside the bandit’s turn circle, the attacker cannot get out of the fight. If he tries to leave the fight, the bandit will just reverse his turn and stick the attacker with a missile. The escape window for the bandit is definitely closed. Since neither fighter can get out of this engagement, somebody is going to the meat locker. The defensive fighter knows that he can’t get out of this fight. The offensive fighter may not know the window is dosed. Lots of guys try to dive out of a closed escape window, only to get hosed in the attempt.
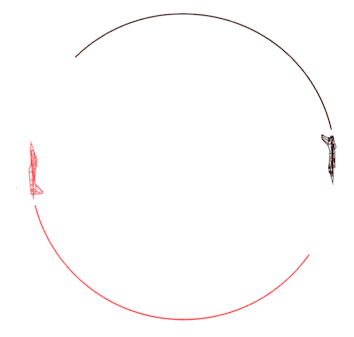
Below, the engagement on the left shows another offensive BFM setup. Is the offensive fighter’s escape window opened or closed in this engagement?
It is open. The engagement on the right illustrates why. When you are out-side the bandit’s turn circle, you can get your nose to lead pursuit early enough in the fight to pass the bandit with high angle-off and high speed. You also force the bandit to turn back 180′ to put his nose on you after already turning 180′ to meet you with high angles. Since the bandit will be slow, your escape window will be open throughout this engagement. What would happen if the attacker drove into lag pursuit and then turned aggressively to put his nose on the bandit? The escape window would close.
In our next engagement, two fighters have entered what we call a Luftberry. They are across the circle from each other, pulling to gain an advantage. Can either one of them get out of this fight? No. Again, the first one that tries to leave, dies.
Do not conclude from this discussion that the purpose of air combat is to fly around and keep your escape window open. If you want to be really safe, you should stay on the ground, holding hands with sweet Marie. If you are going to strap on a fighter, you will have to hang it out at some point, in order to kill the enemy. As you enter a fight, however, you should be aware of what your escape window is doing, so you won’t get caught trying to dive out a closed escape window.
Stay and Fight? Or Separate?
So what affects your escape window? Assuming everybody in the fight has a tally (an assumption that is seldom correct), the following factors drive the position of your escape window:
- Your range from the bandit: the greater the range, the more “open” the escape window.
- Your energy relative to the bandit: the greater your energy, the more “open” your escape window.
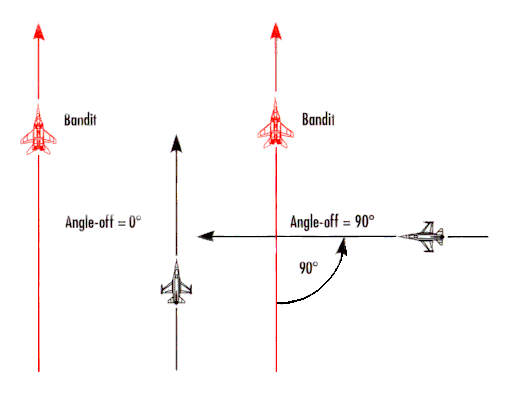
- Your combined angle-off and aspect with the bandit: a head-on pass gives you the best chance for an open escape window.
As you enter a head-on fight, your escape window is usually open. Think carefully before you turn and slam it shut.
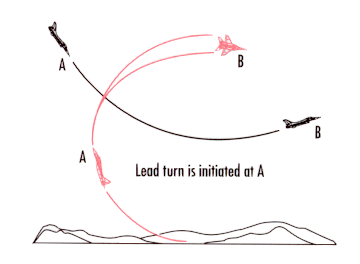
Lead Turns
A lead turn is an attempt to decrease angle-off prior to passing the bandit’s 3/9 line. Lead turning is one of the most important concepts in BFM. Lead turns can be used anywhere, but they are used most often in head-on BFM. Lead turns are the most energy efficient way to BFM. Stated more directly, if one fighter lead turns and the other fighter does not, the lead turning fighter will win. Here’s how you execute a lead turn.
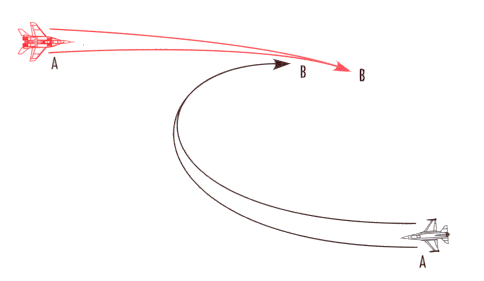
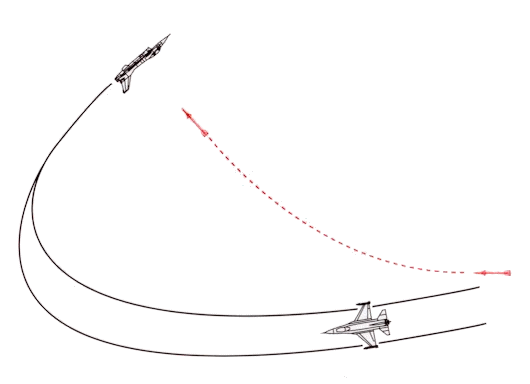
As you approach a bandit head-on, watch the line-of-sight rate of the bandit. When you approach an aircraft head-on, it will be relatively stationary on your canopy. As you get closer, the bandit will start to move aft on your canopy. There is a place in space and time, just as you pass the bandit, where the closure will transition from high positive numbers to high negative numbers. What this means is that, as you approach the bandit, the Vc (pronounced “V sub C”) is high. Your jets are closing on each other at about 1,000 knots since, head-on, Vc will be the sum of your airspeeds. As you pass the bandit’s 3/9 line in this example, the Vc will change rapidly from plus 1,000 knots to negative 1,000 knots. When the Vc starts to change from positive to negative, it is time to start your lead turn.
Unfortunately, there is no lead turn light in the cockpit and watching the Vc in the HUD while simultaneously watching the bandit is very difficult. The best way to judge when to start a lead turn is to watch the bandit’s line-of-sight rate across your canopy. When it starts to increase rapidly, start your turn. This spot where the line-of-sight rate of the bandit increases is usually very close to 30° off your nose. This engagement shows an F-16 lead turning a MiG-29.
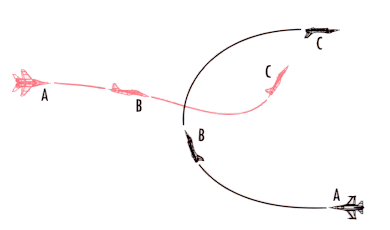
How about the turn itself? Usually lead turns are done at the maximum G possible. When you lead turn, you are closing your escape window and committing yourself to maneuvering combat. Lead turns can be initiated from all aspects and angles-off, but you need to predict the flight path of the bandit and take care not to fly out in front of him while you are doing your lead turn. This engagement shows a lead turn that is initiated too soon.
There is one particular situation where a lead turn can be used to dominate an adversary. This is the nose-high-to-nose-low pass. Nose-high and nose-low refer to the position of an aircraft’s nose in relation to the horizon. When you are nose-high and passing a bandit who is nose-low, it is time to do a big lead turn at max G. You will have the benefit of using the extra radial G caused by gravity, and the bandit will have to fight gravity. If you blunder into this situation or cleverly maneuver the bandit into this situation, you should be able to use a lead turn to gain an immediate 3/9 line advantage. Our next engagement shows a nose-high-to-nose-low lead turn.
You may ask, “if a lead turn is such a potent maneuver) wont the bandit be lead turning my jet?” The answer is “Yes, he will.” The best way to negate the effects of a bandits lead turn is with a lead turn of your own. If you and your done are both flying F-16s and you each perform a lead turn into the other, the net effect is zero. If you are in an F-16, however, and a bandit is in a MiG-29, and you each perform a lead turn into the other, you will gain a slight advantage, since you have a better- turning jet. The way to counter a lead then is with a lead turn of your own.
Options at the Pass
As you approach a bandit head-on, one of your first thoughts should be “How can I get this over with quick?” Shoot a heat missile if you can, and don’t forget the gun. In most head-on passes, you will have to sacrifice BFM to shoot the gun, so it is not advisable to try to line up for a gun shot. If you are committed to separate, however, you should think about a head-on gun shot. Consider that he might also be lining up for a gun shot against you, and even if he isn’t, head-on gun shots are dangerous because of the high midair-collision potential. For the sake of our discussion, let’s assume you are not going to take a gun shot and you’ve decided to stay and fight. Here are your options:
- You can turn nose low.
- You can turn level.
- You can go straight up in the vertical.
You can do a few other things, like pitch back or split-S, but if you see these types of moves on a head-on pass, it normally indicates that the bandit is in the wrong profession. He should be showing a fat lady something in a size 1OD pump instead of fighting you in a fighter.
Anyway, before deciding which maneuver to execute from the options we just mentioned, keep in mind this fighter pilot axiom: “Head-on fights are lost and not won.” Head-on fights require a lot of maneuvering, so the odds that one of the players will make a mistake is high. The biggest mistake made during head-on BFM is losing sight of the bandit. Since you can’t fight what you can’t see, this is a sure way to get your knickers ripped. The absolute best BFM move is no good if you lose sight of the bandit halfway through the maneuver. Some other common head-on BFM mistakes are insufficient G, poor airspeed control, bad lift vector control, failure to lead turn, and trying to BFM in an F-14. (Just kidding on that last one-well, not really.)
So, we are committed to a head-on fight. Let’s talk about each option.
Nose-Low: The Slice
The quickest way to get your nose around on the bandit is by initiating a lead turn slice into the bandit. To do this maneuver, start an immediate 8 G lead turn into the bandit with your nose about 10° below the horizon when the line-of-sight rate of the bandit starts to increase. By pulling around with your nose low, you will gain the use of gravity, which will preserve your airspeed and increase your effective turn rate. (Remember radial G?)

The slice is one of the Viper (F-16) pilot’s favorite moves. The reason is simple. The F-16 can out-turn anything in the sky, so a big lead turn executed nose-low will intimidate the bandit. After completing the turn, you will have gained angles on the bandit and still have plenty of energy for the next turn. The disadvantage of the slice is that it is a high-G, nose-low maneuver that places the bandit at deep six and out of sight momentarily. This is not too big a disadvantage if you know where to look for him as you come out of the turn. The bandit should be slightly above the horizon and approaching your 12 o’clock as you complete 180° of turn. The above engagement shows a slice.
The Level Turn
Another good option at the pass is a level turn into the bandit. This option does not get your nose around as fast as the slice, but it has a big advantage over the slice-you can usually maintain a tally throughout the turn. You per-form the level turn the same way as you do the slice, except you drag your nose straight across the horizon. Besides slowing down your turn rate, the level turn will slow your airspeed more than the slice does. Don’t forget to lead turn when you execute this maneuver.
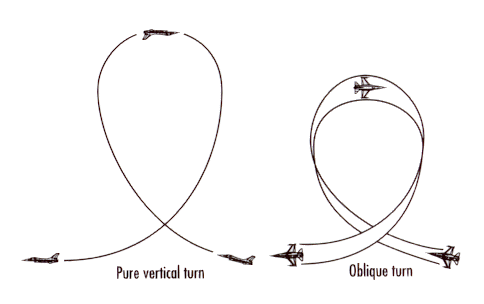
The Vertical Fight
The last option is a straight pull-up into the vertical. This move is only included for a few special cases. If you are fighting a bandit and the sun is directly overhead, you may want to consider a pull-up into the vertical. Remember, head-on fights are usually lost and not won. If you take the sun on your first move, the bandit may lose sight. You can usually tell when a bandit has lost sight because he does a “Magellan Act.” You will see him S-turn and rock his wings trying to pick up tally. His lift vector will probably not be pointing at you as he flails around.
There is another related advantage of a move into the vertical-you will have a lot of aircraft platform to look at, so it is easy to maintain a tally. The big disadvantage of this move is that your initial turn rate is poor as you fight gravity on the pull-up. At the top, of course, you have gravity’s help, so your turn rate goes back up. Unfortunately, the bandit will have made some angles on you by then. Another disadvantage of going into the pure vertical is that you present a very hot target, from the heat plume of your jet exhaust, against a very cold sky background. This, coupled with the fact that the bandit has probably gained some angle advantage, might lead you to grief. As a general rule, don’t go into the vertical on the first move.
If you must go into the vertical, here is how you do it. As you pass the bandit, start a wings-level pull at 550 knots or as close to 550 as you can get. This is not corner velocity, but it doesn’t matter. As you start your 7 G pull, you will bleed off knots like sweat off a pig. This next engagement shows this initial move in the vertical and how much altitude you will gain on the bandit by pulling straight up, rather than turning in the oblique (somewhere in between horizontal and vertical).
As you get to the pure vertical (straight up), pick up the bandit and pirouette to rotate your lift vector right on him. When your lift vector is on him, pull down. If he sees you, he will pull up into you. At this point, you will be on the receiving end of the nose-high-to-nose-low lead turn. In this situation, counter the lead turn by starting a lead turn of your own. After you counter the lead turn, continue around in a level turn to put your lift vector on the bandit.
The other option is to continue the vertical fight. If you do this, go up again and do not wait until you get 550 knots. When you have 300 knots and are passing the bandit, pull into the vertical. If you delay your pull up, the bandit will gain angles on you. Once you get to the pure vertical, repeat the pirouette and pull. You know you are winning this fight when the bandit no longer pulls his nose up into you. This is a sign that he is out of energy. You now own the turning room above the bandit and can use it to convert on him.
Remember, if you are committed to going vertical, roll wings-level and make your initial pull straight up. Then roll to find the bandit and pull for him. Do not go into the oblique, or you will give the bandit turning room. An old fighter pilot saying from the Vietnam era is “You meet a better class of people in the vertical.” This is still true today.
Basic Geometry: One-Circle and Two-Circle Fights
The options that we discussed at the pass can result in either a one-circle or two-circle fight. If both fighters start a lead turn, the fight will go two-circle, as shown in the below engagement. This means that two distinct turn circles are created.

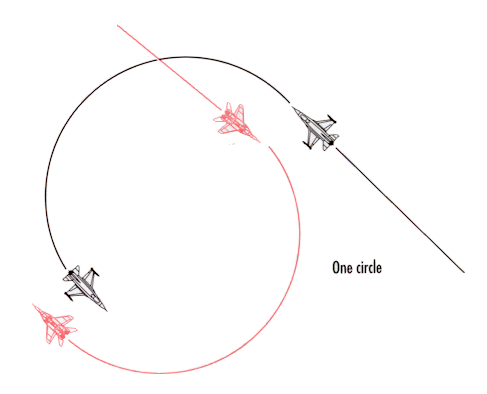
If one of the players turns away, then the fight goes one-circle, as shown above.
Keep in mind that either you or the bandit can force a one-or two-circle fight. A fighter pilot should understand the characteristics of both of these types of fights. Most head-on passes result in two-circle fights. The reason for this is simple. Usually, fighters lead turn into each other to use the turning room available in an attempt to reduce angle-off. If you are offset from the bandit and turn away, you are not using the turning room available, but worse yet, you are letting him use it. The next engagement shows a case where turning away from the bandit will cause you problems.

Two-circle fights have another advantage for an aircraft with a high turn rate and an all-aspect heat missile. You may be able to get your nose around fast enough to get a shot at the bandit. A one-circle fight is far too tight for a heat missile shot after the pass. In fact, that is the principal reason for taking a fight one-circle. If you are in a fighter without an all-aspect heat missile, you should try to jam the bandit’s missile by going one-circle.
A last word about one-circle and two-circle fights. Once you have started your turn, don’t reverse it. In other words, if you want to go two-circle but the bandit turns away from you, just keep turning. You will give up far too many angles by taking the time to reverse your turn.
Part One: The Geometry of Air Combat
Part Two: Introduction to Offensive BFM
Part Three: Introduction to Defensive BFM
Part Five: Introduction to the BVR Fight
Related posts:
 An Introduction to Simulation BFM, Part Two
 Boom and Zoom Tactics, Part Three
 Tactics 101 – Introduction and Lag Pursuit
 Tactics 101 – Pure and Lead Pursuit
 The Falcon 3.0 Manual Tactics Section – Introduction to Defensive BFM
 The Falcon 3.0 Manual Tactics Section – Introduction to Offensive BFM
 The Falcon 3.0 Manual Tactics Section – Introduction to the BVR Fight
 The Falcon 3.0 Manual Tactics Section – Introduction to the Geometry of Air Combat


