SimHQ.com

Feature Article

Boom and Zoom Tactics, Part One

by Andy Bush

Be sure to read all of the parts of this series
[ Boom and Zoom, Part One ][ Part Two ][ Part Three ][ Part Four ]


Introduction

Figure 1 - Energy Maneuvering Figure 2 - Fox 2!

In the hot and humid morning air, the Sidewinder snaked towards one of two MiG-17s. The pair of F-4Es had run a perfect stern conversion intercept on the bandit flight. Ground clutter prevented the AIM-7 shot…but the lead F-4 pilot took that in stride…he wasn’t that keen on using the "Great White Hope," given the lousy kill percentage that the missile had.

Figure 3 - Splash One!

"Splash one," Lead called as his heat seeker impacted the MiG-17. The MiG immediately broke into a smear of flame. The second MiG continued straight ahead for a second or two…almost as if the pilot had been stunned into inaction. Then it broke hard left…away from the F-4 flight as it happened…the MiG driver apparently thought a defensive break was a better idea than continuing to look for a threat that, until a second earlier, he had no idea was anywhere near.

"Shit hot," thought the F-4 lead as the MiG broke the wrong way. All this did was make it easier for the lead to solve the angles. The Lead turned hard into the MiG and pulled his nose out into lead. He reached down to select his gun and verified his gunsight in A2A mode. His plan was to arc the MiG to close the distance and then yo-yo off into a gun track position.

Unfortunately, Lead had never seen a MiG-17 turn with a terrified pilot pulling on the pole. The MiG almost appeared to be swapping ends as it continued its max performance level turn. Seeing his neat little game plan going down the toilet, Lead shoved the throttles into burner and pulled his nose further into lead. "Going guns", he radioed his wingman who was lagging the turn to the outside. Lead set his pipper in the plane of motion of the MiG and eased the stick forward to get about the one G firing conditions he was looking for.

Figure 4 - Too Late!

But as the MiG moved towards the HUD, its rate of turn changed what would have been a 90-degree deflection shot into a front quarter snap shot. This caught Lead again by surprise. He pulled the trigger, but even as the Gatling spun up, he knew he was too late. It was time for the lead to get back into the driver’s seat…so far the MiG had managed to evade his attack.

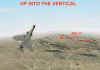
The Lead had made his share of mistakes for the day…he knew continuing to maneuver with the 17 was an exercise in futility. It was "back to the text book" time, and out of it, Lead pulled the chapter on energy fighting. He leveled his wings, selected full AB, and pulled back on the stick to rotate right on the steady AOA tone for best turn performance. As his nose reached the vertical, he relaxed his G and pirouetted to keep the MiG in sight. He eyeballed his slant range for the pulldown, and then made a final roll adjustment to aim his lift vector well in front of the still turning MiG. Then it was back on the stick again to the tone and pull the nose down into the re-attack.

Figure 5 - Up Into The Vertical

Well…we’ll leave this story for some other time while we look at the tactical decisions that the F-4 pilot made. What was this chapter that he was thinking of? What is an "energy fight"? That is what this article is going to look at. Many of us use similar concepts when we fly our favorite sim. In the flight sim community, this tactic is known as the Boom and Zoom maneuver, or BnZ for short.

Background

If you have read any of my articles before, you know what’s coming now!! Yep…it’s time for a little academics! A successful BnZ attack is going to come as the result of two things…knowing when to fly the maneuver and knowing how to fly the maneuver. Let’s start off with a look at when such a maneuver would be necessary in the first place.

We have this maneuver in our clue bag mainly because we can put our A2A maneuvering into one of two basic categories with respect to our adversary.

One category is when our fighter "turns better but accelerates worse" than our adversary. In this case, we refer to our fighter as an angles fighter. The second category is when we "turn worse but accelerate better" than our adversary…that makes us an energy fighter when compared to him.

Turning Performance
A word or two on this subject may be helpful. There are two types of turn performance…turn rate and turn radius. Turn rate means how fast it takes to turn a given number of degrees…this value is expressed in number of degrees per second. In our example above, the F-4 could sustain a maximum turn rate of about 10-12 degrees second under ideal conditions.

Turn radius is self-explanatory…if a fighter were to fly a constant airspeed and constant G circle, the radius of that circle would be his turn radius.

The key to your appreciation of turn performance is understanding that turn rate and radius are only a function of airspeed and G. The winning combination is that of maximum G at minimum speed to produce the greatest rate with the minimum radius.

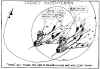
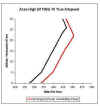
One other factor worth mentioning in this turning performance discussion is wing loading. Wing loading in simple terms considers the lifting area of the wing (in square feet) and relates that to the gross weight of the aircraft…we end up with wing loading being measured in pounds per square foot. The less weight that a wing has to support allows it to generate G at a slower airspeed. A good example can be found when comparing the P-40 to the Japanese Zero. The weight difference here was over 2,000 pounds, the P-40 being the heavier aircraft. The end result was that the P-40 was unable to match the slow speed turning performance of the Zero…if the P-40 tried to slow down to match the turn radius of the Zero, it could no longer sustain the same G as the Zero. Consequently, the Zero had a higher turn rate and could, and did, get on the P-40’s tail easily in a turning contest.

Figure 6 - P-40C Figure 7 - A6M2 Zero

The next diagram is a simplified illustration of differences in turn rate and radius. The P-40 is unable to match the slower Zero’s smaller turn radius and higher turn rate. In approximately two turns, the Zero is gaining the advantage on the P-40.

Figure 8 - P-40 and Zero Loop Diagram

Acceleration Performance
With regard to this factor, we are talking both acceleration (ability to increase speed over time…knots per second), as well as top speed (knots per hour). In general, when we talk BnZ capability, we consider top speed more important than acceleration.

Bottom Line…an angles fighter is one that can generate a higher turn rate at a slower airspeed than the aircraft it is being compared to…and an energy fighter is one that can accelerate to a faster top speed than its opponent. In our sim world, we often refer to the angles fight as a "turn and burn" (TnB) and the energy fight as the "boom and zoom" (BnZ).

Remember…the terms are relative only when making comparisons. It is entirely possible for a specific fighter type to be both, depending on its opponent. For example, the P-38 would be an energy fighter when compared to a Zero and an angles fighter when compared to a Me-110.

All right! As is commonly asked these days, "Can’t we move on?." And the answer is "Most definitely!" Let’s get away from the academics and spend the rest of the time talking BnZ tips, techniques, and considerations.

Performance Comparisons and the BnZ Attack
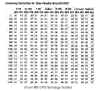
One excellent way to examine energy tactics is to study performance specifications for a given sim’s aircraft. The online sim Aces High publishes top speed and maximum rate of climb numbers for all of its fighters. Other sims such as MiG Alley include energy comparison diagrams in their manuals. Lastly, some sims benefit from after-market strategy guides that include performance data…of these, the MS CFS guide is a good example.

Figure 9 - Aces High Airspeed Data Figure 10 - Data from MiG Alley Manual Figure 11 - MS CFS Strategy Guide Data

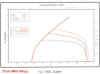
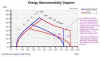
My good friend Leon Smith has let me use the next figure to show how a Spitfire matches up against a P-51. This figure clearly shows how the P-51 enjoys an airspeed and energy advantage over the Spitfire. The two curves intersect at about 250 mph. Below that airspeed the Spitfire has the advantage…above it, the P-51 does. Comparison diagrams such as this make it easy to identify the areas of best performance for your particular aircraft.

Figure 12 - Spitfire vs P-51 Energy Maneuvering Diagram

An Overview Of Boom And Zoom Tactics

The Two Types of BnZ Maneuvers
To simplify this discussion, I’ll use BnZ as a general term to cover all maneuvers of this type. Then, I’ll break that down and say, that for the purposes of this article, there are two types of BnZ maneuvers…the "hit and run" (HnR) and the "hit and climb&" (HnC).

Figure 13 - Hit and Run (HnR) Figure 14 - Hit and Climb (HnC) 

In flying with some of you folks, it seems to me that often you are flying a "hit and run" technique thinking this was how the BnZ was flown. Now, there is absolutely nothing wrong with that! As I have already said, I consider the "hit and run" to be a type of BnZ. I just want to make sure that you understand that this is but one of two BnZ types.

Later in the article, I’ll go into more detail on the specifics of the HnR. For now, let’s just say that this type of maneuver is best used against an opponent that has a significant maximum airspeed deficit relative to you. What does this equate to in terms that we can use? My rule of thumb would be that your WW2 fighter should have at least a 100mph advantage in top speed (P-51 vs Zero), and that your modern jet fighter should have a 200 knot advantage over its opponent (F-4 vs MiG-17). Please note that I am intermixing airspeed in mph and knots to match the indicating system in those era aircraft.

Your other option in the energy fight is what I am now calling the HnC. This is a maneuver flown out of the plane of turn of the opponent. We usually think of the opponent in more or less of a level turn, so the HnC is usually thought of as a vertical maneuver that goes "up" relative to the ground. An example of this tactic is Double Attack. This concept was developed after the Korean War and used the superior energy advantage of the F-104 against the MiG series of fighters.

Figure 15 - Double Attack Energy Fight

In either case, when you fly these maneuvers you are looking for turning room to re-enter the fight. You do this by extending away from the opponent. In the HnR, you are trying to gain lateral separation as a result of your airspeed advantage…in the HnC, you are looking for vertical separation by trading airspeed for altitude.

The Reasons for the HnR and the HnC
Why would we want to fly such a tactic? I can think of three good reasons for starters. The first, we have already touched on...the opponent can outmaneuver us. A second reason may be that we are outnumbered but still want to engage…rather than get tied up with odds not in our favor, we decide to make slashing attacks. Lastly, our armament type may be a factor…in China in 1942, the Flying Tigers liked to go head on against their Japanese opponents because of the P-40's superior hitting power.

In our sims, the aircraft that we fly have specific performance parameters programmed in. We often refer to these as the "flight model." If you are going to be successful, you must be sure to familiarize yourself with your chosen aircraft. In particular, know how it stacks up against your likely opponents. And never forget that you must do this for each and every sim you fly. Don’t assume that the P-38 that you fly in one sim will be the same as in another…bad assumption! Equally bad is to assume that a given opponent is the same from sim to sim. So choose your sim and the plane you want to fly. Study your aircraft’s performance and the performance of the adversaries. Then decide how to fly your aircraft.

Being outnumbered is a bummer! In off-line single mission or campaign flying, we sometimes have a good idea of what numerical odds we are facing. online flying can be much different. Bandits show up all the time…and often just when you don’t want them to! online flying is usually thought of as a "multi-bogey" environment and for good reason. Many prefer BnZ tactics when online as a means of guarding against being surprised…not a bad idea at all!

Figure 16 - Aces High Multi-Bogey

Lastly, your armament can be a big factor. Want to go head to head with guns? A P-38 is a great choice due to its hard-hitting combination of 20mm cannon and 50 cal MG. This particularly true if your sim’s AI weighs armament type in computing the hit bubble Pk. As with the first factor (relative performance), know how your sim is programmed when choosing your attack options. Most BnZ gun attacks involve deflection shooting, rather than a tracking shot. Because of the low Pk of a deflection shot (as compared to a traditional tracking shot), the heavier your armament, the better chance you have of getting a kill. Cannon fire (20 or 30mm) is much more effective than rifle caliber machine gun fire, such as the .303 guns in the early Hurricane and Spitfire.

One Historical View of Boom and Zoom Tactics
One of the best (if not THE best) examples of BnZ tactics, is the record of the American Volunteer group (AVG) against the Japanese in the first six months after Pearl Harbor. Better known as the Flying Tigers, the AVG unit was commanded by a retired Army Air Corps pilot who had come to China several years earlier to help the Chinese resist the invasion of the Japanese. This officer, Claire Chennault, studied Japanese aircraft and tactics and developed an unorthodox theory as to how to best fight the Japanese fighters. For a bio of Gen. Chennault, see http://danford.net/clc.htm.

Figure 17 - Chennault Figure 18 - AVG Emblem Figure 19 - AVG Pilots

It was this theory that Chennault brought to the AVG, and he schooled his pilots thoroughly in these concepts prior to their first combat. As we all remember, the unit had an excellent record against their opponents. From this, a number of conclusions and assumptions have been made.

In preparing this article, I did a little research into the AVG and found some very relevant info that bears directly on how many of us think about BnZ tactics. But I also found that some commonly held assumptions regarding the AVG use of BnZ need a little clarification.

Figure 20 - AVG Kill

The AVG operated as a unit from December 1941 until the summer of 1942. Then, it was absorbed into the regular Army Air Corps. So, the AVG flew early in the war and only for a relatively short period of time. In that six-month period, the AVG had an outstanding success record against their Japanese opponents.

But, we need to look at exactly what the AVG did when we start to make generalizations about how to fly BnZ tactics.

First of all and contrary to what many believe, the AVG did not fly against the Zero fighter. The Zero was not operating in that part of China at that time. The two types of fighters that the AVG encountered were the Ki-27 "Nate" and the Ki-43 "Oscar".

Figure 21 - Ki-27  Figure 22 - Ki-43 Figure 23 - P-40C

One side note of interest…the P-40C pictured above depicts a RAF Tomahawk used in the North Africa campaign. This was the first use of the "shark mouth" nose art and was copied by the AVG from these aircraft.

Chennault had not developed his theories by observing Zeros. His experience was with the older, fixed gear, Japanese fighters. These aircraft weighed about half as much as the P-40, were very lightly armed, were extremely maneuverable, and were quite a bit slower than the P-40. In the Japanese Army and Navy pilot training schools of that time, aerobatic dogfighting skills were emphasized over other types of tactics. As a result, Japanese pilots were encouraged and expected to dogfight in 1v1 TnB contests.

Chennault came to several conclusions. First, don’t try to dogfight the Japanese pilot…he’s probably more experienced in this type of maneuvering than you. Second, don’t try to dogfight with their fighters…they are much too maneuverable and will easily out-turn the P-40. Lastly, use the P-40's speed advantage to attack and break off under your conditions, not theirs.

Figure 24 - P-40 Slashing Attack

And so the AVG would make slashing attacks and then dive away to reposition for another attack. We all know that. What is not so well understood is why the AVG could be successful at this. That directly relates to how you fly your fighter in your sim. If you adopt the AVG technique without knowing the "whys," you may be setting yourself up for disaster!

Here it is in a nutshell. The P-40 had a speed advantage of at least 150mph in a dive over the Nate and Oscar. With that kind of airspeed difference, it was possible for the P-40 pilot to dive away from the Japanese fighters. The Japanese fighters might turn to follow, but they would never catch the P-40. The P-40 pilot would be able to get far enough away that he could turn back, get his speed back, and re-attack to repeat the process all over again.

This HnR tactic worked well because of the limitations of the opponent. It is unwise to assume that the AVG experience is a rubber stamp approval for all A2A engagements. The main thing to keep in mind is the top speed of your opponent. If he can equal your top speed, then a HnR game plan may be unwise. Why? Because your opponent will be able to deny you the spacing that you need to turn around. Don’t try this against a FW-190 or a MiG-21…you may get a nasty surprise.

Lastly…how well did the AVG do using BnZ tactics? The numbers speak for themselves. During its seven months in combat, the unit was credited with at least 230 kills. Most were fighters, and the majority of these (approximately 80%) were Ki-27s. As for losses, the AVG lost five pilots in A2A engagements and another nine to ground fire during A2G missions. By anyone’s reckoning, that is an outstanding record.

See http://danford.net/avg.htm for more info about the Flying Tigers.

HnR And HnC Tactics And Tips

HnR…HnC…Which One Do I Use?
There may be no absolute answer to this question, so I’ll suggest some generalizations.

First, what is your objective? Is your sim mission A2A or are you flying an A2G mission enroute to the target? Are you H2H in a 1v1 or are you in a multi-bogey situation like we see in online sims such as Aces High or in many campaign missions. The answer to these questions may well help you decide which tactic to use. If your mission objective is to avoid getting tied up in a TnB, then a HnR strategy may be best for you.

Next, look at your fighter and its performance capabilities. How does it stack up against the opposition? Remember that this is a relative situation. You may be a HnC fighter in your F-4 against a MiG-23 and a HnR when engaging the MiG-17.

Lastly, how good are you at using the views in your sim? Does your sim have a padlock? HnC maneuvering is much easier when using a padlock…snap views are easy to use when flying the HnR.

The Entry to the Attack
The next figure is taken from a well-known sim strategy guide. Figure 25 - BnZ Entries It shows four types of entries. Fair enough. Your avenues of attack cover a three-dimensional arena. All four types of entries may "work" under certain conditions. The diagram implies that most entries are head on. There is no certainty that this will be the case. Most engagements are too unpredictable to assume any entry type. Other than attacks flown against straight and level bombers, your entries will be against maneuvering fighters where the actual entry angle will be hard to predict. Most common is the "high slashing" attack made from any angle.

Some assumptions can be made regarding these entries. Don’t use the "vertical" attack against a target at low altitude…you may not have enough altitude to recover from your dive! The vertical attack results in a high deflection gun shot…make sure you know how to make this type of gun attack. The "vertical" entry will have the lowest probability of kill (Pk).

Figure 26 – Vertical Attack

The "level" and "low slashing" will require a significant energy advantage…this may work against bombers and less-capable fighters, but will not be as effective against similar performance aircraft.

The Exit from the Attack
Briefly, you have two options. You can dive away and go home, or you may climb away. The former is the easiest to fly. When you have an energy advantage, the latter is an option. For example, the AVG P-40 could climb at a higher airspeed than its opponents. More on exit strategies a little later on.

Figure 27 - Bandit – 12 O’clock High

Defending Against the HnR and HnC
Your defense can take many forms, depending on the initial set up.

Never let an opponent keep an altitude advantage…if you see him soon enough, go max power and begin an energy conserving climb into him.

If bounced at low altitude, get as low as possible to take away the opponent’s ability to dive away.

If the opponent is diving on you, try to turn into and below him. This will increase his dive angle and complicate his gun-aiming problem. This also reduces his lateral and vertical turning room…this reduction in bandit maneuvering room is known as "jamming" the bandit.’

Figure 28 - "Jamming" the Bandit

If the opponent gives you any turning room, lead turn him at the merge.

Figure 29 - Lead Turn, Nose Low Figure 30 - Lead Turn, Nose High 

If you pick up the opponent too late, then turn into the attack using an energy conserving turn. Try to get 180 degrees out if you can. Keep as much energy as you can…you may need it for a gun jink!

If the opponent repositions high (HnC), unload, turn under him to take away his lateral turning room, and go for speed. This tactic is particularly effective if you do not have the energy to climb up into the attack. For example, A-10s use this tactic to defend against slashing attacks at low altitude.

Figure 31 - Low and Slow Defense

If the opponent dives away (HnR), turn hard to follow. Lower your nose to about half of his angle of descent. This will allow you to accelerate while giving you the chance to close the distance (or reduce his extension) through arcing. When you see him begin to climb, follow him with an energy-conserving climb also. This will reduce his ability to gain potential energy on you.

Figure 32 - Chasing with Angles (Arcing)

This concludes our introduction to the basics of the BnZ type of attack. In Part Two of this article, I’ll cover specifics for each attack type. See you then.

 Figure 33 - P-38 HnR Attack 

Click here to go to top of this page.


Privacy Statement | SimHQ Staff

Copyright 1997-2010, SimHQ Inc. All Rights Reserved.