
by Andy Bush
General Offensive and Defensive Considerations
Introduction
Well, folks, it’s time to get down to where the rubber meets the road. Many, if not most of you, want a good understanding of the academics of fighter flying. Usually, this takes the form of procedures and techniques taken right out of real world manuals. This, as far as it goes, is good. Many have Shaw’s book, Fighter Combat, in their home library. I do too…it is probably the best single source reference for traditional fighter concepts that you will find. In addition, each new sim we buy has whole sections devoted to nothing but historical info and explanations of standard maneuvers. All of this has its place. I fully support a good understanding of historical background…it adds to the “immersiveness” of the sim. I also endorse a well written coverage of the basic fighter maneuvers and tactics. You folks need to know this material to get the most out of your sim. But, here the good news stops. This info will not help you fly a better sim…it will only make you conversationally proficient, meaning, you can “talk the talk”, but it remains to be seen whether you can, in the final analysis, “walk the walk”.
Something is missing at this point, and that something is a firm understanding of just how far your sim’s viewing system will permit you to employ the maneuvers and tactics that you studied so hard. Unfortunately and altogether too often, a sim’s viewing system is its Achilles Heel. It’s as simple as this…if you can’t see it, you can’t do it. It is very difficult to ask a two dimensional monitor to portray the three dimensional world of air combat, but we do so every time we fire up a sim.
In this third in a series of BFM versus viewing systems articles, let’s talk for a bit on how you can learn how to “walk the walk”. We’ll take the approach of nailing down what we want to achieve, and then we’ll explore ways of getting that objective out of our sim. First, let’s realize that all sims are not equal in their respective abilities to let us “see”the magnitude of the problem at hand, no matter what that problem may be. Not all sims offer padlock and exterior views. Of those that do, not all have views that are adequate to solve the problem. This article will take a middle of the road approach and discuss viewing systems in general terms. My hope is that there will be enough here for you to increase your proficiency with your particular sim. Ultimately, this is all about having fun…if this article increases your “fun quotient”, then its purpose has been achieved. That being said, let’s get to it.
Basic Concepts
Here it is in a nutshell. We’re talking Basic Fighter Maneuvers…BFM. So, what is BFM? Put aside any previous definitions, and listen to mine. Mine applies in the real world, but, more importantly, it will also apply to you as you fly your sim. Here it is:
BFM is controlling closure and fuselage alignment!!
That’s it. End of story. That’s what you need to be able to do. Control your closure relative to your opponent. Control the alignment of your fuselage relative to your opponent. Simple!!
“Say what”, I hear you say!! “What does that mean?” No problem…let’s take them one at a time. You control closure when you vary your throttle position and/or flight path to change or maintain the rate at which you move towards or away from your opponent. Closure is not your indicated airspeed…it is your rate of movement, either plus or minus, relative to your opponent. Please again note that we control closure both with throttle changes and flight path modification.
Your fuselage alignment is your aircraft’s longitudinal axis. More simply, it is the direction your nose is pointed. It is not your flight path! Your aircraft could be in a tail slide with your nose pointed up with your flight path straight down!! As the pilot, you change your nose position to obtain a change in your flight path. Substituting words, you control your fuselage alignment to gain a desired flight path objective. One final note on positioning your fuselage alignment. Use aileron to set a bank angle that will orient your lift vector in the desired direction. Then use back stick to move the nose at the desired rate of pitch change until you have the nose pointed where you want it. Roll to orient…pull to point.
None of this should be new info for most of you. The issue is not that you don’t understand BFM basics…no, the real issue is that you want to know how to achieve those basics given the constraints of the typical sim viewing system. I can hear you say, “Absolutely…so what do I do?”. That’s what this article is all about. Let’s pause for a moment and recognize those constraints.
As a rule, most sim pilots can maneuver effectively as long as the opponent remains within the confines of the typical forward view (F1 in most sims). It is when the opponent flys out of the forward view that the trouble starts. The number one constraint of any viewing system is that the pilot loses an awareness of his nose position and resulting energy level whenever the pilot selects some other viewing option to keep sight of the opponent. It does not matter which view is selected…snap views, padlocks, or hat switch slewable views. Too often the result is a loss of orientation that ends up with the pilot lawndarting himself as he pursues his opponent!
Part and parcel with this loss of orientation is a contributing inability to interpret the selected view. Padlock views are particularly deficient in this respect. As soon as the padlock view no longer contains some portion of the aircraft , the pilot must rely on padlock symbology to maintain his sense of orientation. As we all know, this can be a real challenge.

Lastly, many pilots find that their ability to determine target aspect, range, and closure is marginal at best. In most sims, despite the improvement of picture quality due to 3D video accelerators, poor depth perception degrades your sense of closure, one of our two key components to effective BFM. If you cannot sense the rate of closure, then your ability to implement a BFM maneuver in response to your opponent’s flight path is severely affected. But the bottom line is that the nature and quality of simulation graphics is beyond our control. The best advise I can give on this contributory factor is to err on the safe side…execute your throttle and pitch changes early and keep their magnitude small. Solve your BFM problem by taking small bites out of it rather than counting on the world’s greatest whifferdill to carry the day!
Let’s end this introduction by restating our initial premise. BFM is the control of fuselage alignment (nose position) and closure. Your manipulation of these two factors often results in maneuvers resulting in your target flying out of the field of view of the typical forward view. You must then rely on some other type of view to keep the target in sight. Regardless of which view you choose, you need to keep your sense of nose position and relative closure. In the next section, we will look at several offensive and defensive situations and analyze how our use of various views meet that need.
Assumptions
I know, I know…here I go again…hedging my bets!! Hang in here for a second!! The thing about BFM is that there are few absolutes. BFM is full of “yeah, buts” and “what ifs”…so let me, for the sake of argument, define the rules!! I want to talk about basic BFM and how to get the most out of our viewing choices in a typical sim. To do that, I’ll restrict myself to the most basic of scenarios…you want to reduce your angle off and control closure such that you can arrive at a position in your opponent’s six o’clock. We are not going to talk about all aspect missile employment, or face shots, or off boresight lockons, or any of that cosmic stuff. Nope, we’re going to talk about breaking down the aspect angle of the bandit. We’re going to talk about pushing the bad guy out front where we can blow him away. We’re going to talk about having fun and maybe learning something in the process. I want you to come away from this with the confidence that you can BFM the bandit and kill him dead. Let’s get started!
Offensive BFM – The Bandit Is In Front of Your Wingline.
We will start with a definition of wingline. Using your nose as the 12 o’clock reference, project lines out from your 3 and 9 o’clock…this is your wingline…your 3/9 line. We will assume the bandit is forward of your 3/9 line. The bandit also has a 3/9 line…his wingline. If you are looking at him from behind his 3/9 line, then you are in a low (rear) aspect situation. Conversely, if you are looking at him from ahead of his 3/9 line, you are in a high (front) aspect situation. These two situations encompass what you usually see in the beginning moments of an engagement…and usually you see this using the forward or F1 view. Most forward views cover about + or – 45 degrees off your nose, so you are seeing the bandit in your 10:30 to 1:30 o’clock position. The objective is to keep him there while you go about the fine art of killing him.
The Low Aspect Situation
Here we are…the bandit is in front of us (at least for now!!)…we’re behind his 3/9 line and that’s where we want to stay. What problems could lie ahead? In this case, two potential problems are immediately obvious….one is angular in nature and the other is closure related…and they can exist in combination. Let’s say that again in a different way…these are the problems:
1. Turning Room. Turning room is the space needed for you to align your fuselage with the 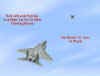 target. We always make the assumption that you do not want to overshoot the target’s flight path…therefore your problem is to turn tight enough (align fuselages) such that you remain inside the target’s flight path.
2. Closure. We do not want to fly past the target’s 3/9 line…do this and we become the shootee instead of the shooter!!

These problems are self-obvious…what is not so obvious is how we are going to first, use our simulation view to assess our turning room needs and rate of closure, and second, use our simulation view to correct our flight path as necessary. Let’s begin by assuming we are using the forward view initially. The target is in our front quarter (+ or – 45 degrees off our nose). Here are some tips on analyzing target position.

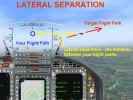
Tip # 1. We’ll begin by assessing target angle off. In the following picture, note the extended fuselage line of the target relative to your own fuselage line. If these two lines are not parallel, the angular mismatch is your angle off. My suggestion is that you do not allow this angle to exceed 30-45 degrees as a general rule. We’ll get to how you do this in a minute.
Tip # 2. Next, we must recognize what type of pursuit curve we are flying. Here’s the idea. Let’s picture ourselves in a left turn. As we look at the target in our forward view, if we see him in the left side of our front canopy/HUD area, we are in lag pursuit…our nose is “behind” the target. If we see the target centered in our canopy/HUD, we are in pure pursuit. Lastly, if we see the target in the right hand side of our canopy/HUD, then we are in lead pursuit…our nose is in front of the target.
Tip # 3. Now we’ll move on to available turning room. We are going to look at the target’s fuselage line and compare its movement relative to our own nose movement. Here’s the idea. Look at the target as you approach it. Ask yourself, “Is the angle off increasing between me and the target?” If you begin by seeing mostly the target’s rear end, but are progressively seeing more and more of its side, then your angle off is increasing. Use this visual clue to determine your turning room needs. If the target is increasing its angle off (as seen by its fuselage line diverging from your own), then you, as a rule, do not have enough turning room. In the real world, this is known as being outside the target’s turning circle. On the other hand, as you continue your turn, if the angle off is not increasing, then you are inside the target’s turn circle. NOTE: This is a huge generalization. It is intended to assist you in learning three dimensional BFM. This tip may not always be technically accurate. For the purposes of this article, I am going to ignore the finer distinctions and concentrate on the basics. As you gain experience and confidence, you will know when to employ this tip or ignore it.
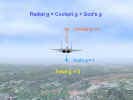
Tip # 4. Our next item to consider involves our energy state relative to the target. Let’s look again at the target in our forward view, but let’s bring the location of the horizon into consideration. Begin by noting the target’s flight path (its fuselage line) relative to the horizon. Next, determine the target’s bank angle relative to the horizon. As a rule, one wing will point above the horizon (I call this the high wing), and one wing will point below (the low wing). The high wing points to the airspace above and behind the target, and the low wing does the opposite. As a technique, use the high wing airspace to control excessive closure. By maneuvering into this area, you are decreasing your energy state relative to the target. On  the other hand, if you have stagnated behind the target, you can turn to point towards the low wing to increase your energy state and gain closure. The magnitude of your maneuver is directly proportional to your closure need.
Tip # 5. Here is another way to look your position relative to the target. As you view the target in your forward view, extend his fuselage line backwards. Now add in the horizon. The airspace above the extended fuselage line and above the horizon we’ll call the 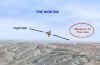 high six. When you are behind the target’s 3/9 line, fly to the high six area when you are trying to control angle off and closure.
Tip # 6. Next, I’ll mention the concept of flying to the elbow. This term comes from the mental picture of a pilot using his hands to describe attacking a target. The target on one arm is his hand. His arm extending back from his hand is his fuselage line. His elbow then is a position behind and in line with the target. By flying to the “elbow”, the pilot is pointing behind the target…he is lag pursuit. Lag pursuit tends to minimize the adverse effect of the target out-turning you…it helps you manage 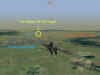 angle off. This concept of flying to the elbow is much the same as the high six and high/low wing techniques in that they all are intended to allow you to control fuselage alignment and closure.
Tip # 7. Lastly, I’ll touch on the subject of closure. As I have already mentioned, your determination of closure is really a depth perception problem, and sims are not too spiffy in their ability to portray this. If your sim has a modern HUD display, then get a radar lock on to the target…most HUDs will display closure in knots. Regardless of sim, be sure to include any HUD feature, pop-up window, or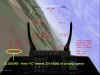 whatever to keep your SA up on this important variable.
OK!! Up to now, we have looked a variety of ways to view the bandit while it is still in our forward view. Unfortunately, as we all well know, the bandit is not going to just sit there and let you shoot at him willy-nilly…so he’ll probably put a hard turn on you. This reaction on his part may well result in the target flying rapidly out of the forward view. We want to keep him in sight for starters. Then we want to reposition to maintain whatever advantage we had…and, if at all possible, we want to improve our position. Let’s now move on to countering the target’s defensive turn.
How To Reposition While Attacking From A Rear Aspect
First, we need to keep the target in sight. We will use either the padlock view or the external player-to-target view. Both have good and not so good points, and they vary in effectiveness from one simulation to another. But both will “work”. Let’s start by making sure we understand what “work” means. Both padlock and external allow you to keep the target in sight…that’s obviously important. But two more items are just as important…you want to remain oriented to your own nose position…and you want to maintain an awareness of your attitude relative to the horizon. In order to employ the tips in the previous paragraphs, you must maintain your situational awareness (SA) with regard to your own aircraft, the horizon, and the target. If one or more of those variables is missing, then BFM is going to be very difficult.
We’ll begin with the padlock view. Our target has entered a hard turn that has taken it out of view. Not only have we lost sight while in the forward view, but our angle off and closure are going to dramatically increase. We must use the padlock view to control this aspect and closure problem. (Note – I use the terms aspect angle and angle off interchangeably in this article. They both describe the same situation, and differ only in the viewer’s orientation.)
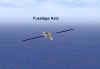
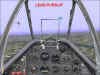
The Padlock View – The following screenshots are taken from Combat Flight Simulator. Figure 16 shows an “extended” padlock view. I like this view in that it allows me to better see my nose position as the padlock rotates to keep the target in sight.
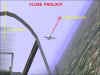


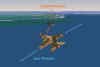
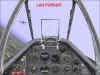
Let’s look at using padlock. We begin in forward view. In Figure 17, the target has generated excessive angle off. It has gone from a low aspect position to one of considerably higher aspect. As this aspect increases, my relative closure starts to also increase even though I have not changed my airspeed at all. As a result of these two changes, my available turning room has disappeared. I can no longer turn “in plane” with the target. I must maneuver “out of plane” by using the padlock view to keep the target, the horizon, and my nose position in sight.
Our response is to maneuver out of the target’s plane of motion. By moving our plane of motion away from the target’s, we are splitting the planes of maneuver…we are split plane maneuvering. Another term for our repositioning is “using the vertical for turning room”. I am throwing all these terms at you because you will see them used in most BFM discussions, and I want you to be comfortable with them.
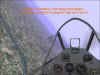
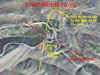
Figure 18 shows the beginning of our reposition in padlock. In this picture, our aircraft has begun a climb above the target’s flight path. We have initiated our reposition with back pressure only. We pull up at least 15 to 30 degrees above the target’s plane of motion. The closer in you are and the greater the angle off, the higher you pull your nose up.

Once you have your nose up the desired amount, unload (relax g) and roll your lift vector towards the target. Do not roll it all the way to the target initially. Point your lift vector at the high six or the elbow. Now start the back pressure on the stick again to keep your nose moving towards the target.
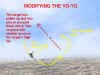
At this point, you analyze the target’s angle off and your rate of closure. Be ready to repeat this maneuver…you do this by unloading again…then roll away from the target approximately 90 degrees from its extended fuselage line…then pull “up” some more…unload again…roll back towards the target and reassess your position. In this maneuver, as in all your flying, you position your lift vector with roll, and you move your nose with back pressure.
You probably remember this maneuver as the High Yo-Yo. I just think of it as an out-of-plane maneuver. It is the bread and butter of BFM. You must be able to successfully fly this maneuver in padlock to deal with a turning target.
There are several points of emphasis regarding this out-of-plane maneuver. I’ve already mentioned one…be ready to perform the maneuver repeatedly until you have reduced target aspect to manageable terms. Think of doing several small yo-yos rather than one large one…take the problem in little bites. Re ready to momentarily switch to forward view if you are losing your SA with the horizon or your own nose position…do not continue to fly in padlock if you do not know where you are heading!! Lastly, return to forward view as soon as possible…as a general idea, if the target’s angle off has been reduced to about 30 degrees and you have your closure under control, the switch back to forward view and press the attack.
Now, let’s look at the same BFM problem from an external view perspective. Everything previously said remains unchanged…the only thing that does change is your monitor picture.
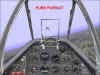
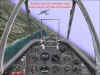
The Player-To-Target External View – Not all sims offer a player-to-target external view. Of those that do, the typical external view has the pilot’s aircraft in the foreground with the target aircraft in the background. You, as the pilot, are always looking past your aircraft at the target. The sim rotates the view to always maintain this orientation.
Without a doubt, the most difficult part of using this view is to keep oriented in roll control. As long as your aircraft is headed away from you, this is not usually a problem. But when your aircraft is heading towards you, it is easy to get your “rights” and “lefts” confused!! It helps me to think to myself as I view my aircraft…”roll right – pull”…”unload – roll left”, for example. It’s a lot like flying a radio-controlled model plane. Practice makes perfect…don’t let some initial confusion turn you away from this technique.
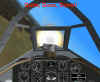
We begin with the target turning hard away from the attacker. As before, you want to fix in your mind several key variables…your angle off, your and the target’s position relative to the horizon, and your closure. Of these, closure will, as before, be the most difficult to measure. Be ready to cycle back to the forward view to check your own speed and nose position if necessary. The advantage of this view is that angle off, aspect, and horizon references are immediately obvious…there is little need to analyze this picture to see the relationship between yourself and the target.
As before, you initiate your maneuver with a pull up and out of plane. It will not be as easy to judge how far to pull up unless you use the forward view briefly while pulling up. I don’t think this is necessary. What you want to do is to establish a new flight path for yourself…one technique is to time the pull up by counting “potatoes”…use a moderately hard pull up (3-5 g) and count, “one potato, two potato…”. Two should suffice for the typical maneuver!!

Once you have your nose up, unload, and watch the target. You are looking for it to stop moving towards you. As soon as you see that the target is starting to increase its distance from you, roll back towards the target. Your rudder is your aiming reference. Point your rudder where you want your lift vector to go. As before, initially, point your rudder (lift vector) at the target’s high six…not at the target. Then bring in the back pressure to start your aircraft turning towards the target.
As long as you think your angle off is excessive, or you need more separation, then repeat the maneuver.
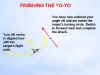
Once the angle off reduces below 30 degrees, then roll your lift vector on to the target and pull to the point where it looks like you are pointing right at the target. Then switch back to forward view and continue the attack.
What is the advantage to using the external view? Quite simply, it lets you analyze your position relative to your target much more quickly than does padlock or any other view. In addition, it is often easier to “see” the split plane perspective in external.
Well…whew!! That’s a bunch of words!! I think I’m going to need a Part Four to address the remainder of this subject. See you then!!
Related posts:
 Air Combat Basics: The Scissors Maneuver Page 2
Air Combat Basics: The Scissors Maneuver Page 3
Air Combat Basics: The Scissors Maneuver Page 2
Air Combat Basics: The Scissors Maneuver Page 3
 Air To Air Gunnery – Theory and Application, Part Three Page 8
 An Introduction to Simulation BFM, Part Two
 It’s All a Matter of Perspective – Part Four
 It’s All a Matter of Perspective – Part Two
 It’s All a Matter of Your Perspective – Part One
 The Falcon 3.0 Manual Tactics Section – Introduction to the Geometry of Air Combat


