
by Andy Bush
The following articles were written several years ago in support of a web site devoted to Janes ATF, and later, Fighters Anthology (FA). Much of the material is of a general nature and may be applicable to all sims. Newcomers to air combat simulation may find this material helpful in understanding some of the terminology of air combat.
For those of you interested in the technique of learning and flying BFM while using the player-to-target external view can find some tips here. The FA sim has several features that make it a good choice for practicing BFM with the external view. In particular, you may find the explanations of how to fly a variety of specific maneuvers to be helpful.
There are no illustrations to these articles, however, many of the techniques are covered in the ‘It’s All A Matter Of Perspective’ series of articles.
BFM Lesson 4 – BFM Concepts
Well, we finally got airborne!! Here we are, ready to go…but before we jump right into a double underhanded wifferdill or whatever, let’s talk a bit about how to fly this sim. Now, for you experienced guys (and gals!!), please hang with me here…just maybe there might be something here for you as well as the beginner.
First of all, let’s remember that we’re flying a flight sim, not a real jet. As good as ATF as modified by Greg is (and it’s real good, much better than the game right out of the box), it still ain’t the real McCoy…and probably will never be, given the limitations of the program. For example, here are some sim flight characteristics which differ from real life and which tend to reduce BFM effectiveness:
1. ATF aircraft accelerate the same at one G as they do at less than one G. This essentially eliminates the Low Yo-Yo as a effective BFM maneuver. In real life, reducing the G load to less than one…normally to about one half G…results in a significant reduction in drag and a corresponding improvement in acceleration. ATF, as presently programmed, doesn’t do this.
2. ATF aircraft roll under high G…meaning high angle of attack (AOA)…the same as they do at one G. This is also unlike the real world. Real fighters tend to roll considerably slower when at high AOA, and in doing so, they tend to lose energy very quickly. In real BFM, this can be used to your advantage if used to force an attacking opponent to overshoot. ATF doesn’t fly like this, and as a result, the BFM maneuver known as a Vector Roll or a High G Rudder Roll is not possible. These maneuvers are used to control closure or overtake and are do not produce the same effect in ATF as they do in real life. The latest sims such as F-15 and Falcon 4 do a much better job at modeling high AOA maneuvers.
3. In the real world, the effect of gravity on an aircraft’s ability to turn is a very important part of BFM. Gravity is often referred to as “God’s G.” Gravity always produces a force of one G on your jet, and how you use that one G can be significant when it comes to turn rate and radius. I don’t want to get into the serious math at this point…if you just have to know, please e-mail me<g>…but what it boils down to is this: if your lift vector is anywhere above the horizon, then God’s G is working against you and you have less G working for you than you think…up to one G less. Orient your lift vector below the horizon…as in being upside down…and God’s G now improves your ability to turn by adding up to one G to your total G load. This effect is responsible for maneuvers being flown in the vertical as well as the horizontal planes, and is often the singular evidence of BFM proficiency in a pilot. From what I have seen, most flight sims don’t model this as well as they should. Turn rates and radii appear to be the same regardless of lift vector orientation. If this is the case…and it seems that way to me…then sim pilots have lost an important tool in their BFM bag of tricks.
But, not to worry!! We can still do a pretty credible job of simulating BFM and have a great time doing it. In talking about how to fly our BFM maneuvers, we need to stress again our basic objective: we want to maneuver our aircraft behind our opponent to a position where we are co-speed and at very little to zero angle off, and in gun range. This is classic BFM…it hasn’t changed from World War One to the present. There are many other maneuver objectives in the total air-to-air combat environment, but we are only going to concentrate on the most basic. You will learn how to reduce an angle off and aspect problem in order to close in to a gun kill position.
A word of caution. In the world of air-to-air, there are few absolutes. Other than “what goes up must come down,” there is little that somebody somewhere can’t take issue with if they want. Fighter pilots come equipped with over-sized egos and tend to operate from the point of view that whom ever yells the loudest, wins. What I’m going to say about BFM is only my point of view, and it’s meant to provide beginner level instruction in the fine art of going about gunning somebody else’s brains out. As always, there are other ways to skin this cat. Take advantage of all the sources of BFM info to get as wide a point of view as possible.
Let’s now define some basic definitions and objectives that will apply to our discussions of specific maneuvers. This terminology is critical. Please understand the following completely.
1. Airspeed Control. You can have too much of a good thing!! For our maneuvers, try to maintain airspeeds in the 350-450 knot area…this is the corner velocity (CV) speed range for most of the ATF fighters. CV is the airspeed that will allow you to pull maximum G at the lowest speed and thus gives you your quickest, tightest turn. The caret symbol on your ATF HUD airspeed scale shows you CV for your chosen jet. Your maneuvering may take you above or below the CV range for periods of time, but as a rule, that speed range is a good place to start.
2. Closure. Airspeed is what you see on your HUD…closure is the rate at which you are accelerating or deccelerating from your opponent. Closure is what BFM is concerned with…not airspeed. BFM maneuvers control closure, not airspeed. You don’t care how fast your opponent is going, you only care about whether or not you are catching him!!
3. Frame of Reference. THIS IS ABSOLUTELY CRITICAL. There are two frames of reference in BFM…the horizon and your opponent’s plane of motion. Depending upon the maneuver, you will use one or the other or both. In general, your opponent is of more importance than the horizon.
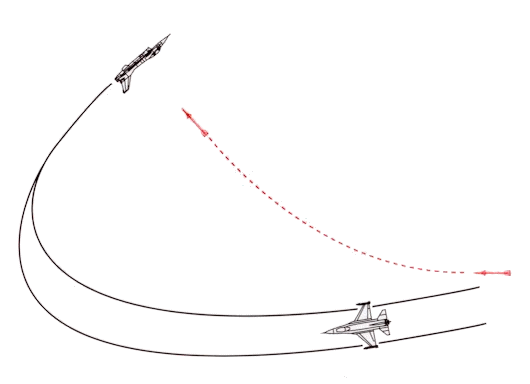
a. Finding Your Frames of Reference. The horizon line in your HUD and the Other View window help keep you oriented to where the horizon is if it is out of view…normally, this is not a problem. But what do we mean by your opponent’s plane of motion? What are the visual clues for this? Here’s simple rule of thumb. His plane of motion is where his lift vector is pointed. Under positive G, his lift vector comes out of the top of his aircraft…if he has a single vertical stabilizer (rudder), then you can use it to represent his lift vector. If he is bunting (negative G), then his lift vector is coming out of the bottom of his aircraft. This lift vector defines his direction of turn. Imagine his wings as representing a flat plane. His lift vector is perpendicular to this flat plane. If you match his angle of bank, your lift vector is aligned with his…you are by definition in or parallel to his plane of motion. Now, here’s the goodie. If you can see the top of his wing and you are in his plane of motion, you areINSIDE his turn…if you are looking at the bottom of his wing, most likely you are OUTSIDE of his turn. In BFM, we usually want to be inside of our opponent’s turn…therefore, you must be looking at the TOP of his wing. Inside his turn means closure…this is lead pursuit. Outside his turn generally means no closure…this is lag pursuit. Most of the time, you will be in lead pursuit
b. Relative Energy States. You can use the horizon and your opponent to help control your energy. If your opponent is in a turn, his low wing represents the direction of positive energy for you relative to him. If you are trying to close on him, fly on his low wing side. His high wing represents a minus energy area…if you have too much energy relative to him, fly to his high wing side. In most of our maneuvering, we will be flying on the low side as we try to gain or maintain relative closure. Low wing + Top of the wing = closure = lead pursuit. High wing + Bottom of the wing = no closure = lag pursuit. Folks, it doesn’t get any simpler than this.
4. Flying to the Elbow…Pulling to High Six. You may have heard these terms before. They are immortal. They are timeless. They are Omnipotent. They are the be all and end all of basic BFM. Control of the elbow is control of your opponent. Control of high six is victory. He who is at high six is behind. He who is not is, therefore, in front. He who is in front, dies.
a. The Elbow. Look at your arm. Your hand represents your opponent. Your elbow is where you want to be. It is where you want to point your lift vector at. It is where you want to end up…behind your opponent.
b. High Six. That area behind and above your opponent…relative to THE HORIZON. The “six” refers to the position relative to him, ie, the area behind him. “High” is in reference to where the horizon is. If you can fly to the “high” side of your opponent, you are pushing him out in front. You must understand this concept. It is perhaps the most basic of all BFM. Lift vector control is often the contest for who controls the high six of their opponent. Know this cold.
Whew!! Enough of this rocket science!! This info is the foundation for understanding BFM. These terms will be the language of all follow on discussions. Please read this article until you have it down pat. If you don’t understand something, please write me.
BFM Lesson 5 – More Concepts
Well, it’s time to get our hands dirty…do a little flying…and look at some of this BFM stuff we have been discussing. Let’s start out with some general ideas that apply pretty much across the board to all maneuvers. And once again, let’s review the ground rules…this discussion is aimed at a guns only, one v one, beginner level look at basic BFM maneuvers designed to reduce angle off and aspect angle to produce a low angle off gun kill.
General Concepts
1. Power Management. Earlier we talked about corner velocity (CV)… we said CV was about 350-450 knots for most of the aircraft in ATF, and we said that we wanted to stay in this speed range for most of our maneuvering. If your choice of aircraft has an afterburner (AB), use it for two purposes only: for acceleration to a desired speed, and to maintain your present speed while in a high G, energy bleeding turn. Do not fly around in AB…you will burn too much fuel and you will not stay in the CV range. Remember, your turn rate and turn radius are a direct function of your airspeed…too much speed and your turn performance suffers.
Throttle use while flying in the vertical. Any time you are not flying level with the horizon, you are to some extent flying with a component of your flight path in the vertical…in doing so God’s G may be helping or hurting your turn performance. As a general rule, when your lift vector is pointed in the “up” direction relative to the horizon( the bottom half of a loop), do not use AB. AB in this case tends to increase your turn radius, slow your turn rate, and increase your altitude lost. But do use your AB when you are flying with your lift vector pointed “down” (the top half of a loop)…here AB will help you maintain your energy and God’s G will add to your turning ability. So…when you are “right side up,” i.e. pulling out of a dive, don’t use the AB. When you are “upside down”, i.e. on your back, do use AB. Remember, this is just general advice. If you don’t need AB in a given situation, don’t use it!!
2. Lead Turns. The ability to lead turn your opponent is the Holy Grail of BFM. Without a doubt, it is the number one key to success in you winning your BFM contest with your opponent. If you lead turn him, he cannot, by definition, lead turn you. If Moses had been a fighter pilot, he would have said “Do unto others before they do unto you,” meaning lead turn the other sucker before he can do the same to you. But what is this lead turn thing, how do you do it, and what does it look like?
a. What it is. A lead turn is a maneuver which you initiate to reduce angle off before your flight path crosses your opponent’s flight path. It used to be called an “early turn” because you start the turn before he starts his. The simplest example of a lead turn in to visualize two aircraft approaching each other head on. If they wait until they pass each other before they begin a turn towards each other, they will roll out essentially facing each other again, i.e. no advantage gained by either. But if one aircraft begins to turn before they pass each other, he will complete his turn and be pointing at his opponent before that aircraft has completed its turn…advantage goes to the pilot who turned first. Another example…visualize two aircraft weaving back and forth criss-crossing their flight paths…if each aircraft waits until he crosses the other’s flight path before he reverses his turn, no advantage will be gained for either. But if one pilot begins his reversal slightly before the flight paths cross, he will “gain angles” on the other pilot, meaning his angle off will be reduced. Try this with your hands…make a weaving motion with your hands…before they cross each other, make one hand start to turn back the other way. Notice how that hand seems to slide behind the other hand? The same thing will happen in an airplane. In either case, one pilot began his turn before the other pilot with the end result being an advantage.
b. How do you do it? The concept is pretty simple…it’s the execution that is the hard part. Like in most things, you can get too much of a good thing. In this case, this means it is possible to begin your lead turn too soon by being too aggressive. This usually ends up with you flying out in front of your opponent, and in general terms, this is considered poor form<g>. For head on pass type situations, I would recommend, as a rule, that you wait until your opponent passes your 10:30 or 1:30 position, or about 45 degrees off your nose, before you begin your turn. If you are scissoring (in a weave…criss-crossing), I would advise waiting until you have covered at least 1 / 2 to 2 / 3 the distance back towards your opponent before you reverse the turn. These are just yardsticks, and pretty conservative ones at that…with experience, you may choose to be more aggressive.
c. What does it look like? Use the F7 exterior view to help you visualize the lead turn…particularly in a scissors maneuver, since your opponent is otherwise out of view. I SAY AGAIN…use the F7 exterior view to “see” the need for and the execution of the lead turn…particularly in those close in situations where your opponent is not in sight if you are in F1 forward view. Once I’m in close quarters with my opponent,I tend to fly the entire fight in F7 until I’m ready to shoot. I use the Other View window to tell me when my opponent can be seen in F1…if you can see him in the little Other View window, he will be visible in F1. F7 allows an intuitive sense to BFM that F1 cannot give you. It clearly allows you to see you angular relationship to your opponent and it gives you a rate of closure that is so necessary when timing a lead turn. F1 will not do this for you. But there is a serious problem in using F7…you must keep yourself oriented with which way to turn. It is very easy to turn the wrong way. Those of you who have flown radio controlled aircraft will understand exactly what I’m talking about. My technique is to constantly talk to myself about what I want to do while I’m maneuvering. I look at the F7 screen and say to myself…”right turn” or “left turn,” otherwise I get all screwed up<vbg>. But once you get the hang of it, you’ll find F7 allows you to feel a sense of “flying” BFM that no other view will give you. It’s as close to the actual thing as the sim environment is going to give you.
OK!! This has been a bunch to digest…please feel comfortable with these ideas. If you aren’t, then add your question to the SimHQ Air Combat board (I guarantee some one else has the same question but is too shy to ask.). Remember, there are no dumb questions, only dumb answers! I promise not to give too many dumb answers…you do your part by speaking up if you don’t understand. If you want a private answer, then e-mail me.
One other thing. I’m an airline pilot these days, and as a result, I’m gone for days at a time. If I don’t get right back with an answer, that’s why. But I will answer, trust me.
Next up is the High Yo-Yo or Quarter Plane maneuver. We’ll look at how to deal with a bandit that is turning hard into us and is creating an angle off / aspect angle problem as a result.
BFM Lesson 6 – Flying The Maneuver
This is the first discussion of how to actually fly a BFM maneuver using the ATF flight sim as modified by Greg Pierson. Please refer to the earlier article on how to set up your screen if there are any questions about basic keyboard / flight stick techniques.
This article will talk about how to handle a situation where your opponent is turning hard enough to cause him to fly out of view…usually this happens due to two reasons…either you had too much airspeed and you literally flew past him, or, more likely, he turned hard enough to cause a flight path overshoot due to excessive crossing angles. We’ll talk about both situations…too much airspeed or too much crossing angle. In either case, regardless of flight sim, the most typical response is to turn in the last known direction of your opponent and attempt to chase him with him out of view. This is kinda hard to do…even the Red Baron couldn’t fly blind!! There is a better way…and that is the technique of shifting between forward view (F1) and an exterior view (F7) to keep the bandit in sight. Please note there are other exterior views…F9 and F10…which also show you a big picture view of you and your opponent, but I do not recommend using either to practice BFM with.
1. Getting Started. Once you have set yourself up behind your opponent as previously described in the set up article, begin by adding power to close on your opponent. ATF will begin maneuvering him around and your job is to stay behind. At some point you will find that you cannot keep him in sight no matter how hard you try to turn…what do we do?
2. The BFM Textbook Answer. Various BFM texts will describe a number of maneuvers for this type of situation…high yo-yo, quarter plane, barrel roll, vector roll, etc. Each of these maneuvers is designed to address a specific BFM problem…either too much closure, or too much fuselage misalignment (angle off / aspect angle).
a. High Yo-Yo. Traditional BFM academics use the high yo-yo as a maneuver designed to control closure. The high yo-yo is used to slow your rate of closure on your opponent. This does not necessarily mean that the maneuver slows you down, i.e. you lose airspeed (although this often happens as a by product)…instead, the maneuver slows you down relative to your opponent by lengthening your flight path relative to your opponent. It is true that the high yo-yo also tends to reduce aspect and angle off when flown properly, but this is a secondary result of a maneuver intended to solve a closure problem. Yo-yo can be big or little, depending on the magnitude of your closure problem.
b. Quarter Plane. The quarter plane is a last ditch maneuver intended to keep you behind your opponent. It is designed to keep you behind your opponent’s 3 / 9 line and sacrifices angle off and closure in the process. It is essentially a reposition maneuver and almost always requires a follow up maneuver such as a low yo-yo to re-enter the fight. Consider it an “emergency procedure”!!
c. Barrel Roll. The barrel roll is designed to solve an aspect problem. Use this maneuver when you can match the turn rate of you opponent but you find yourself too much inside his turn. In this situation, you have aligned your fuselage with his but you have too much lateral separation, i.e. you have too much sideways displacement. Your objective is to reduce the lateral separation without losing your angle off advantage…meaning you want to get behind him and still keep your fuselage aligned with his. In this situation, you do not have a significant closure advantage.
d. Vector Roll. The vector roll is a specialized adaptation of the barrel roll. The vector roll is designed to handle too much closure and is used when your fuselages are close in alignment. The vector roll is an aggressively flown barrel roll where high G is used to roll around your opponent’s flight path. The resulting longer flight path which you fly slows you down relative to your opponent.
3. Performing the Maneuvers. Let’s talk about how to fly each of these maneuvers using the F1 and F7 views. Please keep in mind my original “yeah, but”…this is only one way to describe BFM relative to the flight sim…there are other, and maybe better ways, but, for right now, this is going to be my way (g). We’ll talk about each maneuver by describing how to recognize when the maneuver is necessary (see the need) and how to perform the subsequent corrective action (stick and throttle response).
a. High Yo-Yo.
1. See the Need. You are turning with your opponent. He is getting larger in your F1 view (high closure) and he is moving toward the side of your screen. There is at least 45 degrees of difference between his heading and yours (high angle off). You are unable to keep him in view by continuing to turn.
2. Response. While still in F1, roll toward your opponent (away from direction of turn) until your nose points just behind him. Your angle of bank should be approximately 90 degrees less than his. Begin a moderately hard (4 G) pull away from his flight path. Go full power. Switch to F7. You will see your aircraft climbing “above” your opponent and there will be a significant mismatch in fuselage alignment. Hold this position (do not continue to pull or roll) until you see your opponent start to increase his separation from you. This will only take a second or two. Immediately roll back towards your opponent. Aim your lift vector (visualize this as your rudder or as an arrow coming out of the top of your canopy) in front of your opponent. Now pull hard back “down” towards your opponent until your aircraft looks like it is pointing in his direction. Now look at your Other View window. Is he in the window field of view? If so, switch back to F1 and press your attack. If not, re-examine your nose position relative to the other aircraft. Where is it pointing? Roll and pull to point your nose at your opponent. Can you see him now in the Other View window? If you can, stay at full power for a moment or two as you “descend” towards your opponent…then reduce your throttle, go back to F1 and blow him away!
3. Sidenotes. The yo-yo is best started early so that you don’t have to fly a big one. Several little ones are easier to handle than one big one. Expect to have to repeat the process as the bandit maneuvers…the sim AI will attempt to oppose your maneuvering…just like a real opponent would. When in F7, avoid turning in the wrong direction by talking to yourself about which way you want to go, i.e., “turn left…relax G”…”turn right…pull.” Remember, you position yourself by aiming your lift vector with roll, and then you move your nose with back stick (G). Practice and repetition will make this F1 / F7 / F1 process seem natural as you get familiar with the concept.
b. Quarter Plane.
1. See the Need. As before, you are turning trying to keep your opponent in view, but he has really put a hard turn on you and there is no way you can match his turn. Not only that but you are too close…he’s huge and you’re about out of ideas!! What should you do? It’s time to get out of Dodge!! You have to do two things…get out of his plane of turn, and stay behind him. The quarter plane is like an extreme high yo-yo. The “quarter” refers to your resultant flight path where you orient your lift vector 90 degrees away from his plane of turn (90 degrees being one quarter of 360 degrees) prior to your pull.
2. Response. Immediately roll to aim your lift vector AT LEAST 90 degrees away from your opponent. Pull hard into the vertical. Switch to F7. Go full AB. Now analyze your position…are you separating away from him while at the same time staying behind him? You must stay behind his 3 / 9 line. If this is not the case, then roll your lift vector to point behind him and pull to move your nose further to his 6 o’clock. Put your flaps down if required (I like to put mine down…the sim is more maneuverable with flaps down). Now roll back to aim your lift vector at your opponent. Are you now behind him? If so, then pull back towards him and re-enter the fight. Stay in AB to get your speed back…raise your flaps to help accelerate.
3. Sidenotes. Think of this maneuver as a zoom emergency procedure, because that is what it is. It ain’t pretty…it’s supposed to save your butt and preserve your offensive position. The whole point is to keep behind his 3 / 9 line…you do that by using F7 to pull towards his 6 o’clock. Watch out for a stall. Use full AB and flaps. Don’t be gentle. Roll fast…pull hard to stay behind him.
c. Barrel Roll / Vector Roll. I’ll describe these two maneuvers together since they are pretty similar in execution (G being the major variable). Don’t expect to use these much in ATF…they are well up the “food chain” in sophistication and complexity.
1. See the Need. In F1, your opponent is turning and you are turning with him. Your angle off is low…fuselages nearly aligned. Your aspect, however, is too far inside his turn…meaning that you are too far away from him…too much lateral displacement. What you want to do is to somehow move your jet across the space between you and your opponent without changing your low angle off.
2. Response. While in F1, add back pressure as required to match his fuselage. Then switch to F7 and begin a moderate pull up. After raising your nose about 10-20 degrees, start a slow roll into your opponent while maintaining a little back pressure. You will start to fly across the space between the two aircraft. Relax your back pressure to stop your nose from turning any further. As your aircraft nears the turn radius of your opponent, roll your aircraft to point your lift vector into the plane of his turn…match his bank angle. Then add back pressure to pull your nose back into alignment with his fuselage. You should now be behind him and above the plane of his turn. Point at him, check your Other View window, and when he is in sight, switch to F1 and continue the attack. For closer initial ranges and higher closure rates, the maneuver should be flown much more aggressively. You will end up rolling around your opponent’s flight path…your resultant longer flight path relative to him will reduce your excessive closure while reducing your aspect.
Well, that’s enough to digest for now!! Give this a try. Remember, it’s the “big picture” view of F7 that makes all of this possible. Using F7, you will, with practice, intuitively “see” the need for a flight path correction much in the same manner as an actual pilot would in a real BFM environment.
Related posts:
 Air Combat Basics: The Scissors Maneuver
 An Introduction to Simulation BFM Part One
 It’s All a Matter of Perspective – Part Two
 Tactics 101 – Introduction and Lag Pursuit
 The Falcon 3.0 Manual Tactics Section – Introduction to Defensive BFM
 The Falcon 3.0 Manual Tactics Section – Introduction to Head-On BFM
 The Falcon 3.0 Manual Tactics Section – Introduction to Offensive BFM
 The Falcon 3.0 Manual Tactics Section – Introduction to the Geometry of Air Combat


